This article discoursed by MiniTool mainly teaches you the methods to deal with Chromebook Camera not working files system error. All solutions have managed to help users with similar issues. Move on to find your solution!
Why Does Chromebook Camera Say File System Error?
Why is my camera saying “file systems error” when I open it?
I just got this computer 2 days ago and tried to use the camera several times. It works within other apps such as Snapchat and let me use it when signing in to add a profile picture but will not work on its own.
That is an example of file system error on Chromebook camera. Then what causes the issue? Generally, there are several reasons.
- The underlying ChromeOS glitch makes the camera unreachable.
- Outdated ChromeOS can result in the Chromebook camera not working file system error.
- Also, ChromeOS is tend to produce corrupted system temp files interfering between software connections bridging the BIOS with the hardware, which can also cause Chromebook file system error camera.
Knowing the possible causes of camera file system error Chromebook, let’s introduce some solutions for the problem.
#0 Remove Policy Restriction
Before starting, it is necessary to inform you that if your Chromebook is a school-managed PC, a policy restriction might be in place. If so, you need to ask for permission to take advantage of the camera.
By default, all apps are on the blacklist except the ones that students are allowed to use (in the whitelist). And, the Camera app is on the blacklist. So, you need to transfer it from the blacklist to the whitelist in Google Admin.
Most problematic devices have two camera apps. It is probably due to the recent ChromeOS update including the Camera app as a system app, so you no longer need to whitelist the older Camera program that was from the app store. The latter no longer works and returns the “file system error” message.
Therefore, the possible solution is to change “force install” of the app store Camera program to “allow install” and delete the older Camera app from the app store. Or, you may further change it to “block” to never install the Camera software from the app store.
#1 Restart Chromebook
Firstly, the most direct and easiest way to deal with file system error camera Chromebook is to reboot Chromebook, which is especially helpful for the situation the camera works just properly outside the Camera app.
#2 Sign out and Sign in Back
Secondly, you can try to sign out of your system account and sign in again to try to solve the problem.
#3 Update ChromeOS
Keeping your operating system (OS) up-to-date is also a method to avoid Chromebook camera file system errors.
Google has addressed this error with ChromeOS version 87.0.4280.142. Thus, to handle this bug, you are recommended to install the newest version of ChromeOS, especially for Asus c300 or a different ASUS Chromebook.
After updating, it is necessary to restart the computer to make changes take effect.
#4 Reset/Refresh Chromebook Hardware
Secondly, since file system error Chromebook camera might be caused by the corrupted information that is currently maintained in the memory, the system fresh/hard reset (which will force clear and reestablish the software connections between the hardware and the BIOS) may be a cure.
- Turn off the target Chromebook.
- Press and hold the Refresh + Power buttons.
- When your Chromebook starts up, release the Refresh button.
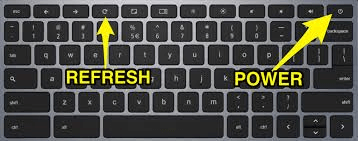
If you are using a tablet, just press and hold the Volume Up and Power buttons for no less than 10 seconds. Then, release them.
For some branded Chromebooks, you should press a special button to reset Chromebook hardware, unplug the power cable, or remove and re-insert the battery.
#5 Reset Chromebook to Factory Settings (Software)
If the above hardware reset does not help, you can try software reset to its factory defaults. However, factory resetting the Chromebook will erase all information on your Chromebook including files, apps, as well as settings. So, make sure you have synced your settings and info to your Google Account and created a backup copy of crucial files or move them to another safe place.
- Sign out of your Chromebook.
- Press and hold Ctrl + Alt + Shift + r.
- Choose Restart.
- In the popup, select Powerwash > Continue.
- Follow the guide to sign in to your Google Account, which will be the owner account.
- Follow the instructions to set up your Chromebook.

After backwashing your computer, check if you still receive file system error Chromebook camera.
#6 Recover Chromebook
Recovery is to remove and reinstall the ChromeOS, which will wipe everything on your Chromebook’s hard disk drive permanently. Thus, you’d better transfer or back up vital items in advance.
1. Remove all attachments of the target Chromebook such as a mouse or external hard disks.
2. Boot into Chromebook recovery mode. Just press and hold Esc + Refresh buttons and press the Power Then, release the Power button. when a message shows on the screen, release the other keys.
- On some Chromebook models, you need to press and hold Esc + Maximize Then, press the Power key and release the Power key.
- For a Chromebook tablet, you should press and hold the Volume Up, Volume Down, and Power keys for at least 10 seconds and then let go of them.
3. If your PC has Internet access, choose Recover using Internet connection and follow the steps. If not, you have to perform a traditional recovery as below.
Traditional Chromebook Recovery
For preparation, you need another Chromebook or a Windows or Mac computer with ChromeOS installed, as well as a USB flash drive with at least 8 GB of storage space and no crucial data (for it will be erased).
1. Install the Chrome Recovery Utility extension on the other PC with ChromeOS installed.
2. Turn on and open the recovery extension.
3. Click Get Started.
4. Click Select a model from a list, or type in the model number of the Chromebook that you are going to recover.
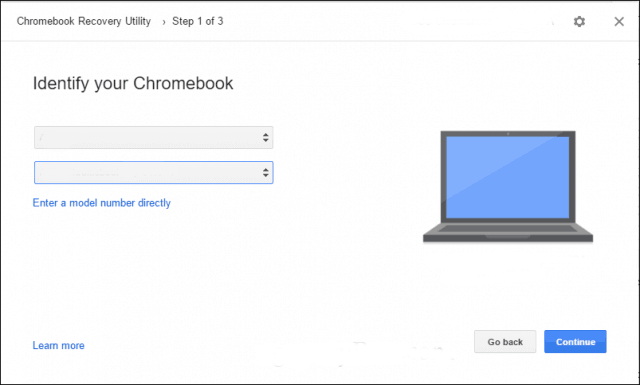
5. Click Continue and insert the USB into the healthy machine.
6. In the drop-down menu, select the inserted USB.
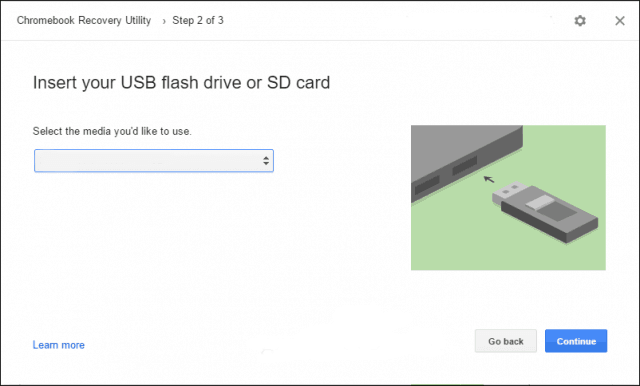
7. Choose Continue > Create now to create a recovery media.
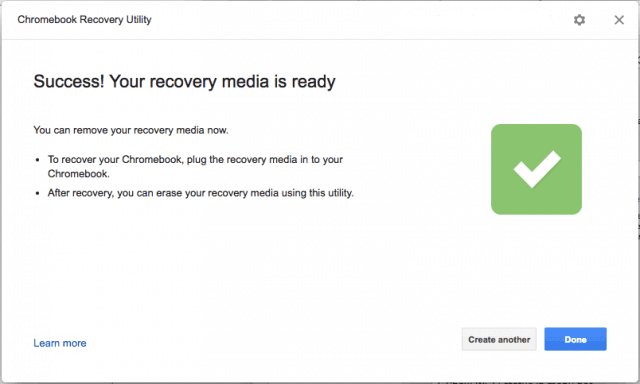
8. When it’s done, remove the USB and connect it to the problematic computer.
9. Use the recovery USB to recover the target Chromebook.
Finally, if none of the above solutions manage to solve the file system error on Chromebook camera, you can troubleshoot your Chromebook or contact its support for help.
Windows 11 Assistant Software Recommended
The new and powerful Windows 11 will bring you many benefits. At the same time, it will also bring you some unexpected damages such as data loss. Thus, it is strongly recommended that you back up your crucial files before or after upgrading to Win11 with a robust and reliable program like MiniTool ShadowMaker, which will assist you to protect your increasing data automatically on schedules!
MiniTool ShadowMaker TrialClick to Download100%Clean & Safe
Also read: [7 Fixes] Windows 11 Can’t Find Camera or Camera Doesn’t Work

![[Fixed] Fatal Python Error: Unable to Load the File System Codec](https://images.minitool.com/minitool.com/images/uploads/2022/03/unable-to-load-the-file-system-codec-thumbnail.png)
User Comments :