NordVPN not connecting or working on your Windows 11 computer? Do you know the reasons for this issue? If you want to solve this problem, do you know what you should do? If you have no idea, you come to the right place. In this post, MiniTool Software will show the information you want to know.
NordVPN Not Working on Windows 11
NordVPN is a very popular VPN service that is available on Windows, macOS, Linux, Android, iOS, and Android TV. It is very easy to connect to the NordVPN service. But some users report that NordVPN is not working on Windows 11, the new Windows version.
When this issue happens to you, you may ask: why won’t my NordVPN connect on my Windows 11 computer. Here are some main causes.
Top Reasons for NordVPN Not Working/Connecting on Windows 11
- The NordVPN service is not compatible with Windows 11.
- The internet connection is disabled or bad.
- Your NordVPN account is not activated.
- There is something wrong with your server.
- The adapters are corrupted.
- Software on your PC is conflicted with NordVPN.
- And more….
NordVPN won’t connect on Windows 11 is a common issue. You can try the methods in this post to solve it.
Fix 1: Allow NordVPN to Run in Compatibility Mode
Windows 11 is a new Windows version. The NordVPN service may be not compatible with it. But you can manually set to allow it to work in compatibility mode. This is proved to solve the issues of NordVPN not working on Windows 11.
- Go to the installation location of NordVPN and right-click the application. Then, select Properties.
- Switch to the Compatibility tab.
- Check Run this program in compatibility mode for under Compatibility mode.
- Select Windows 7 from the drop-down menu.
- Click Apply.
- Click OK.
Fix 2: Reinstall NordVPN TUN Drivers
If NordVPN not connecting on Windows 11, you can also reinstall NordVPN TUN Drivers to have a try.
- Right-click Start and select Device Manager.
- Expand Network adapters.
- Right-click NordLynx Tunnel and select Uninstall device.
- Close Device Manager.
- Use the universal method to uninstall NordVPN Network TUN from your computer.
- Restart your computer.
- Download the NordLynx Tunnel from NordVPN’s official site.
- Install the driver on your computer.
Fix 3: Reinstall Network Drivers
Some users solve NordVPN not working on Windows 11 by reinstalling Network drivers. Here is the guide:
- Open Device Manager.
- Expand Network adapters.
- Uninstall all drivers except WiFi, ethernet or LAN, and bluetooth driver.
- Right-click Network adapters and choose Scan for hardware changes.
- Restart your computer.
Fix 4: Check Your Internet Connection
If NordVPN won’t connect on Windows 11, you need to make sure that the local internet connection works well. You can use your web browser to open a webpage and see if it can open it smoothly.
If the result shows that your internet connection encounters issues, you need to first fix these issues. After that, you can try to connect NordVPN and see if the NordVPN connection works. If the issue persists, you can try the next fix.
Fix 5: Check Your NordVPN Account
If your NordVPN not logging in, you need to check your NordVPN account. You need to make sure that your NordVPN account is active. You can click My Account from the NordVPN website, enter the login details, open the account dashboard, and then you can see expiration on the date for your VPN subscription from the account dashboard. If your account is not activated, you need to do something to activate it.
Fix 6: Use Alternative NordVPN Servers
There is not only one NordVPN server. To rule out the server issue, you can use an alternative VPN server within a country on the NordVPN map. You can also click Countries and select another server to connect.
Fix 7: Restart the TAP Adapter
- Press Win+R to open Run.
- Type ncpa.cpl into the Run box and press Enter to continue.
- The Network Connections interface opens. Right-click TAP-NordVPN Windows Adapter and select Disable. Right-click it again and select Enable.
After these three steps, you can connect NordVPN again and see it can connect successfully.
Fix 8: Reinstall NordVPN
You can also uninstall the NordVPN software and then reinstall it on your computer to have a try. It is easy to do this. You can just use the normal method to uninstall it. After that, you can download the latest version of it from the NordVPN official site and install it on your device.
Fix 9: Turn off Windows Defender Firewall
Another possibility is that the NordVPN service is blocked by Windows Defender Firewall. You can disable Windows Defender Firewall and see if you can connect to NordVPN again.
On the other hand, you can also check if Windows Defender Firewall blocks NordVPN. If yes, you can move it from the block list.
Fix 10: Clean Boot Your Windows PC
A Windows clean boot can help you find out the conflicting software.
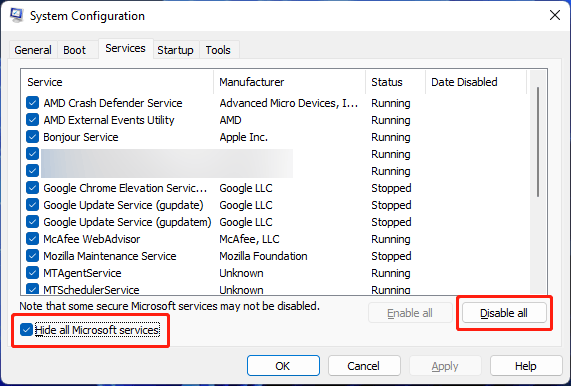
1. Use Windows search to search for msconfig and press Enter to open System Configuration.
2. Check Hide all Microsoft services. Then, uncheck the NordVPN service from the list.
3. Click the Disable all button to continue.

4. Switch to Startup and click Open Task Manager.
5. On Task Manager, select the suspected startup program and click the Disable button. Then, repeat this step to disable all the suspected programs.
6. Close Task Manager.
7. Close System Configuration.
8. Restart your PC.
After these steps, you can go to check if you can connect to your NordVPN successfully. If the issue disappears, it means that third-party software is conflicted with the NordVPN service. You can repeat step 1 to step 3 but only enable half of the listed services. You can use this way to find the culprit.
Fix 11: Flush the Network Stack
1. Use Windows search to search for cmd.
2. Right-click Command Prompt from the search result and select Run as administrator.
3. Type the following commands to Command Prompt and press Enter after each.
- ipconfig /release
- ipconfig /flushdns
- ipconfig /renew
- netsh winsock reset
- netsh interface ipv4 reset
- netsh interface ipv6 reset
- netsh winsock reset catalog
- netsh int ipv4 reset reset.log
- netsh int ipv6 reset reset.log
4. When the process ends, restart your computer.
Fix 12: Adjust the DNS Server Configuration
- Press Win+R to open Run.
- Type ncpa.cpl into the Run box and press Enter. This opens the Network Connections interface.
- Right-click TAP-NordVPN Windows Adapter V9 and select Properties.
- On the next page, select Internet Protocol Version 4 (TCP/IPv4) and click the Properties button to continue.
- Select Use the following DNS addresses.
- Type 103.86.96.100 for Preferred DNS servers and 103.86.99.100 for Alternate DNS servers.
- Click the OK button twice to save the changes.
Fix 13: Switch the IP Protocol from UDP to TCP
- Open NordVPN on your computer.
- Click Settings from the top.
- Scroll down to the bottom and select Advanced Settings.
- Select TCP if UDP is selected.
Fix 14: Use Another VPN Service
If NordVPN still won’t work or connect on your Windows 11 computer after using the above methods, you can consider using another VPN service like Private Internet Access, Surfshark, Cyberhost, or BullGuard.
Bottom Line
NordVPN is not working or connecting on Windows 11? You can just try the methods mentioned in this post to help you out. There should be a suitable solution for you. Should you have any other related issues, you can let us know in the comments.


User Comments :