Windows 10 CPU Spikes after Update
If you are careful enough, you’ll find there’re a lot of people saying they run into the CPU Spike bug after finishing the Windows 10 1903 KB4512941 update. But what I want to say is that you don’t need to be panic since you got many companions. Let’s take a look at an example in which the user says his CPU spikes.
MiniTool Solution has provided various tools to help solve disk problems and improve system performance.

After 1903 update: CPU spikes and noisy fan:
Hi, after installing the 1903 update the fan of my PC gets loud while using common programs (even while browsing simple text websites). Checking via task manager shows high CPU peaks… this didn’t happen before the update, Even the fan was only hearable while doing difficult renderings etc. My configuration (with latest drivers of course): AMD A6-5400K APU with AMD Radeon HD 7540D, 64 Bit, 3.6 GHz, 6 GB RAM, 1000 GB HD (800 GB free). The only workaround was reducing the CPU speed via AMD Catalyst Control Center to 2.8 GHz (which makes the PC slower of course). Any ideas? Thanks!– said NBGXL in the Microsoft Community
On August 30, 2019, Microsoft released the new KB4512941 update, planning to work out some issues found on the devices running the Windows 10 May 2019 Update (version 1903). However, many users who installed this update said they have experienced unexpected processor spikes. It causes a major and constant spike in CPU usage Windows 10 (up to 40%). You can go to check the CPU usage by opening Task Manager.
Fix Desktop Window Manager High CPU Or Memory Issue!
Though Microsoft didn’t admit this problem on Windows 10 at the beginning, the statistics show there’s something wrong with the Cortana integration. And this finally results in SearchUI.exe process spiking and the function of Start menu is also affected.
Later, on September 4, 2019, Microsoft acknowledged that there is a bug with KB4512941 update and it causes high CPU usage spikes.

At that time, there was no official explanation for the root cause of Cortana high CPU usage and no effective fix to Windows 10 CPU spikes. But don’t worry, you still have chance to solve Windows update high CPU.
How to Fix High CPU Usage Windows 10
There are mainly two ways to solve high CPU usage with KB4512941.
Way 1: remove the update.
- Move your cursor to the lower left corner of the screen and click on the Windows button.
- Choose Settings (which is the second option from the bottom up).
- Scroll down to choose Update & Security (Windows Update, recovery, backup).
- Make sure Windows Update is selected in the left pane.
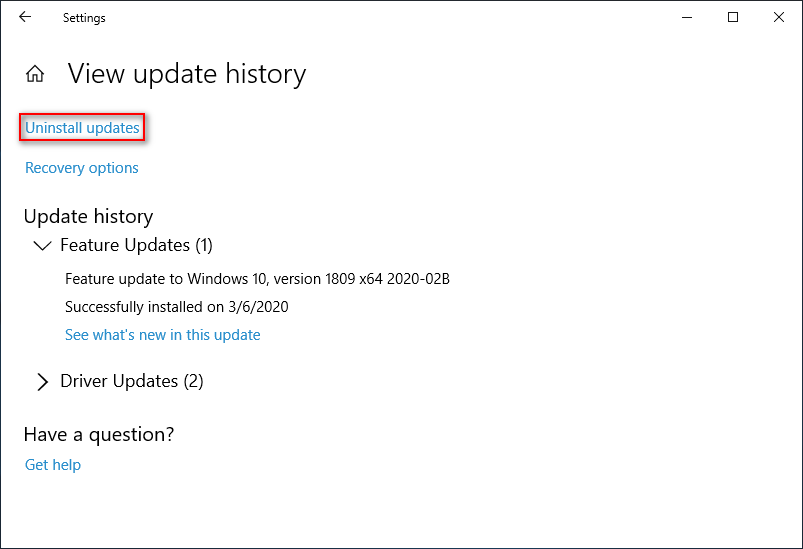
- Scroll down in the right pane to look for View update history option and click it.
- Click Uninstall updates link in the View update history window.
- Browse the list in Installed Updates window.
- Look for the Update for Microsoft Windows (KB4512941) item and select it.
- Click on the Uninstall button appeared on the right side of Organize.
- Choose Yes in the pop-up confirmation window.
- Click on the Restart Now button and wait.

Way 2: tweak the Registry settings.
- Open Run dialog box by pressing Win + R (you can also choose Run from the WinX menu).
- Type regedit and click on the OK button below.
- Choose Yes if you see a User Account Control window.
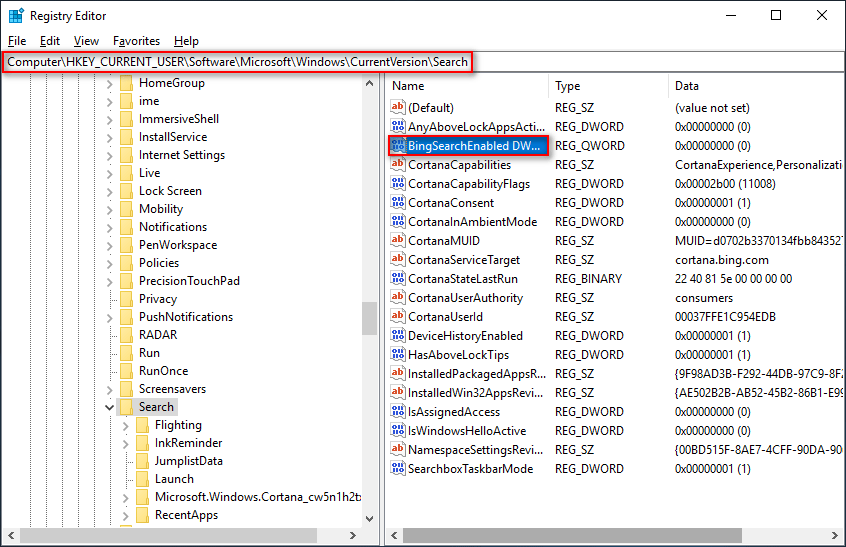
- Copy and paste this to the address bar of Registry Editor: Computer\HKEY_CURRENT_USER\Software\Microsoft\Windows\CurrentVersion\Search.
- Press Enter on the keyboard and Search will be selected immediately.
- Look for the BingSearchEnabled DWORD Value on the right pane. Then, right click on it.
- Change the Value data from 0 to 1 (some users also reported that they have solved CPU spikes by deleting BingSearchEnabled).
- Click on the OK button and reboot your computer.
How to fix if the Windows 10 WinX menu is not working?
If you also encountered the high CPU usage Windows 10, please try these methods without delay.
User Comments :