Actually, a few changes can be found in Windows 10 on how to manage disk space. The new Reserved Storage feature is one of them; it helps to eliminate the update failures which caused by not enough free disk space. If you are not so familiar with it, I’ll explain how this feature works in detail.
Reserved Storage Made Its Debut
The new Reserved Storage feature was firstly introduced in the Windows 10 build 1903. As you can see from the name, its main function is to allocate a certain amount (generally 7GB) of storage space automatically for storing the following things (this part of space will be set aside):
- Updates
- Apps
- System caches
- Temporary files
- Etc.
Reserving enough storage space is an effective way to let Windows 10 more reliable. In this way, the Windows needs more space error won’t appear when the system drive/system partition has no more free space. That is to say, it can ensure the completion of Windows Updates.
According to Microsoft, you can only use this feature on the devices where the Windows 10 19H1 (version 1903) is pre-installed or clean installed. You are not able to find it on the devices where people upgrade to the next version.
How Is the Reserved Storage Used
Once the temporary files are generated by system processes and applications, they will be put into Reserved Storage directly, without occupying the free user space. Your computer will work more reliably because of the adding of Reserved Storage feature. Besides, the temporary files which are no longer needed will be removed automatically by storage sense.
Sometimes, your reserved area may fill up and Windows will continue to operate as expected. At this time, some disk space outside of the reserved area will be occupied temporarily.
The 7GB Reserved Storage Changes over Time
The initialize size of the Reserved Storage given by Microsoft is 7GB. This part of space can’t be removed from the OS once it is activated. Yet, the size is changeable; two main factors to make it change are: optional features and installed languages.
- Optional features: the amount of reserved storage will be increased when an optional feature is added to the system so as to keep the feature works well on your device.
- Installed languages: the size of reserved storage will be enlarged whenever an additional language is installed so as to maintain all the installed languages.
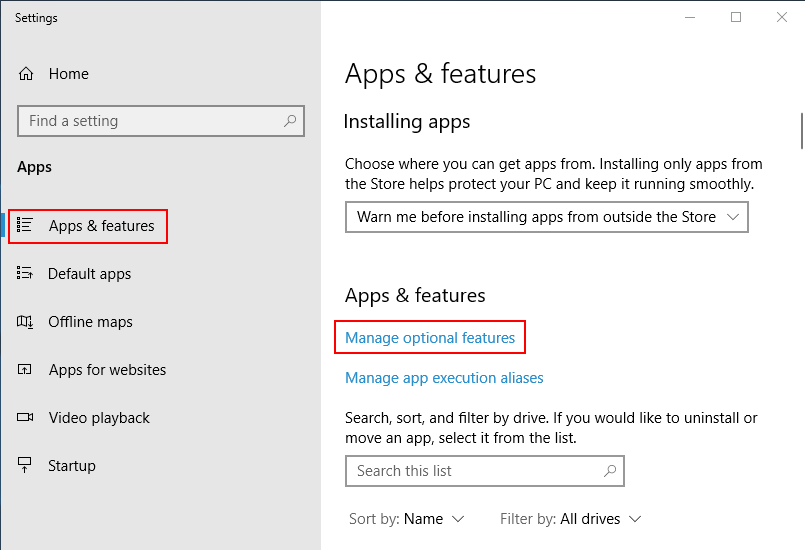
Enable Reserved Storage on Windows 10 Insider Builds
Indeed, Microsoft offers you a method to enable the Reserved Storage feature on the Windows 10 Insider Builds. You must follow these steps:
- Press Win+R button on the keyboard to open Run dialog window.
- Type regedit and press Enter button to open the Registry Editor.
- Select Yes in the prompt window to allow the app to make changes.
- Expand HKEY_LOCAL_MACHINE.
- Expand SOFTWARE, Microsoft, and Windows.
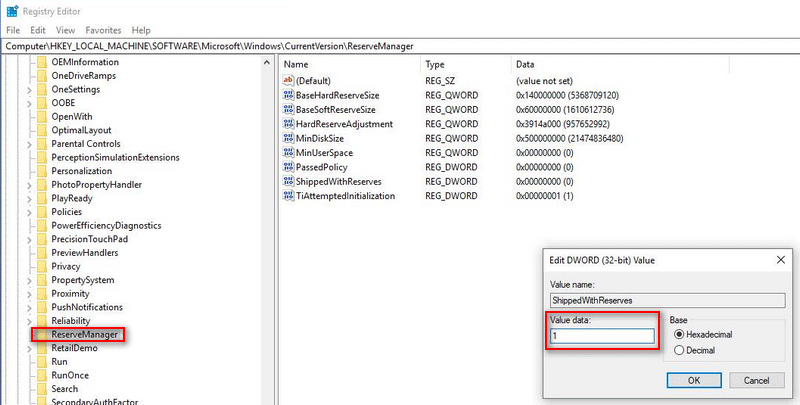
- Open CurrentVersion to find & select ReserveManager.
- Right click on the ShippedWithReserves option from the right panel.
- Modify the value data to 1 and click on the OK
- Exit Registry Editor.
Now, you can enjoy reserving enough storage space after you upgraded your device to the next build on which Reserved Storage is available.
You can repeat this process to disable Reserved Storage easily (change the value data to 0 in step 8).
Reserved Storage Promotes Windows Update
The adding of Reserved Storage is a wonderful action for Windows Update; it will make sure the Windows Updates work without any issues. Why? That is because some free disk space will be needed temporarily for downloading and installing necessary files during each update. With the appearance of reserve area, the update process will be accelerated.
Even when there is not enough free space in the Reserved Storage, a new update can be installed since Windows will delete the temporary files here to release space.
Yet, there’s a special case: when the size of Windows Update is larger than the Reserved Storage, you will be asked to extend your hard drive volume to gain enough space.
Here’s how to get back files lost during Windows Update:

Here’s how to fix when Windows Update keeps turning itself back on:
User Comments :