Microsoft is planning to introduce more and more new features to Windows 11. The desktop search bar is one of the new features that have been announced. However, it is only available on a few Windows 11 PC. But you can manually enable it. MiniTool Software will show you how to enable the desktop search bar on Windows 11.
What Is the Desktop Search Bar on Windows 11?
The desktop search bar is a new feature on Windows 11. This feature initially appeared in Windows 11 build 25120 in the Dev Channel. The desktop search bar is located on the desktop outside of the Widgets panel. With it, you can search for something like using a web browser.
However, this new feature is not available on all Windows 11 Insider preview builds in the Dev Channel. If your Dev installation lacks the desktop search bar, you can manually enable the desktop search bar with the help of ViVeTool.

ViVeTool is a tool that can enable or disable the hidden new features on Windows 11. It is not preinstalled on your device. You need to download it from github.com. After you get it, you can run the specified command in Command Prompt to enable the desktop search bar on Windows 11.
In this post, we will show you a full guide.
How to Enable or Disable Desktop Search Bar on Windows 11?
How to Enable the Desktop Search Bar on Windows 11?
Step 1: Download ViVeTool from github.com.
Step 2: The downloaded file is a compressed file. You need to unzip the folder, then you’d better move that folder to C drive. Next, copy the path of that folder. In my case, the path is C:\ViVeTool-v0.3.2. When running the command in Command Prompt, you need to use this path.
Step 3: Click the search icon from the taskbar and search cmd. Then, right-click Command Prompt from the search result and select Run as administrator.
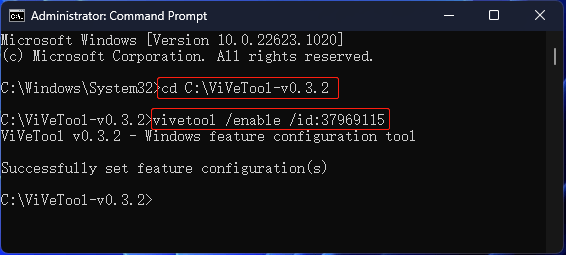
Step 4: Run cd C:\ViVeTool-v0.3.2 in Command Prompt. You need to replace C:\ViVeTool-v0.3.2 with the path you have copied.
Step 5: Command Prompt will navigate to that path. Then, you need to run this command: vivetool /enable /id:37969115. When this command runs completely, you will see the prompt:
ViVeTool v0.3.2 – Windows feature configuration tool
Successfully set feature configuration(s)
Step 6: Restart your PC.

How to call out the desktop search bar on Windows 11?
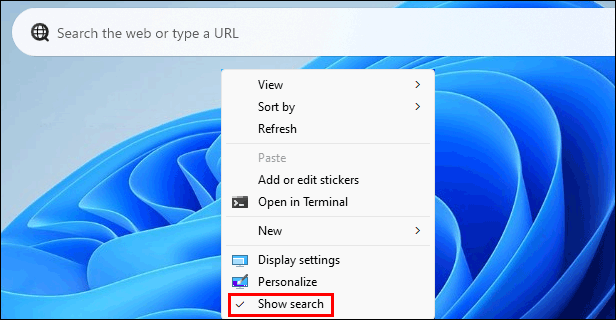
Step 1: Right-click your desktop and select Show more options.
Step 2: On the expanded context menu, select Show search. Then, you can see the desktop search bar on the top side of the desktop. If you want to hide this search bar, you need to deselect Show search from the right-click menu.
You can use the search bar t search the website. You can also enter the URL of a page and open it.
How to Disable the Desktop Search Bar on Windows 11?
If you want to disable the desktop search bar on Windows 11, you can use these steps:
Step 1: Click the search icon from the taskbar and search cmd. Then, right-click Command Prompt from the search result and select Run as administrator.
Step 2: Run cd [the path of the ViVeTool] in Command Prompt.
Step 3: Run this command: vivetool /disable /id:37969115.
Step 4: Restart your PC.
Bottom Line
Now you should know how to enable the desktop search bar on Windows 11. It is easy to do this with the help of ViVeTool. Should you have other related issues, you can let us know in the comments.
About The Author

Position: Columnist
Stella has been working in MiniTool Software as an English Editor for more than 8 years. Her articles mainly cover the fields of data recovery including storage media data recovery, phone data recovery, and photo recovery, videos download, partition management, and video & audio format conversions.
User Comments :