Since the release of the March Patch Tuesday update KB5053598, many threads have emerged complaining about various issues. The most common KB5053598 issues include RDP disconnection and blue screen (BSOD) errors. If you are experiencing these problems, read this MiniTool guide for effective solutions.
Windows 11 KB5053598 Update & RDP Disconnection & BSOD Issues Overview
Windows 11 KB5053598 is the March 2025 Patch Tuesday update, released on March 11, 2025. Like other security updates, KB5053598 addresses security vulnerabilities and introduces new features. However, since its release, many users have reported encountering various KB5053598 issues, the most common being RDP disconnection and BSOD.
These issues can prevent you from remotely accessing your server, interrupt running remote tasks, cause system boot failures, and restrict access to your files. To restore normal functionality to your computer, you can try the following fixes.
How to Fix KB5053598 RDP Disconnection Issues
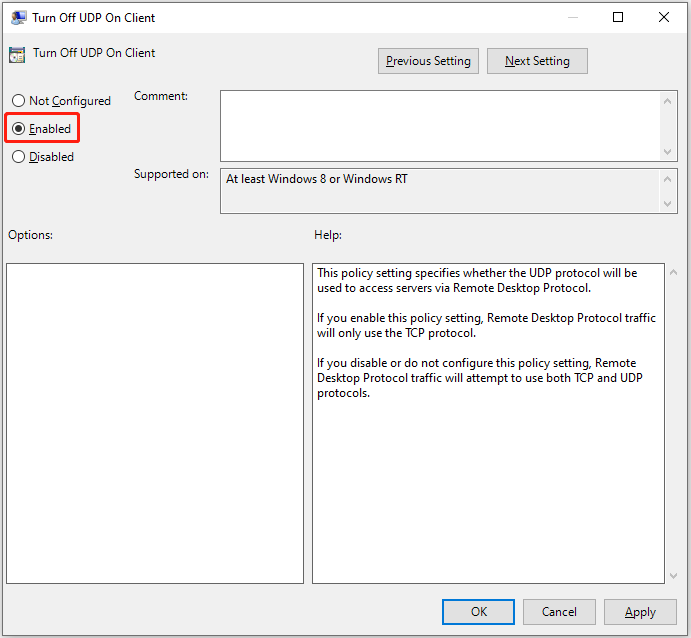
Fix 1. Enable Turn off UDP on Client
You can change group policies to force Remote Desktop clients to connect using TCP, rather than UDP, as a workaround for the KB5053598 RDP disconnection issue.
Step 1. Type Edit group policy in the Windows search box and press Enter to open Local Group Policy Editor.
Step 2. Navigate to: Computer Configuration > Administrative Templates > Windows Components > Remote Desktop Services > Remote Desktop Connection Client.
Step 3. On the right side, double-click Turn Off UDP On Client. Then, select Enabled, and click Apply and OK sequentially to apply this change.
Fix 2. Select RDP for the Security Layer
Selecting RDP for Security Layer is usually done to improve the security of remote connections, but according to user feedback, it also helps solve problems with unstable RDP connections. So, you can give it a try.
Step 1. Open Local Group Policy Editor.
Step 2. Go to Computer Configuration > Administrative Templates > Windows Components > Remote Desktop Services > Remote Desktop Session Host > Security.
Step 3. In the right panel, double-click on Require use of specific security layer for remote (RDP) connections. Next, select the Enabled option, and then choose RDP for Security Layer.
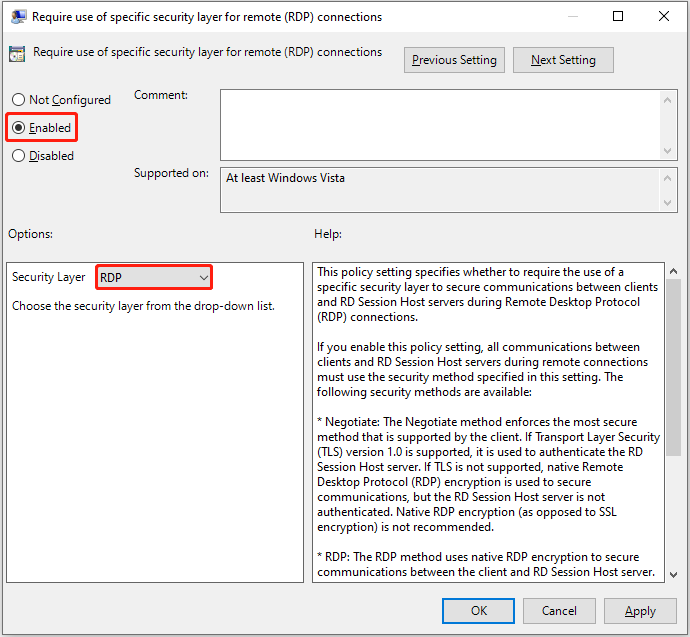
Step 4. Click Apply > OK to save this change.
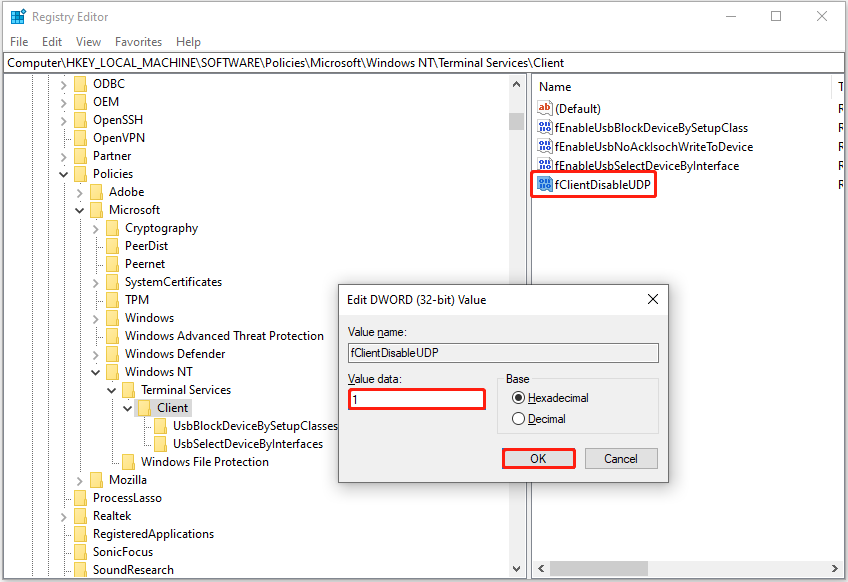
Fix 3. Set up the Value Data of fClientDisableUDP to 1
Creating a new value – fClientDisableUDP and setting up its value data to 1 can also help resolve the RDP disconnection issue. Follow the steps below.
Step 1. Open Registry Editor.
Step 2. Go to Computer\HKEY_LOCAL_MACHINE\SOFTWARE\Policies\Microsoft\Windows NT\Terminal Services\Client.
Step 3. In the right panel, check if fClientDisableUDP exists. If no, right-click on any blank area on the right side and choose New > DWORD (32-bit) Value. Then name it fClientDisableUDP.
Step 4. Double-click on the newly created value, set up its value data to 1, and click OK. After that, restart the computer and check if the problem is resolved.
Fix 4. Uninstall KB5053598
If the methods above fail to resolve the RDP issue, you can uninstall KB5053598 and pause Windows updates for a few weeks.
Open Settings and go to the Windows Update section. Under Related settings, select Update history > Uninstall updates. Select KB5053598 from the update list and choose Uninstall.
You can also select the amount of time you would like to pause the update in the Windows Update section.
How to Fix KB5053598 BSOD
Fix 1. Boot Into the Safe Mode
Faced with the KB5053598 blue screen, you can try booting into safe mode and transfer your files in case of severe system failures.
Press and hold the Power button on your computer for 10 seconds to turn off it, and then turn on it. Repeat this process to turn off and on your device 3 times until you see “Automatic Repair couldn’t repair your PC”. Next, click Advanced options and choose Troubleshoot > Advanced options > Startup Settings > Restart. Click F5 to start Windows in safe mode with networking.
Now, you can uninstall KB5053598, or transfer or back up your files. If you prefer to back up files by using professional and secure data backup software, MiniTool ShadowMaker is worth a try. As the best Windows backup tool, it can easily back up files/folders, partitions/disks, or the system to an external disk.
MiniTool ShadowMaker TrialClick to Download100%Clean & Safe
Fix 2. Perform a Clean Install
If you are unable to enter safe mode, you may need to do a clean install of Windows to refresh the device.
Recover Files:
Since a clean install will erase all data on the drive, it is recommended to recover your files before proceeding. How can you recover files from an unbootable computer? MiniTool Power Data Recovery can help you.
It provides a bootable edition that allows you to create bootable media, which can help start your computer and extract files from your device. However, this feature is not available in the free edition – you need to upgrade to an advanced edition to use the “Bootable Media Builder” feature.
MiniTool Power Data Recovery FreeClick to Download100%Clean & Safe
Clean Install:
Step 1. On a working computer, use a blank USB drive to create an installation media for Windows.
Step 2. Connect the installation media you created to your nonfunctional PC, and then start your computer from it.
Step 3. Follow the instructions on your screen to complete the installation.
Bottom Line
Are you experiencing Windows 11 KB5053598 issues – RDP disconnection and BSOD? If yes, try the workarounds outlined above to fix it.
About The Author

Position: Columnist
Shirley holds a bachelor’s degree in English and has been an editor at the MiniTool Team for many years. She specializes in IT-related content, with a focus on data recovery, file backup, disk management, and other technical topics. She is committed to delivering clear, accurate, and practical solutions to help users resolve common computer issues.
User Comments :