Booting into Windows 10 Safe Mode is an essential diagnostic method to help you identify and fix Windows 10 PC issues. This MiniTool post provides you with a step-by-step guide on how to start Windows 10 in Safe Mode (while booting) to troubleshoot the problems you are having with your Windows 10 PC.
Once your computer is installed with improper drivers or inappropriate software, the PC may freeze or crash occasionally. Utilizing Windows 10 Safe Mode can assist in diagnosing and resolving these issues. Let’s see what Safe Mode is and how to boot in Safe Mode Windows 10.
About Windows 10 Safe Mode
What Is Safe Mode?
Safe Mode is a built-in diagnostic mode of Windows 10 (7, 8, 11, etc.) computer operating system.
In Windows 10 Safe Mode, the OS will be started with only core components and many other non-necessary drivers or services such as video drivers will be disabled. Third-party startup programs are also prevented from loading. This simplifies the process of identifying the root causes of operating system issues.
For instance, you can start Windows 10 in Safe Mode to identify whether the default settings and drivers in Windows 10 are causing the misbehaving of Windows 10 PC. Or, you can diagnose if it’s the installation of poorly configured software/programs that are preventing Windows 10 PCs from booting into a normal state.
Besides, sometimes though you can’t start a Windows 10 PC normally, you can still boot it into Safe Mode. This makes it a good option to access your files and troubleshoot problems such as a blue screen or black screen. Windows 10 Safe Mode allows you to safely uninstall problematic programs, solve driver issues, diagnose hardware conflicts, and more.

Three Types of Windows 10 Safe Mode
Windows 10 offers three types of Safe Mode. You can choose to boot Windows 10 in any type of Safe Mode based on your own needs.
- Enable Safe Mode: This is the most basic type of Safe Mode. It starts Windows 10 by loading the most essential settings and services of the system. Any other unnecessary programs, drivers, or services won’t be loaded. This puts the PC in a safer status by cutting off the possible malware or virus that may move through third-party software, drivers, or local networks.
- Enable Safe Mode with Networking: If you choose to start Windows 10 in Safe Mode with networking, then it will add other necessary drivers and services that are required to access the networks while keeping the same set of drivers and services of Safe Mode. This is not as safe as Safe Mode, but it’s useful when you need to access the Internet.
- Enable Safe Mode with Command Prompt: If you boot Windows 10 in Safe Mode with Command Prompt, your computer will display a big Command Prompt window. You can address Windows 10 PC-related issues easily using command lines. However, if you don’t know much about CMD, it’s not advised to choose this option. Both Safe Mode and Safe Mode with Command Prompt are not connected to a network.
How to start Windows 10 in Safe Mode (while booting)? See detailed below.
If you prefer a quick video guide, you can watch this tutorial:
1. Start Windows 10 in Safe Mode From Settings
If you’ve already logged into Windows 10, then you can boot into Safe Mode in Windows 10 from Settings.
Step 1. Click the Start button on your taskbar and click Settings. Or you can press the Windows + I key combination to open Windows 10 Settings.
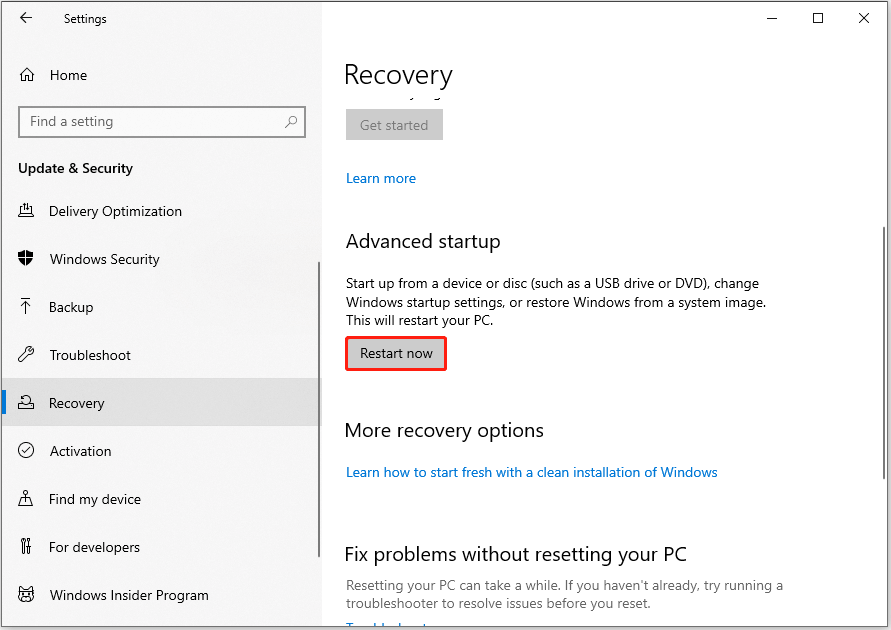
Step 2. Click Update & Security, choose the Recovery option from the left panel, and click Restart now under Advanced startup to enter Windows RE (Recovery Environment).
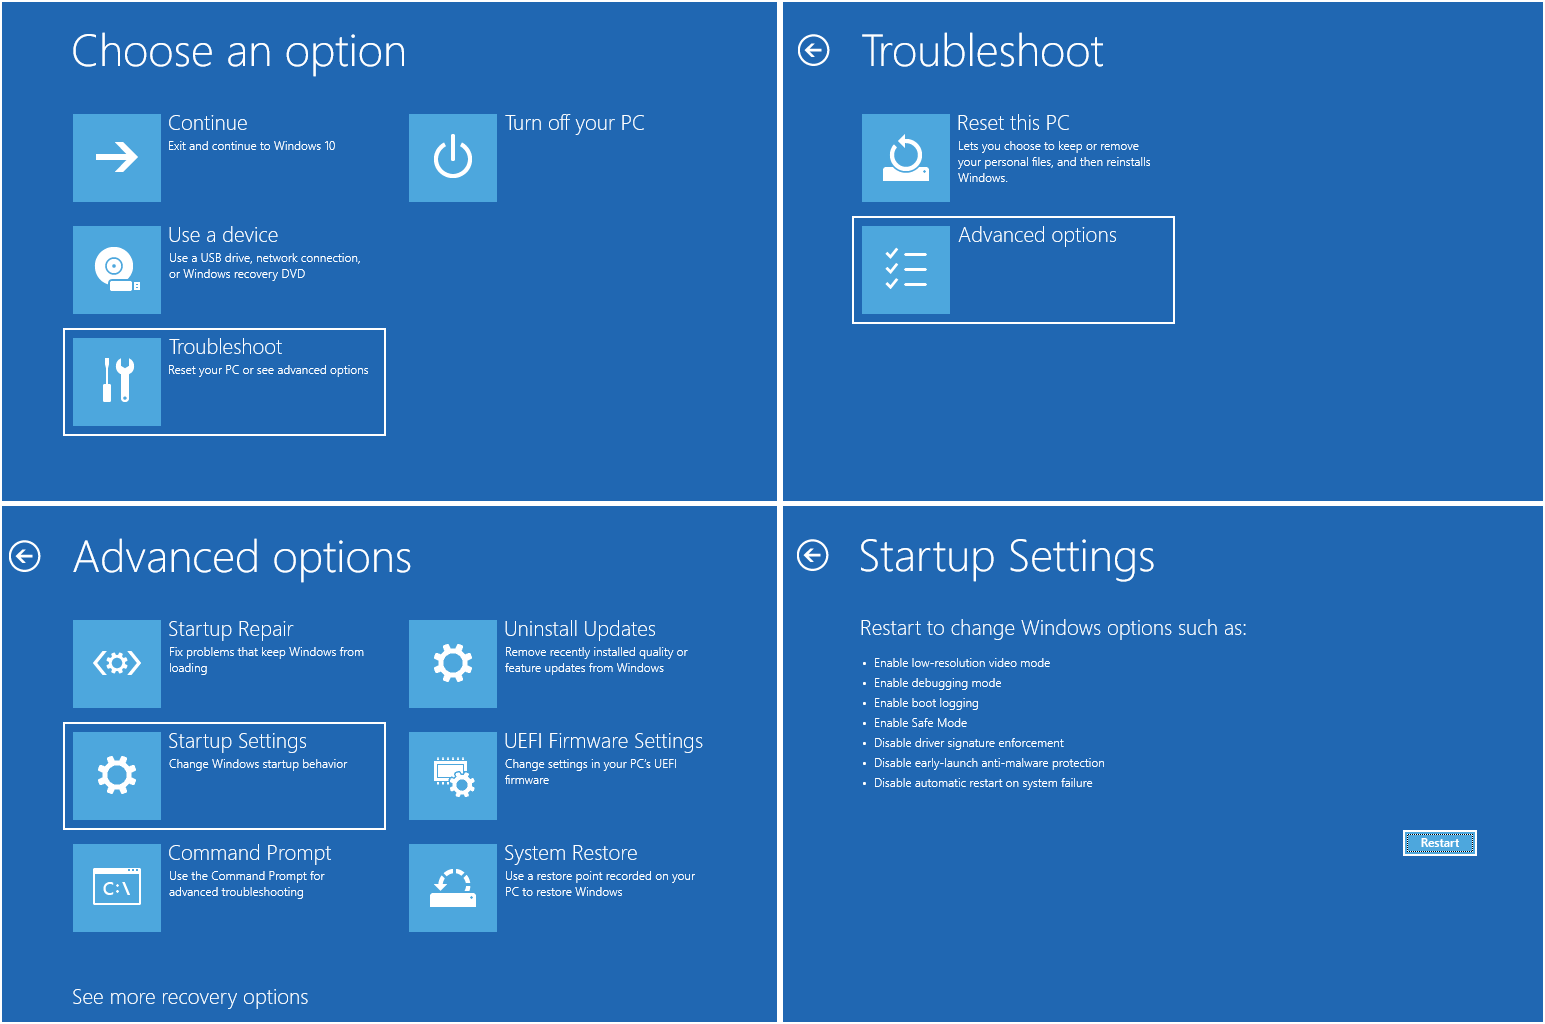
Step 3. Next, click Troubleshoot -> Advanced options -> Startup Settings -> Restart.
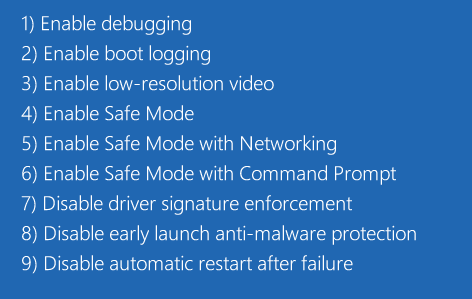
Step 4. Wait until the computer restarts, then choose a preferred Safe Mode option.
Press 4 or F4 on the keyboard to start Windows 10 PC in Safe Mode; Press 5 or F5 to boot Windows 10 in Safe Mode with Networking; Press 6 or F6 to access Windows 10 in Safe Mode with Command Prompt.
2. Boot Windows 10 in Safe Mode Through MSConfig
Alternatively, you can boot into Safe Mode in Windows 10 using the Windows System Configuration (msconfig.exe) tool.
Step 1. Press the Windows + R key combination, then input msconfig in the input box and hit Enter to open the System Configuration utility.
Step 2. In the new window, move onto the Boot tab. Under Boot options, choose a preferred Safe boot option based on your own needs.
- Minimal equals to Safe Mode.
- Alternate shell refers to Safe Mode with Command Prompt.
- Network refers to Safe Mode with Networking.
- Active Directory repair option is used to repair the Active Directory server.

Step 3. Click OK to boot into the selected Safe Mode.
3. Enter Windows 10 in Safe Mode With Shift + Restart
Furthermore, you can start Windows in Safe Mode by using the Shift + Restart feature. This way also enables you to boot into Safe Mode Windows 10 without login.
If you have logged in:
Press and hold the Shift key on the keyboard, and click the Start button on the taskbar. Then click Power -> Restart. After you get into the Choose an option screen, click Troubleshoot -> Advanced options -> Startup Settings -> Restart.
Next, press F4, F5, or F6 to choose a desired Safe Mode option.
If you haven’t logged in:
If you’re unable to log in to Windows 10 but can access the Sign-in screen, you can initiate Safe Mode in Windows 10 by using Shift + Restart from the login screen.
On the sign-in screen, press and hold the Shift key, click the Power icon at the bottom-right, and choose Restart.

Once you enter the WinRE screen, you need to click Troubleshoot -> Advanced options -> Startup Settings -> Restart. Then press F4, F5, or F6 to select a Safe Mode option that suits your needs.
4. Start Windows 10 in Safe Mode While Booting Through the F8 Key
In Windows 7, accessing the Advanced options window before logging in could be achieved by continuously pressing the F8 key. However, this approach doesn’t function in Windows 10 due to its significantly faster booting speed.
Nevertheless, you can re-enable the F8 functionality in Windows 10 by using the BCD (Boot Configuration Data) edit command.
Step 1. Open Administrator Command Prompt Window.
Press the Windows + R key combination to open the Run window. Then type cmd in the box and press Ctrl + Shift + Enter key to go to the Administrator Command Prompt window.
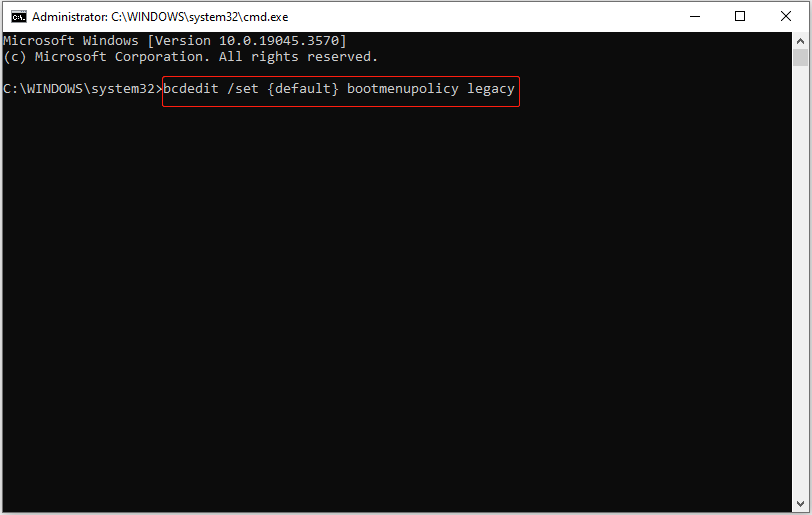
Step 2. Reactivate F8 Key Function
Then you can type this command line: bcdedit /set {default} bootmenupolicy legacy. After that, hit the Enter key.
Step 3. Reboot Windows 10 PC in Safe Mode
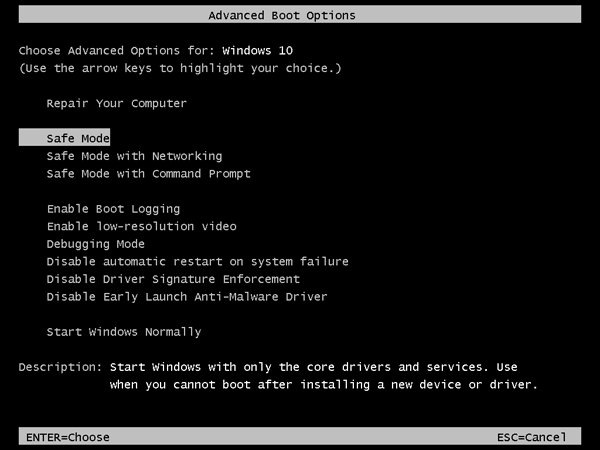
Next, you can close the Command Prompt window and restart your PC. Before the Windows logo appears, you can constantly press F8 to enter into the Advanced Boot Options screen.
You can use the arrow keys on the keyboard to choose to start Windows 10 in Safe Mode, Safe Mode with Networking, or Safe Mode with Command Prompt.
To get rid of the F8 key function in Windows 10, you can follow the same operation to get into the Administrator Command Prompt window. Then input this command line: bcdedit /set {default} bootmenupolicy standard and hit Enter. After that, restart your computer again.
Related article: Function Keys Not Working in Windows 10? Try These Fixes
5. Initiate Windows 10 in Safe Mode From a Black/Blank Screen
If your Windows 10 PC can’t start normally, you can also choose to boot Windows 10 in Safe Mode to troubleshoot problems.
To boot your Windows 10 PC in Safe Mode from a black or blank screen, you need to enter into the Windows Recovery Environment (WinRE) first by turning off and on the PC 3 times.
Step 1. Enter Into WinRE.
Press and hold the Power button on your PC for 10 seconds to turn off the computer, then turn on the computer by pressing the Power button again. When the computer is going to boot the operating system (e.g., the computer manufacturer’s logo appears when restarting), press the Power button again for about 10 seconds to turn off the device.
Duplicate the same process to turn off and on your Windows 10 PC 3 times. When the PC is turned on for the third time, the computer should enter into the Automatic Repair window. If not, follow the same steps until the WinRE screen is displayed.
When you see “Automatic Repair couldn’t repair your PC”, click Advanced options to enter into the Windows Recovery Environment screen.
Step 2. Enter Into Startup Settings.
In the WinRE window, you can then enter the Startup Settings window by clicking Troubleshoot -> Advanced options -> Startup Settings -> Restart.
Step 3. Start Windows 10 in Safe Mode With Networking.
Then you can press F5 to start Windows 10 PC in Safe Mode with Networking, which is a suggested option when you need to troubleshoot a black screen.

How to Use Safe Mode to Fix Windows 10 PC Issues
As mentioned before, starting Windows 10 PC in Safe Mode can help you fix some problems with your computer.
1. Recover Lost/Deleted Files on PC
If your computer has a system crash or hard drive error, you may lose some important files, and can’t start Windows 10 normally.
Upon entering the Safe Mode in Windows 10, you can use the best data recovery software – MiniTool Power Data Recovery to easily recover deleted files or lost data in 3 simple steps.
MiniTool Power Data Recovery is a 100% clean data recovery tool that is fully compatible with Windows 11/10/8/7.
You can use this software to recover lost or mistakenly deleted files from a PC hard drive, external hard drive, SSD, USB flash drive, pen drive, SD card (from Android, cameras, etc.), and more, under various kinds of data loss situations.
Download and install MiniTool Power Data Recovery, and follow the detailed guide below to recover lost data and files with ease.
MiniTool Power Data Recovery FreeClick to Download100%Clean & Safe
Step 1 – Run MiniTool Power Data Recovery.
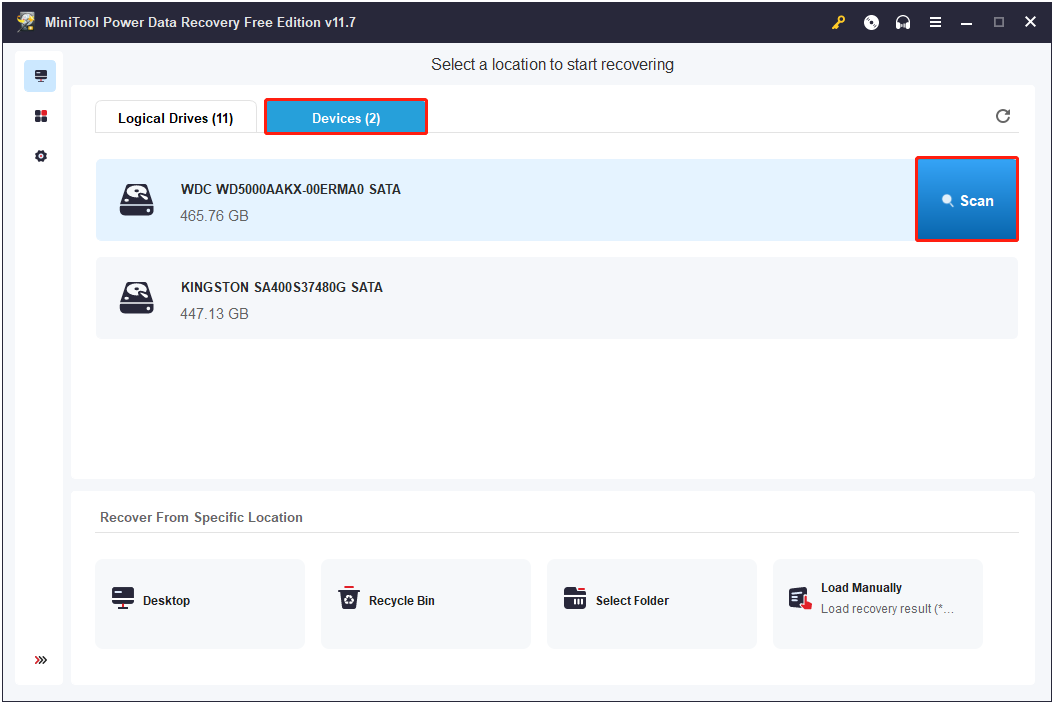
Launch MiniTool Power Data Recovery Free to enter into its main UI. All the detected drives and devices on your PC are displayed.
Step 2 – Scan for Lost Data.
Under Logical Drives, choose the partition from which data is lost and click the Scan button. Then this file recovery service will automatically scan for all lost, deleted, and existing files on the selected partition.
If you don’t know which partition contains the deleted/lost files, you can switch to the Devices tab and choose the whole disk to scan.
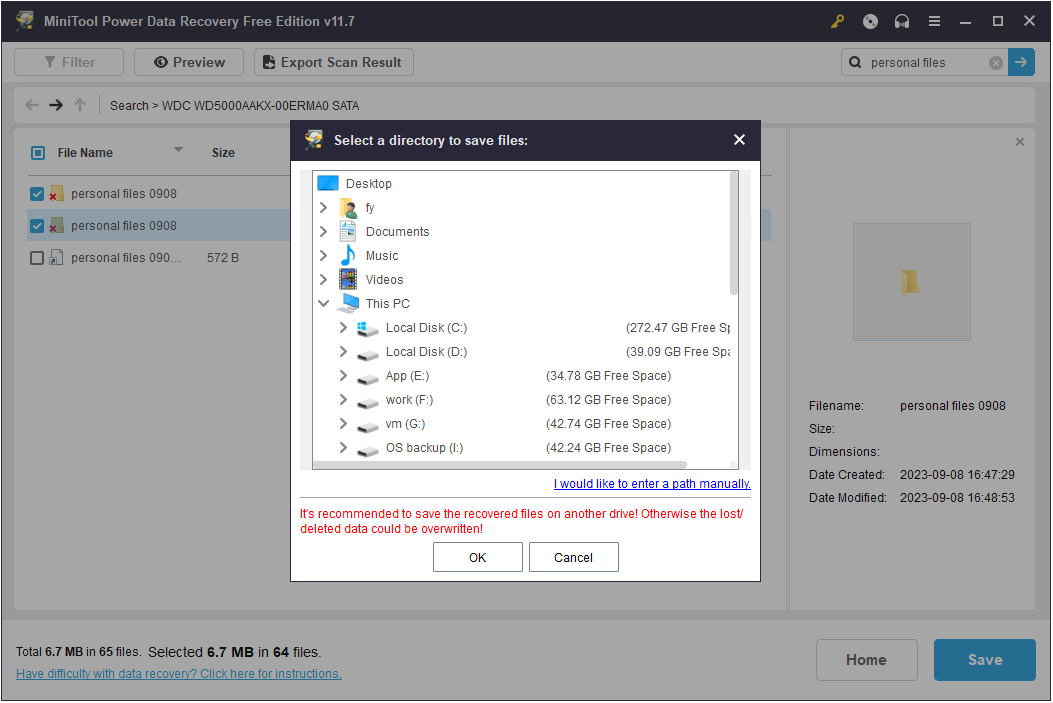
Step 3 – Preview and Save Lost Files.
Once the scanning is finished, you can browse from the scan results to find the needed files. The Filter and Search features are available to help you quickly find the wanted files.
- Filter: If you click the Filter button, you will have the option to filter out unwanted files by file type, file size, file modification date, and file category.
- Search: If you remember the file/folder name, you can locate a certain file/folder by typing the file/folder name in the search box and pressing Enter.


Moreover, it is crucial to preview the recovered files to ensure they are the ones you need. This hard drive data recovery service allows you to preview various types of files, such as Word documents, Excel files, pictures, videos, audio, slides, emails, etc.

Finally, click the Save button to store the wanted files to another drive.
2. Uninstall Inappropriate Software
If your Windows 10 computer can’t work because of some recently installed programs that may have conflicting drivers, you can uninstall the suspicious software from the Control Panel in Windows 10 Safe Mode. Then restart your computer to see if the problem is fixed.
3. Perform System Restore
Performing a System Restore is a great option to restore the unstable Windows operating system to a previous state in good condition. But what if Windows System Restore is stuck or hangs up? In this case, you can try to start Windows 10 in Safe Mode to run a successful System Restore without crashing.
You can also boot Windows 10 in Safe Mode to fix Windows 10 black screen, and blue screen issues like the Kernel Data Inpage Error, etc.

Bottom Line
This post illustrates several ways to start Windows 10 in Safe Mode. If your computer doesn’t function optimally, you may want to address related issues, as well as recover deleted or lost data with MiniTool Power Data Recovery Free in Safe Mode.
If you have any concerns about MiniTool software, please feel free to contact [email protected].
Windows 10 Safe Mode FAQ
About The Author

Position: Columnist
Shirley holds a bachelor’s degree in English and has been an editor at the MiniTool Team for many years. She specializes in IT-related content, with a focus on data recovery, file backup, disk management, and other technical topics. She is committed to delivering clear, accurate, and practical solutions to help users resolve common computer issues.
User Comments :