Are you blocked by the error “there was a problem with NVIDIA App”? Don’t worry and you are not alone. To solve NVIDIA App not working/opening/loading in Windows 11/10, try these proven solutions collected by MiniTool in this pro guide.
NVIDIA App Not Working
NVIDIA App is specially designed for PC gamers and creators. With the latest GeForce Game Ready and NVIDIA Studio Drivers for games, GPU Control Center, NVIDIA overlay and other features, this software dramatically enhances gaming experience. However, the issue of NVIDIA App not working may ruin your day.
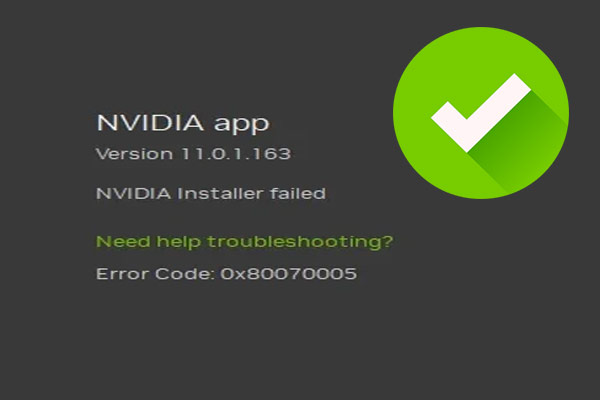
On forums or communities, some users have reported various issues in Windows 11/10, for example, NVIDIA app cannot launch/open or there is an error message on the screen “There was a problem with NVIDIA app”. Specifically speaking, the error may appear every time you try to launch NVIDIA App. Or sometimes it takes about a lot of time (about 20 minutes) until the error appears.
In case of NVIDIA App not loading/opening/launching/working, some of you may consider reverting to GeForce Experience. Also, some insist in using the new app. There are several proven tips to address these concerns.
Way 1: Reinstall NVIDIA App
The popup of “there was a problem with NVIDIA App” recommends reinstalling this software and rebooting your PC. For some users, this way ends up fixing it.
So, take these steps to uninstall then reinstall NVIDIA App:
Step 1: Navigate to Settings > Apps.
Step 2: In Windows 10, go to Apps & features, choose NVIDIA App and tap Uninstall.
In Windows 11, go to Installed apps, locate NVIDIA App, and click three dots then Uninstall.
MiniTool System Booster TrialClick to Download100%Clean & Safe
Step 3: After uninstallation, press Win + R, type in %appdata%, and delete the NVIDIA App folder.
Step 4: Access the official website, download NVIDIA App again and run the executable file to finish the installation according to prompts.
Later, reboot your machine and check if NVIDIA App not working/opening persists.
Way 2: Run NVIDIA App as Administrator
Some apps cannot work as expected if they lack the administrative privileges. Hence, running NVIDIA App as an administrator can grant it the necessary rights so as to solve the not working or launching issue.
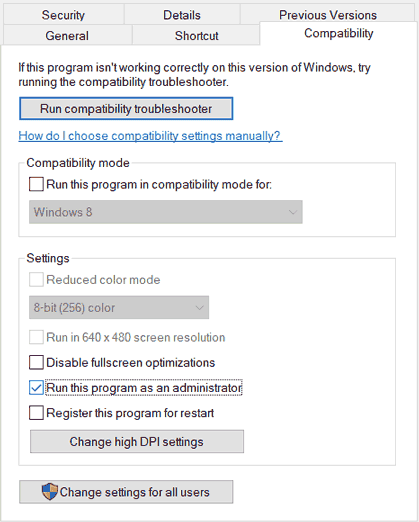
So, right-click on the shortcut of NVIDIA App in Windows 11/10 and choose Run as administrator. To always run this program with admin permissions, right-click the shortcut and select Properties. Next, tick Run this program as an administrator under Compatibility and save the change.
Way 3: Enable Windows Notifications
Some Reddit users said enabling Windows notifications removed the error “there was a problem with NVIDIA App”. Perhaps this app relies on notifications and disabling them could cause it to have a hard time performing some operations.
To enable notifications:
Step 1: Head to Settings > System.
Step 2: Click Notifications & actions (Windows 10) or Notifications (Windows 11), then make sure the option of Notifications is on.
Step 3: Scroll down to find NVIDIA App and enable the notification setting.
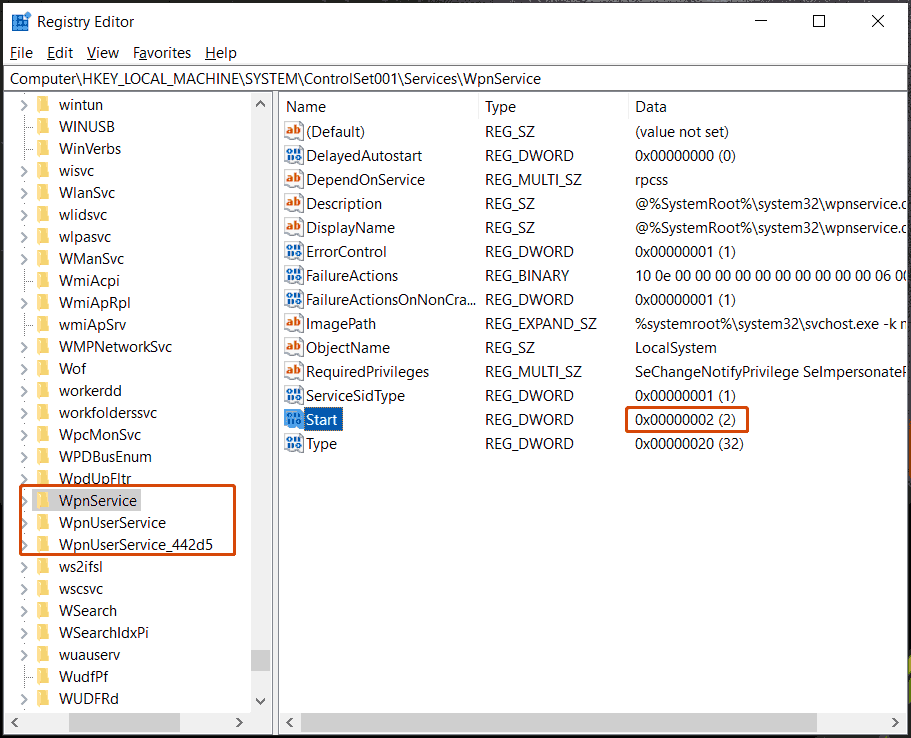
Way 4: Enable WPN Service in Registry
If you disable WPN service (Windows Push Notification service) in Windows Registry, NVIDIA App not launching/loading/working likely happens. Fix this issue using these steps:
Step 1: Open Registry Editor and access Computer\HKEY_LOCAL_MACHINE\SYSTEM\ControlSet001\Services.
Step 2: Locate WpnService, WpnUserService, & WpnUserService_xx one by one, then make sure the Start value of them is set to 2.
Way 5: Delete a Log File
NVIDIA App not opening/working can also be resolved by deleting the log file _NvMessageBusBroadcast.dll. Please check C:\Program Files\NVIDIA Corporation\NvContainer\plugins\LocalSystem and find that log file to delete.
Way 6: Update GPU Driver
An outdated graphics card driver could trigger NVIDIA App not working or launching along with the message “there was a problem with NVIDIA App”.
Update it in Device Manager:
Step 1: Right-click on the Start button and choose Device Manager.
Step 2: Under Display adapters, right-click on your NVIDIA graphics card and choose Update driver.
Step 3: Click Browse my computer for drivers > Let me pick from a list of available drivers on my computer.
Step 4: Choose your NVIDIA GPU and then Device Manager begins installing a driver.
Way 7: Update Windows
It is essential to keep Windows up-to-date, ensuring system reliability and compatibility with apps like NVIDIA App. Before an update, remember to create a backup for your PC using the backup software MiniTool ShadowMaker to avoid potential update issues and data loss.
MiniTool ShadowMaker TrialClick to Download100%Clean & Safe
Next, open Settings > Windows Update, check for updates and download & install them.
By applying these fixes, you should effectively solve your issue with NVIDIA App.
About The Author

Position: Columnist
Vera has been working at the MiniTool Team for over 10 years as a technical editor and content writer. She mainly focuses on disk and partition management, data recovery, Windows backup and restore, and PC troubleshooting. Through in-depth software testing and hands-on experience, she has helped users solve a wide range of computer problems and better protect their data on Windows devices.
User Comments :