What Is Network Level Authentication
Network Level Authentication (NLA) is a security feature in Windows Remote Desktop. With NLA enabled, others must authenticate themselves before establishing a remote session successfully. This reduces the risk of unauthorized access and helps protect your computer from malicious software.
However, many users have reported that when they try to connect to a remote desktop, they receive the error message stating that the remote computer requires Network Level Authentication, which prevents them from initiating a remote connection.
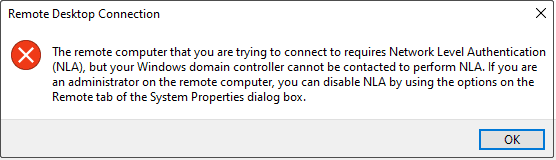
If you are also encountering this error, do not worry. You can try the following methods to fix the issue and regain access to the remote desktop.

How Do I Fix the Remote Computer Requires Network Level Authentication
Try Some Basic Steps
Before turning to advanced solutions, you need to try some basic troubleshooting steps to check whether they can fix the remote desktop connection error.
- Check your network cables and ensure that they are firmly connected.
- Update your network adapter drivers.
- Go to Settings > Update & Security > Troubleshoot > Additional troubleshooters and run the Internet Connections and Network Adapter troubleshooters.
- Go to Settings > Network & Internet > Status > Network reset to reset the network settings.
If the error message still appears after performing the steps above, consider using one of the following methods to disable NLA on the remote computer.
Disable NLA From System Properties
The System Properties window provides a simple graphical way to change remote desktop settings. You can turn off NLA from it.
Step 1. Press Windows + R to open Run. Then type sysdm.cpl in the text box and press Enter.
Step 2. Go to the Remote tab.
Step 3. Under Remote Desktop, tick Allow remote connections to this computer, and then untick Allow connections only from computers running Remote Desktop with Network Level Authentication (recommended).
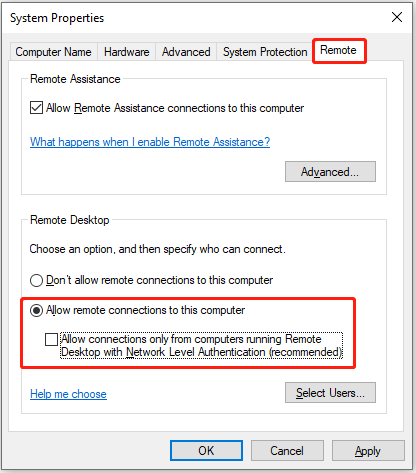
Step 4. Click OK to save this change.
Disable NLA With CMD
If you prefer to disable NLA using command line, follow the steps below.
Step 1. Press Windows + S and type cmd in the search box. Right-click Command Prompt and choose Run as administrator.
Step 2. Type the following command and press Enter:
reg add “HKLM\SYSTEM\CurrentControlSet\Control\Terminal Server\WinStations\RDP-Tcp” /v UserAuthentication /t REG_DWORD /d 0
Step 3. Restart the remote desktop computer and try to connect to it again.

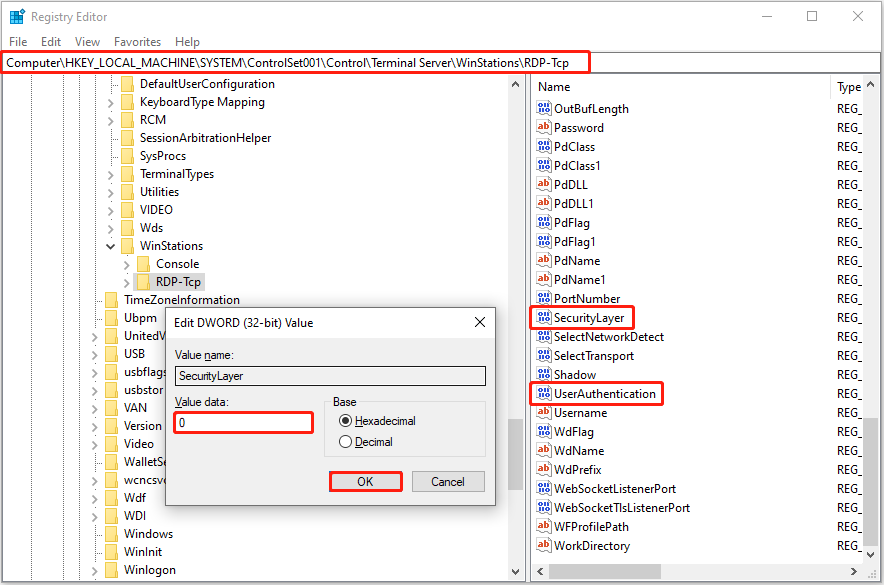
Disable NLA Using Registry Editor
Another method is to modify specific registry values to disable NLA manually.
Step 1. Open Registry Editor by using the Windows search box.
Step 2. Navigate to this location:
Computer\HKEY_LOCAL_MACHINE\SYSTEM\ControlSet001\Control\Terminal Server\WinStations\RDP-Tcp
Step 3. In the right panel, find and double-click SecurityLayer and UserAuthentication and set their value data to 0.
Disable NLA via the Local Group Policy Editor
The Local Group Policy Editor provides another way to disable NLA by adjusting system-level RDP settings.
Step 1. Press Windows + R, type gpedit.msc, and press Enter to open the Local Group Policy Editor.
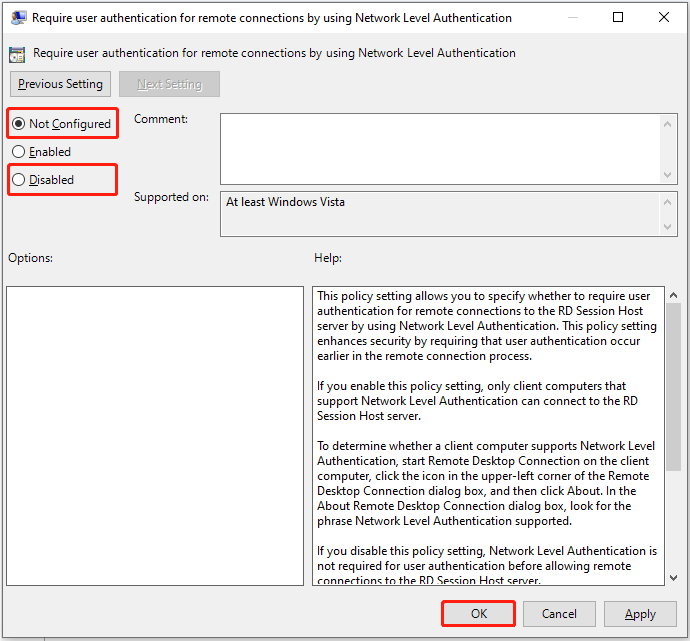
Step 2. Navigate to Computer Configuration > Administrative Templates > Windows Components > Remote Desktop Services > Remote Desktop Session Host > Security.
Step 3. In the right panel, double-click the Require user authentication for remote connections by using Network Level Authentication option.
Step 4. Check the Not Configured or Disabled option and click OK to save the change.
Bottom Line
If you receive the error message saying that the remote computer requires Network Level Authentication, check your network connections first. If it works well but the error persists, consider turning off NLA temporarily to solve it.
About The Author

Position: Columnist
Shirley holds a bachelor’s degree in English and has been an editor at the MiniTool Team for many years. She specializes in IT-related content, with a focus on data recovery, file backup, disk management, and other technical topics. She is committed to delivering clear, accurate, and practical solutions to help users resolve common computer issues.
User Comments :