If you run into the error message “unable to start Windows Subsystem for Android” when trying to start this environment, what should you do to fix the virtualization not enabled error in Windows 11? Read this post and you can find some useful solutions offered by MiniTool Solution to help you out.
Windows 11 Unable to Start Windows Subsystem for Android
In Windows 11, there is a feature called Virtualization that creates a virtualized environment so that you can run non-native applications on the system. This means all supported computers should be able to run Android apps natively in Windows 11 without installing a third-party emulator on the system.
But with the release of Windows Subsystem for Android to Insiders, you may get an error saying “unable to start Windows Subsystem for Android” when starting the environment.
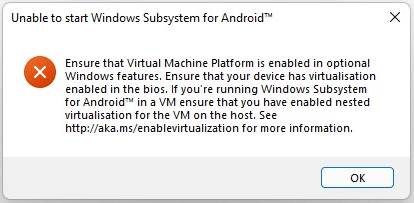
From the error window, you can know the reason is the virtualization problem. If you don’t enable virtualization in Windows 11, the Windows Subsystem for Android environment can’t be enabled to initialize. As a result, the error appears. To get rid of this issue, you can follow the methods below. It is easy to fix it and let’s go to see them.
How to Fix Virtualization Not Enabled Windows 11
Enable Virtual Machine Platform
When getting the above error, the first thing you should do is to ensure that Virtual Machine Platform is enabled. This is the given suggestion by Windows.
How to do this thing? The instructions are here:
Step 1: Open Control Panel in Windows 11 and view all the items by Category.
Step 2: Click Programs and click the Turn Windows features on or off link.
Step 3: In the Windows Features interface, scroll down to find Virtual Machine Platform and then tick the checkbox of this feature. Also, you can check Windows Hypervisor Platform.
Step 4: Next, click OK to save the change.
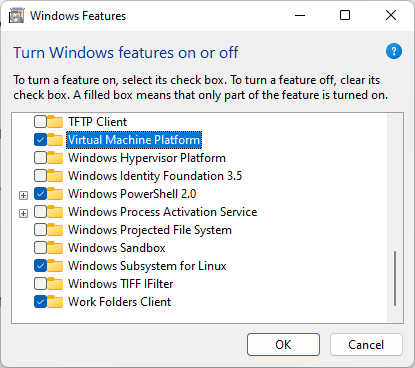
Step 5: Restart your computer and then see the error is removed.
Enable Virtualization in BIOS
In addition to enabling Virtual Machine Platform, you should also make sure virtualization is enabled in BIOS. To run Android apps, you must enable virtualization. How can you do this task? Follow the steps below.
Step 1: Boot your PC to the BIOS menu by pressing a specific key like DEL, F2, F10, or ESC during the reboot process.
Step 2: Locate the section for CPU configuration.
Step 3: Find the settings for Virtualization and the similar name may be Intel Virtualization Technology, SVM, AMD-V, Hyber-V, Vanderpool, or VT-X.
Step 4: Enable the option for Virtualization.
Step 5: Press F10 to save the changes and restart your computer.
Enable Nested Virtualization
If you install Windows 11 in a virtual machine to run Windows Subsystem for Android, you need to enable nested virtualization. Or else, the error “unable to start Windows Subsystem for Android” appears on Windows 11.
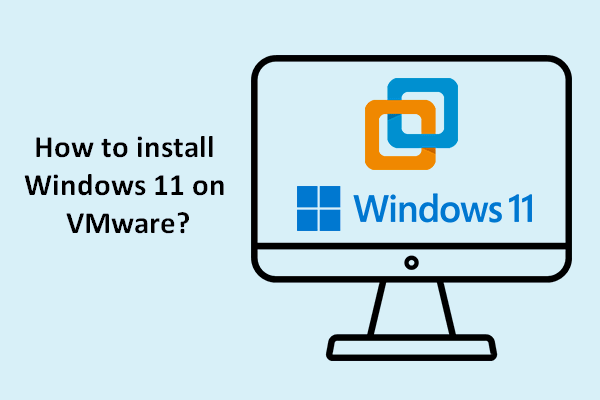
The way to enable nested virtualization is different depending on the hypervisor. For VirtualBox and VMware, you can easily find this option in the virtualization settings. For VirtualBox, enable Nested VT-x or AMD-V. For Hyper-V, you need to use a command-line way. Go to find the detailed wizards on the Internet.
After enabling nested virtualization, you can run Windows Subsystem for Android without any error.
About The Author

Position: Columnist
Vera has been working at the MiniTool Team for over 10 years as a technical editor and content writer. She mainly focuses on disk and partition management, data recovery, Windows backup and restore, and PC troubleshooting. Through in-depth software testing and hands-on experience, she has helped users solve a wide range of computer problems and better protect their data on Windows devices.
User Comments :