Ventoy Verification Failed
Ventoy, similar to Rufus, is a free tool to create a bootable USB drive or ISO files so that you can clean install Windows 10/11. Although your PC cannot meet the system requirements, the installation is feasible. Know details from this guide on Ventoy bypass Windows 11 Requirements.
It supports x86 Legacy BIOS, IA32 UEFI, x86_64 UEFI, ARM64 UEFI, MIPS64EL UEFI, and MBR and GPT partition styles. However, when booting your PC from the bootable USB drive, you get Ventoy verification failed errors.
On the computer, one of the error messages displays:
- Verification failed: (15) Access Denied
- Verification failed: (0x1A) Security Violation
When digging into the causes behind the boot errors, you will find they involve the enabled secure boot setting in BIOS, a Ventoy version issue, compatibility issues, and Ventoy configurations. In the event of Ventoy error 0x1A or error 15, calm down and continue reading this guide to discover possible solutions.
MiniTool ShadowMaker TrialClick to Download100%Clean & Safe
Fix 1: Disable Secure Boot
According to users on some forums, disabling secure boot in UEFI settings works well in fixing Ventoy verification failed issues.
To try this way:
Step 1: Boot your computer to its BIOS settings by pressing a key such as F2, Del, F10, Esc, etc. during the startup. The key varies from computer brands.
Step 2: Under the Security tab, highlight Secure Boot and set it to Disabled. This step may be different based on different PCs, so check for details as per your PC brand.
Later, reboot the machine from the bootable USB drive again and you can use Ventoy to begin installing Windows 11/10 without encountering verification failed: (15) access denied or verification failed: (0x1A) security violation.
Also read: How to Fix Ventoy Not Booting from USB? Here Are 4 Ways
Fix 2: Enroll Key or Hash from Disk
When having a Ventoy verification failed error, you can click OK and then press any key to perform MOK management to solve your issue. Ventoy offers two methods – Enroll key from disk and Enroll hash from disk to manage secure boot.
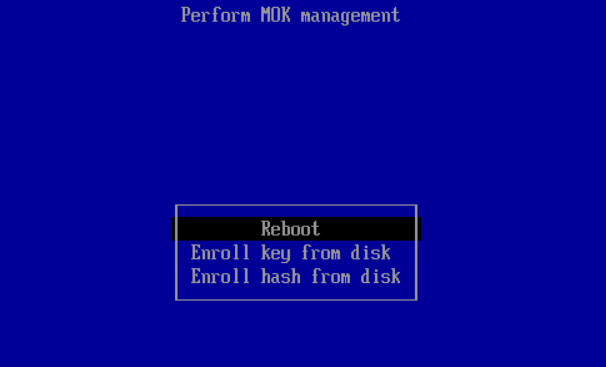
Enroll Key from Disk
Step 1: After selecting Enroll key from disk, locate VTOYEFI and press Enter.
Step 2: Choose ENROLL_THIS_KEY_IN_MOKMANAGER.cer and press Enter.
Step 3: Select Continue > Yes > Reboot. Then, boot menu options will appear and you can proceed with the installation process, without any Ventoy verification failed error.
Enroll Hash from Disk
Step 1: Go to Enroll hash from disk > VTOYEFI > ENROLL_THIS_KEY_IN_MOKMANAGER.cer.
Step 2: Choose BOOT/ and press Enter.
Step 3: Select grubx64.efi to continue.
Step 4: Hit Continue > Yes > Reboot to go ahead with the installation.
Fix 3: Use Another Tool to Create a Bootable Drive
Some PCs may be not compatible with Ventoy Secure Boot, leading to Ventoy error 15 or error 0x1A. In this case, try running another tool like Rufus to create a bootable USB drive to install Windows 11/10.
Step 1: Download and launch Rufus, then connect a USB drive to the PC.
Step 2: Choose a downloaded ISO file, configure some options, and click START to initialize the process.
If you don’t have ISO, you can download one using Rufus and make a bootable drive.
MiniTool ShadowMaker TrialClick to Download100%Clean & Safe
The End
Are you striving to look for ways to solve Ventoy verification failed errors on Windows? Trying these three fixes can easily get you out of the hole. Follow the step-by-step guide!
About The Author

Position: Columnist
Vera has been working at the MiniTool Team for over 10 years as a technical editor and content writer. She mainly focuses on disk and partition management, data recovery, Windows backup and restore, and PC troubleshooting. Through in-depth software testing and hands-on experience, she has helped users solve a wide range of computer problems and better protect their data on Windows devices.
User Comments :