Windows Volume is crucial in computer use. If you encounter the problem of Windows Volume stuck at 100%, how can you fix it? Don’t panic. This article from MiniTool can help you solve your urgent problem.
Every time I restart my computer, the Volume slider breaks, and no matter what percentage it’s on, the Volume slider remains at 100%. I figured out I could fix the problem by disabling the Synaptics Audio Driver. But then the next time my laptop restarts, it stops working again. Help?answers.microsoft.com
Volume Stuck at 100% on Windows
The volume plays an important role in the computer. When the problem of Windows Volume stuck at 100% occurs, it will affect your use. If you cannot adjust it through shortcut keys, system tray, or external devices, it may be caused by driver abnormality, system setting conflict, or hardware failure. This problem is common in Windows systems. The following content will provide a step-by-step troubleshooting guide.
How to Fix Windows Volume Stuck at 100% Issue
Solution 1: Adjust the Volume via Speaker Properties
If the problem of Windows Volume stuck at 100% occurs, you can try adjusting the Speaker Properties. This practice gives you in-depth control over your audio settings to optimize sound quality or troubleshoot audio issues. Do as follows.
Step 1: Right-click on the volume icon on the taskbar and click Sounds.
Step 2: Switch to the Playback tab, right-click on your speaker, and click Properties.
Step 3: In the Levels tab, you can adjust the volume.
Step 4: When it’s done, click on Apply > Yes to confirm the change.
If this way doesn’t work, go ahead to try the next method.
Solution 2: Run the Audio Troubleshooter
Running the Playing Audio troubleshooter can help automatically detect and fix common audio-related issues. This tool is built into Windows and simplifies the process of troubleshooting and resolving audio issues. Work with the following steps.
Step 1: Press the Win + I keys to open the Windows Settings app.
Step 2: Click on Update & Security > Troubleshoot.
Step 3: In the right pane, click on Additional troubleshooters.
Step 4: Under the Get up and running section, click on Playing Audio.
Step 5: Click on Run the troubleshooter in the expanded section to start detecting.
Solution 3: Update, Rollback, or Reinstall Audio Driver
Updating, rolling back, or reinstalling your audio driver can help resolve audio-related issues. These actions can help fix driver glitches or compatibility issues with the operating system. Here is how you can do it.
Step 1: Right-click on the Windows button and choose Device Manager.
Step 2: Click on the small arrow in front of Audio inputs and outputs to expand it.
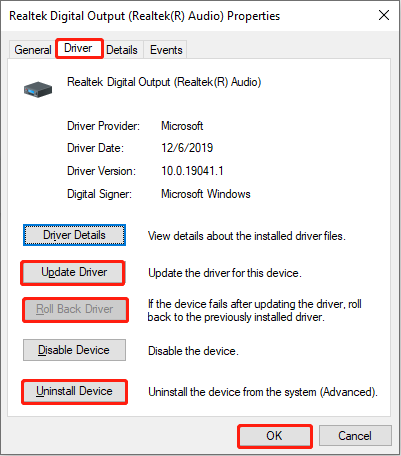
Step 3: Right-click on the audio device and choose Properties.
Step 4: Switch to the Driver tab, and click on Update Driver > OK.
Repeat step 4 to roll back the driver and uninstall the device.

Solution 4: Restart Windows Audio Service
Restarting the Windows Audio service can resolve audio-related issues such as no sound or the audio service not running. This may be caused by an incorrect service status, a driver problem, or system settings. Here are the steps.
Step 1: Press the Win + R keys to open the Run dialog.
Step 2: Type services.msc in the box and press Enter to open this utility.
Step 3: Scroll down the list to find and right-click on Windows Audio to choose Restart.
Step 4: Repeat the previous step to restart Windows Audio Endpoint Builder.
Solution 5: Troubleshoot in Clean Boot State
Troubleshooting in a Clean Boot state can help isolate problems in your system. A Clean Boot turns off all non-essential startup items and services, leaving only essential Windows services running. This is especially useful for troubleshooting issues related to conflicts with third-party software or services.
Step 1: Type System Configuration in the Windows search box and press Enter.
Step 2: Go to the Services tab, check the box for Hide all Microsoft services, and click on Disable all.
Step 3: Go to the Startup tab and click on Open Task Manager.
Step 4: Right-click on the third-party software to choose Disable.
Step 5: Switch to the Boot tab, click on Safe boot, and click on OK > Restart.
Open the software you just closed one by one. If the problem occurs, you need to disable it again.
MiniTool Power Data Recovery FreeClick to Download100%Clean & Safe
To Sum Up
Through the above-layered troubleshooting, most volume lock issues can be resolved. If the problem still cannot be fixed, it is recommended to use a USB external sound card as a temporary solution and contact professional maintenance personnel to check the hardware status of the motherboard audio module.


User Comments :