Description of “Disk Management console view is not up-to-date” Error
As is well known, Disk Management is a Windows snap-in utility enabling users to complete some basic disk and partitioning operations, such as create partition, delete partition, format partition, change drive letter and path, and extend partition.
Generally, users can finish those operations with ease since detailed instructions are provided, but a lot of users frequently report the error – Disk Management console view is not up-to-date, when they are doing specific operations, like format partition, assign a drive letter, and view partition properties.
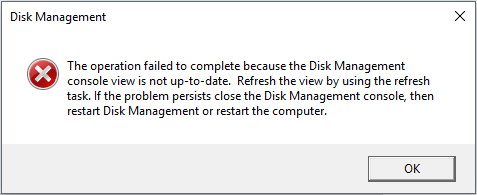
This kind of partitions is always without a drive letter, file system, partition type (primary or logical), or other necessary information. And below is the thumbnail of the very error message:
In addition to this issue on Disk Management console view, sometimes Windows may show “an unexpected error has occurred” message and also ask to close the Disk Management console, then restart Disk Management or restart the computer. But, in most cases, this doesn’t work.
Are you troubled by the same or similar problem? If yes, keep reading this post, from which you may find a solution.
How to Fix “Disk Management console view is not up-to-date” Error
A lot of factors could result in this issue, such as improper partitioning, virus attack, and sudden power outage. And to operate both previous partitions and newly created partitions, you might receive the same error message. Nevertheless, solutions should be different even though the error is the same.
Now, let’s see specific solutions.
Try These 4 Methods If the Partition Saves Important Data
Solution 1. Assign a Letter for the Inaccessible Partition in Diskpart.
When failing to assign letter in Disk Management, you can try doing it in Diskpart.exe. Please type diskpartin Search box, and run it as administrator. Once this tool is opened, you just need to type the following commands, and each type should end with pressing on Enter key. Here, we take Windows 7 for example. Please type:
List volume
Select volume # (# is the number of the volume you want to assign a letter to)
Assign letter=X (X is the letter you want to assign for the inaccessible volume, and it can be any unused letter)
Exit
After doing this, you might be able to visit this partition.
However, sometimes the inaccessible volume does not appear in the volume list of diskpart or you are unable to assign it a letter in Diskpart. At this time, please try our second solution.
Solution 2. Assign Letter with MiniTool Partition Wizard
MiniTool Partition Wizard is a tool that can help Windows users complete both basic and advanced partitioning operations, such as create partition, format partition, assign/change drive letter, resize partition, convert file system between FAT32 and NTFS, and change partition style between MBR and GPT. For more functions, please see Free Partition Manager.
To assign a letter to fix Disk Management console view is not-to-update error, please download this partition magic at first, which is free for Windows non-server users.
MiniTool Partition Wizard FreeClick to Download100%Clean & Safe
Then, launch the program to get its main window.
Next, select the partition which does not have a drive letter, and choose Change Drive Letter function from the left side.
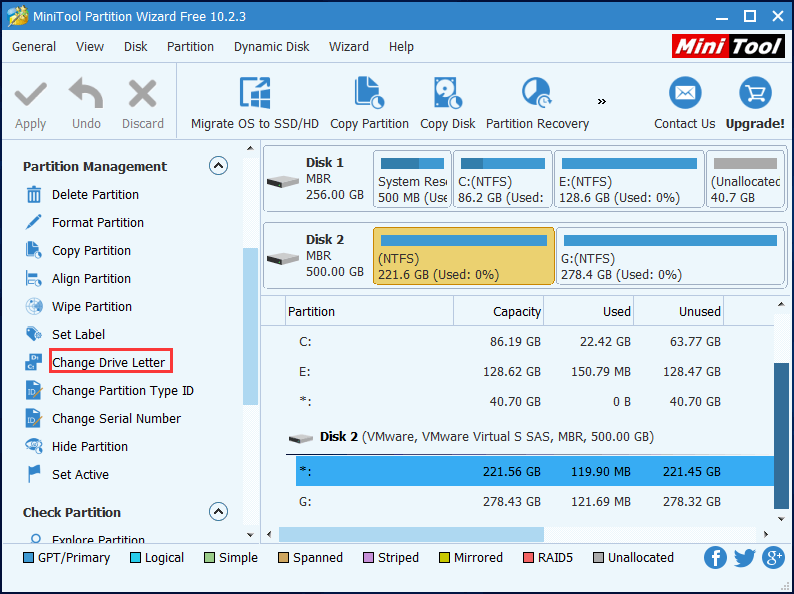
Then, choose a letter for the partition and click “OK“.
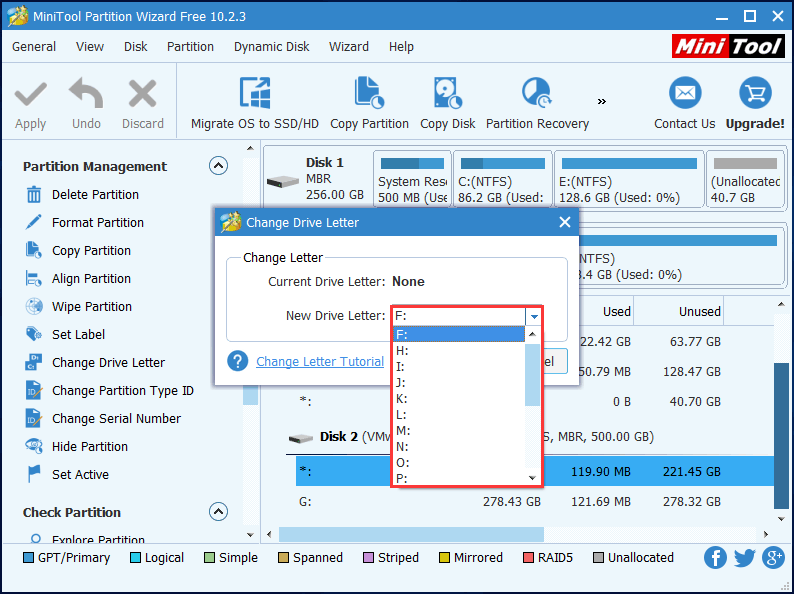
At last, click the “Apply” button to make the change performed.
However, if Partition Wizard fails to solve the Disk Management console view not updated issue, try the third method.
Solution 3. Recover Inaccessible Partition with MiniTool Partition Wizard
Virus attack or mistaken operation may damage partition table, which could make corresponding partition(s) inaccessible. So, you can try rebuilding partition table to see whether this method works for your situation. And the key reason for recommending this method is that lots of people said it helped them get the partition as well as all important files back.
You might be interested in the post How to Fix: Partition Disappears in Windows 10 Anniversary Update.
By the way, this method is harmless, so you can try it without worrying about data loss.
“Partition Recovery” feature is not available in the Free Edition. To use this function, you should get the Professional Edition if you are a non-server user.
Then, let’s start recovering.
Step 1. Install this software on your computer.
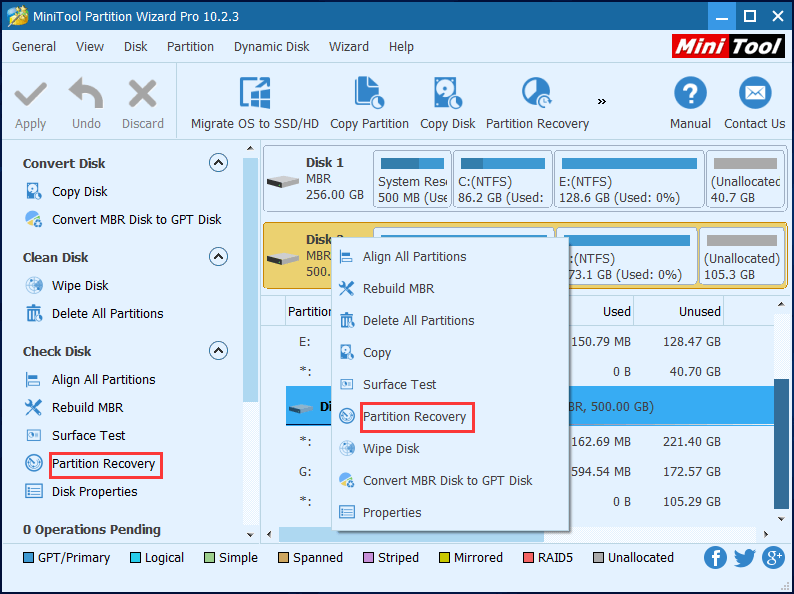
Step 2. Launch this software and register it. Then, you will enter the following interface. Right-click the disk where the inaccessible partition resides and choose “Partition Recovery” feature to start to fix Disk Management console view not-to-update issue.
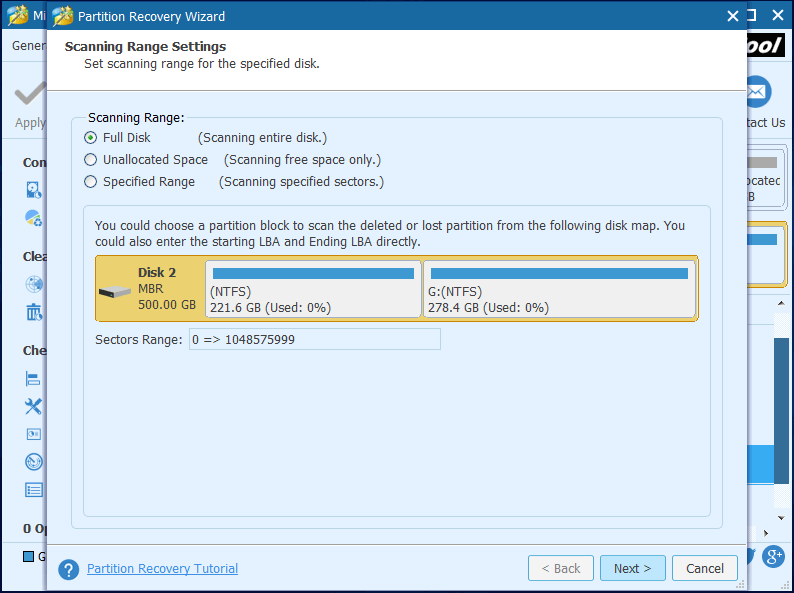
Step 3. Set scanning range for the selected disk. Here, we suggest choosing Full Disk. Then, click “Next” to continue.
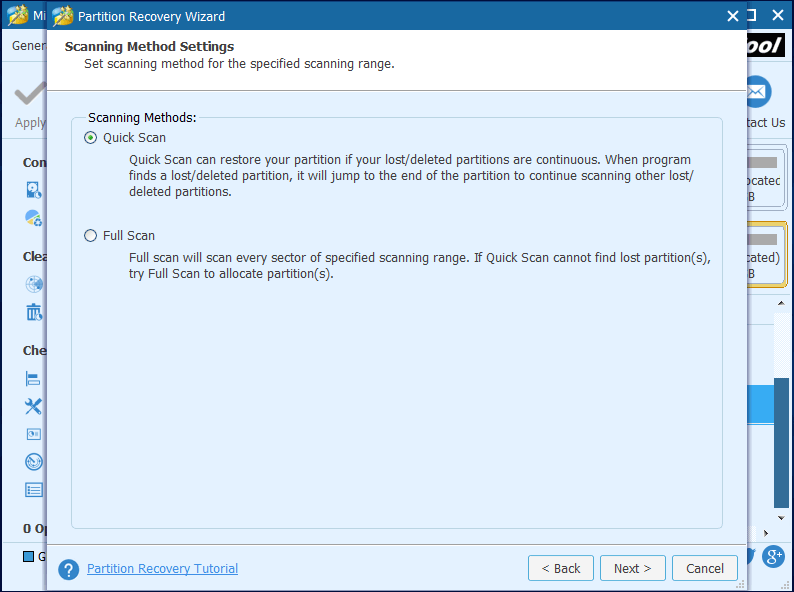
Step 4. Set scanning method for the selected scanning range and click “Next“. Firstly, you can choose Quick Scan, which is much faster. But if this scanning method fails to find the desired partition, go back and choose Full Scan.
Step 5. Check all needed partitions, both existing ones and lost/deleted ones, and click on “Finish” button.

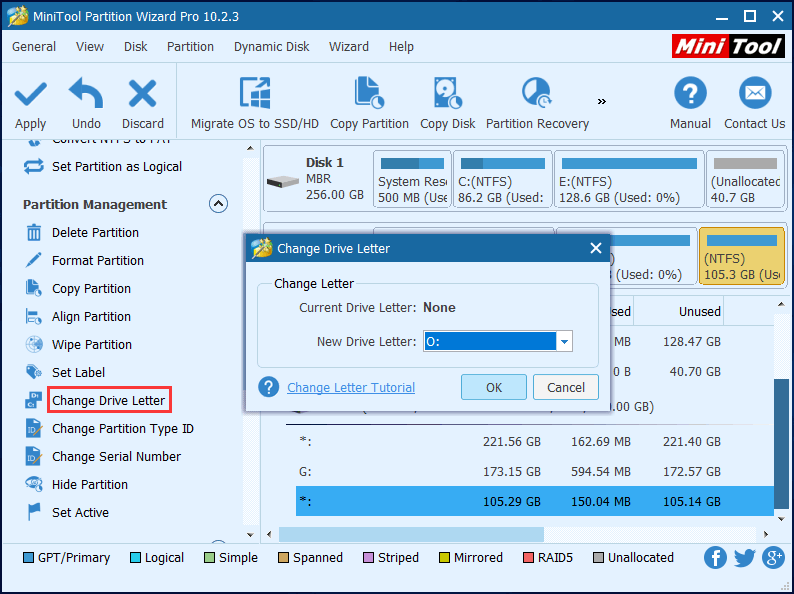
Step 6. Select the recovered partition, choose “Change Drive Letter” feature from the left action pane, and assign a letter for this recovered partition.
Step 7. Click the “Apply” button in the top left corner to make all changes performed.
Now, you should be able to access the partition as well as its data.
Nevertheless, if this method also fails to work to solve the “Disk Management console view is not up-to-date”, try the third solution.
Solution 4. Transfer Important Files out, Delete and Recreate Partition
Many users said their partition is inaccessible only on a specific computer but works well on other machines. So, if your inaccessible partition resides on an external hard disk (not removable devices), just connect the disk to another computer to see whether the partition is accessible.
If yes, transfer data out, and then delete the inaccessible partition. If you are not allowed to delete, try cleaning and formatting disk in diskpart.
However, if the partition is located on internal disk or also inaccessible on other computers, you need to use third party tools to transfer data out. Steps are as follows.
Firstly, you need to download and install MiniTool Power Data Recovery on your computer. Here, you can try its Trial Edition to check whether the needed files can be found. If yes, upgrade to its Personal Deluxe Edition.
MiniTool Power Data Recovery TrialClick to Download100%Clean & Safe
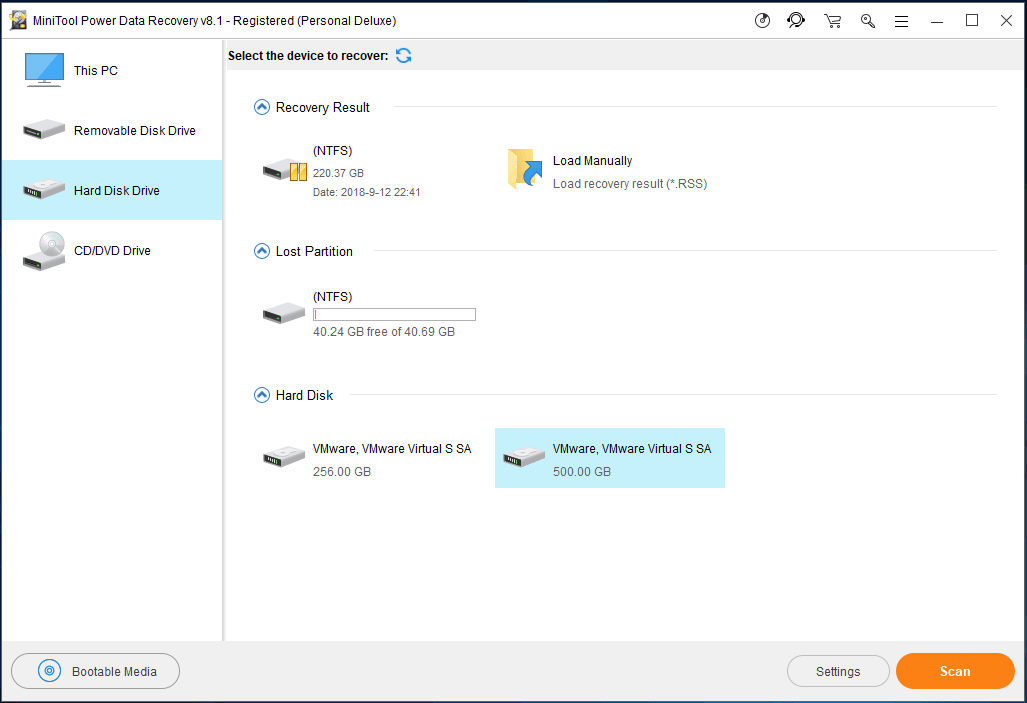
Step 1: Start the program to get its main window where you can choose “Hard Disk Drive” module. And then, select the target disk where the inaccessible partition resides and click Scan to continue.
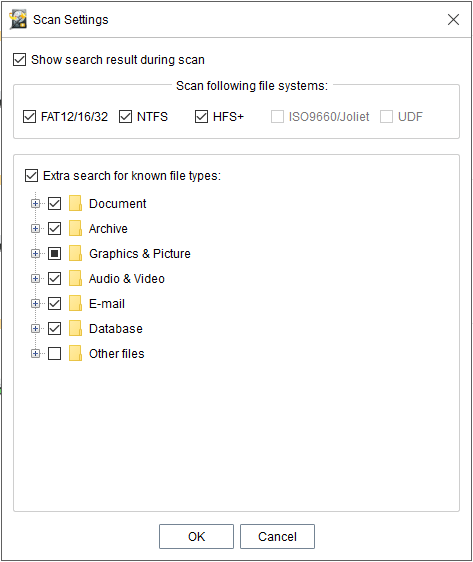
Here, you can uncheck FAT12/16/32 and HFS+ if the inaccessible partition was originally an NTFS partition, as well as remove check marks from file types not related to your issue.
Step 2: Then, this software is scanning the target disk.
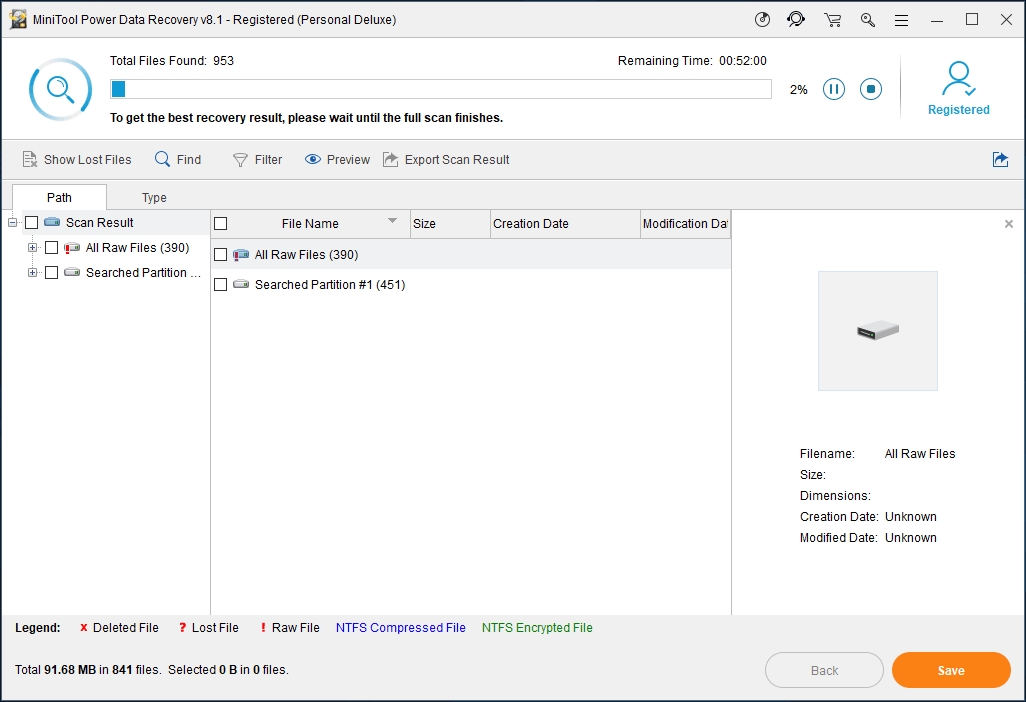
Step 3: After a successful scan, MiniTool Power Data Recovery will show all partitions it found as well as files saved in those partitions.
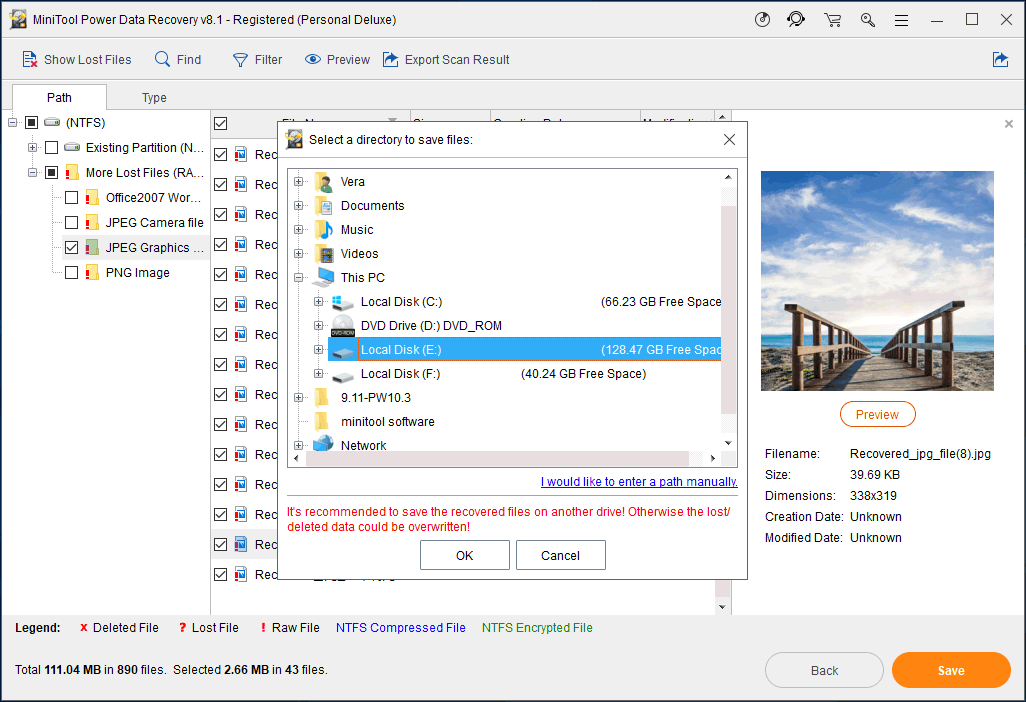
At this time, you can only need to look for files you want, then give them check marks, and finally save them to another storage device.
However, if you fail to find the partition and data via this function, go back to the main interface of the program and choose “This PC” to have a try.
Once important data are transferred out, you can delete the partition in either Disk Management or Diskpart without worrying data loss.
Alternatively, you can choose to uninstall the partition in Device Manager. Maybe, this can fix your issue, but we can’t guarantee.
In addition, someone suggests updating Windows since this helped him fix his “Disk Management console view is not up-to-date” error. And you can have a try if all 3 solutions above are useless. For steps to update Windows, you can refer to the post How to Get an Update through Windows Update.
However, if all above are not applied to your situation, keep reading.
Uninstall Inaccessible Partition If the Partition Is Newly Created
If power loss appears shortly after you create a new partition in Disk Management or Diskpart, this partition is very likely to be inaccessible. When modifying this partition, you may receive “Disk Management console view is not up-to-date” error. That is because the configuration information for the new partition was not written to disk by the time the power loss occurred.
To fix this issue, you need to take the following steps:
Step 1. Right click the Computer icon on the desktop, and choose Device Manager from the popup menu. Of course, there are other ways to enter Device Manager, like type devmgmt.msc in Search box or Runbox.
Step 2. Look for unknown devices in the window of Device Manager. If not finding such a device, go to Viewtab and choose Show hidden devices. If you are still unable to find an unknown device after the 2 attempts, look for Storage Volumes item, and expand it. If there is also no Storage Volumes, look for Other devices and expand it.
Step 3. Right click the unknown device, tap Uninstall, and confirm operation.
Step 4. Restart your computer if you are prompted to do so. However, if you are not asked to reboot computer, just right click any item here and choose Scan for hardware changes. Once the restart or scan is completed, you’ll be able to access this partition.
Uninstall the Partition If the Error Appears When You Are Creating Partition
If power loss or system crash occurs shortly after creating a partition, this partition is very likely to be inaccessible. In Disk Management, you are not allowed to do any operation on it except deleting.
When you recreate a partition here, Disk Management gives the error “The operation failed to complete because the Disk Management console view is not up-to-date. Refresh the view by using the refresh task. If the problem persists close the Disk Management console, then restart Disk Management or restart the computer”, after hanging for some time.
Even if the partition is recreated finally, it is also inaccessible. That is because some registry entries for the newly created volume device haven’t been written to disk
To fix this issue, please enter Device Manager by referring to the above solution, look for unknown device, right click it, and choose Uninstall. After successful uninstalling, delete or format the partition in Disk Management or Diskpart.
Try These 3 Ways If the Error Appears When You Are Modifying USB Drive
Uninstall the unknown USB device in Device Manager.
As to uninstalling a device or partition, we have introduced in the above part. So here we do not show specific operations.
Uninstall the USB driver in Device Manager.
Some people fixed the issue by going to Device Manager and uninstalling the USB driver. When they plugged the USB drive back, Windows reinstalled the driver, and their USB device worked. For details, please see the post Disk Management Console view is not up-to-date in Windows forum.
Transfer data out and then delete partition of the USB device.
In Solution 3, we have introduced how to transfer data out from inaccessible partition as well as delete partition and clean disk, but there is still another thing we should mention: how to delete partition on removable device.
As we know, Disk Management does not allow users to delete partitions from removable device, so we suggest using MiniTool Partition Wizard Free edition to do the deleting.
MiniTool Partition Wizard FreeClick to Download100%Clean & Safe
After running Partition Wizard successfully, we can see all disks and partitions, both internal and external. To delete partition of removable device, please select the partition and choose “Delete Partition” feature from the left side, and then tap on “Apply” button to make this change finally executed. After that, you can recreate partition on removable device.
Bottom Line
Are you facing the Disk Management console view not updated issue when formatting, assigning a drive letter or creating a partition? If yes, try our solutions which may fix your issue.
If one of the solutions solved your problem, please give us feedback in Comments part or send an email to [email protected], which could be helpful for others. On the contrary, if all our solutions failed to work for your situation but the problem is finally solved using another solution, please share it with us. Much appreciated!
About The Author

Position: Columnist
Stella has been working in MiniTool Software as an English Editor for more than 8 years. Her articles mainly cover the fields of data recovery including storage media data recovery, phone data recovery, and photo recovery, videos download, partition management, and video & audio format conversions.
User Comments :