What Is the Lenovo Boot Menu?
The Lenovo boot menu is a firmware-level interface that appears during the initial startup process of a Lenovo computer.
It allows you to choose which device (such as a USB drive, DVD, or hard drive) your computer starts from. It’s like a gateway that gives you control over what gets loaded when you turn on your computer.
You might need to access the boot menu in several situations:
- Boot from a USB drive or DVD: If you want to boot your computer from a USB drive or DVD instead of a traditional hard drive, you can use the boot menu to select the desired boot device. This is often for reinstalling Windows, Linux, or other operating systems.
- Multi-boot: If you want to switch between multiple operating systems installed on your computer, you can use the boot menu.
- Network boot: If your organization uses a network boot service, the boot menu can enable network boot, allowing you to load an operating system from a network server.
Further reading: What’s the difference between Boot Menu and Boot Sequence?
The boot menu is a separate, accessible menu that can be summoned during the initial startup phase by pressing a specific key (commonly F12, F11, or Esc, depending on the manufacturer).
The boot sequence (or boot order) is a permanent setting (accessed via a different key, usually F2 or Del) configured within the computer’s BIOS or UEFI firmware. It is a prioritized list of devices (e.g., hard drive, USB drive, DVD-ROM, network) that the computer attempts to boot from in the specified order every time it starts up.
How to Access Boot Menu on Lenovo Computer?
To access the boot menu on a Lenovo computer, you can press keys like F12, F2, or use the Novo Button during startup, depending on your specific Lenovo model.
While the primary key for the Lenovo laptop boot menu is generally F12, some models require different keys like F11, F8, or even a dedicated Novo button.
- Lenovo ThinkPad: F12 (Fn + F12) or Enter
- Lenovo IdeaPad: Novo button or F12 (Fn + F12)
- Lenovo Yoga: F12 or Novo button
- Lenovo Legion: F12 or Enter
- Lenovo desktops and all-in-ones: F12, F8, or F10
Method 1. Use the Lenovo Boot Menu Key
On the majority of Lenovo laptops and desktops, pressing the F12 key during startup brings up the Boot Menu. Here’s how to do it:
- Shut down your Lenovo computer completely.
- Press the Power button to turn it on.
- Immediately and repeatedly press the F12 key before the Lenovo logo disappears.
Once you’ve successfully accessed the Boot Menu, you’ll see a screen listing all detectable bootable devices. Common entries include:
- Removable Devices: External drives with bootable operating systems.
- Hard Drive: The primary storage device.
- CD-ROM Drive: Optical media such as Windows installation discs.
- Network boot from xxx: Used for booting from a network server, common in corporate environments.
Then use the arrow keys to navigate to your desired boot option, and press Enter to start from that device. The selection is temporary and will not affect future boots unless you modify the BIOS/UEFI settings.
Method 2. Use the Novo Button
Many Lenovo laptops, especially consumer and business models like the IdeaPad, Yoga, and Legion series, feature a Novo button.
The Novo button is a small circular physical button. It has an icon next to it that resembles an upside-down “U” or a backwards arrow.
This method is particularly useful if the F12 key does not work or if the keyboard is unresponsive during boot.
To use the Novo button, here are the steps:
- Turn off the Lenovo computer.
- Press and hold the Novo button for a few seconds. Release it when the Novo Button Menu appears.
- Use the arrow keys to select Boot Menu and press Enter.
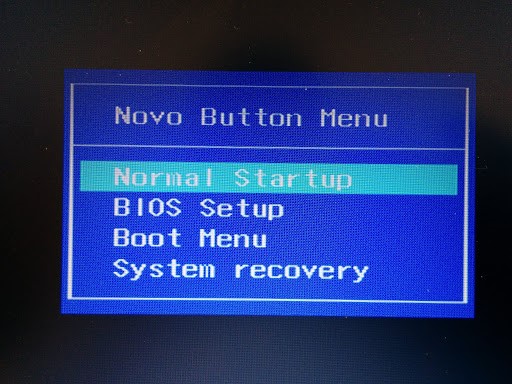
–image from Lenovo.com
How to Fix the Lenovo Boot Menu Key Not Working?
Despite following the correct steps, some users may encounter issues when accessing the Boot Menu. Is the F12 key or the Novo button not working? Try the different solutions below.
#1. F12 Key Not Working
If the F12 key fails to trigger the boot menu, the most common cause is Fast Boot being enabled, blocking recognition. The solution is as follows:
- Press the power button to start the device, and continuously press F2 to enter BIOS/UEFI Setup.
- In the BIOS interface, use the arrow keys to switch to the Boot tab, find the Fast Boot option, and set it to Disabled.
- Press F10 to save the settings and restart the device. Then press F12 again, and the boot menu can be triggered normally.
#2. Novo Button Not Responding
If the Novo button is not responding, it may be caused by a hardware issue, or the button is stuck.
Try the F12 key or access BIOS through Windows Advanced Startup.
#3. Boot Menu Not Appear
If the boot menu doesn’t appear after pressing a specific key or key combination, you can try the following methods:
- Ensure you press the correct key or key combination. Carefully consult your computer’s manual or search online to confirm the correct key to access the boot menu for your computer model.
- If you are using a USB keyboard, try using a different USB port, as some computers may only recognize specific ports during startup.
- Test your keyboard by connecting it to another computer or connecting another keyboard to your computer to see if it works properly.
If the above methods are ineffective, you can try accessing the boot order or boot settings directly through the BIOS or UEFI settings.
Further Reading:
- If the USB drive is not listed in the Boot Menu, it could be that the USB drive may not be properly formatted as bootable, or USB booting may be disabled. First, ensure the USB is created with a tool like Rufus or the Windows Media Creation Tool. Then, check BIOS/UEFI settings to confirm USB Boot is enabled.
- If the Boot Menu appears but no devices are listed, it may be caused by the fact that no bootable media was detected. Verify that the drive is connected and recognized in BIOS. Check cable connections (for desktops) or try a different USB port.
Bonus Tip: How to Boot Your Lenovo Computer from a Recovery USB?
When your Lenovo computer fails to boot, you need to use a recovery USB to boot.
A recovery USB drive is a type of bootable USB drive that contains tools to diagnose, repair, or reinstall a computer’s operating system when it fails to boot. They are essentially external, bootable storage devices created using built-in OS tools or third-party software.
The primary types are defined by their intended use:
- USB Recovery Drives: When your PC won’t boot, or you need to restore to factory settings with original drivers/software.
- OS Installation Media: When performing a clean install of Windows, upgrading to a newer version, or fixing corrupted system files.
- MiniTool Partition Wizard Bootable Media: When your main OS is unbootable, and you need advanced disk management, data recovery, or rebuilding MBR.
In the following part, the detailed steps are shown.
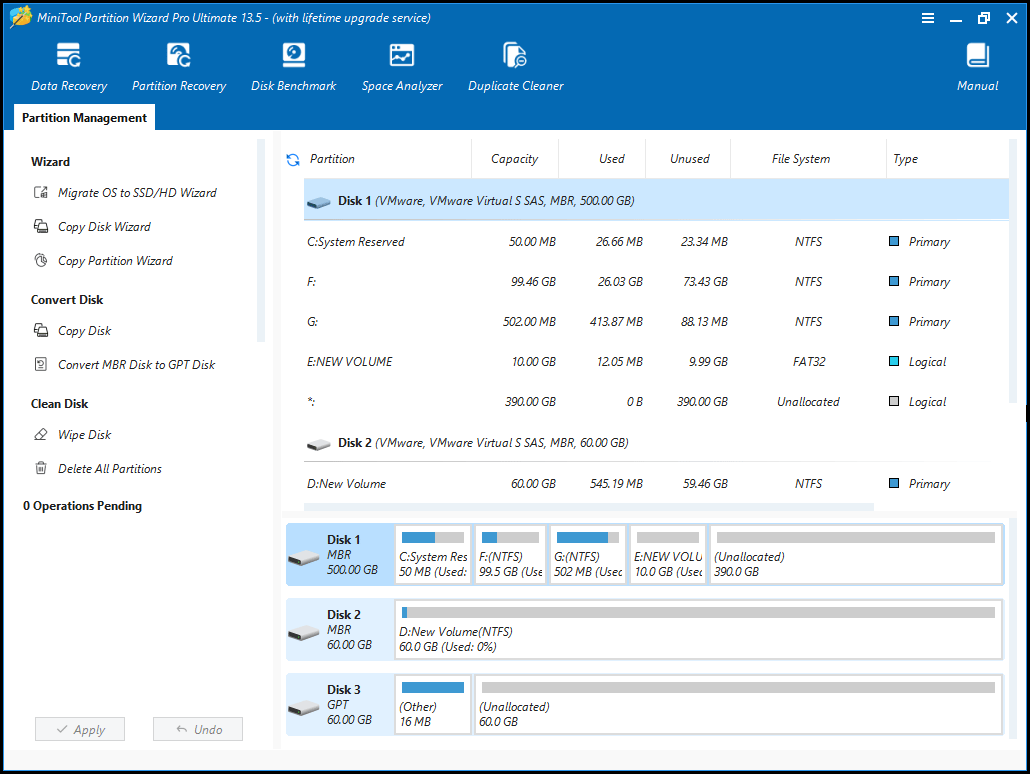
Method 1. Use MiniTool Partition Wizard Bootable Media
MiniTool Partition Wizard Bootable Media is a third-party program. It enables you to perform some specific tasks such as advanced data recovery, partition management, or rebuild MBR when the computer is not bootable.
To use MiniTool Partition Wizard when your PC won’t boot, create bootable media on another PC, then boot your problematic computer from it to access a Windows PE environment, allowing you to perform partition management like resizing, formatting, or fixing boot issues directly.
Here are the steps:
MiniTool Partition Wizard DemoClick to Download100%Clean & Safe
Step 1. Create the bootable media on a working computer.
- Download and install MiniTool Partition Wizard on a working computer.
- Plug your USB flash drive into the computer. Building bootable media will format your USB drive. So, you need to back up the USB drive data if there are important files.
- Launch this software and click the Bootable Media feature in the top right corner.
- Click Win-PE-based media with MiniTool plug-in.
- Select USB Flash Disk.
- Then click Yes to confirm.
- Wait patiently until the process ends and click Finish.
- Finally, eject the USB drive from the computer safely.

Step 2. Boot from the media on the unbootable computer.
- Plug the bootable USB drive into the problematic computer.
- Restart the computer and repeatedly press the F12 key to enter the Lenovo Boot Menu.
- Use the arrow keys to select the bootable USB drive and press Enter.
- Then your computer will load from the USB drive and enter the main interface of MiniTool Partition Wizard after a while.
Then, you can use MiniTool Partition Wizard to fix unbootable issues by rebuilding MBR, setting system partition as active, and performing a surface test. Because issues like corrupted MBR, inactive system partition, and other errors can cause the computer to be unbootable.
Method 2. Use a USB Recovery Drive
A USB recovery drive can be created using a computer’s built-in utility (like the Windows Recovery Drive utility).
It contains a bootable version of the OS’s recovery environment, original device drivers, and pre-installed software, allowing a user to troubleshoot problems or reset the system to its original factory condition.
Here are the detailed steps:
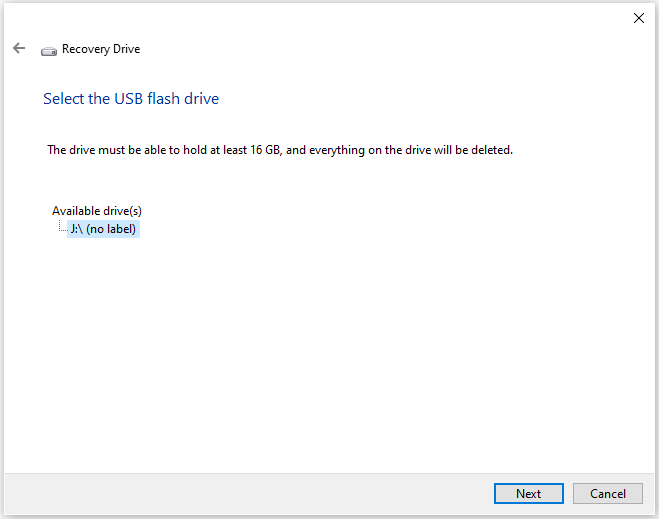
Step 1. Create a USB recovery drive on a working computer
- Connect the USB flash drive to a working Lenovo computer.
- Search for recovery drive and open it.
- Select the Back up system files to the recovery drive checkbox and click Next.
- Select the USB flash drive and click Next.
- Confirm the warning message. Then, click Create.
- The system will automatically create the recovery drive. Once the drive is created, click Finish.
- Unplug the USB drive from your computer.
Step 2. Use the USB recovery drive to refresh or reset a faulty Lenovo computer.
- Insert the USB recovery drive and then restart your computer. While restarting, continuously press and hold the F12 key.
- The Lenovo boot menu will then appear. Choose the USB drive from the boot menu.
- Then select Troubleshoot > Refresh PC or Reset PC, and then follow the on-screen instructions to complete the process.
Method 3. Use Windows Installation Media
Windows installation media is created using tools like the Microsoft Media Creation Tool or Rufus. It is used to perform a clean installation of an operating system or serve as a method to enter WinRE.
Here is how to install Windows using the Windows installation media:
Step 1. Create a Windows installation media on a working computer.
- Connect the USB drive to a working computer.
- Download the Windows 10 Media Creation Tool or Windows 11 Installation Assistant.
- Run the tool, accept the license terms, and select Create installation media (USB flash drive, DVD, or ISO file) for another PC.
- Select your language, edition, and architecture settings.
- Choose USB flash drive, select your inserted USB drive, and follow the prompts to create the installer.
Step 2. Install Windows on the problematic computer.
- Insert the created bootable USB drive into the computer that won’t boot.
- Turn on the PC and repeatedly press the F12 key to select the USB drive as the boot device.
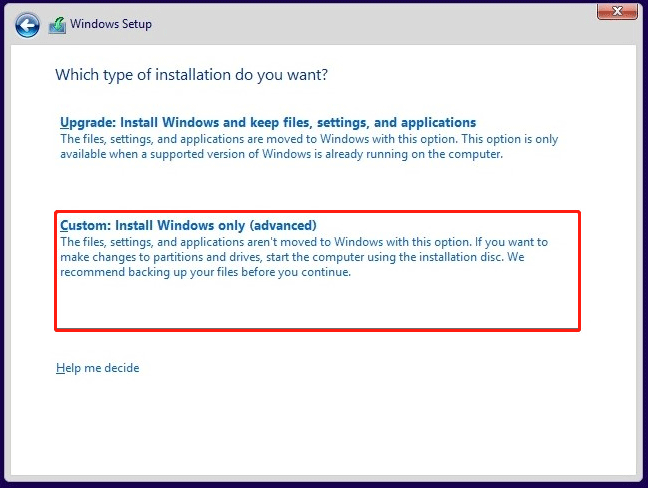
- On the Install Windows screen, select the language/region and click Next, then Install now.
- Click I don’t have a product key.
- Select Custom: Install Windows only (advanced) for a clean slate.
- Select each partition on your main drive and click Delete, then choose the Unallocated Space and click Next to install.
- Follow the on-screen prompts to finish the Windows setup (region, account, privacy).
Lenovo Boot Menu FAQ
It is often fixed by a hard reset, checking connections, reseating components, or using Lenovo diagnostics to reset BIOS/drivers or repair Windows.
Bottom Line
Lenovo boot menu is a powerful and user-friendly feature that empowers users to take control of their computer’s startup process. You can access it via the F12 key or the Novo button, and then boot from USB/DVD, or multi-boot.
If you have any questions or suggestions on how to use MiniTool Partition Wizard, do not hesitate to contact us via [email protected].
About The Author

Position: Columnist
Vega enjoys helping people with computer problems, including disk management, data recovery, and more. She is constantly expanding her knowledge in related fields. And she will continue to bring more easy-to-understand professional articles to help people solve various problems on the PC.
User Comments :