Nowadays, PC games embrace a large amount of popularity among gamers. Windows 10 has witnessed incremental improvement with many cool features requiring higher hardware specifications to run as intended. Therefore, follow this post from the MiniTool website to optimize Windows 10 for gaming for an enhanced gaming experience.
All the time, gamers have been seeking methods to make games run faster on computers. You should know that computer gaming performance has a bearing on the network, graphics card, CPU, memory, hard disk, and so on.
To get Windows 10 to run at its most efficient level is essential for its gaming performance. In the following part, you will find a comprehensive guide to improve gaming performance on Windows 10.
How to Optimize Windows 10 for Gaming Easily?
Option 1. Turn on Game Mode
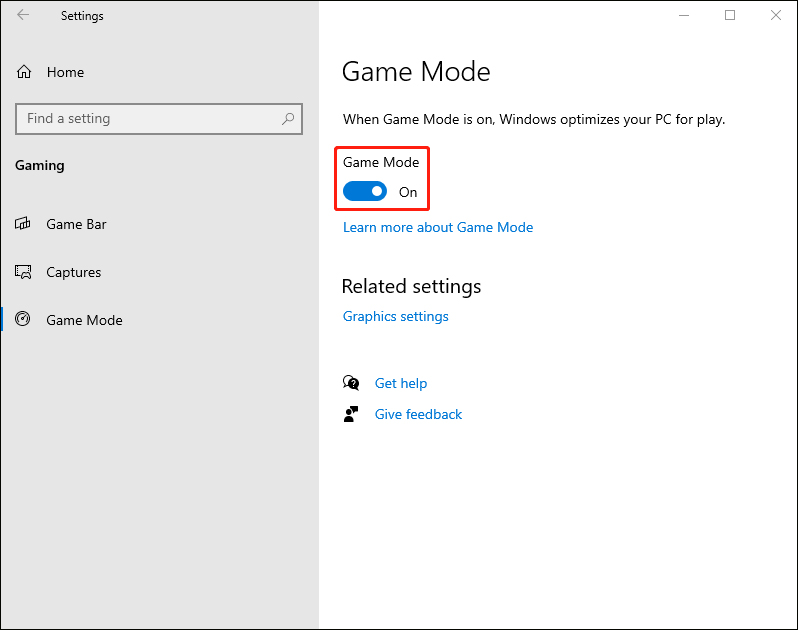
Windows 10 possesses a feature called Game Mode, which will automatically manage system resources for your game thereby giving you the best performance on your PC whenever you’re playing. Therefore, it is strongly recommended that turn on this feature to tweak Windows 10 for enhanced gaming performance. Follow the tutorial below.
Step 1: Open the Settings screen by pressing the Windows key and I key at the same time.
Step 2: Scroll down to navigate to the Gaming module.

Step 3: Select Game Mode in the left panel and switch on this feature.
Option 2. Turn off Game Bar
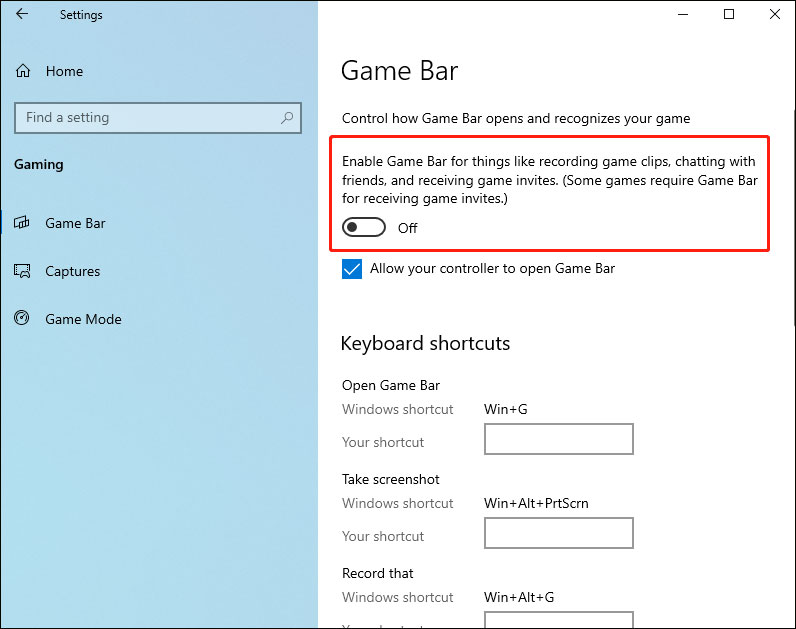
Game Bar is an in-built feature in Windows 10 that helps you capture screenshots, record your game plays, and more while you play. However, this feature will slow down the gaming performance if your PC isn’t very advanced. In this case, you are supposed to disable this feature to make Windows 10 faster for gaming. Just do a few steps as follows.
Step 1: Press the Windows and I keys simultaneously to open Settings.
Step 2: Select Gaming and following that hit Game Bar.
Step 3: Turn off the option that states “Enable Game Bar for things like recording game clips……”
Option 3. Minimize Unnecessary Background Apps
If there are many apps running in the background, your games may keep lagging in the foreground. So, it is recommended to switch off background services that use up your PC’s resources.
Step 1: Open the Settings screen.
Step 2: Scroll down to click on the Privacy module.
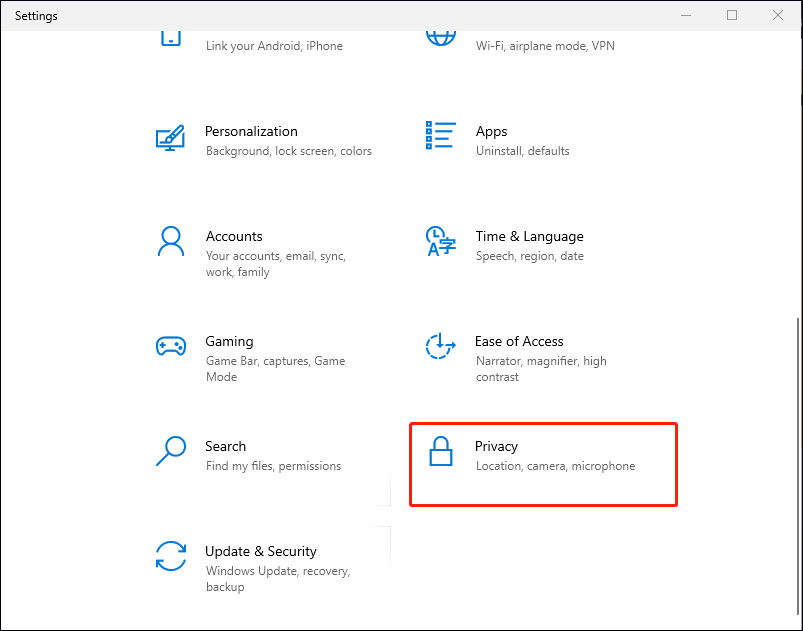
Step 3: Scroll down to select Background apps on the left panel.
Step 4: Switch off Let apps run in the background.
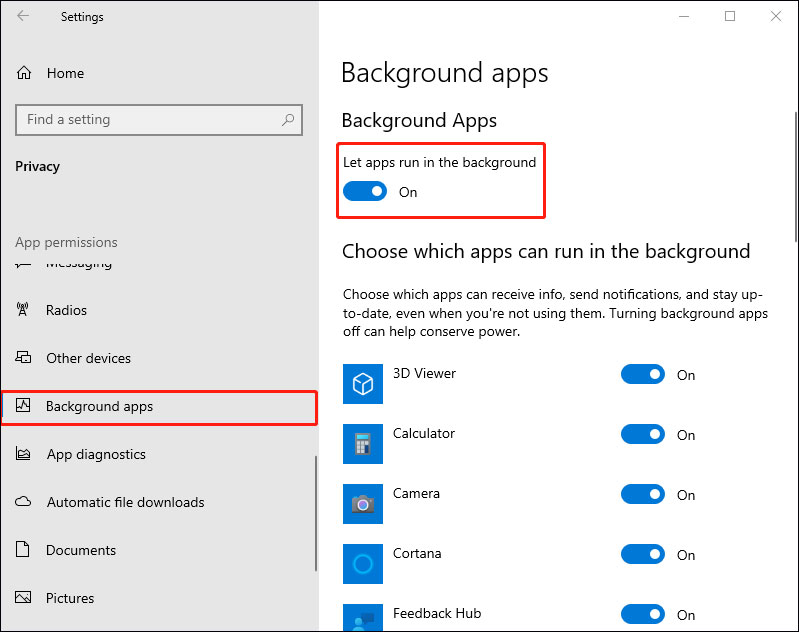
You can keep some main apps running in the background by switching on these individual apps.
If your background apps permissions feature is missing, you can read this post to find solutions: Background Apps Permissions Missing? Fix It Now.
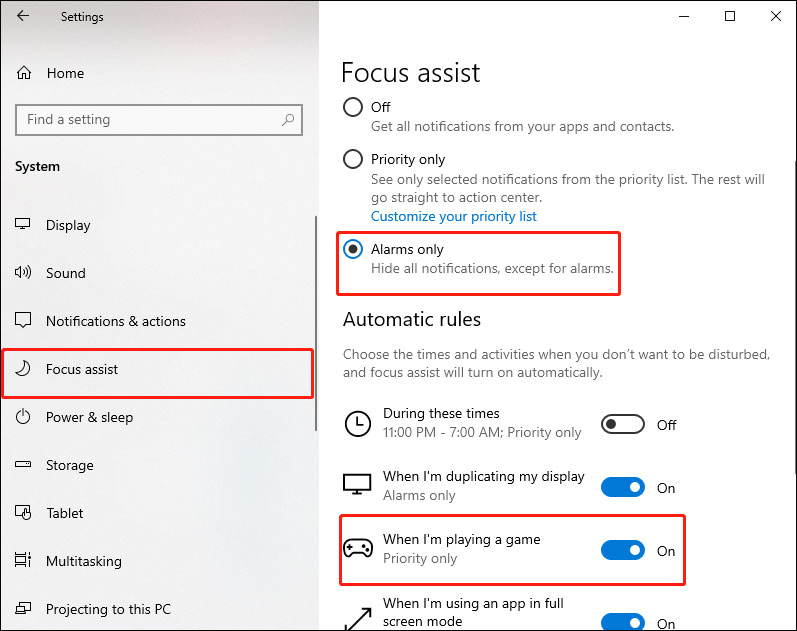
Option 4. Disable Notifications
The Focus Assist feature in Windows 10 allows you to customize how and when you receive notifications. Popups and chimes usually accompanying notifications can interrupt games, thus destroying your gaming experience immediately. It is so annoying that you should disable it to get Windows 10 PC optimized for gaming. Detailed steps are as follows.
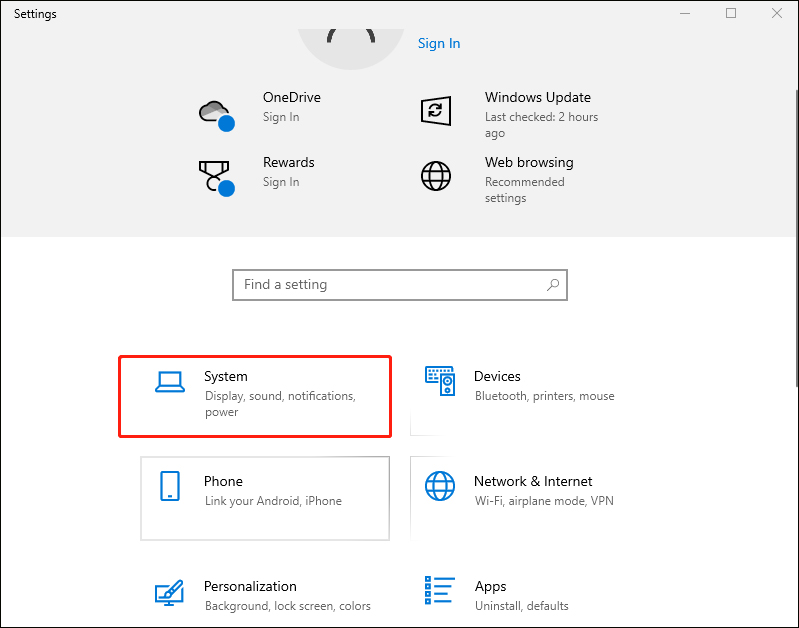
Step 1: Go to the Settings menu.
Step 2: Locate the System module.
Step 3: Select Focus assist in the left panel.
Step 4: In the popup page, turn on Alarms only to hide all other notifications and ensure When I’m playing a game is set to On.
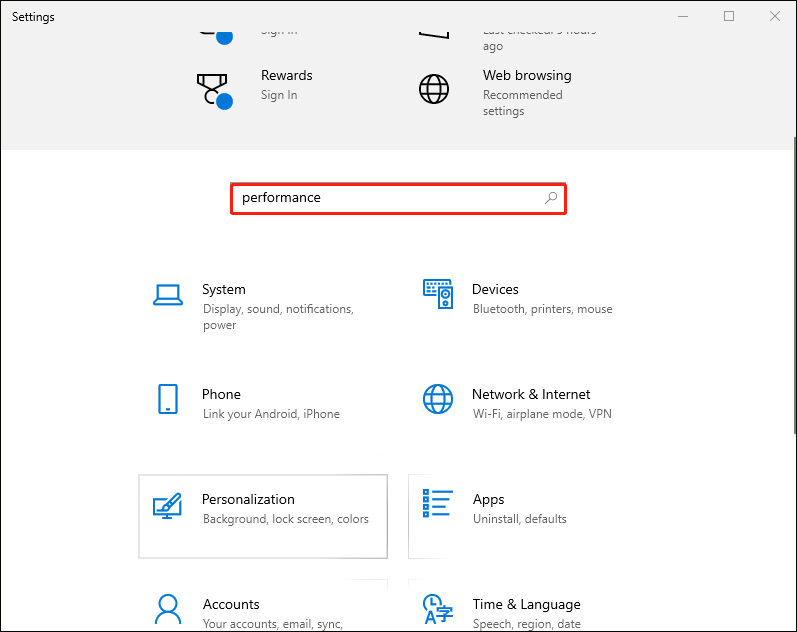
Option 5: Tweak Windows 10 Visual Effects
The GUI (Graphical User Interface) can be an obstacle to your current program. Many graphics are turned on in the background, thus causing conflict with the games running in the foreground. Therefore, tweaking this setting can improve gaming performance effectively. Follow the tutorial.
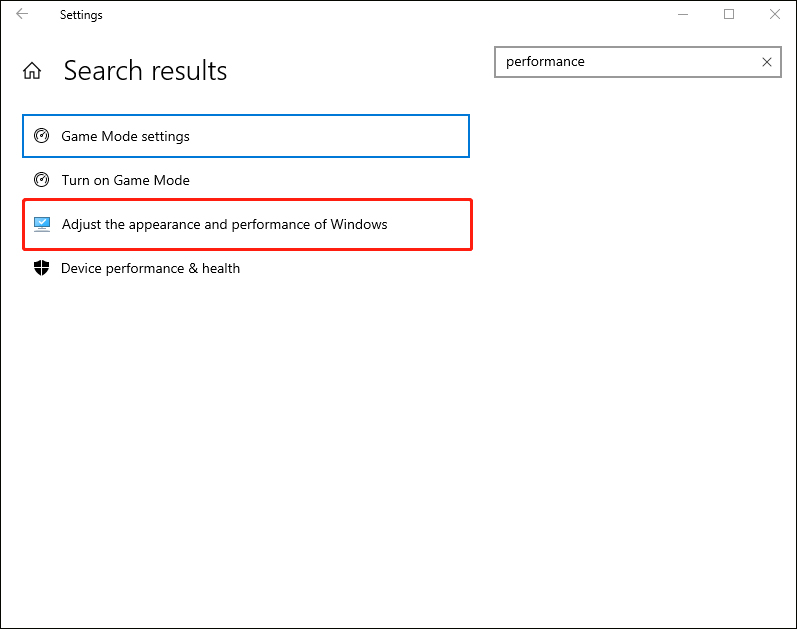
Step 1: Open Settings by pressing the Windows and I keys together and then type performance in the search bar.
Step 2: Head to Adjust the appearance and performance of Windows.
Step 3: Select Adjust for best performance in the pop-up window and following that click Apply.

Step 4: Switch to the Advanced tab and under the Adjust for best performance of: section select Programs.
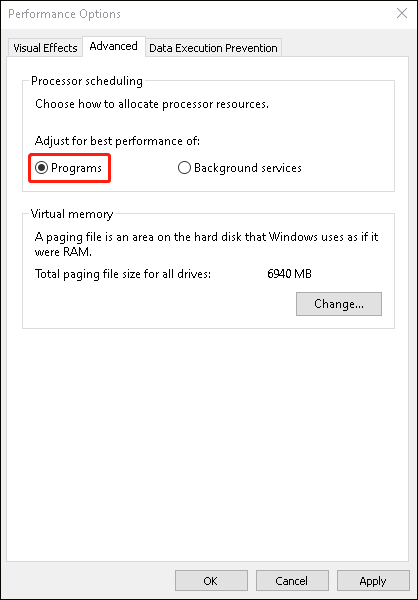
Step 5: Click Apply again, and then click on OK to confirm.
Option 6. Use a High-Performance Power Plan
Power options are designed to manage battery usage better on portable devices. Changing power plan may help you get Windows 10 PC optimized for gaming. Some gamers have already claimed that adjusting it for higher performance works. Then follow the tutorial.
Step 1: Open Settings on your PC.
Step 2: Select System to continue.
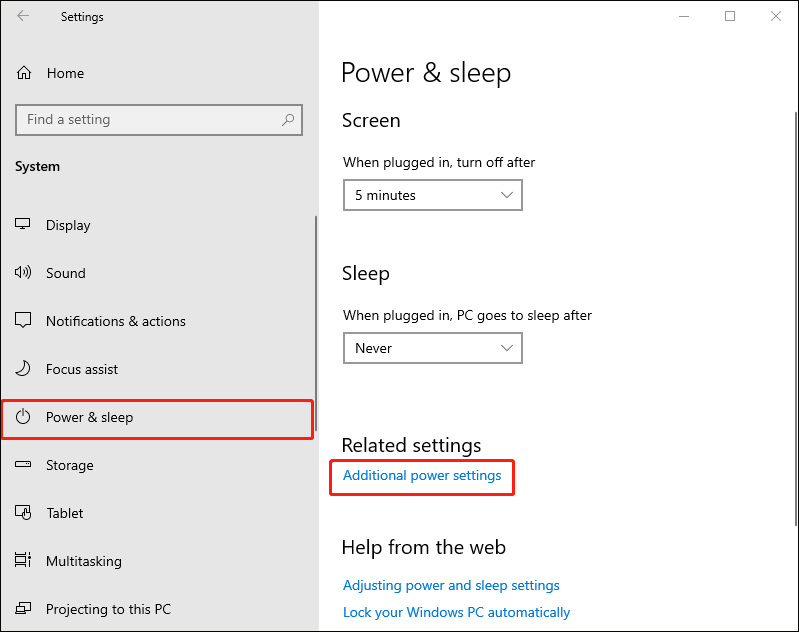
Step 3: Select the Power & sleep tab in the left panel, and then open the Additional power settings.
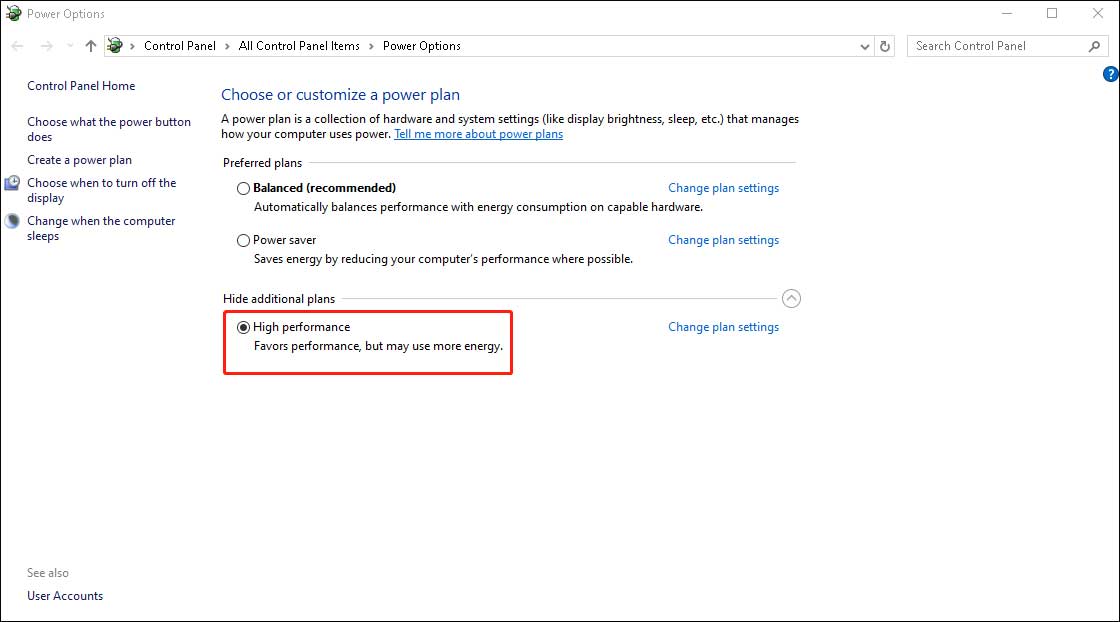
Step 4: In the Power Options window, unfold Hide additional plans and check the option High performance.

Option 7. Update GPU Drivers
GPU (Graphics Processing Unit) is the most crucial part of gameplay on your PC, needing the latest graphics driver to optimize the PC for better gaming performance. If your GPU driver is old, your game may not perform well and cause certain problems like bugs and system crashes. Therefore, to tweak Windows 10 for enhanced gaming performance, you are supposed to update the GPU driver. Follow the detailed tutorial.
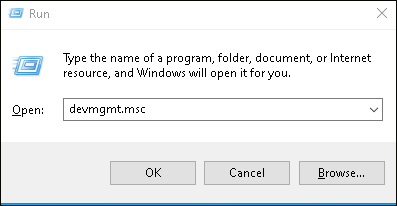
Step 1: Press Windows key and R key together to open the Run dialog.
Step 2: Type the command devmgmt.msc in the box and click OK to continue.
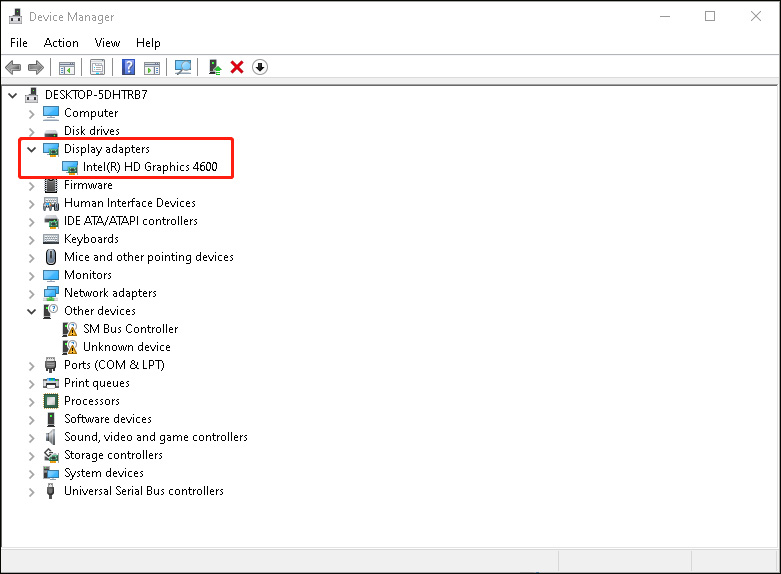
Step 3: After the Device Manager window pops up, locate and expand the Display adapter, and then select the driver on your computer.
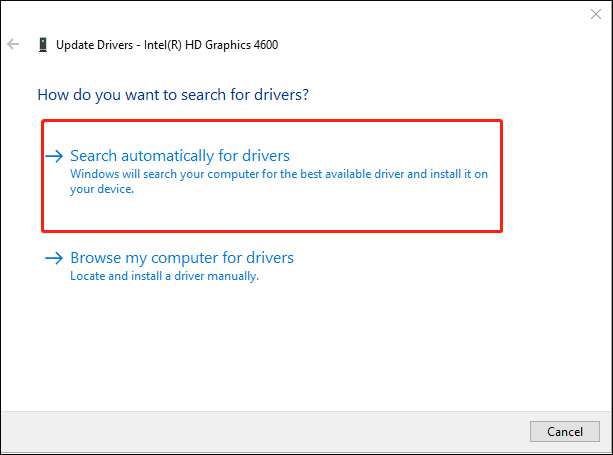
Step 4: Right-click on it and choose Update driver to continue.
Step 5: In the pop-up window, choose Search automatically for drivers and then follow the onscreen wizard to continue.
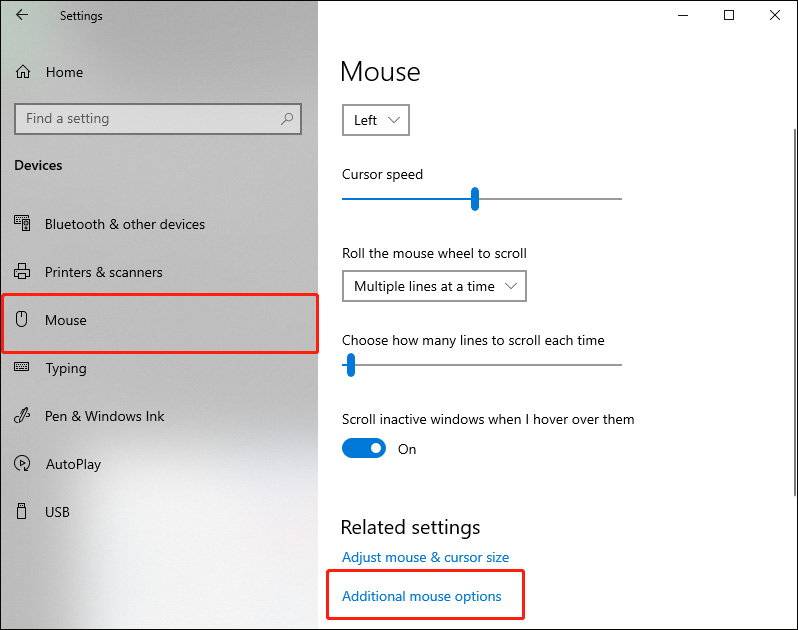
Option 8: Disable Mouse Acceleration
The mouse acceleration feature can change your cursor speed based on the speed you move your mouse. Tweaking your mouse settings to improve your mouse performance in games can be a great idea, thus optimizing Windows 10 for gaming. Here’s how you can do that:
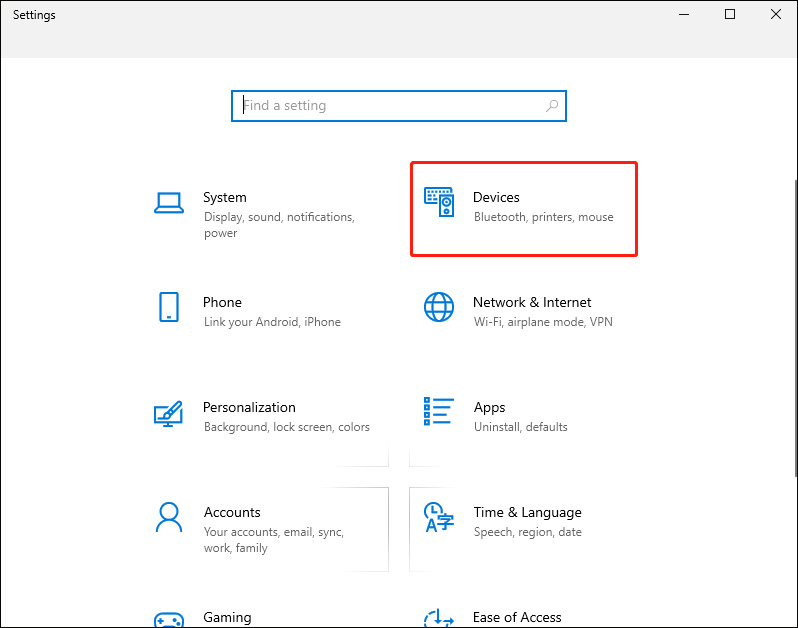
Step 1: Launch the Settings window on your computer.
Step 2: Click on Devices in the pop-up window.
Step 3: Locate the Mouse tab in the left panel, and click Additional mouse options.
Step 4: In the pop-up page, navigate to the Pointer Options and uncheck the option Enhance pointer precision.
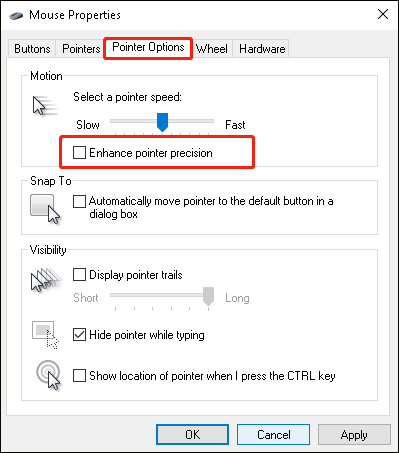
Step 5: Click Apply, and then click OK to confirm.
Option 9. Prevent Steam from Auto-Updating Games
It is most likely that PC gamers buy and install games via Steam. Its update feature is very annoying, which implements automatic updates across all your games. Updating in the background eats up the PC’s memory and limits the Internet speed, thus degrading the gaming performance. Therefore, you can try preventing Steam from updating games in the background:
Step 1: Go to your Steam account.
Step 2: Go to Steam > Settings > Downloads.
Step 3: Uncheck the Allow downloads during gameplay option. Then the game will not update during the gameplay process.
Option 10. Upgrade HDD to SSD
Windows 10 enjoys many satisfactory features, but running these features seamlessly requires more storage not just the minimum. So, you can upgrade your hardware to make your computer faster, for example, upgrading to an SSD or adding an external SSD.
Compared to HDDs, SSDs can increase operating system speeds. Apps can open faster and games load faster with the support of SSD. Consequently, you can choose to upgrade HDD to SSD or clone SSD to larger SSD to speed up your Windows 10.
To upgrade HDD to SSD without data loss, you need the help of a free clone software – MiniTool ShadowMaker, which enables you to clone OS from HDD to SSD without data loss. In addition to the clone function, it also has a powerful data backup function. Then you will be given a comprehensive guide on how to clone a hard drive using MiniTool ShadowMaker.
MiniTool ShadowMaker TrialClick to Download100%Clean & Safe
Step 1: Download and install the MiniTool ShadowMaker trial version or purchase an advanced edition if you need to clone a system disk.
Step 2: Connect the SSD to your computer, and launch this software, and click Keep Trial. The trial edition allows you to free use for 30 days.
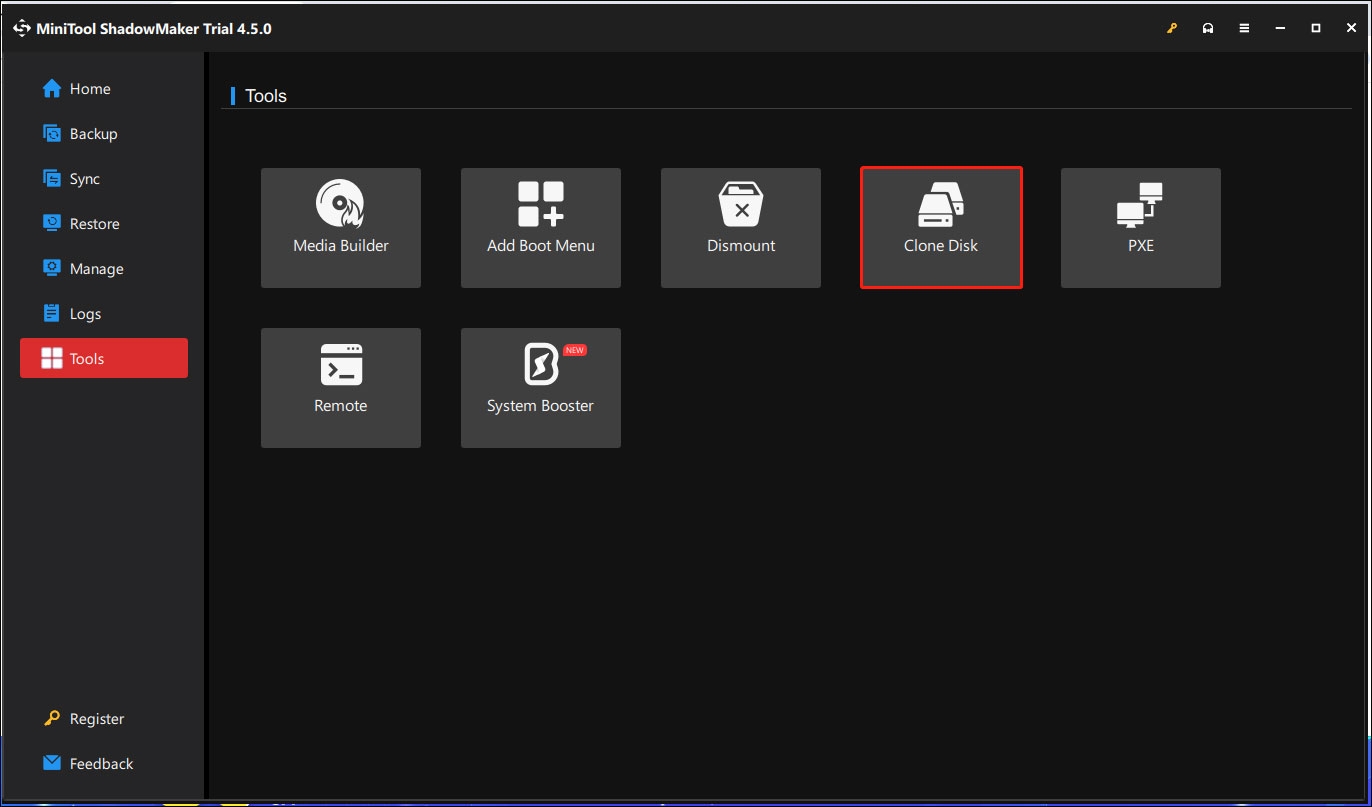
Step 3: After you access the main interface, navigate the Tool section from the left panel and then select the Clone Disk feature to continue.
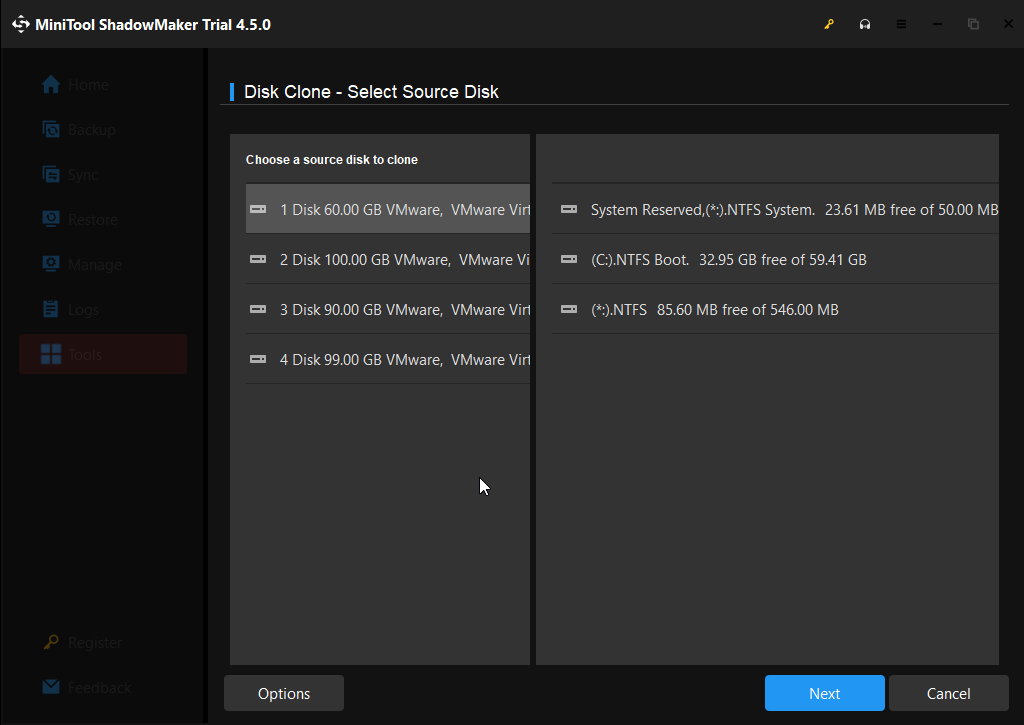
Step 4: In the new window, choose the clone source. Then click Next.
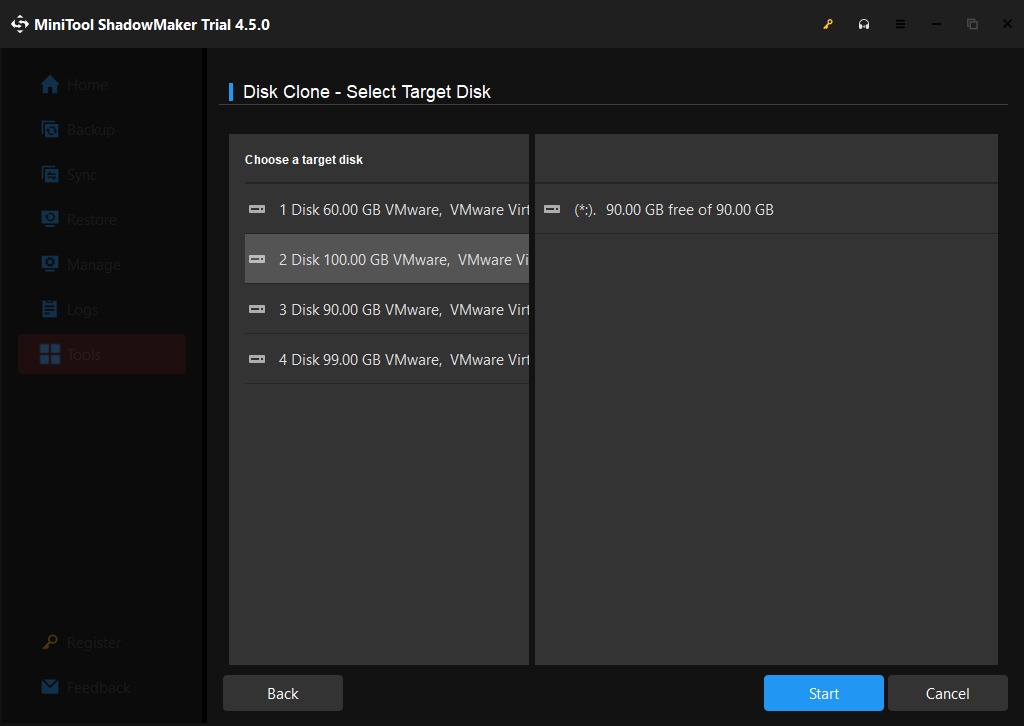
Step 5: Select your SSD as the target disk. Next, click Start. Then you will receive a warning message stating that your all data on the target storage drive will be destroyed during the disk cloning, just click OK to continue. As a reminder, if you choose the system disk, it will pop up a purchase screen.
Step 6: Wait patiently for the clone process to complete since it might take several minutes.
Summing up
Windows 10 can be a great delight for modern gamers. This article has explained several useful techniques for you to optimize Windows 10 for gaming, such as adjusting various available features like Game Mode and Focus Assist. You can rest assured of trying them.
If you have any problem with MiniTool software, please contact us with no hesitation via email [email protected] and we will reply you as soon as possible.
Optimize Windows 10 for Gaming FAQ
1. Upgrade your GPU and CPU.
2. Upgrade or install additional RAM.
3. Set Windows 10 in "Game Mode".
4. Check the game's graphics Settings.
5. Install the latest drivers for your graphics card.
1. Select the Start button and go to Settings. Choose Settings > System > Display.
2. If you have more than one monitor, select one that supports HDR at the top.
3. Turn on Use HDR, then select More options.
4. Turn on Auto HDR.
User Comments :