How to transfer files from Windows 10 to Windows 11 if you get a new Windows 11 PC? This is not an easy task but you can follow the 6 methods mentioned in this post on the MiniTool website to finish data migration from PC to PC. Go on reading to know some details.
It’s Important to Move Data from Windows 10 to Windows 11
After Windows 11 is released to the public, many users choose to upgrade Windows 10 to this new operating system to enjoy its brand new settings, taskbar, start menu, and user interface, and new & improved features. Before the update, you need to run a compatibility test to check if the PC is compatible with Windows 11 with the PC Health Check app.
If your computer cannot meet the minimum system requirements of Windows 11 and the PC is too old, you may choose to purchase a new PC that is compatible with the new OS. Most of the familiar files are on the old PC and you are unwilling to take a start from the head. You may wish to take all your files to the new PC.
This is possible for data migration from PC to PC. And it is the topic that we will talk about today. Let’s see how to transfer files from Windows 10 to Windows 11.
How to Transfer Data from Windows 10 to Windows 11
The ways to transfer Windows 10 files to Windows 11 are various, including using OneDrive, an external hard drive (copy & paste, file sync), PC to PC file transfer software, LAN cable, and USB cable. Now, let’s go to see the detailed operations.
How to Move Files via OneDrive
In Windows 10 and Windows 11, the system offers you OneDrive that can be used to transfer data from PC to PC.
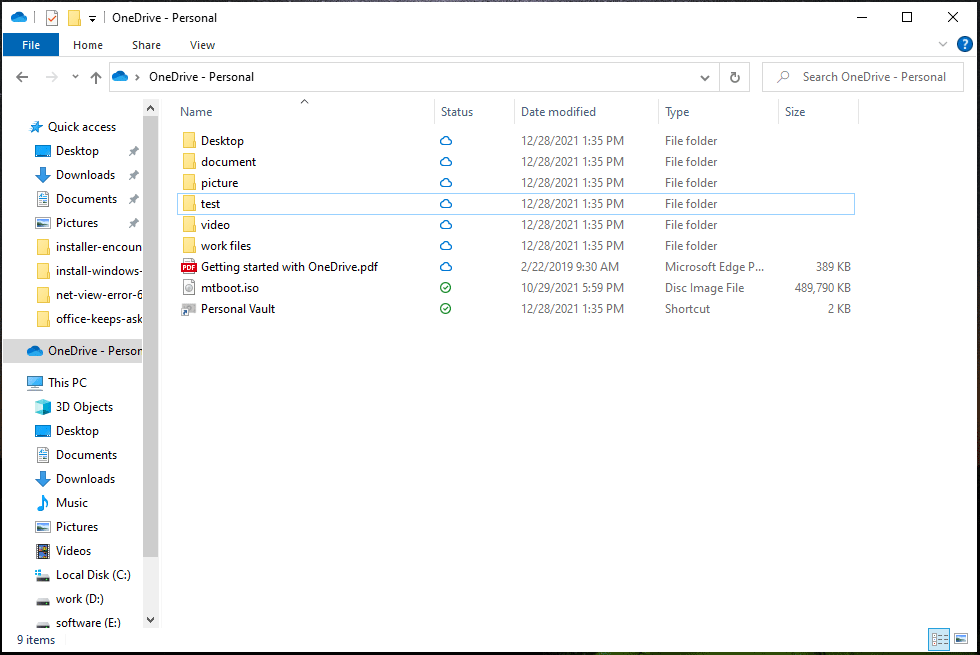
With OneDrive, you can back up the important folders on the current computer including Desktop, Documents, and Pictures online. If you use the same account to sign in OneDrive, you can transfer the data to all the devices.
That is, you can back up important files in Windows 10 and sign in to the same account on the Windows 11 PC, then all the files can be synced to Windows 11. Note that OneDrive only supports 5GB of free space. To get more space, you need to pay some money.
Here is how to transfer files from Windows 10 to Windows 11 via OneDrive:
Step 1: In Windows 10, search for OneDrive via the search bar. If you use it for the first time, you need to set up OneDrive using an email address and password.
Step 2: By default, OneDrive can automatically sync Desktop, Documents, and Pictures folder. If you want to transfer files outside of these folders, launch File Explorer and drag the files you want to sync to OneDrive.
Step 3: Open your Windows 11 PC, set up OneDrive, and sign in it with the same account. Then, you can access the OneDrive folder and view the files you have synced.
OneDrive is a useful way to transfer data from Windows 10 to Windows 11 but the limit is that you can only free sync 5GB of data.
Copy & Paste via an External Hard Drive or USB Drive
Using OneDrive for data transfer requires internet and if you don’t have internet but have an external hard drive or a big USB flash drive, you can still transfer files from PC to PC. And the way is to use the copy & paste feature.
Step 1: Connect your USB or external drive to the Windows 10 PC.
Step 2: In File Explorer, open a drive, and copy the items you want to transfer to Windows 11.
Step 3: Open your USB drive or external hard disk and paste the files you have copied.
Step 4: Disconnect the device from your Windows 10 PC and connect it to your Windows 11 PC.
Step 5: Go to File Explorer, open the external drive or USB drive, and copy & paste the data to the current computer.
This is an easy way to transfer data from Windows 10 to Windows 11. But, you need to transfer files twice, which is time-consuming and boring. If there are big files, the speed may be slow and the time is longer.
Move Files from Windows 10 to Windows 11 via File Sync
Besides copy & paste, you can perform data migration via file sync with MiniTool ShadowMaker. This file sync software is compatible with Windows 11/10/8/7 and supports multiple devices including a USB drive, external hard drive, NAS, and more. Its sync feature allows you to sync files and folders to the supported device.
To transfer files from Windows 10 to Windows 11, you can sync files to the external hard drive in Windows 10 and then go to the Windows 11 PC to locate the folder to access data.
Step 1: Download MiniTool ShadowMaker by clicking the following button.
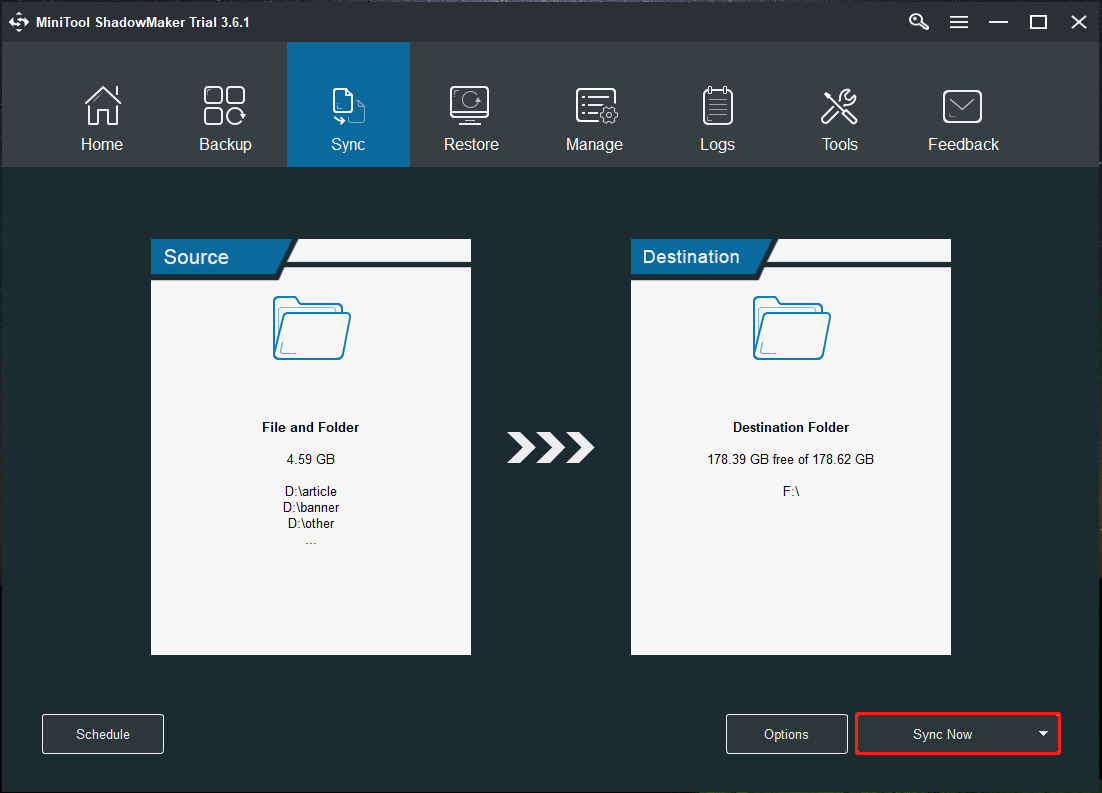
Step 2: Launch this sync software in Windows 10 and go to the Sync interface.
Step 3: Click Source to choose items that you want to transfer and click OK.
Step 4: Click Destination to choose your external hard drive or USB drive as the target path.
Step 5: Click Sync Now to start synchronization. This will take a few minutes.
After that, disconnect the drive from the Windows 10 PC and open your Windows 11 PC. Open the drive in File Explorer to locate the synced data and you can move them to the current PC.
Use PC to PC File Transfer Software for Data Migration
On the market, there are some PC to PC transfer software that can be used for Windows 11 easy transfer. Before Windows 10, the Windows Easy Transfer app developed by Microsoft can be used to transfer personal files and settings from a computer to another computer. But in Windows 10, this program is not available but Microsoft has partnered with Laplink to bring you PCmover.
PCmover is compatible with Windows 11/10/8/7 and you can use it to transfer settings, user profiles, files, and applications from an old PC to a new one at a fast transfer speed. And you are required to install PCmover and then follow the simple setup to begin transferring everything you select. Note that this software is paid and you need to go to Laplink to buy one.
The following are simple instructions about how to transfer data from Windows 10 to Windows 11 via PCmover. To know much information, refer to the PDF document.
Step 1: Run PCmover on both PCs including your Windows 10 and Windows 11 PC.
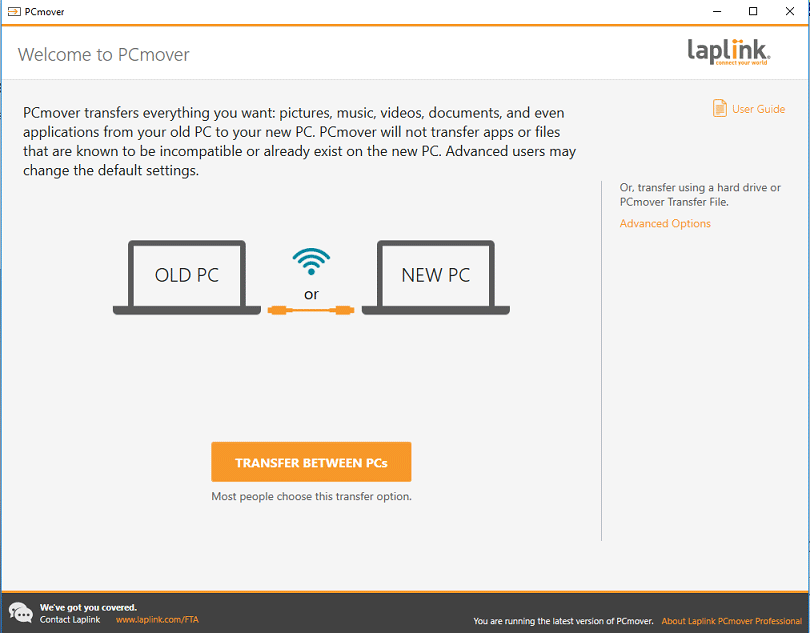
Step 2: Choose a proper way to connect your old and new PCs, for example, via a Wi-Fi or wired network.
Step 3: Go to the new PC to finish setting up the transfer and choose what to transfer.
Step 4: Start transfer. The transfer time may vary depending on the speed of hardware configuration, your connection, and other factors.
Transfer Files from PC to PC over Network (LAN)
If your PCs are in the same network, you can transfer Windows 10 files to Windows 11 via a LAN cable and a big shared folder. The operations are not easy and you should follow the steps below for data transfer.
Step 1: Use a LAN cable or Ethernet crossover cable to connect your two PCs.
Step 2: Enable Network Sharing on Both PCs for Data Transmission.
1. Go to search for control panel to open this app.
2. View the items by Category and click Network and Internet.
3. Click Network and Sharing Center.
4. Choose Change advanced sharing settings.
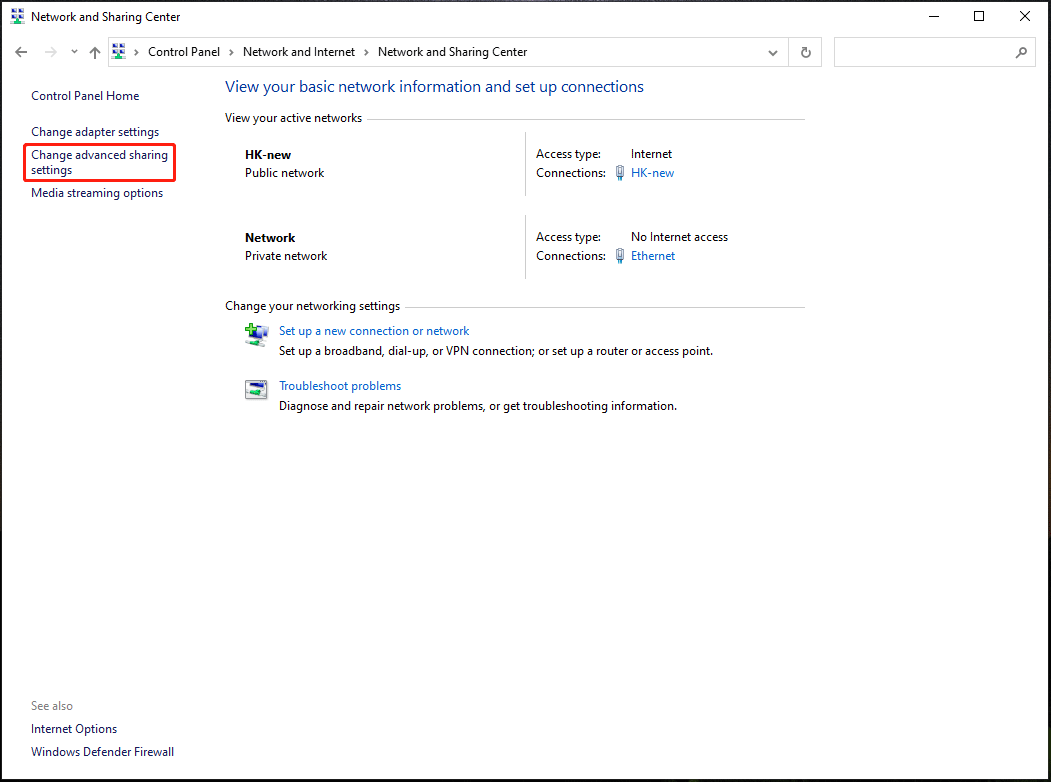
5. Expand All Networks, turn on public folder sharing and turn off password protected sharing.
Step 3: Set a Static IP Address
After enabling network sharing, it’s time to bring two computers onto the same network by setting a static IP address of the same class.
1. In the Network and Sharing Center interface, click the Ethernet link.
2. Click Properties in the new dialogue.
3. Choose Internet Protocol Version 4 (TCP/IPv4) and click Properties.
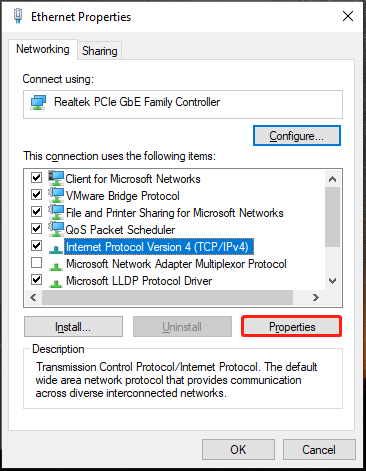
5. Configure the two PCs with different IP settings.
On PC 1, set the following values:
IP Address: 192.168.1.1
Subnet mask: 255.255.255.0
Default gateway: 192.168.1.2
On PC 2, set the following values:
IP address: 192.168.1.2
Subnet mask: 255.255.255.0
Default gateway: 192.168.1.1
After setting up everything, you can go to File Explorer and click Network, two PCs can be listed here.
Step 4: Share a Folder
1. Create a folder on the desktop and move all the files you want to transfer to Windows 11 to that folder.
2. Right-click on that folder and choose Give access to > Specific people.
3. Choose Everyone from the drop-down menu and click Add > Share.
After all the operations, you can go to your Windows 11 PC and open Network in File Explorer. Then, click another computer to see the folder you have shared.
How to Transfer Files from PC to PC Using USB Cable
In addition, there is another way for you to move data from Windows 10 to Windows 11 and that is to use a USB cable. It can save much time since you don’t need to use an external device to upload the data. And here are the detailed operations:
Step 1: Download and install the drivers offered by the manufacturer of the USB bridge cable on both PCs.
Step 2: Connect the USB cable to each USB port of the two PCs.
Step 3: Turn on your 2 PCs and let them recognize the USB cable. This can start an installation wizard.
Step 4: Choose USB Super link adapter for the installation.
Step 5: Select High-Speed Data Bridge.
Step 6: Open Device Manager, expand System devices and make sure the USB cable is listed as High-Speed USB Bridge Cable. The name of the cable may be different based on the vendors.
Step 7: Insert the installation disk that was provided with the package of the USB cable into your CD/DVD-ROM drive. Then, install the data transfer software. Do the same thing for the second PC.
Step 8: Launch this program on your two PCs and you can see a window – your computer will be shown on the left side and the new computer where you want to transfer the data will be shown on the right side.
Step 9: Open a drive and drag the folders & files you want to move and drop them to the desired location.
Bottom Line
These are all the common ways to transfer files from Windows 10 to Windows 11. Just try one for data transmission when there is a need. Of course, if you have any other ideas, you can tell us by leaving a comment in the following section.
About The Author

Position: Columnist
Vera has been working at the MiniTool Team for over 10 years as a technical editor and content writer. She mainly focuses on disk and partition management, data recovery, Windows backup and restore, and PC troubleshooting. Through in-depth software testing and hands-on experience, she has helped users solve a wide range of computer problems and better protect their data on Windows devices.
User Comments :