In order to keep your data safe, you can try to copy your files and folders to another location. Normally, we only press Ctrl + C to copy the files and then press Ctrl + V to paste the files to another location. But there is an advanced command that you can use to do that – XCOPY command.
Introduction to XCOPY Command
What is XCOPY command? In computing, XCOPY represents an extended copy, which was created as a more functional file copying tool compared with Copy command. XCOPY command is used to copy files or folders from one location to another location.
Besides, the XCOPY command can be used on IBM PC DOS, MS-DOS, IBM OS/2, Microsoft Windows, FreeDOS, ReactOS, and related operating systems. But there is a thing you need to know: the availability of certain XCOPY command switches and other XCOPY command syntax may vary by the operating system.
After getting some basic information about XCOPY command, then what are the advantages of the XCOPY command? The advantages of XCOPY command has been listed below:
- XCOPY command can copy directories.
- XCOPY command can exclude files based on file names or extensions.
- XCOPY will automatically delete the read-only attribute when copying files from the CDROM to the hard drive.
- XCOPY command can recursively copy all files including subdirectories and can copy the source directory structure as it is.
- XCOPY command can help identify updated files (based on archive attributes or based on the given expiration date), thus it is great for incremental backup needs.
Although XCOPY command is better than Copy command, it has some limitations:
- When the length of the path plus file name exceeds 254 characters and moves a large file without the “/J” option (only available after Server 2008R2), the XCOPY command fails and displays an “out of memory” error, which consumes all available RAM on the system.
- XCOPY cannot be used to back up real-time operating system volumes.
- XCOPY cannot copy open files.
XCOPY Command Options
You already know the advantages and disadvantages of the XCOPY command, and this part will list XCOPY command options for you. Before you run the XCOPY command, you need to make sure your source and destination.
The source is the files or top-level folder that you want to copy from, and it is the only required parameter in the XCOPY command.
The destination is where you want to save the source files or folders. If you don’t list the destination, then the files or folders will be copied to the same folder from which you run the XCOPY command.
Now let’s take a look at some common XCOPY command options.
- /A– Running this option will only copy archive files found in source and /a and /m cannot be used at the same time.
- /B – Running this option will copy the symbolic link itself instead of the link target. This command was first available in Windows Vista.
- /C– Running this option will force XCOPY to continue even though it meets an error.
- /D (:date)– Running this option and using a specific date in the MM-DD-YYYY format will copy files changed on or after that date. You can also perform this option without specifying a specific date to copy only files in the source that are newer than the files in the destination. This is useful when performing regular file backups using the XCOPY command.
- /E– When used alone or with /S, this option is the same as /S, but an empty folder that was also empty in the source will also be created in the destination. The /E option can also be used with the /T option to include empty directories and subdirectories found in the source in the directory structure created in the destination.
- /F– Running this option will show the full path and file name of both the source and destination files being copied.
- /G– Running this option can copy the encrypted file from the source to the destination that does not support encryption. When copying files from an EFS encrypted drive to a non-EFS encrypted drive, this option has no effect.
- /H– When this option is used, hidden files or system files are copied.
- /I– Running the option will force XCOPY to assume that the destination is a directory. If you do not use this option and you want to copy from a source that is a directory or file group and copy to a non-existent destination, the XCOPY command will prompt you to enter whether the destination is a file or a directory.
- /J– This option allows you to copy files without buffering, which is useful for large files. This XCOPY command option was first available in Windows 7.
- /K– When copying read-only files, you can keep file attributes in destination using this option.
- /N– This option uses short file names to create files and folders in the destination. This option is only available if you use the XCOPY command to copy the file to the destination on the drive, which is formatted with an older file system that does not support long file names (such as FAT).
- /O– Use this option to retain ownership and Access Control List (ACL) information in the files written in the destination.
- /S– In addition to the files in the source root directory, this option can also be used to copy directories, subdirectories and the files contained in them. Empty folders will not be recreated.
- /W– Copy only after you respond to the prompt to start copying (if this option is omitted, copying will start after you enter the XCOPY command and press Enter).
- /Y– Use this option to prevent the XCOPY command from prompting you to overwrite source files that already exist in the destination.
- /-Y– Use this option to force the XCOPY command to prompt you for information about overwriting files.
How to Copy Files and Folders Using XCOPY Command?
After knowing some XCOPY command options, now let’s see some Windows XCOPY command examples.
In order to move files and folders in Command Prompt, the most used XCOPY command syntax should be: XCOPY [source] [destination] [options]
Copy the File Using XCOPY Command
How to copy files using XCOPY command? Here is a quick guide:
Step 1: Press the Win + R keys at the same time to open the Run box.
Step 2: Type cmd in the box and then press Enter to open Command Prompt.
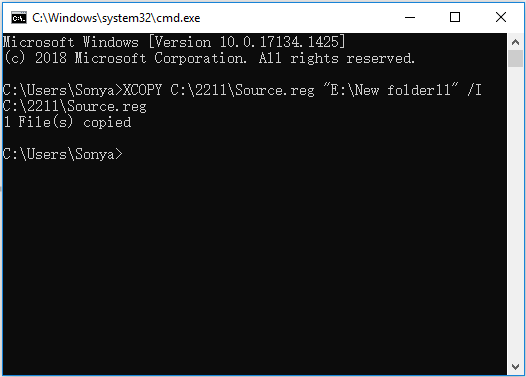
Step 3: Now, type the XCOPY command as follows to copy the file. For example, if you want to copy the “Source.reg” file from the “2211” folder of C drive to the “New folder11” folder of E drive, enter the XCOPY command as follows:
XCOPY C:\2211\Source.reg “E:\New folder11” /I
Copy a Folder Including All Subfolders Using XCOPY Command
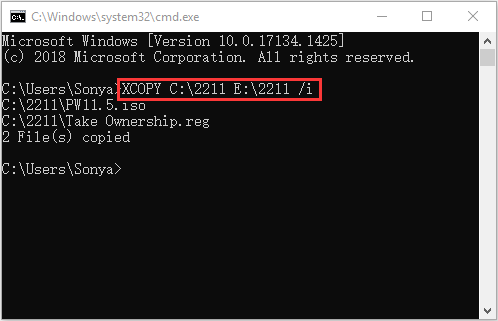
To copy a folder including all subfolders using the XCOPY command, you need to open Command Prompt at first. If you want to copy the “2211” folder on the C drive to the “\New folder11” folder of E drive, enter the XCOPY command as follows:
XCOPY C:\2211\* “E:\New folder11\2211” /S/I
XCOPY Command Alternative
As you can see, there are many different XCOPY commands. In most cases, you need to use multiple XCOPY command options at the same time. However, if the option isn’t used correctly, the XCOPY command may refuse to work, and even worse, you may lose files. Thus, you must be very careful when using the XCOPY command.
Besides, most of you may feel confused about the XCOPY command, so it is recommended you to use a third-party file sync tool – MiniTool ShadowMaker, which can also allow you to copy files and folders using Sync features.
To protect your data, MiniTool ShadowMaker allows you to sync files and folders regularly. Besides, it is a brilliant Windows backup utility, which allows you to back up files, folders, partitions, disks, and even the operating system.
What’s more, you can use the Clone Disk feature to create a bootable external hard drive. MiniTool ShadowMaker provides you a Trial Edition that allows a 30-day free trial for all backup features.
MiniTool ShadowMaker TrialClick to Download100%Clean & Safe
Now, follow the steps below to copy your files and folders using the Sync feature.
Step 1: Install and launch MiniTool ShadowMaker, then click Keep Trial.
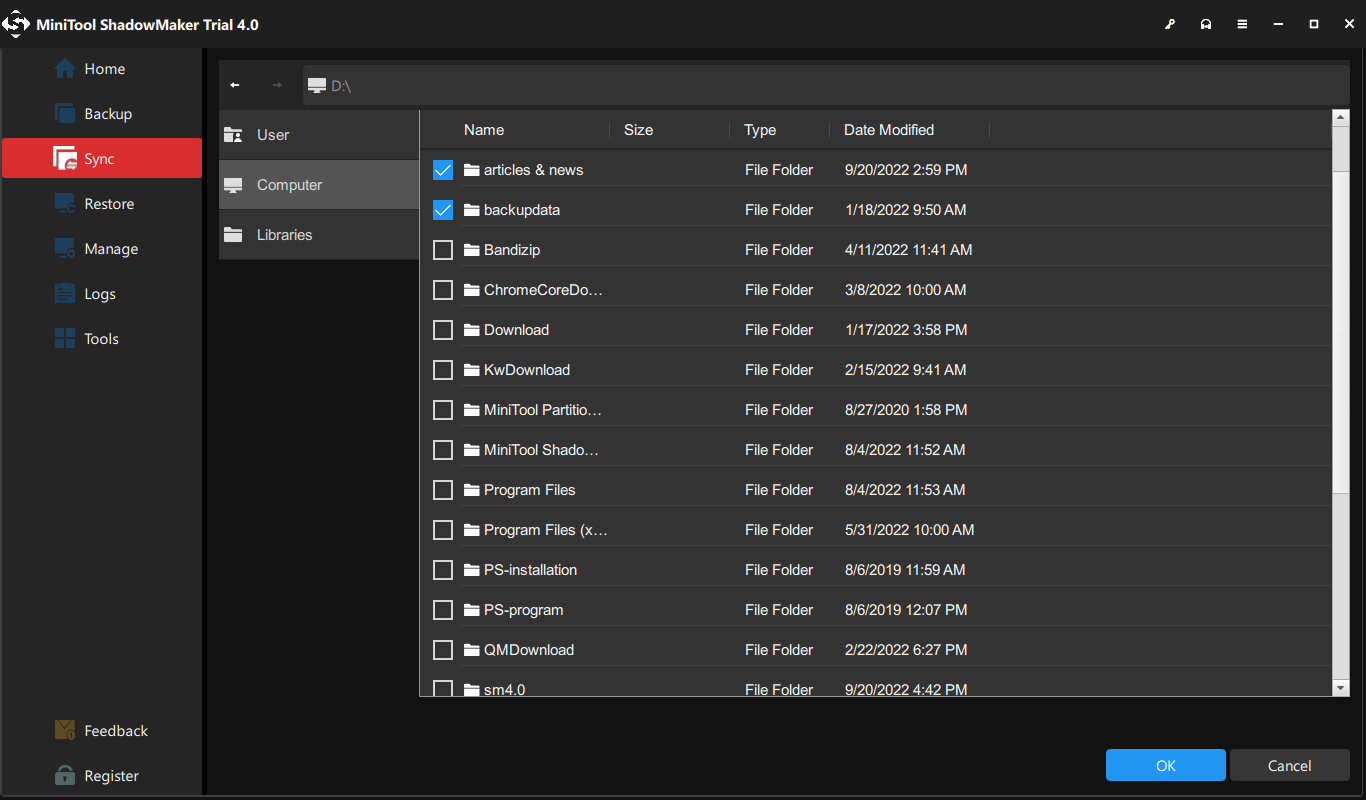
Step 2: Go to the Sync page and then click the SOURCE module to choose the files you want to copy. Then click OK to continue.
Step 3: Click the DESTINATION module to choose the destination path. After you have confirmed the destination path, click OK.

Step 4: After choosing the source and destination, click Sync Now to start to copy your data to the destination. Or you can delay the task by clicking Sync Later, but you need to start the task on the Manage page.
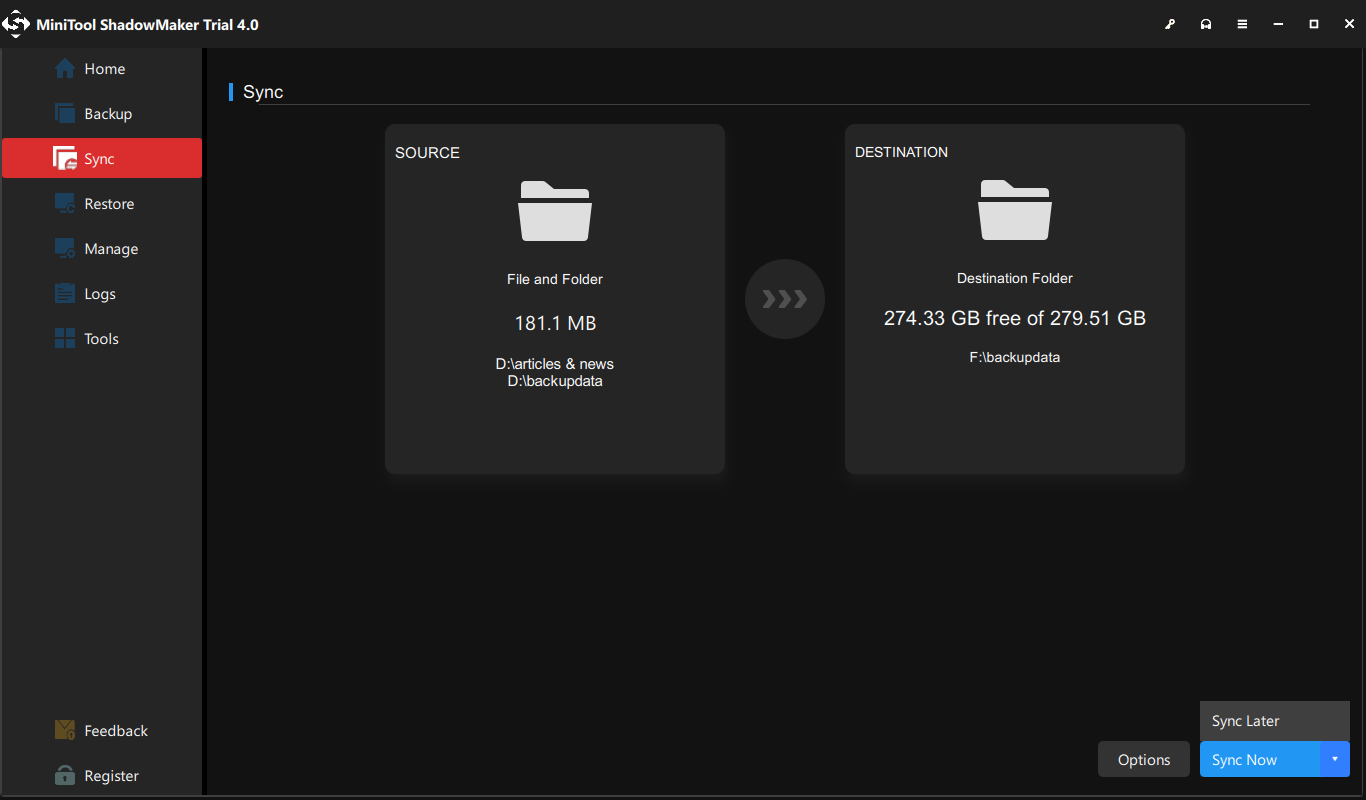
After the task has been completed, you can go to the destination path to view the files and folders.
The End
This post is mainly talking about the XCOPY command. After reading this post, you should know the advantages and disadvantages of the XCOPY command. If you want to copy files and folders using the XCOPY command, it is pretty sophisticated because it has so many options. Therefore, it is recommended to use MiniTool ShadowMaker.
If you have any questions about using MiniTool ShadowMaker, leave a comment below or send an email to [email protected].
User Comments :