This MiniTool post introduces what the Kernel Data Inpage Error is, why it occurs, and how to fix it. The approaches involve troubleshooting in Safe Mode, testing your RAM, running CHKDSK, scanning for viruses, updating the disk driver, and moving page files.
Hi, for about a few weeks or so now, while I’m using my laptop randomly, the Kernel_Data_Inpage_Error with a blue screen pops up, and most of the time, in a few seconds without any info being collected (0% complete), my laptop will just shut off and restart.learn.microsoft.com
What Is Kernel Data Inpage Error
Kernel Data Inpage Error is a Windows blue screen of death (BSOD) error, usually with the stop code 0x0000007A.
It indicates that the system failed to read critical kernel data from the hard drive or paging file, causing the required data page to fail to load into memory.
When this error occurs, the computer may display a blue screen and restart, run slowly, or even fail to boot.
Why Does Kernel Data Inpage Error Occur
Many causes can lead to this error, and the common ones are listed below.
- Hard drive problems. Bad sectors, aging, I/O errors, and unstable SATA/USB connections are among the most common causes.
- Memory (RAM) failure. Damaged memory modules or abnormal memory read/write operations can prevent the system from correctly loading kernel data.
- Driver issues. Damaged or incompatible storage controllers, disk drivers, or chipset drivers may prevent data from being correctly read into memory.
- Corrupted system or paging file. A corrupted paging file (pagefile.sys) or a corrupted system file can prevent kernel data from being read correctly from the disk.
- Interference from viruses or malware. Malicious programs may corrupt system files, paging files, or disk structure, causing read/write failures.
- Power supply or motherboard issues. Unstable voltage, insufficient power supply, or abnormal motherboard I/O channels can also cause data read failures (indirectly triggering errors).
Now you have a better understanding of the Kernel Data Inpage Error. The next step is to fix it.
How to Fix Kernel Data Inpage Error on Windows 10/11
This section explains how to fix BSOD Kernel Data Inpage Error by troubleshooting in Safe Mode, testing the RAM, running CHKDSK, scanning for viruses, updating the disk driver, and moving page files.
Approach 1: Troubleshoot in Safe Mode
If your computer frequently experiences blue screens and unstable startup, first boot into Safe Mode to troubleshoot.
In Safe Mode, only essential drivers and core services are loaded, providing the most streamlined and secure system environment for troubleshooting. Here is how to access it.
Step 1: Right-click the Windows button and choose Settings.
Step 2: Click Update & Security > Recovery, and then click Restart now under Advanced startup.
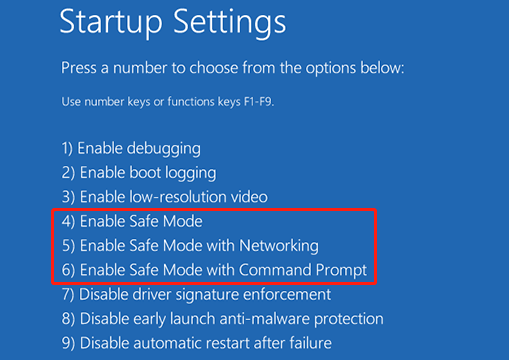
Step 3: In WinRE, click Troubleshoot > Advanced options > Startup Settings > Restart.
Step 4: Press F4, F5, or F6 based on your needs to enter Safe Mode.
- F4: Enable Safe Mode.
- F5: Enable Safe Mode with Networking.
- F6: Enable Safe Mode with Command Prompt.
When entering Safe Mode, perform the following actions to locate and repair the problem:
- Check recently installed drivers or software
- Run a virus scan
- Uninstall problematic system updates or programs
- Check Event Viewer for detailed bug analysis
- Perform a System Restore
Approach 2: Test Your RAM
If bad blocks or read/write errors occur in the RAM, the system cannot load data correctly, causing the kernel to report an error and crash.
Testing the RAM can help distinguish between memory problems and other causes, such as hard drive/driver issues.
Step 1: Press Win + R to open the Run dialog.
Step 2: Type mdsched.exe in the box and press Enter.
Step 3: Click Restart now and check for problems (recommended).
Step 4: Follow the on-screen instructions to complete the process.
If this approach doesn’t work, move on to the next step.
Approach 3: Run CHKDSK to Check Bad Sectors
One cause of the Kernel Data Inpage Error is the presence of bad sectors on the hard drive. CHKDSK is a system utility that can scan the disk and identify bad sectors on a hard drive. Follow these steps to run it.
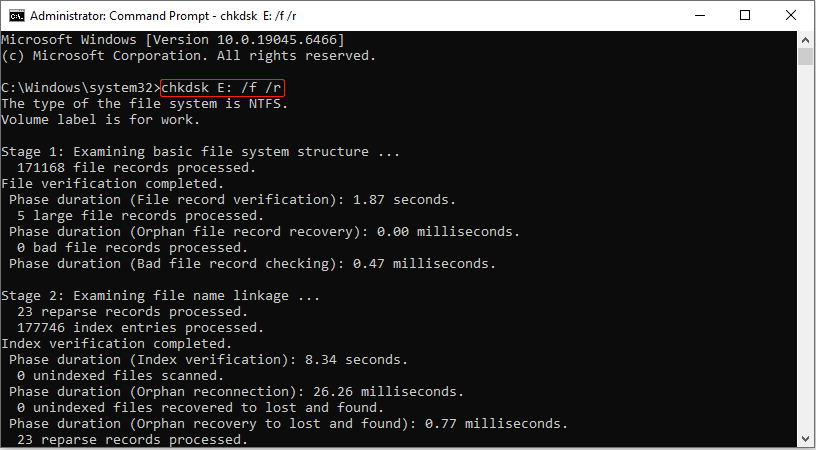
Step 1: Type cmd in the Windows search bar, right-click the Command Prompt, and choose Run as administrator.
Step 2: When asked by UAC, click Yes to continue.
Step 3: Type chkdsk E: /f /r and press Enter. Replace Ewith the actual drive letter of your drive.
Wait for the repair process to complete. Should this method fail, proceed with the next option.
Approach 4: Scan for Malware and Viruses
Viruses can interfere with normal data reading and writing, causing inconsistencies in kernel access to the hard drive or memory, thus triggering a blue screen.
Scanning for and removing viruses can eliminate security threats.
Step 1: Press Win + I to open Settings and click Update & Security.
Step 2: Switch to the Windows Security tab and click Virus & threat protection.
Step 3: Click Scan options, choose a scan method, and click Scan now.
This process will scan and remove viruses from your computer. If this method doesn’t solve the problem, try the next one.
Approach 5: Update/Reinstall the Disk Driver
Outdated or corrupted drivers can cause read/write errors when the system accesses the hard drive or paging file.
Updating or uninstalling the disk driver can fix known errors, improve compatibility and stability, and thus reduce such errors.
Step 1: Press Win + X and choose Device Manager.
Step 2: Expand Disk drives, right-click the disk, and choose Update driver.
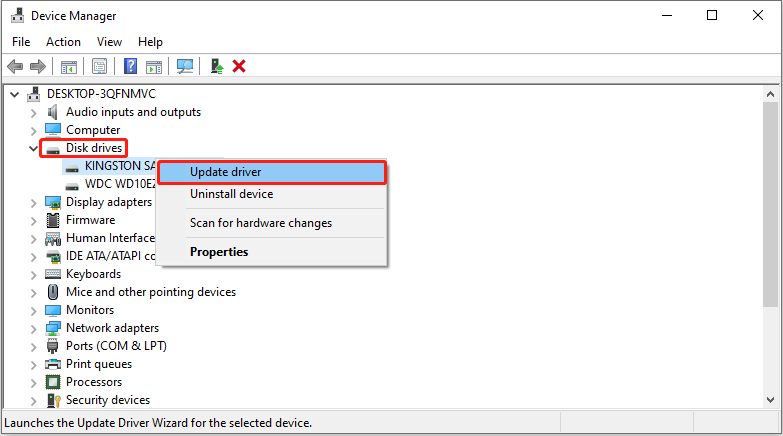
Step 3: Select Search automatically for drivers to detect the new driver.
When the new driver is detected, follow the instructions to complete the installation.
If the problem persists after that, try uninstalling the device.
In Device Manager, right-click the disk under Disk drives and choose Uninstall device.
After uninstallation, restart your computer, and Windows will automatically install the new driver.
If this solution doesn’t fix the issue, attempt the following one.
Approach 6: Move Page File to an Internal HDD
If the paging file is placed on an external or unstable storage device, there may be issues with read/write speed and connection reliability. This can easily lead to errors when the system accesses the paging file.
The paging file is a crucial data exchange area when memory is low. If it is located on an internal HDD, the system can achieve more stable read/write performance.
Here is how to move page files to an internal HDD:
Step 1: Type Advanced System Settings in the Windows search bar and press Enter.
Step 2: Under the Performance section, click the Settings button.
Step 3: In the Performance Options page, switch to Advanced and click the Change button under Virtual memory.
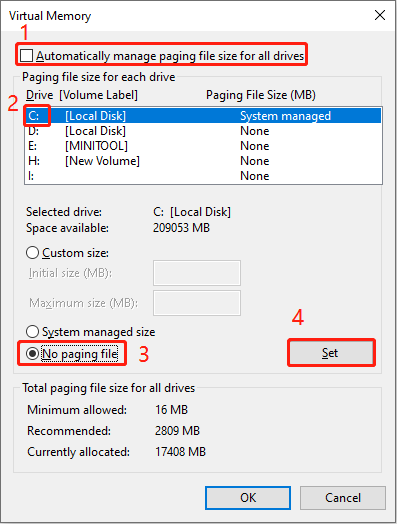
Step 4: Uncheck Automatically manage paging file size for all drives.
Step 5: Select your C: drive, click No paging file, and click Set to confirm.
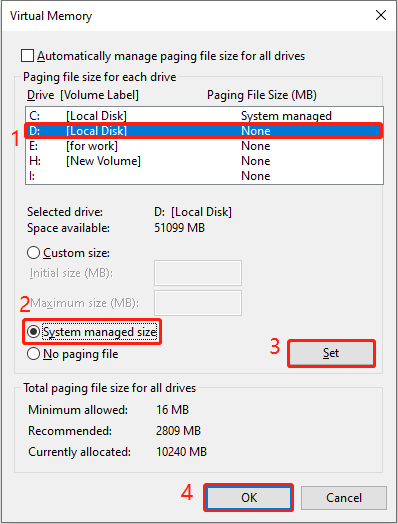
Step 6: Select your internal HDD (e.g., D:, E: drive), click System managed size, and click Set.
Step 7: Finally, click OK to confirm the change, and then restart your computer.
How to Recover Data Lost Due to Kernel Data Inpage Error
This error could potentially cause data loss. Therefore, if you discover data loss after repairing the system, follow the instructions to perform data recovery. Below are data recovery methods for both bootable and non-bootable computers.
When the Computer Can Boot to Windows
This powerful and professional software, MiniTool Power Data Recovery, is suitable for PC data recovery. Here are some of his characteristics.
- Support for various data loss scenarios. This tool can recover data as much as possible in the event of accidental deletion, partition loss, hard drive failure, or system crash.
- Wide device compatibility. It supports various storage devices such as hard drives, USB flash drives, SD cards, and external hard drives.
- Multiple file type recovery. It is capable of recovering almost all file types, including documents, pictures, videos, audio, and emails.
This free file recovery software is compatible with Windows 11/10/8/8.1 and allows you to restore 1 GB of files for free. Download and install it to recover deleted files.
MiniTool Power Data Recovery FreeClick to Download100%Clean & Safe
Step 1: Launch the software and scan the target drive
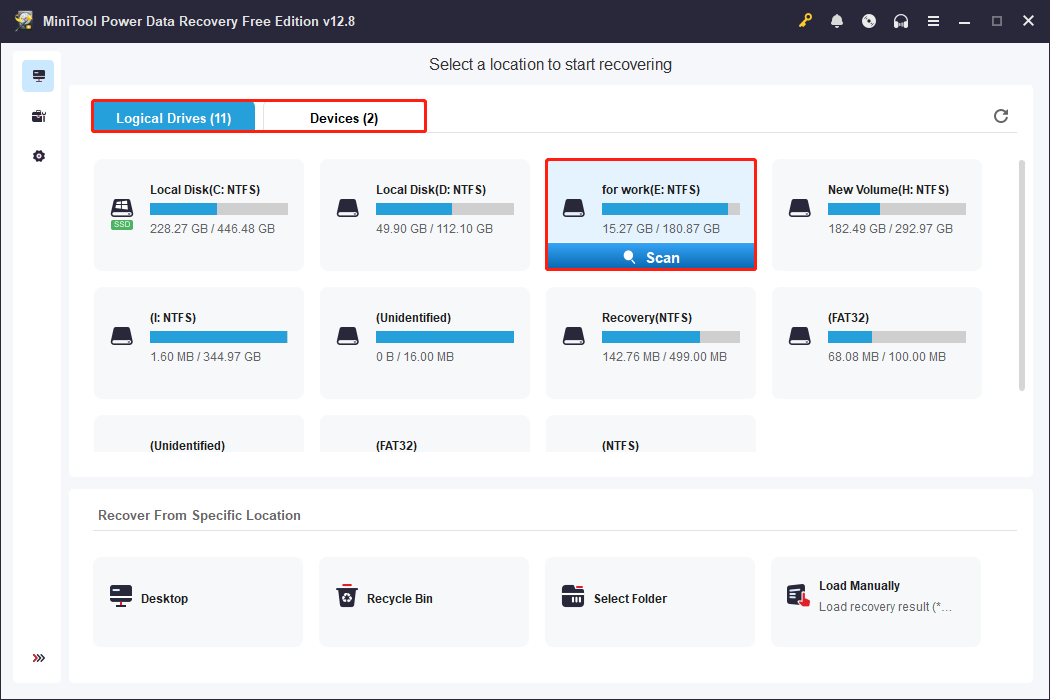
Open MiniTool Power Data Recovery. In the main interface, there are several sections for you to choose a scan location.
- Logical Drives: It lists all the partitions, including existing partitions, lost partitions, and unallocated space.
- Recover From Specific Location: It allows you to scan the Desktop, Recycle Bin, or a specified folder.
- Devices: It shows all the disks connected to your computer.
Select the scan location and click Scan.
Step 2: Wait for the scan to end and find files
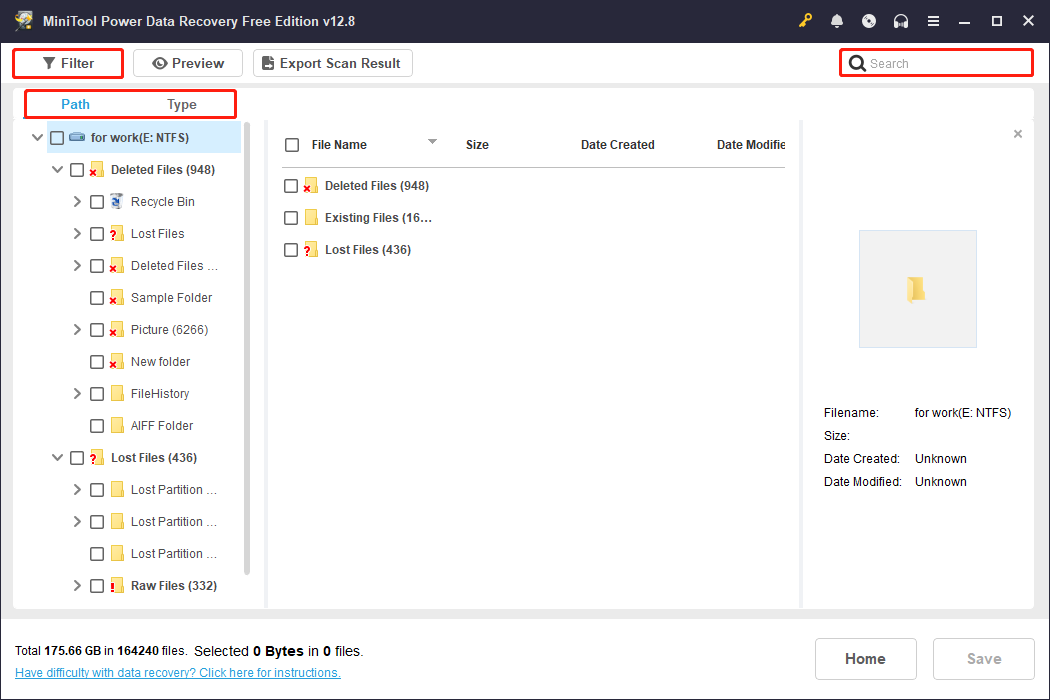
The scan process may take some time. When it completes, use Path, Type, Filter, and Search to locate the target files. Here are specific introductions for these features.
- Path: Browse found files by original folder structure (Deleted, Lost, Existing).
- Type: View files by file type (documents, pictures, videos, audio).
- Filter: Narrow results by file type, modification date, file size, or file category.
- Search: Enter a filename or keywords for quick search.
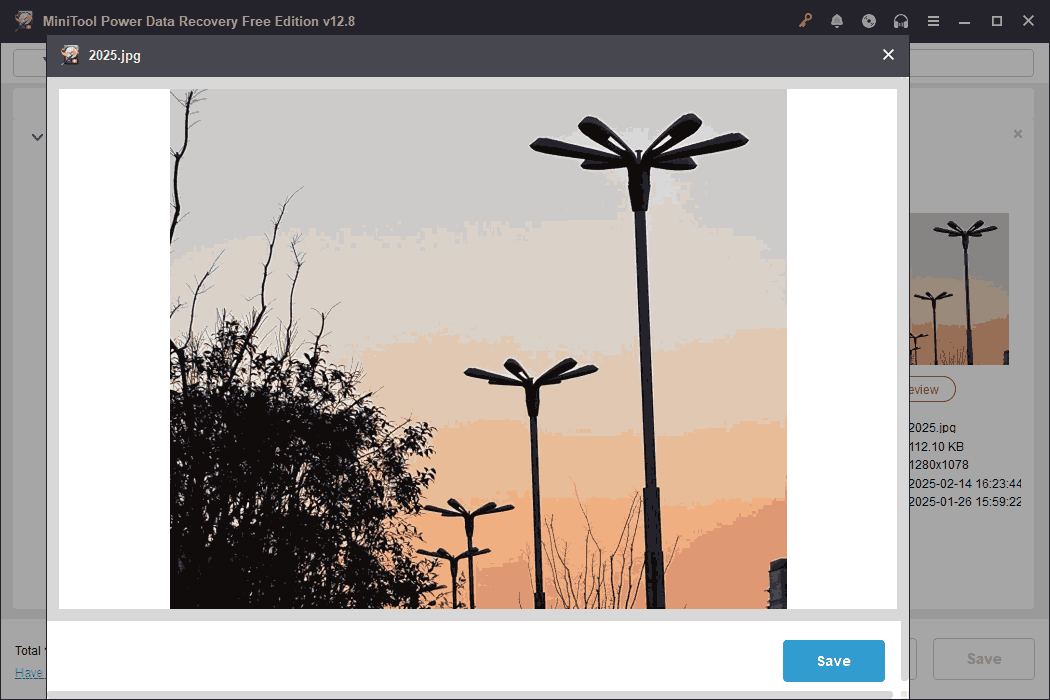
Step 3: Preview the found files before recovery
MiniTool’s Preview feature enables you to view the contents of files, such as pictures, audios, or videos, before recovery, thereby confirming file integrity and correctness.
This not only prevents the recovery of useless or corrupted files but also saves time and storage space.
Double-click the wanted files, and the preview window will pop up.
Step 4: Save files to a safe location
Select all the needed files and click the Save button. There will be a window prompting you to choose a safe destination. Finally, click OK to start recovery.
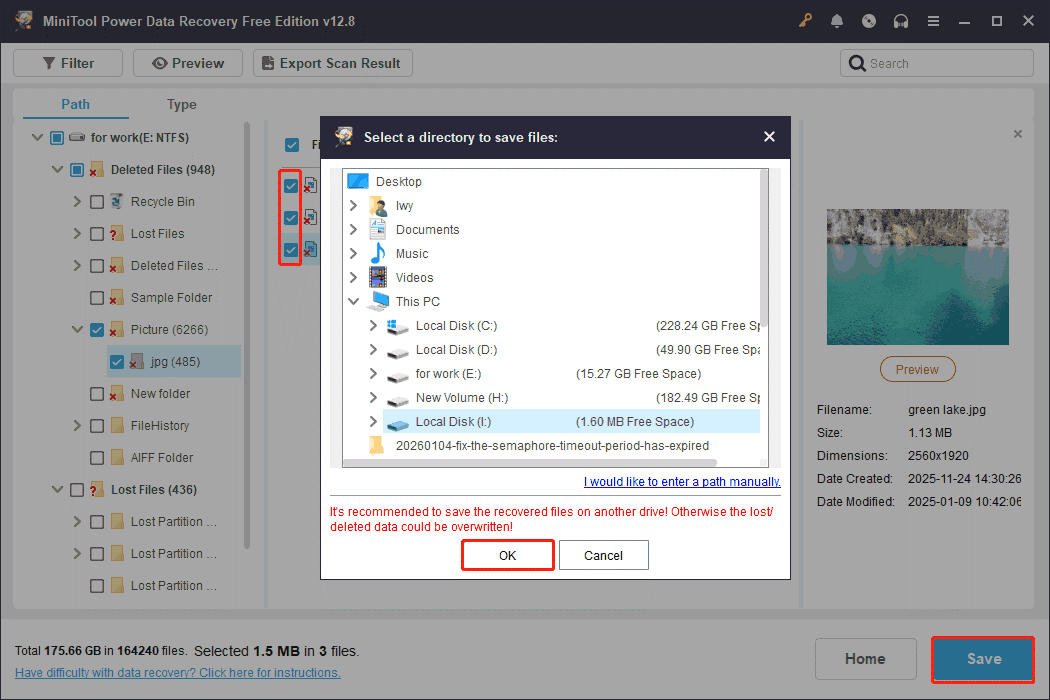
When the Recovery Completed window shows, click the View Recovered button to check the files.
If you’ve used up your free 1 GB recovery capacity, upgrade to the full edition to continue recovery.
When Your Computer Cannot Boot Normally
What if your computer cannot boot into Windows? Use the bootable edition of MiniTool recovery software to create a bootable disk. This allows direct access to hard drive data from external media.
Here are the steps to recover data from your unbootable computer.
Step 1: Create a bootable disk on another working computer
1.1. On a working PC, download and install MiniTool Power Data Recovery Bootable.
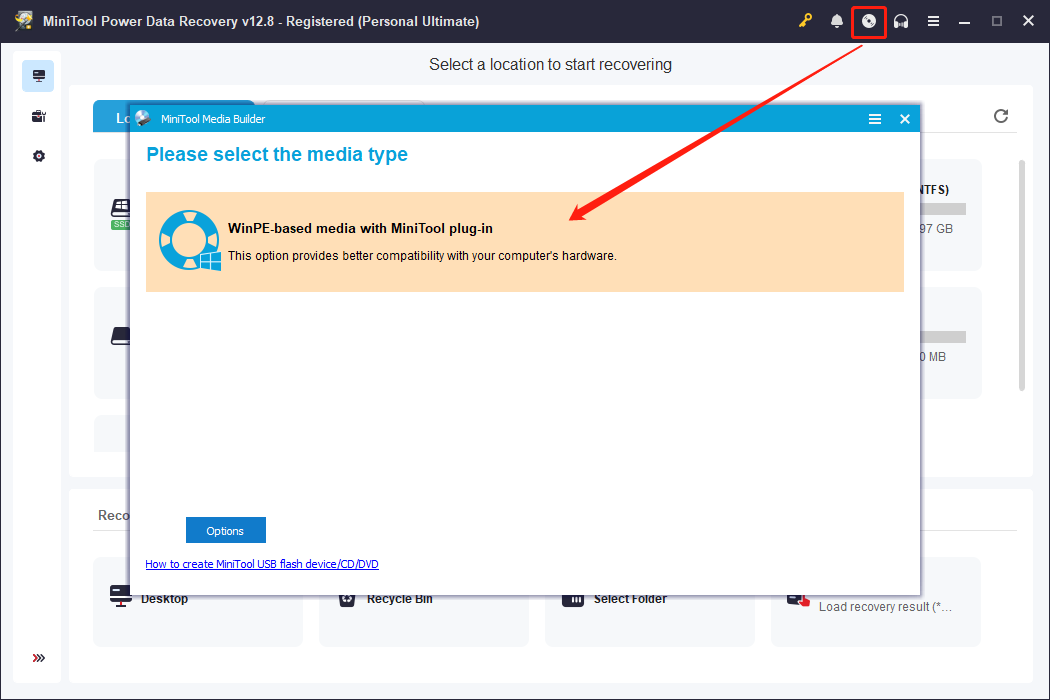
1.2. Open the program and do the following to create a bootable disk.
- Click the Bootable Media Builder icon (top‑right).
- Insert a blank USB flash drive.
- Choose WinPE‑based media with MiniTool plug‑in.
- Select USB Flash Drive.
Step 2: Boot the non‑bootable computer
2.1. Plug the prepared USB drive into the non‑bootable PC.
2.2. Restart and press F2, F12, Esc, or Delete during boot.
2.3. In the Boot tab, set USB as the first boot option and save the change. The system will load into the MiniTool WinPE environment.
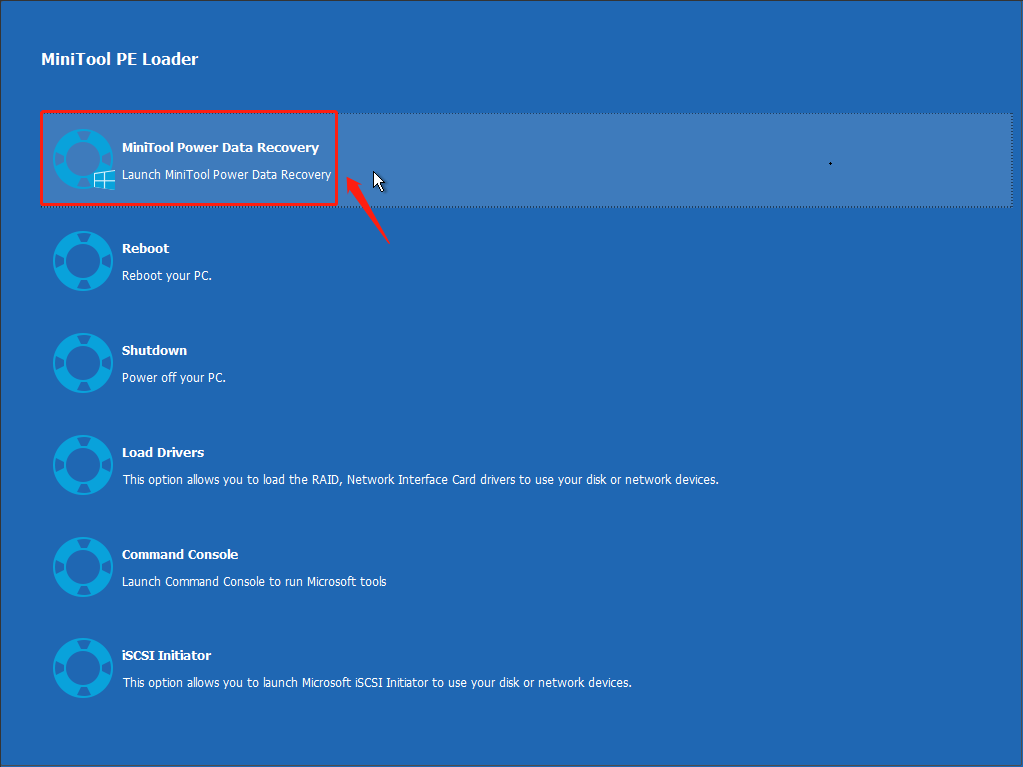
Step 3: Recover data with MiniTool Power Data Recovery
3.1. Click the MiniTool Power Data Recovery option to launch it.
3.2. Select the scan location and click Scan.
3.3. Find the target files using Path, Type, Filter, and Search.
3.4. Double-click the found files to preview them.
3.5. Select all required files and click the Save button.
3.6. Choose a safe path and click OK to store the recovered files.
Final Words
Now you know how to deal with the Kernel Data Inpage Error on Windows 11/10.
To fix it, try troubleshooting in Safe Mode, testing the RAM, running CHKDSK to check for bad sectors, scanning for viruses, updating the disk driver, and moving page files.
To recover data lost due to this error:
- If the computer can boot normally, use MiniTool Power Data Recovery Free.
- If the PC is stuck in the BSOD, use MiniTool Power Data Recovery Bootable.
For any questions or concerns about MiniTool products, feel free to contact us through [email protected].
About The Author

Position: Columnist
Chelsea graduated from university with a major in English. She has a strong interest in English writing. It is this passion for writing that led her to become an English editor. Her articles mainly focus on data recovery and other computer industry news. As an energetic and outgoing girl, Chelsea enjoys listening to music, singing, riding bikes, and eating in her spare time.
User Comments :