Blue screen of death is a protection mechanism in Windows that stops the system when a critical failure occurs to avoid further damage. This guide explains what happens when a BSOD occurs and what commonly causes it. It also offers fixes for both bootable and unbootable systems with guidance on data protection and BSOD prevention.
A blue screen of death (BSOD) may appear suddenly while Windows is running, often forcing the system to stop responding or restart. Such incidents may cause panic.
This article outlines the background of Windows BSOD errors and explains their potential causes and corresponding solutions.
What Happens When Windows Shows a Blue Screen
Understanding what happens during a BSOD is the first step in evaluating its impact and identifying possible causes.
This also helps determine whether the system is at risk of further damage or data loss.
What Is the Blue Screen of Death
Despite its name, a blue screen of death is actually a protection mechanism. When Windows detects system failures, it stops all operations and displays a blue screen containing a stop code to prevent further file system corruption or data damage.
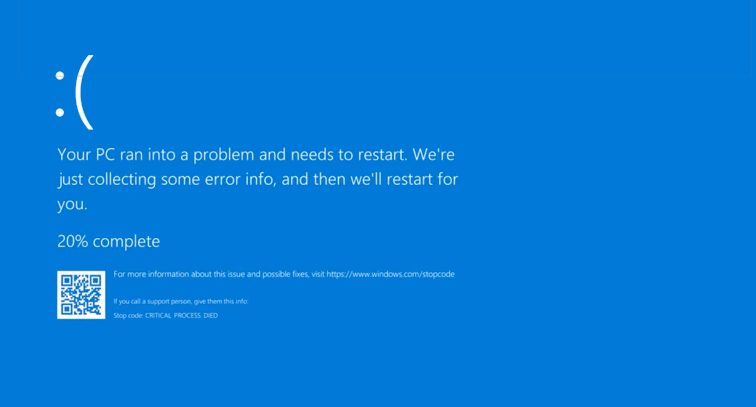
Image source: support.microsoft.com
Is BSOD Caused by System or Hardware
Both system and hardware problems can trigger a blue screen of death.
Although a BSOD is usually accompanied by a stop code, the code itself does not directly identify the root cause. It only provides a clue about the type of issue.
Hardware components such as RAM, hard disks, and the CPU, as well as system components such as drivers and software, may all lead to a BSOD.
Detailed common causes will be described in the following sections.
Will BSOD Damage the PC or Cause Data Loss
As explained above, a BSOD is a protection feature designed to prevent more serious failures. Therefore, it generally does not damage the computer.
However, while a BSOD does not directly cause hardware failure, frequent BSODs often indicate underlying severe issues that may damage the PC.
Regarding data loss, a BSOD does not typically delete files. However, data loss may still occur under certain circumstances, such as:
- A BSOD appears before the files you are editing are saved.
- A BSOD occurs and interrupts file transfers.
- The system is stuck in the BSOD and fails to boot normally.
- The storage device containing the files is damaged.
- …
Could Recent System or Software Changes Be the Cause
Recent changes are often the primary cause of a BSOD, especially when the problem occurs immediately after a certain change. Common examples include:
- Driver updates
- System updates
- System file deletions
- Software installations
- Newly added hardware, such as memory modules, hard disks, scanners, or printers.
The next section provides detailed explanations of the potential causes behind BSOD errors.
Common Reasons for Blue Screen of Death on Windows 11/10
A BSOD may be triggered by hardware defects, software conflicts, or system and driver incompatibilities. Here are the potential factors.
Hardware Issues
>> Faulty RAM:
RAM stores the data and instructions that the CPU needs to keep the system running. If the RAM is faulty or incompatible, the information stored on it may become corrupted.
As a result, the CPU cannot access the correct data, which can cause the system to fail to load properly. Stop codes such as PAGE_FAULT_IN_NONPAGED_AREA or MEMORY_MANAGEMENT usually indicate a RAM failure.
>> Failing hard disks:
Important system files are stored on the internal HDD or SSD. While Windows is running, it continuously reads core system data from the disk.
If the disk has file system errors or bad sectors, the system may encounter problems when reading data or may even be unable to access the data. Consequently, a BSOD error occurs.
Unusual disk noises or system messages, such as Repairing disk errors, are common signs of disk failure.
>> Graphics failures:
Windows continuously communicates with the graphics card to display the interface and handle visual data.
If the graphics card experiences hardware failure or a corrupted driver, the system may encounter errors when handling graphics instructions. This can lead to a blue screen on startup.
>> Incompatible external devices:
External devices such as external disks, printers, or scanners may have corrupted drivers or draw more power than the USB ports can supply. This can make the system unstable and may even trigger a blue screen crash.
If a blue screen consistently occurs after a particular device is connected to your computer, that device is usually the cause.
>> Power supply issues:
The power supply unit provides stable electricity to the CPU, GPU, hard disk, and other internal components to keep the system running.
If the power supply is unstable or faulty, data processing may be interrupted, which can cause the system to crash.
>> Overheating:
When the system overheats, the transistors and circuits may produce incorrect data, causing the system to become unstable.
As temperatures continue to rise, the risk of physical damage to internal hardware components increases.
To prevent additional damage, Windows typically stops the operations and displays a blue screen.
Software and System Issues
>> Corrupted or missing system files:
Core system files are essential for loading drivers and other components.
If key system files are corrupted or missing, critical processes required for Windows to run may fail to load or be interrupted.
When this happens, Windows will be unable to operate and display a blue screen of death.
>> Defective drivers:
Drivers run in kernel mode and have the highest privileges to control memory and other computer devices.
When a driver becomes corrupted or outdated, Windows cannot safely stop it due to its high-level access to system resources. As a result, Windows halts the system to prevent further damage or data loss.
Stop codes such as DRIVER_IRQL_NOT_LESS_OR_EQUAL usually indicate a driver-related problem.
>> Software conflicts:
When Windows is running, many programs and background services share system resources. If software conflicts occur, the system may encounter errors or even suffer from system file damage, resulting in a BSOD.
Frequent software crashes or system messages related to software incompatibility are common signs of program conflicts.
>> Problematic Windows updates:
Windows updates are designed to fix known bugs and enhance system functionality. However, sometimes an update itself may contain errors.
For example, the March 2025 Patch Tuesday update KB5053598 caused many computers to display a blue screen after installation.
>> Malware or virus infection:
Viruses or malware may damage or delete key system files and interfere with device drivers. Some malware can even modify memory addresses and registry values.
These actions can prevent core services from running properly, making the system unstable or even causing it to crash.
Overall, a blue screen of death can occur without warning, but there is always an underlying reason. However, in most cases, the stop code does not provide details to identify the exact cause of the crash.
To help find the root issue more precisely, Windows generates a minidump file that records detailed information at the time of the system failure.
The next section will explain how to open and analyze this minidump file.
How to Analyze Windows Minidump Files
WinDbg is a professional debugger developed by Microsoft that is designed to read and analyze BSOD crash dump files.
Here is how to use this tool:
Step 1. Open Microsoft Store, search for WinDbg, and install it.
Step 2. Type WinDbg in the Windows search box, right-click it, and choose Run as administrator to access system crash dump files.
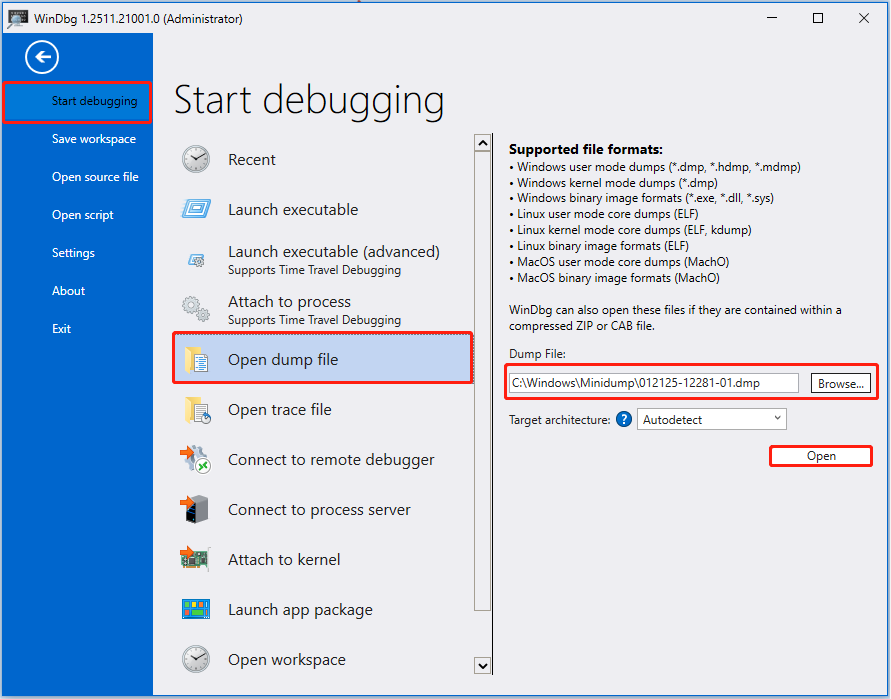
Step 3. In WinDbg, click File > Start debugging > Open dump file.
In the right panel, click Browse to select the target dump file. Finally, click Open to start debugging the selected file.
Step 4. Wait for the debugging process to complete. After that, type !analyze -v in the command box and press Enter to start analyzing and displaying details.
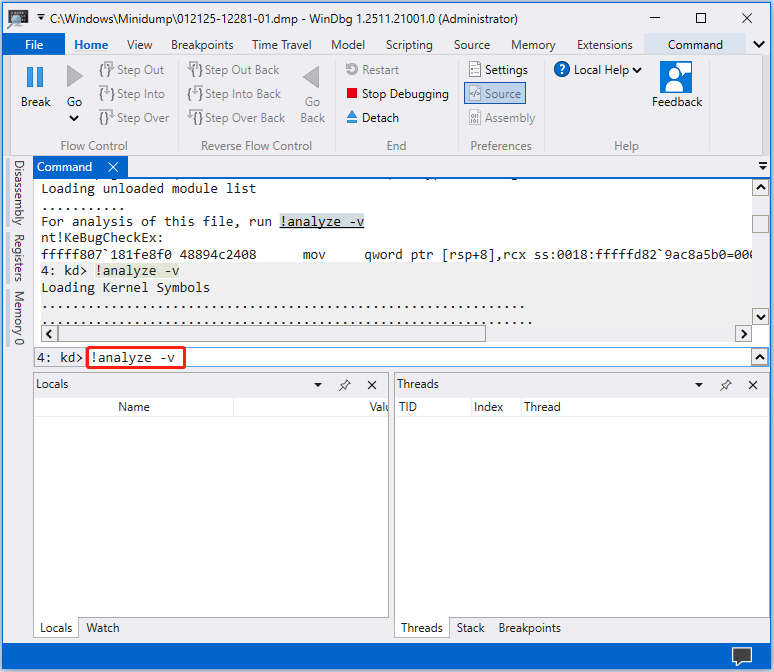
Step 5. After completing the analysis, review the Bugcheck Analysis section for error details.
The clarity of the information depends on the dump file type and the issue. In some cases, it provides only vague information, while in others it clearly identifies the cause.
How to Know Whether a BSOD Is Serious
Knowing the causes of a BSOD is not sufficient. Determining whether it is severe helps you know if software repairs are enough or if you need to replace hardware devices.
To evaluate severity, consider the following aspects.
Frequency of the BSOD
An occasional BSOD usually indicates minor issues with drivers, external devices, or system updates. However, frequent blue screens often indicate severe corruption of system files or hardware damage.
When the BSOD Occurs
If the BSOD happens during gaming, video rendering, or other high‑load tasks, overheating may be the cause. This is usually not serious and can often be resolved by cooling the system.
In contrast, if BSODs occur during normal use or even while idle, the problem is more likely related to critical system errors.
Ability to Boot Normally
If a simple restart resolves the BSOD and the system runs normally, the issue may be a temporary glitch or software conflict.
If the computer is stuck in a BSOD loop and cannot boot into Windows, the problem is usually serious.
Other Changes After the BSOD
If software fails to launch, disks cannot be accessed, or files are missing/corrupted after a blue screen of death, the risk is high. If there are no changes after a BSOD, the issue may not be severe.
In the next section, we will explain how to fix blue screen errors on Windows 10 and 11.
How to Fix Blue Screen of Death on Windows 10/11
The methods to fix a blue screen differ depending on whether Windows can still boot normally.
For a one‑time BSOD, undoing recent system changes or checking for corrupted system files often resolves the issue.
If the BSOD persists, a startup repair, system restore, or even a clean installation may be required.
In some cases, updating or resetting the computer’s BIOS can also help.
Case 1. A One-Time or Occasional BSOD
(Windows Can Still Boot Normally)
When Windows can still start normally, you can troubleshoot issues within the standard Windows environment. Follow the steps below to roll back or update drivers, uninstall recent updates, and check for system file corruption.
MiniTool ShadowMaker TrialClick to Download100%Clean & Safe
Remove External Devices and Undo Recent Changes
Removing newly connected external devices and restoring recent software changes can help determine whether they interfere with the system.
Devices that should be disconnected include USB drives, external hard disks, printers, and scanners.
Possible changes to undo include uninstalling newly installed software, restoring previous registry settings, or rolling back system configurations.
Update or Roll Back Drivers and Windows Updates
Updating or rolling back driver or system updates can help rule out an incompatible or damaged version of the driver or the system.
>> Update drivers:
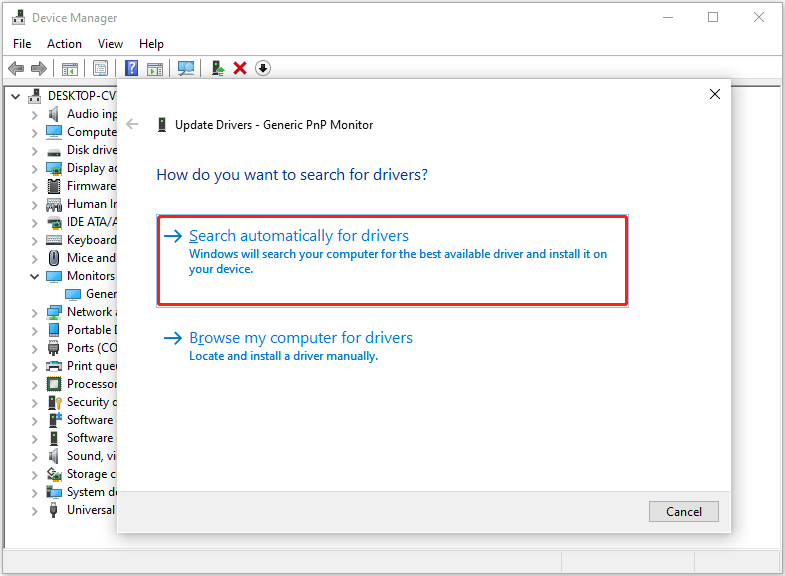
Step 1. Right-click the Start button and choose Device Manager.
Step 2. Expand the target category, right-click your device, and choose Update driver.
Step 3. Choose Search automatically for drivers and follow the on-screen instructions to complete the process.
>> Roll back drivers:
Step 1. In Device Manager, right-click the target device and choose Properties.
Step 2. Switch to the Driver tab, and click Roll Back Driver if available.
>> Update Windows:
Step 1. Press Windows + I to open Settings.
Step 2. Click Update & Security (for Windows 10) or Windows Update (for Windows 11). In the Windows Update section, check for updates and install available updates.
>> Uninstall Windows updates:
For Windows 10:
Step 1. In Settings, click Update & Security > Windows Update > View update history > Uninstall updates.
Step 2. Right-click the problematic update and choose Uninstall.
For Windows 11:
Step 1. In Settings, click Windows Update > Update history > Uninstall updates.
Step 2. Click the Uninstall button next to the update you want to remove.
Run Basic System Integrity Checks
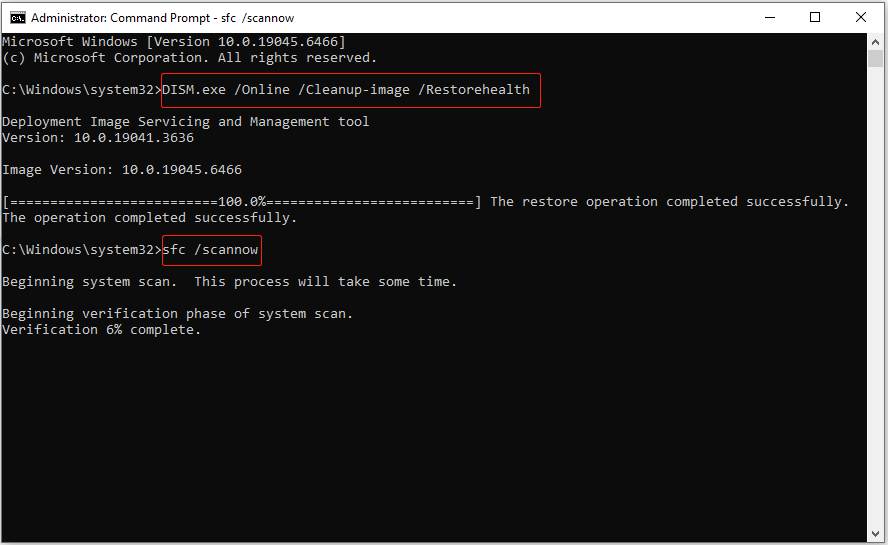
To fix a blue screen caused by missing or corrupted system files, run the DISM and SFC commands.
DISM uses Windows Update as the source to provide required files for system file repair. SFC scans all protected system files and replaces damaged ones with copies from system backups or caches.
Follow the steps below to run DISM and SFC:
Step 1. Type cmd in the Windows search box, right-click Command Prompt, and choose Run as administrator.
Step 2. Type DISM.exe /Online /Cleanup-image /Restorehealth and press Enter.
Step 3. Once the DISM command is executed, type sfc /scannow and press Enter.
What Not to Do at This Stage
When your computer experiences only an occasional blue screen, it usually does not indicate a serious problem. In such cases, it is recommended to avoid these actions to prevent unnecessary risks:
- Do not replace hardware devices, because a single BSOD is usually caused by minor issues.
- Do not reinstall Windows since a one-time crash can often be fixed with simple troubleshooting.
- Do not change core system settings and registries, as this may cause new issues.
- Do not use unsafe repair tools, because they can cause further failures.
In most cases, the solutions outlined above can resolve blue screen errors. Nevertheless, if your computer is stuck on a blue screen and cannot boot into Windows, proceed to the next section.
Case 2. Repeated BSOD or Windows Fails to Boot
(System Becomes Unstable or Unbootable)
Persistent blue screens that prevent access to the Windows desktop often indicate a critical system failure. Under these circumstances, do not repeatedly restart your computer, as this may further damage the system.
Why Repeated Restarts Can Increase Risk
>> Increase hardware pressure. Repeated restarts may put additional stress on your hard disk, CPU, or power supply.
>> Cause persistent overheating. Each reboot prevents proper heat dissipation. If the problem is caused by high temperature, the risk becomes greater.
>> Lead to file system corruption. Frequent restarts may interrupt file writes on your hard disk and lead to file system corruption.
Therefore, you should avoid restarting your computer many times. Instead, try entering Safe Mode to undo recent system changes or perform a system restore.
Entering WinRE or Safe Mode Safely
Since you are unable to boot into the desktop, try entering Safe Mode to troubleshoot the BSOD.
If Safe Mode fails to start, use the recovery tools in Windows Recovery Environment (WinRE) instead.
1. How to access WinRE:
Step 1. Press and hold the Power button for 10 seconds to turn off the PC.
Step 2. Press the Power button again to turn on the computer. When the manufacturer’s logo appears, hold the Power button for 10 seconds to turn off the PC again.
Step 3. Repeat this process 3 times, and your device should access WinRE.
2. How to access Safe Mode:
Step 1. In the Choose an option window, click Troubleshoot > Advanced options > Startup Settings > Restart.
Step 2. After restarting, press 4 on your keyboard to enter Safe Mode or press 5 to enter Safe Mode with the Internet.
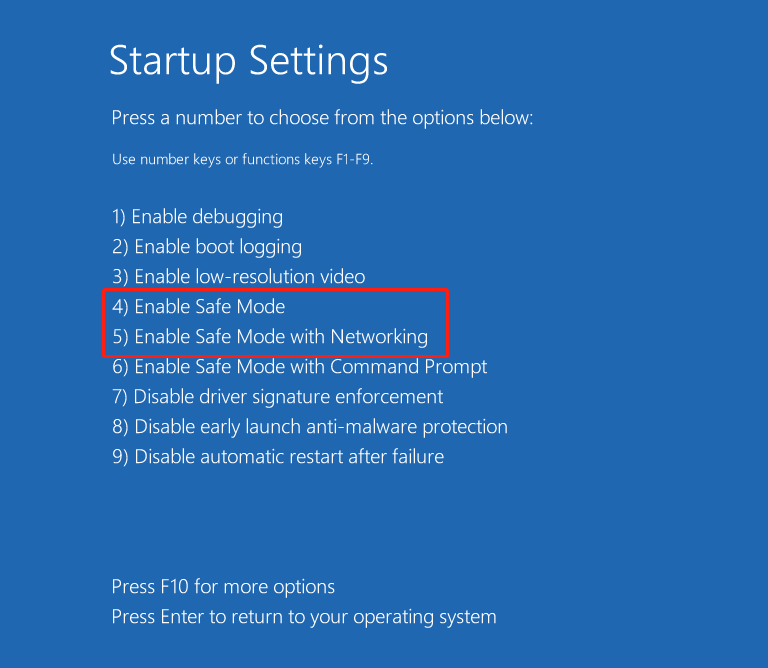
In Safe Mode, you can uninstall recently installed programs or drivers, check for hard disk errors, and perform other troubleshooting steps.
However, sometimes the system prevents you from entering Safe Mode. In that case, follow the methods below to fix the BSOD problem.
Low-risk Recovery Options
This section outlines several repair solutions in WinRE with a lower risk to your system and files.
These include running the embedded startup repair tool, restoring the system to a previous healthy state, or uninstalling problematic updates.
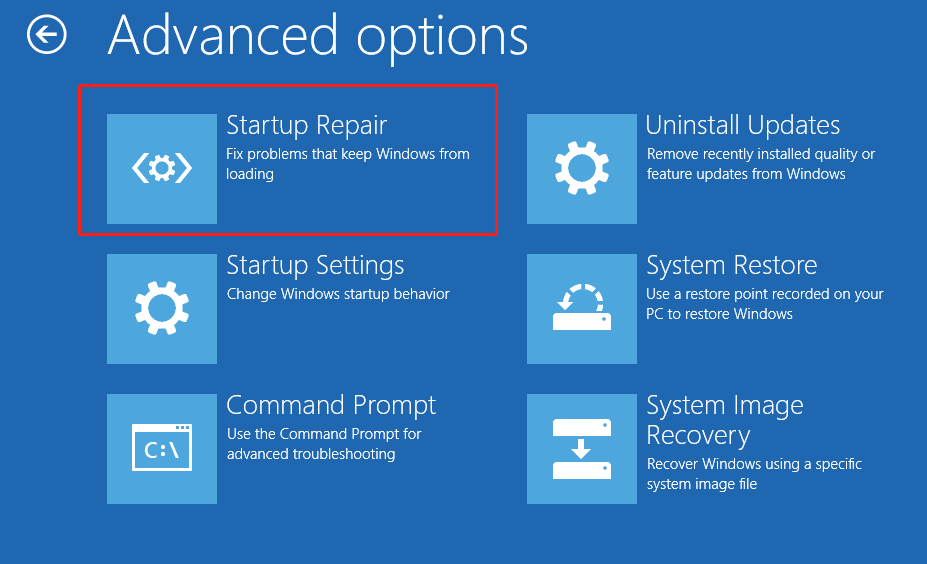
>> Option 1. Run Startup Repair
Startup Repair is a tool built into Windows that automatically scans your computer for corrupted system files and repairs them. It also repairs boot configuration data and resolves registry problems.
In WinRE, select Troubleshoot > Advanced options > Startup Repair. Then wait for the repair process to complete, and check if you can boot into your desktop normally. If not, proceed to the next solution.
>> Option 2. Perform a System Restore
Windows provides a system restore feature to help restore your system to a previous healthy state if the system encounters issues.
The system restore feature relies on restore points to run. Restore points can be created automatically by the system during software installations or system updates, or you can create them manually.
In the Advanced options window, click System Restore. Then follow the on-screen instructions to choose a restore point and complete the restore process.
>> Option 3. Uninstall Windows Updates
Uninstalling Windows updates can also be performed without booting into Windows. In the Advanced options window, click Uninstall Updates and follow the prompts to remove problematic updates.
>> Option 4. Check for File System Errors
WinRE also provides an option to run common commands to check for errors.
When the computer cannot boot, there may be issues with the system disk. Running the CHKDSK command can detect and fix file system errors, as well as isolate bad sectors.
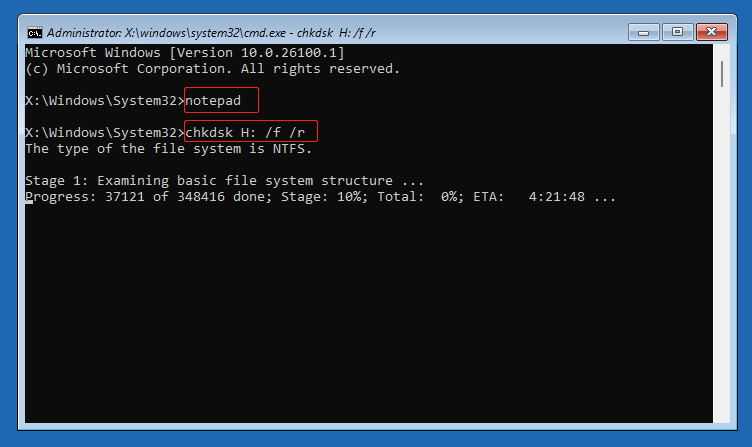
Step 1. In the Advanced options window, click Command Prompt.
Step 2. Since the system drive may not be assigned the letter C, open Notepad and browse to identify the system drive letter.
In the command window, type notepad and press Enter. Click File > Open > This PC to find the drive letter of the system disk.
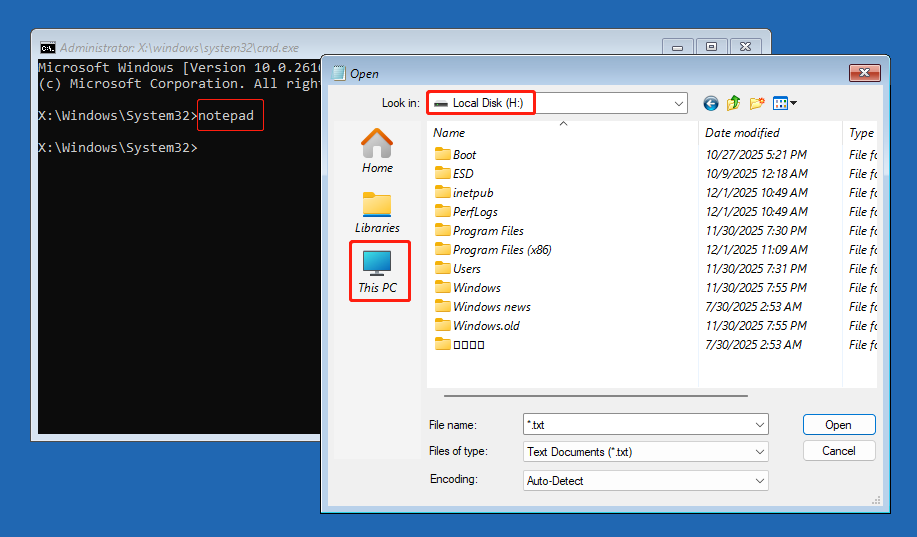
After that, close the Notepad.
Step 3. Type chkdsk X: /f /r and press Enter. Replace X with the actual drive letter you want to check (usually the system drive).
- /f: Fixes errors on the specified disk.
- /r: Locates and isolates bad sectors on the drive and recovers readable information. It includes all the functionalities of /f.
Once the CHKDSK command is executed, restart your computer and check if the BSOD disappears. If not, keep reading.
A High-Risk System Rebuild Option
Option – Do a Clean Installation
If none of the basic solutions fix the BSOD, consider reinstalling the system.
However, a clean installation will erase existing data. To prevent permanent data loss, use data recovery software to recover important files to a safe location before reinstalling Windows.
Data Recovery Before a Necessary Windows Reinstallation
Why Reinstallation Can Cause Irreversible Data Loss
A clean reinstallation of Windows deletes all files on the system drive, and they will be very difficult to recover. Reasons are as follows.
>> The partitions will be deleted.
During the reinstallation process, you will be required to delete all partitions on the system disk. The disk space will be displayed as unallocated, and all files stored in those partitions will be permanently erased.
>> New files will be written to the deleted partitions.
The Windows installer will repartition the disk, creating the primary system partition and recovery partition.
New system files and boot files will be written to these partitions, overwriting the original data. Once overwritten, files cannot be recovered using any data recovery software.
>> SSD TRIM mechanism.
If the system disk is an SSD, the chance of recovery is lower. SSDs use the TRIM feature, which marks deleted blocks as erasable. Once TRIM is executed, data recovery tools cannot read or restore the original data.
Therefore, if important files are stored on the system disk, transfer them first.
Safe Methods to Recover Files From an Unbootable System
When Windows cannot boot, you can recover files using Command Prompt for basic access or a bootable USB drive when CMD is unavailable or the files you want to restore are deleted.
The first method allows you to access your drive without booting into Windows and transfer your files to an external disk. The second method applies when CMD is not working or when some files have already been deleted.
Option 1. Use CMD
Step 1. Connect a USB drive or external hard disk with sufficient free space to your computer to store the rescued files.
Step 2. Start the computer to WinRE, then click Troubleshoot > Advanced options > Command Prompt.
Step 3. Type notepad and press Enter.
Step 4. In the Notepad window, click File > Open > This PC.
Step 5. Access the drives and locate the files you want to recover. Select the target files, right‑click them, and choose Copy.
Then navigate to This PC, open the external drive, right‑click an empty area, and select Paste.
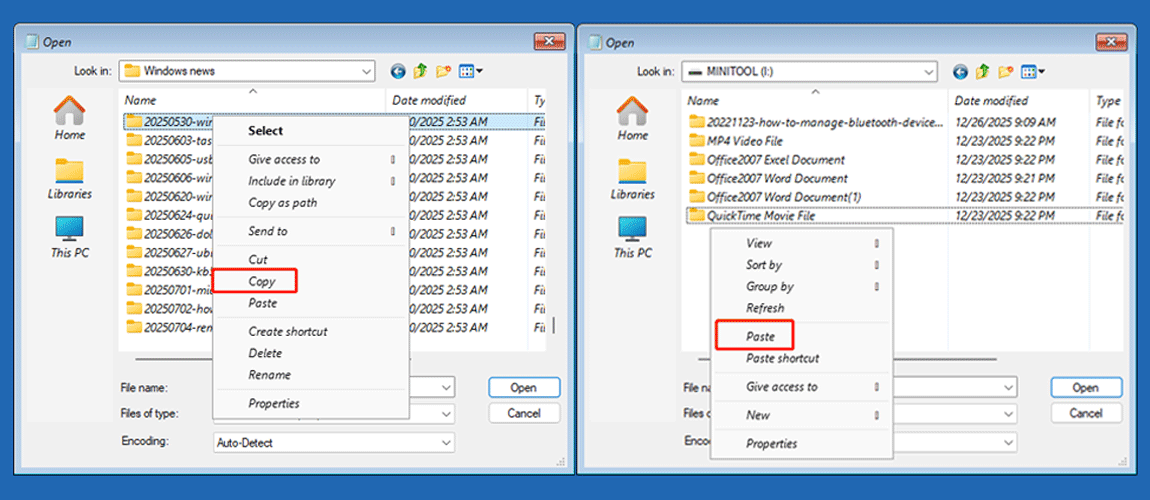
Repeat this process until all required files have been copied. After that, remove the external drive and connect it to a working computer to verify the recovered items.
Option 2. Use MiniTool Power Data Recovery
If you encounter issues while using the Notepad tool to do free data recovery, you may need MiniTool Power Data Recovery. This is a professional data recovery tool designed for Windows 11/10/8.1/8.
It provides a Bootable Media Builder that allows you to create a bootable recovery drive. You can then use it to start your computer and access your files without Windows active.
Supported file types to recover include documents, pictures, videos, audios, emails, archives, and more.
Note that the Bootable Media Builder is not available in the free edition. To use it, download the free edition on a working computer and then register it, or directly get the bootable edition.
MiniTool Power Data Recovery FreeClick to Download100%Clean & Safe
Here is a breakdown on how to recover files from an unbootable computer:
Step 1. Connect a blank USB drive to the functioning computer. Recommended USB drive size: 4 GB to 64 GB.
Step 2. Launch the registered recovery software and click the Bootable Media Builder icon. Next, click WinPE-based media with MiniTool plug-in and follow the on-screen instructions to create a bootable USB drive.

Step 3. Insert the burned USB drive into the unbootable computer.
Next, start the computer and press the BIOS key, such as F10, F12, Esc, or Del, to enter the BIOS.
Then open the Boot menu, set the USB drive as the first boot device, and start the PC from the burned USB.
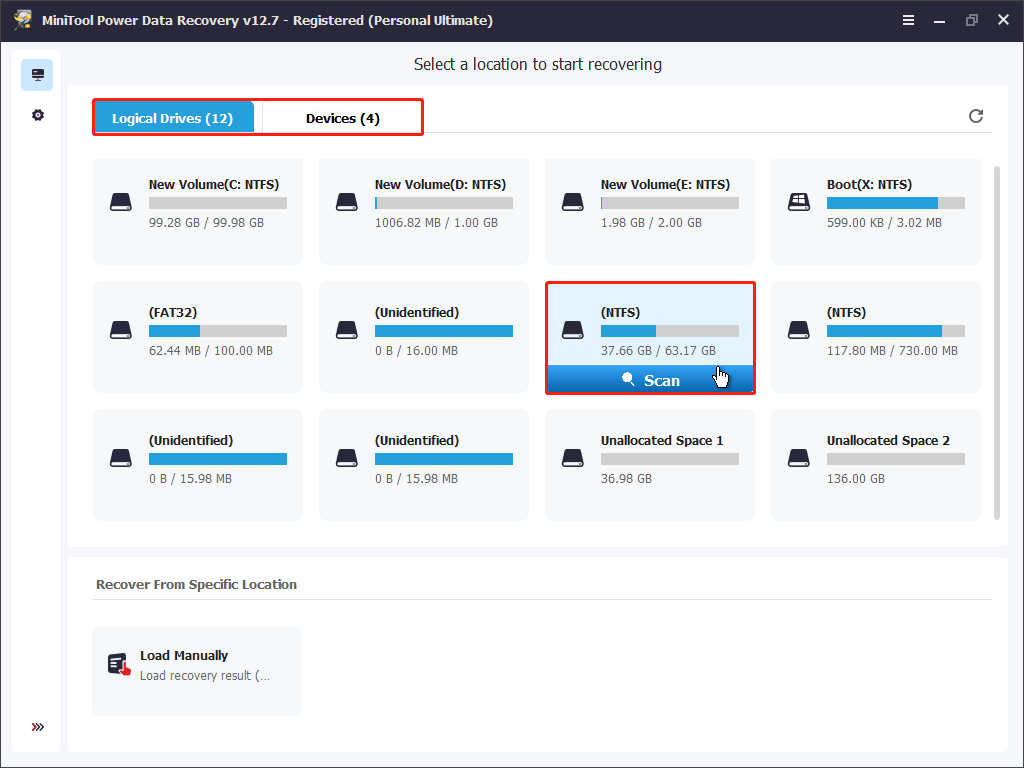
Step 4. Follow the on-screen prompts to launch MiniTool Power Data Recovery. On its main interface, select the drive (under Logical Drives) or disk (under Devices) from which you need to rescue files and click Scan.
Step 5. Once the disk scan is completed, start locating and checking the files you want to recover.
Both Path and Type list all found files. The former displays files based on their original folder structure, while the latter organizes them by file type and data format.
- In addition, use Filter to filter files by file type, modification date, file size, and file category.
- Use Search to search for a specific file by using its partial or complete file name.
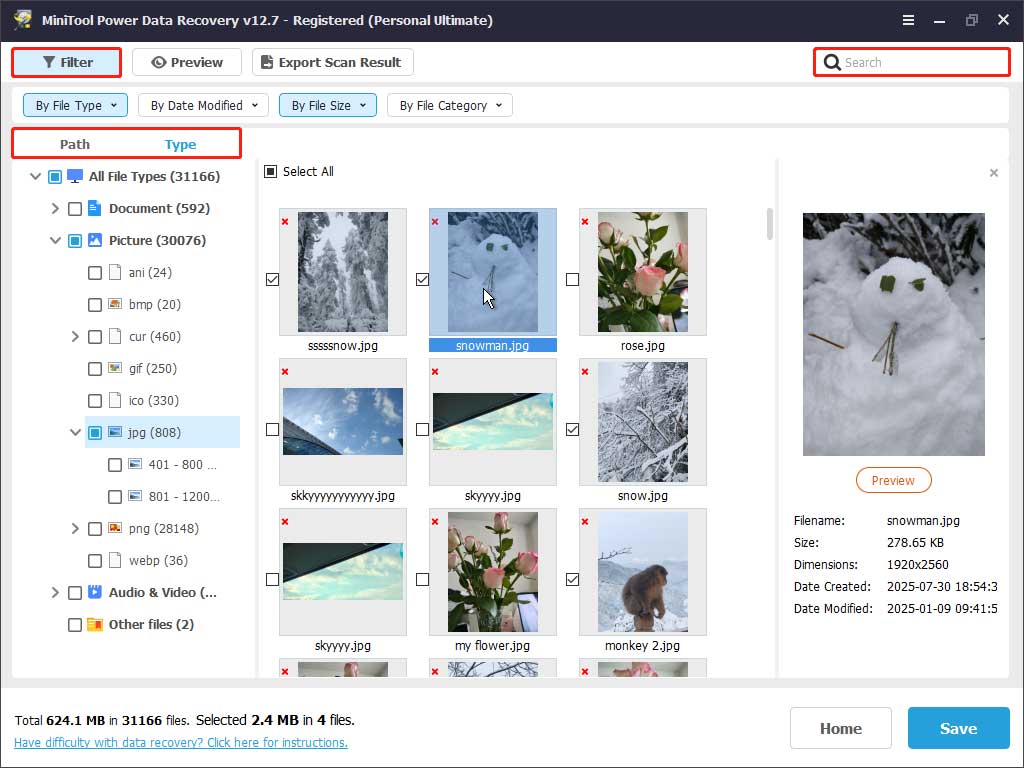
Step 6. Double-click on the target files to preview them. After confirming all the files, click Save and store them to an external disk.

Once all important files are restored, start reinstalling Windows to regain access to your computer.
Steps to Perform a Clean Installation
Here are the steps to reinstall Windows with an installation drive:
Step 1. Connect a blank USB drive to a functioning computer.
Next, download the Windows Media Creation tool, and follow the prompts to create a Windows installation media.
Step 2. Boot into BIOS and start your computer from the installation media.
Step 3. In the Windows Setup interface, set up your language and keyboard settings, and follow the instructions on your screen to complete the reinstallation.
For detailed steps, check out this Microsoft Windows 11 Clean Installation guide.
When BIOS Reset or Update Makes Sense
The last resort for resolving a blue screen loop is resetting or updating the BIOS. This method is worth considering when a clean installation of Windows still fails to fix the issue.
Why are BIOS changes placed after a system reinstallation?
Why BIOS-related Actions Are Not Routine Fixes
Most blue screen errors are caused by software‑level issues such as system file corruption, driver errors, Windows update bugs, or software conflicts.
All these problems occur within the operating system, and a clean installation of Windows can usually resolve them completely.
In contrast, the BIOS is a critical component that manages hardware initialization and system startup. Because of its importance, BIOS modification is not considered a general troubleshooting step.
When They May Be Relevant
BIOS reset or update should only be considered when you suspect hardware issues or when it is confirmed that a specific problem requires a BIOS change.
To be specific, BIOS actions may be required in the following situations:
- The blue screen reappears after a hardware change, such as replacing the CPU, memory, or graphics card.
- The blue screen occurs immediately after you modify a BIOS setting.
- Microsoft states that a BIOS update or reset is required after installing a certain system update or driver.
Risks of Unnecessary BIOS Changes
Unnecessary or failed BIOS changes may cause serious issues. These include system inabilities, new bugs when accessing files or opening software, or even complete system damage.
If you are certain that a BIOS update or reset is required, ensure that the power supply is stable and will not be interrupted. Then follow the walkthrough below to safely update or reset the BIOS.
How to Reset BIOS to Defaults
Step 1. Restart your computer. During startup, keep holding down the BIOS key (F2, Esc, F12, F10) on your keyboard to enter BIOS.
Step 2. Once the BIOS setup utility window appears, use the arrow keys on your keyboard to navigate to the Boot section.
Step 3. Press the key displayed on the screen to restore default BIOS settings, such as F9.
Step 4. Press the key shown for saving changes to apply the settings.
How to Update BIOS
Different motherboard manufacturers require different methods to update the BIOS. However, in most cases, the process involves the following steps:
- Identify your motherboard model.
- Visit the official manufacturer’s website to download the BIOS update file, and then copy it to a USB drive.
- Enter the BIOS interface and navigate to the specialized BIOS update utility.
- Select the BIOS update file in your USB drive and start the update process.
- Wait for the update to finish without interrupting the power supply to avoid motherboard damage.
For detailed instructions, search for the official guidance provided by your motherboard manufacturer.
Useful Tips to Prevent Blue Screen of Death
During daily computer usage, there are many feasible actions you can take to prevent system file corruption or other problems that may lead to a BSOD.
Below are some common preventive measures.
Keep Windows and software updated. Install Windows updates, especially critical security updates, to reduce the risk of system instability.
Download drives from trusted sources. Always update drivers from Device Manager or download them from the official manufacturer’s website. Avoid downloading drivers from unknown third‑party sites to prevent malware infection.
Do not install suspicious software. Unknown software may modify system files or install harmful drivers, thereby triggering a blue screen error.
Avoid changing BIOS settings unnecessarily. Do not modify unfamiliar BIOS settings because incorrect BIOS configurations can cause boot failures.
Keep real-time virus protection enabled. Ensure Windows Defender’s real‑time protection is enabled to prevent virus infections. Alternatively, you can install a trusted third-party antivirus program such as Avast, Norton, or McAfee.
Use high-quality hardware and install it properly. Use reliable components, especially memory modules and graphics cards. In addition, make sure they are correctly and firmly connected to your computer.
Keep free space on the system drive. Avoid filling the system drive completely because insufficient free space can cause system instability or performance issues.
Check disk health regularly. Use tools such as CHKDSK to detect file system errors or bad sectors on your hard drive.
Keep a stable power supply. Avoid using low‑quality power supplies as unstable power can cause sudden shutdowns or even hardware damage.
Clean the computer regularly. Regularly clean dust from fans and other hardware components to maintain proper heat dissipation. Overheating is a common cause of BSODs.
Back up the system and files. Use Windows Backup and Restore or File History to back up important data regularly. With a backup, even if a BSOD reoccurs, you can reinstall the system without losing files.
Bottom Line
To sum up, a BSOD is not always a sign of hardware failure. It is often a protective mechanism designed to prevent further damage. BSODs may arise from software or hardware issues, often triggered by incorrect changes.
If it is a one‑time BSOD, try undoing recent changes such as system updates, driver updates, or hardware adjustments. If that does not help, run DISM and SFC to repair system files.
When the BSOD keeps occurring and Windows cannot boot, enter WinRE to run the built‑in repair tools.
If nothing works, recover files first, and then perform a clean reinstallation of Windows.
Additionally, whether you have fixed the issue or purchased a new PC, maintaining good habits is essential to prevent BSODs from happening again.
If you encounter any issues while using MiniTool software, please contact the support team at [email protected].
About The Author

Position: Columnist
Shirley holds a bachelor’s degree in English and has been an editor at the MiniTool Team for many years. She specializes in IT-related content, with a focus on data recovery, file backup, disk management, and other technical topics. She is committed to delivering clear, accurate, and practical solutions to help users resolve common computer issues.
User Comments :