ADATA SSD is a fast and reliable data storage device. However, it may still suffer from data loss, device corruption, and other issues. This post on MiniTool shows you how to complete ADATA SSD recovery with powerful software and how to repair an ADATA SSD in different situations.
ADATA SSD Data Loss Causes
Since data loss happens frequently and unexpectedly, it is necessary to understand the causes of data loss before performing an ADATA SSD recovery. The most common reason is human errors such as mistaken deletion, accidental formatting, etc. Besides, there are several other causes that can lead to data loss on your ADATA SSD:
- Virus infection: If you connect an ADATA SSD to an unknown or untrusted public device, the SSD may be vulnerable to virus or malware attacks. Malicious attacks may not only result in data loss but also compromise personal information.
- Improper removal: If you forcibly remove the ADATA SSD from your computer while it is in use, the data stored on the SSD is likely to be lost, or worse, corrupted.
- Bad blocks: Similar to bad sectors in an HDD, an SSD will have bad blocks. Bad blocks are not suitable for storing data. If there are data stored in bad blocks, they will get lost.
- Physical damage: Physical damage, such as bending, squashing, breaking, etc., prevents you from accessing the SSD normally. If the SSD is severely damaged, your data may be unable to be restored.
Tips to Increase Data Recovery Success Rate
What should you do when finding there are files lost from the ADATA SSD? Here are some tips to increase your chances of ADATA SSD recovery.
- 1. Disable TRIM: Most modern SSDs support TRIM commands, including ADATA SSDs. If your SSD has enabled TRIM, the block used to store data will be wiped once data is deleted from your SSD. Though TRIM benefits the performance and extends the life of the SSD, it makes data recovery more difficult. You should ensure the TRIM is disabled on your SSD before performing an ADATA SSD data recovery.
- 2. Stop saving new data to the ADATA SSD: Once you find data lost from your ADATA SSD, you should stop using it to save new data. Deleted or lost files are inaccessible but remain on the device. New data is randomly saved on the device and may overwrite the lost data.
Recover Files from an ADATA SSD with MiniTool Power Data Recovery
Things You Should Know About MiniTool Power Data Recovery
As a secure data recovery software, MiniTool Power Data Recovery provides a green data recovery environment and causes no damage to your original data. This file recovery software is designed to recover data from Windows operating systems and various external data storage devices, including SSDs, USB flash drives, CDs, SD cards, etc.
Whether your SSD can’t be recognized by your computer or has become corrupted, this file recovery software can meet your data recovery needs. MiniTool Software gives several editions to meet the different demands of users better. You can get MiniTool Power Data Recovery Free to experience its robust built-in features and restore 1GB of files for free.
MiniTool Power Data Recovery FreeClick to Download100%Clean & Safe
Guide to Complete an ADATA SSD Recovery
After downloading this ADATA SSD recovery software, you need to connect the SSD to your computer, and then launch the software to enter the main interface.
Step 1: Scan the Target Partition
Here are all the detected partitions. If you only need to recover files from a specific partition, you can hover your mouse over the partition and click Scan. To make an ADATA SSD data recovery on the whole SSD, switch to the Devices tab and select the ADATA SSD. However, scanning the whole SSD requires a longer time.
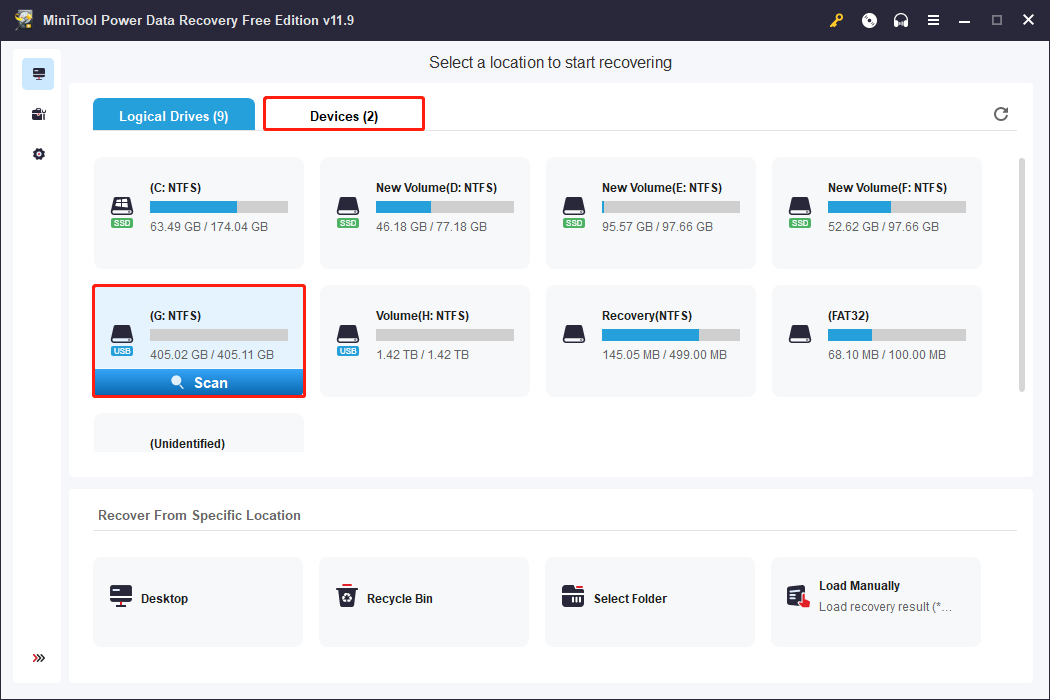
Found files will be displayed during the scan. For the best data recovery result, please wait until the scan process is completed.
Step 2: Locate the Required Files
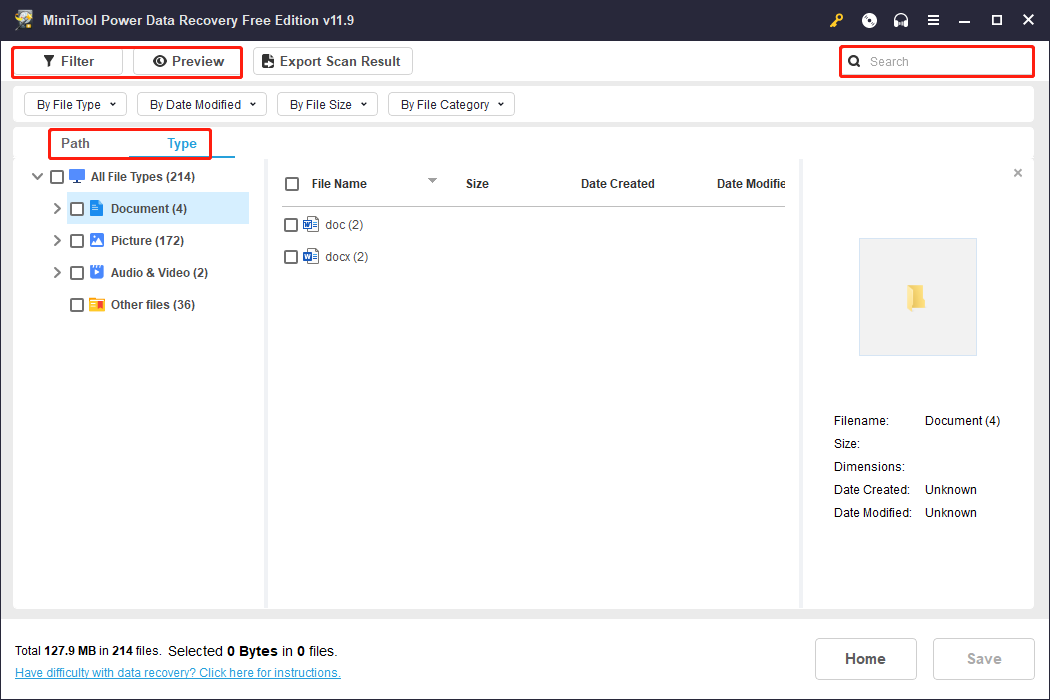
The scanned files will be categorized by Path by default. Alternatively, you can access files according to their types by switching to the Type tab.
Piles of files make it difficult to quickly find the ones you need. In this case, you can use the Filter and Search features to filter out unwanted files or locate specific files by name.
Furthermore, you have a method to verify whether the chosen file is the one you want. Select the file and click the Preview button at the top toolbar or under the file icon on the right pane. You can go to this page to check the supported preview file type.
Step 3: Recover the Chosen Files
Add check marks in front of all the needed files and click on the Save button. In the following small window, you should choose a destination different from the original path and click OK to start the recovery process.
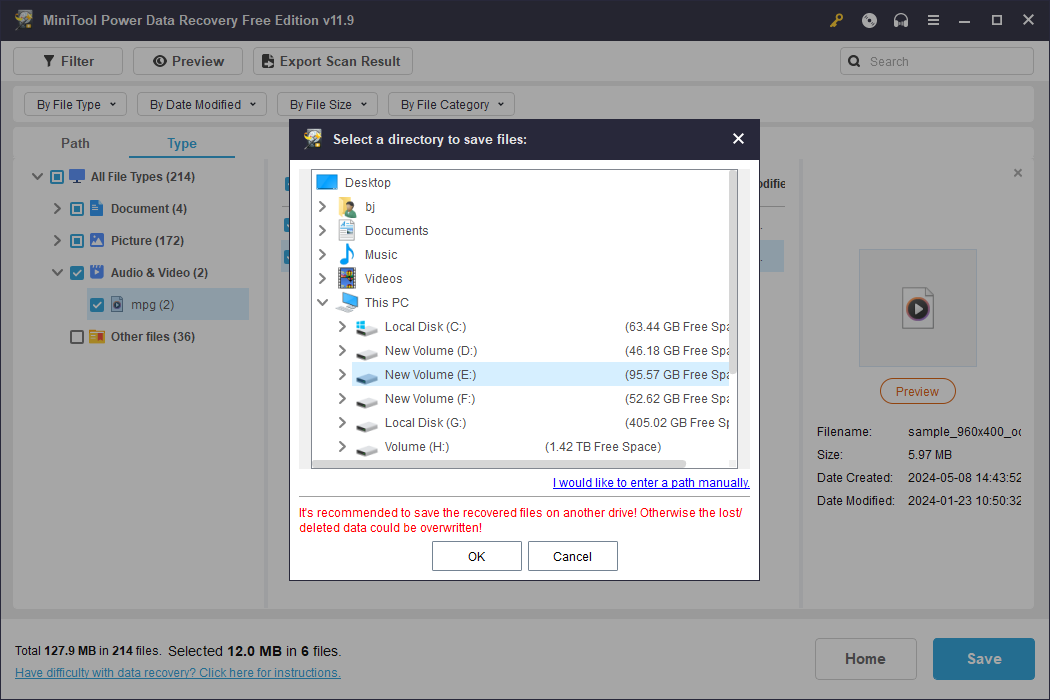
There will be a prompt window to inform you the ADATA SSD recovery is completed.
You can go to the destination to check the files. Since you are running the free edition now, there is only 1GB of free data recovery capacity. If you select more than 1GB of files, you need to update to an advanced edition.
Recover Files from an ADATA SSD with DriveSavers
Alternatively, you can use ADATA’s third-party partner, DriveSavers, to restore data. DriveSavers has a team of data recovery experts and top-tier facilities. When your ADATA SSD loses files due to mistaken operations, logical errors, or physical damages, you can connect them to obtain assistance.
You will need to send the SSD to the DriveSavers lab and wait for the results of the test, including whether the data is recoverable and the cost of the restoration. You can get detailed information from this page. However, this process could be time-consuming and costly.
MiniTool ShadowMaker TrialClick to Download100%Clean & Safe
How to Repair an ADATA SSD
In addition to common data loss situations, your data may become inaccessible due to the ADATA SSD being corrupted, damaged, or unrecognized. In this section, we will show you several basic and feasible methods to repair a problematic ADATA SSD.
Fix an ADATA SSD Not Showing up on the Computer
Method 1. Assign a Drive Letter
When you connect the ADATA SSD to your computer but it doesn’t show up in File Explorer, one possible reason is that your SSD is missing a drive letter. You can go to Disk Management to have a check and add one if necessary.
Step 1. Right-click on the Windows logo in the left corner.
Step 2. Choose Disk Management to find the target disk.
Step 3. Right-click on it and choose Change Drive Letter and Paths.
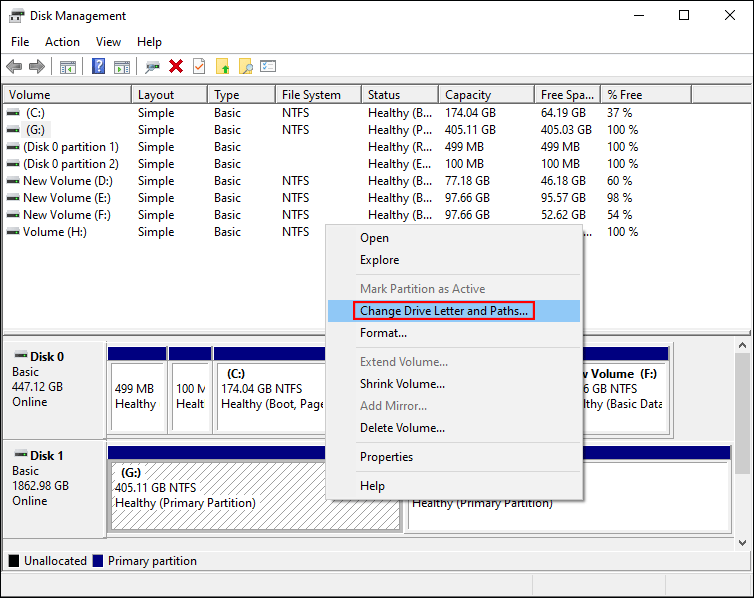
Step 4. Click Add, then choose one drive letter from the dropdown menu of Assign the following drive letter.
Method 2. Update the ADATA SSD Driver
If the driver is outdated or corrupted, your computer cannot communicate properly with your ADATA SSD, leading to the ADATA SSD not showing up. This issue can be resolved by updating or installing a proper driver in Device Manager.
Step 1. Type Device Manager into the Windows Search bar and hit Enter to open it.
Step 2. Find and expand the Disk drives option.
Step 3. Right-click on the ADATA SSD and choose Update driver from the context menu.
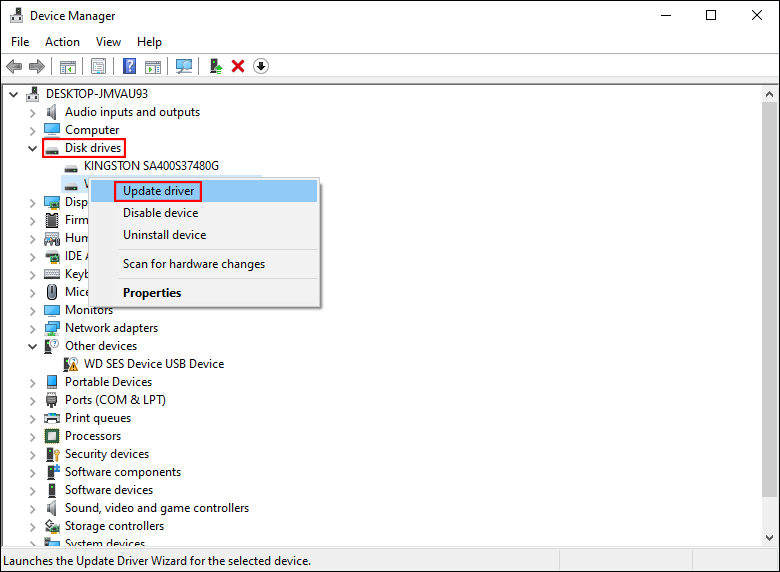
Step 4. Choose Search automatically for drivers in the following window.
The computer will find and install the latest compatible driver automatically. After that, check whether your ADATA SSD shows up on your computer.
If the problem is still here, try to reinstall the driver by choosing the Uninstall device from the same menu in Step 3 and clicking Uninstall again to confirm. Then, restart your computer. During this process, your computer will install the driver automatically.
Method 3. Run the Hardware and Devices Troubleshooter
The Hardware and Devices troubleshooter is a Windows built-in utility that can detect and repair device issues.
Step 1. Press Win + R to open the Run window.
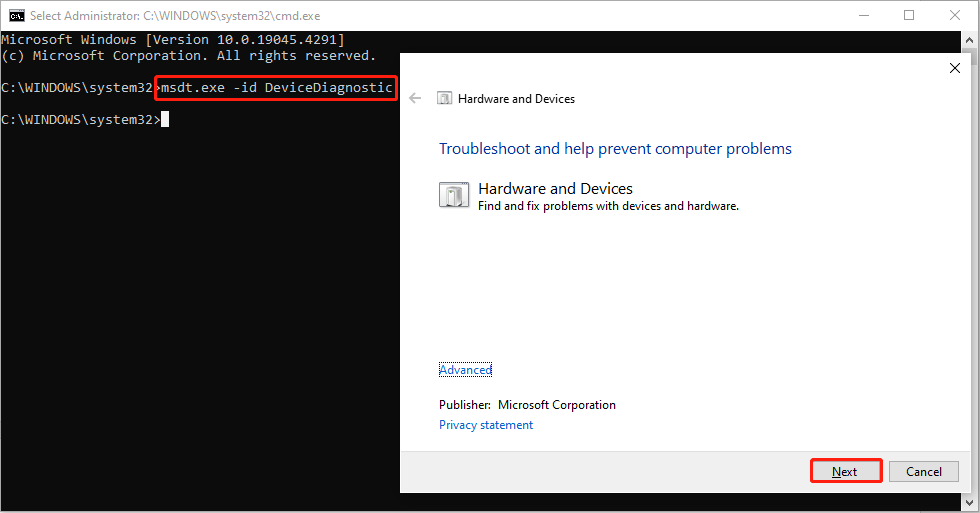
Step 2. Type cmd and press Shift + Ctrl + Enter to run Command Prompt as administrator.
Step 3. Copy and paste msdt.exe -id DeviceDiagnostic and hit Enter. The Hardware and Devices troubleshooter will launch automatically.
Step 4. Click Next to run the troubleshooter. Wait and follow the on-screen instructions to resolve the found problems.
Fix a Corrupted ADATA SSD on the Computer
An ADATA SSD becomes corrupted due to bad blocks, file system corruption, virus attacks, overheating, etc. You can try the following methods to complete ADATA SSD repair.
Method 1. Check Bad Blocks on an ADATA SSD
To check whether your ADATA SSD contains any bad blocks, you can choose a professional partition manager to detect and repair bad blocks. MiniTool Partition Wizard is an optimal choice. This user-friendly software has clear instructions and a clean user interface. You can get this software by clicking the download button below.
MiniTool Partition Wizard FreeClick to Download100%Clean & Safe
Step 1. Connect your ADATA SSD to the computer and launch the software. Right-click on the SSD and choose Surface Test.
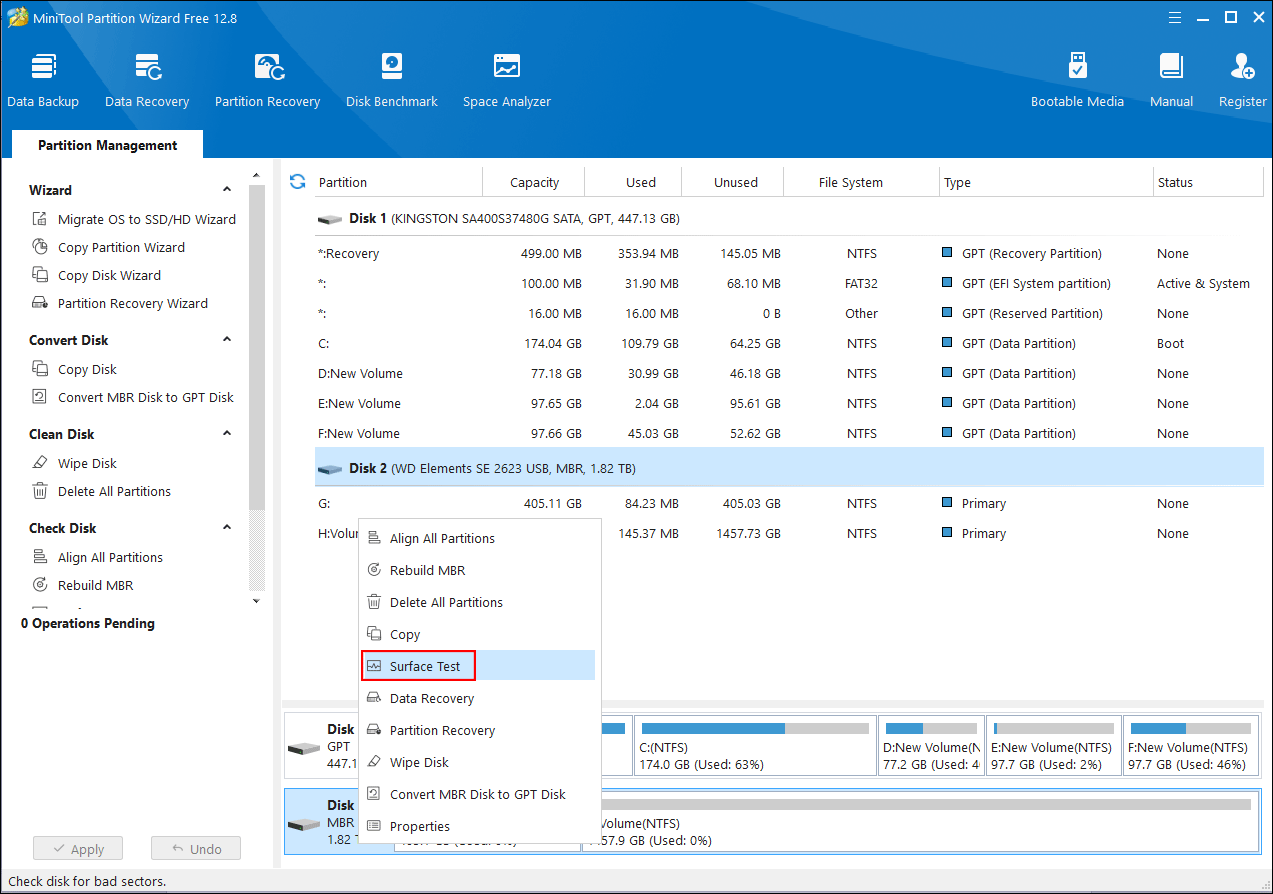
Step 2. In the following window, click Start Now to scan the SSD. A bad block will be marked as red in the window.
Step 3. Exit the software. If there are any bad blocks, you can open Command Prompt as administrator, type CHKDSK X: /r, and hit Enter to mark the bad blocks as unusable on the SSD. (You need to change X with the actual drive letter of the target drive.)

Method 2. Perform a Virus Scan
Sometimes, your ADATA SSD becomes corrupted after connecting to untrusted public devices. In this situation, you can consider if the device corruption is triggered by virus attacks. You can connect the ADATA SSD to an unused computer to prevent it from being infected. Then, work with the following steps.
Step 1. Type Virus & Threat Protection into the search bar and hit Enter to open Windows Security.
Step 2. Under the Virus & threat protection tab, select Scan options.
Step 3. Select Full scan and hit Scan now.
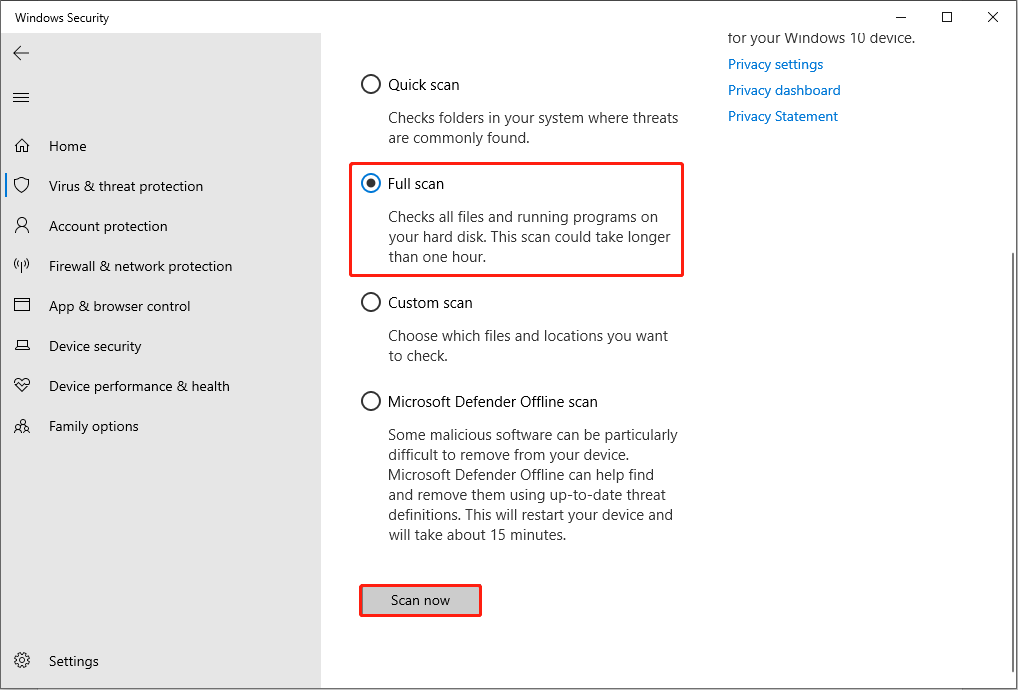
The process may take a long time. Please wait patiently until the scan process is completed. If your computer finds any threats, click Start actions to remove them.
Method 3. Format the ADATA SSD
The last method is to format your SSD, but this operation will erase all your data on the device. Therefore, I advise you to recover files from a corrupted ADATA SSD first with MiniTool Power Data Recovery. This ADATA SSD recovery software can retrieve files from corrupted drives, inaccessible partitions, unrecognized USB drives, etc.
MiniTool Power Data Recovery FreeClick to Download100%Clean & Safe
After rescuing files from the ADATA SSD, you can start formatting the device with the next steps.
Step 1. Open Disk Management on your computer and locate the target disk.
Step 2. Right-click on it and choose Format from the context menu.
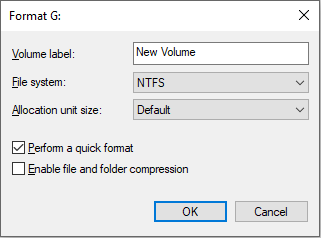
Step 3. Set the File system and check Perform a quick format in the prompt window. Then, click OK to start formatting.
Further Reading:
- How to Fix a Corrupted External Hard Drive without Formatting
- How to Fix Corrupted Hard Drive Using CMD & Safeguard Data
Final Words
After reading this post, you can discover that ADATA SSD recovery is an easy task. However, the two preliminaries are extremely essential: disabled TRIM and no newly saved data. With the two conditions, you can recover files with the guidance in this post.
Additionally, this post shows you several basic methods to repair ADATA SSD issues. You can read and try them to resolve your problem.
Hope you can get useful information from this post. Please let us know if you have any puzzles in using MiniTool software at [email protected].
User Comments :