The memory management error on Windows indicates problems with RAM, drivers, or software. It can usually be fixed by running Windows Memory Diagnostic, updating drivers, scanning for malware, or removing recently added hardware/software. To get detailed instructions, read this MiniTool post.
When experiencing a Blue Screen of Death (BSOD), a Windows stop code will appear on the screen, helping identify the problem and resolve it.
One of the common stop codes associated with the BSOD is MEMORY_MANAGEMENT.
First, we will explain what memory management is and what a memory management error means.
Overview of Memory Management Error on Windows 11/10
In a broad sense, computer memory refers to physical devices utilized to store data permanently or temporarily through integrated circuits.
Computer memory is generally divided into:
- Primary Memory: Quick, volatile, designed for active data, such as RAM (random access memory) and ROM (read-only memory).
- Secondary Memory: Slower, non-volatile, intended for long-term storage, like HDDs and SSDs.
Keep reading to get more detailed information about memory management.
About Memory Management
Memory management is the process of controlling and organizing computer memory to ensure that the OS, apps, and processes have the necessary memory to function.
Specific sections known as blocks are assigned to various active programs to enhance overall system efficiency.
Below are some key functions for memory management:
- Effective Resource Use: Optimizes memory usage by allocating and reclaiming space for processes to minimize waste.
- Simultaneous Program Execution: Allows multiple applications to run concurrently by partitioning memory, preventing interference between programs.
- System Reliability and Security: Protects processes from accessing each other’s memory, enhancing stability and data security.
- Performance Improvement: Techniques like paging and virtual memory can support more applications than the physical memory can handle, keeping the system responsive.
- Handles Memory Problems: Helps reduce problems such as memory fragmentation and efficiently reclaims memory when processes terminate.
About the Memory Management Error
The memory management error happens when Windows encounters a serious issue related to the computer’s memory management or access methods.
Consider your RAM as a workspace where applications temporarily keep data for rapid retrieval.
If the system detects corruption, malfunction, or physical issues in this workspace, it triggers a BSOD to prevent further damage.
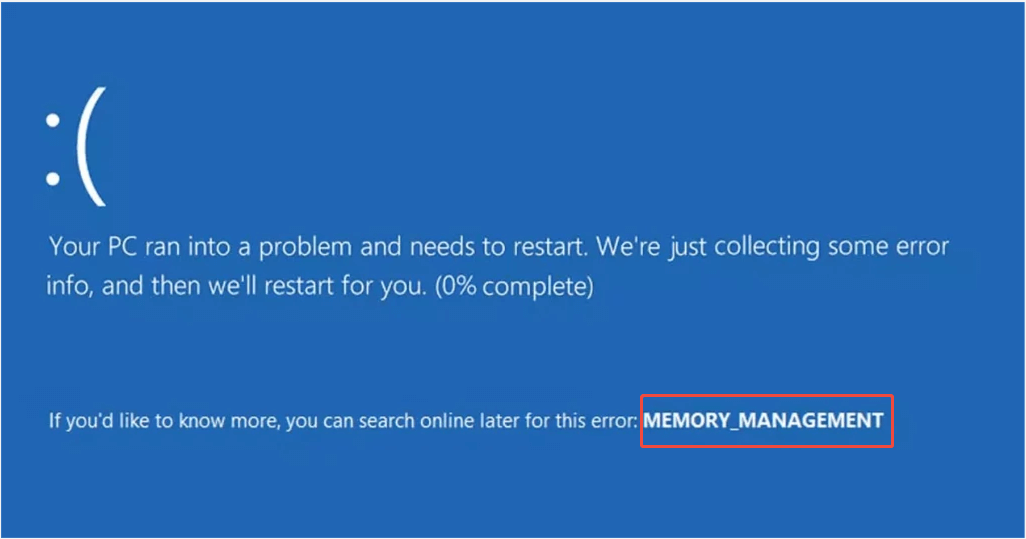
The MEMORY_MANAGEMENT error will be accompanied by a blue screen, as the image shows below:
The reason for the MEMORY_MANAGEMENT BSOD problem varies. In the following part, we will introduce the most common causes.
Possible Causes of the Memory Management BSOD Error
While the memory management error is usually related to RAM or how Windows handles memory tasks, a system crash during startup is more severe, particularly if it leads to a restart loop.
Here are some reasons why this error may occur:
- Faulty or Loose RAM: Loose, incompatible, or faulty RAM can lead to a memory management error.
- Corrupted System Files: Issues caused by software conflicts or malware can corrupt system files, leading to errors.
- Outdated Drivers: Old or incompatible drivers for hardware can result in memory issues.
- Malware Infections: Malware can disrupt memory management and trigger errors.
- Overclocking: Overlocked RAM beyond stable limits can cause memory-related errors, especially at startup.
- Memory Leaks: Background processes consuming excessive RAM due to poor software design can trigger memory issues.
- BIOS/UEFI Issues: Incorrect motherboard settings or outdated firmware can cause a BSOD.
- Virtual Memory Problems: Misconfigured page file settings can lead to memory errors.
After learning the reasons, proceed to the specific fixes to resolve the error.
How to Fix Memory Management Error if Your PC Boots Normally
This section outlines several methods to fix the memory management error if your computer can still boot.
The solutions include uninstalling software, clearing temporary files, repairing system and disk errors, and running virus scans, memory tests, and system updates.
Method 1. Remove Peripherals & Restart the PC
When you encounter a blue screen, the first thing to do is disconnect all external devices like the keyboard, printers, or external hard disks.
This can help identify whether they are causing the memory management BSOD issue.
Meanwhile, a simple restart may resolve the memory management problem caused by a temporary glitch.
Method 2. Remove Recently Installed Software
If the memory management BSOD error occurs after a software installation or update, you need to roll back or uninstall the software.
Here are the steps for removing software using the Control Panel:
Step 1. Type Control Panel in the search box and press Enter.
Step 2. Set the View by option to Category, then click on Uninstall a program under the Programs section.
Step 3. Locate the software you recently installed, right-click on it, and choose the Uninstall option. Follow the on-screen prompts to complete the uninstallation process.
If the error still exists or you don’t install or update any software, keep trying the following ones.
Method 3. Run the Windows Memory Diagnostic Tool
Windows 11/10 offers the Windows Memory Diagnostic tool to check for memory issues that may affect your computer’s performance.
Try to run this tool to test your RAM and fix the memory management issue by following these steps:
Step 1. Press Win + R to launch the Run dialog, type mdsched.exe, and press Enter.
Step 2. Choose an option based on your requirements:
- Restart now and check for problems (recommended): It will examine your memory as soon as possible.
- Check for problems the next time I start my computer: It allows you to continue working and perform the memory check later.
After selecting, the Windows Memory Diagnostics Tool will run automatically either right away or during the next boot.
While running, you can see the scanning process and the current status.
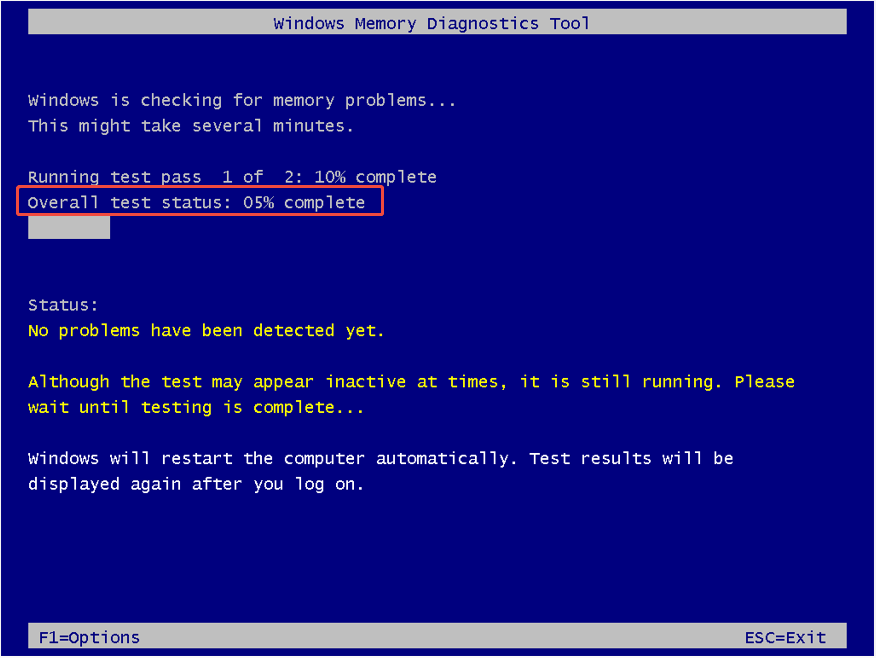
If you do not observe any errors on the screen, your memory is functioning properly. In this case, you should explore other solutions.
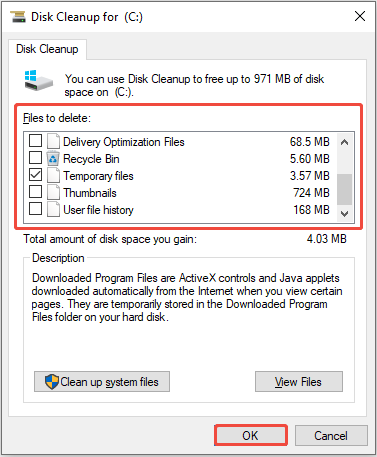
Method 4. Clear Temporary Files
Too many temporary files and folders will lead to slow app responses, impact processing speed, and result in error messages.
In this situation, consider using Disk Cleanup, a built-in Windows tool, to delete these unnecessary files.
Here’s how to do it:
Step 1. Press Win + S to open the Windows search bar, type Disk Cleanup, and then launch it.
Step 2. Select the target drive from the dropdown menu and click OK.
Step 3. Choose the files in the Files to delete section, then click OK to remove them.
Method 5. Update Windows
An outdated operating system may lead to unforeseen errors, like a memory management error. Therefore, consider updating Windows if it is available.
Here’s how you can do it:
- For Windows 10: Press Win + I, then navigate to Update & Security > Windows Update. Install any available updates.
- For Windows 11: Press Win + I, then go to Windows Update. Install any updates that are pending.
Method 6. Update Drivers
As mentioned above, outdated drivers, like GPU drivers, are a major culprit in BSOD issues.
While Windows can update drivers automatically, there are times when manual updates are necessary.
Follow the steps below to easily update drivers:
Step 1. Press Win + X and select Device Manager from the WinX menu.
Step 2. Look through the list to see if there is an error symbol, usually indicated by a yellow exclamation mark.
If you see the arrowhead symbol, right-click on the corresponding device and choose Update driver.
If there are no issues, the driver may not be the source of the error. Proceed to the next solution.
Method 7. Scan for Malware
Sometimes the error could be the result of a virus or malware infection.
Windows Security is an effective built-in tool to safeguard your PC against any potential virus or malware threats.
Here’s a guide on how to scan your PC with Windows Security.
Step 1. Press Win + S, type Windows Security in the box, and then press Enter.
Step 2. Select Virus & threat protection.
Step 3. Click on Scan options to choose a scanning method, such as Full scan.
Step 4. Click the Scan now button to begin the scan immediately.
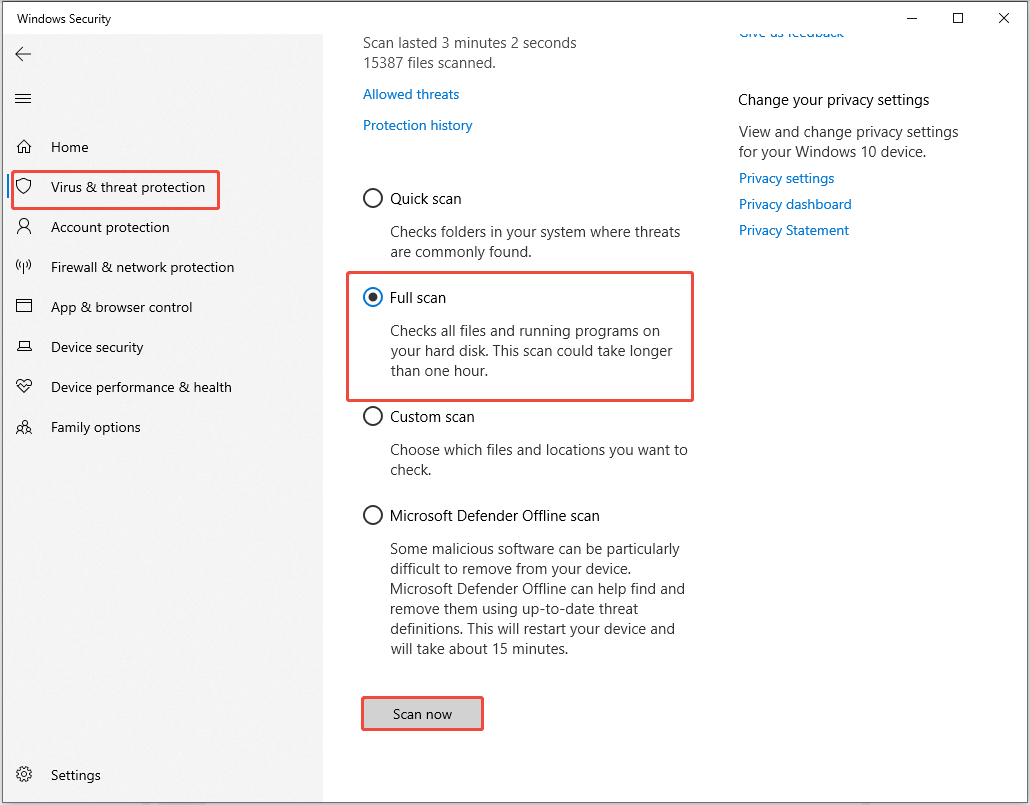
Wait for the process to complete and follow the on-screen instructions. If no virus is found, try checking for and repairing corrupted system files to resolve the issue.
Method 8. Repair System Files
Corrupted system files can destabilize memory management, causing the BSOD issue.
DISM and SFC are built-in Windows tools for scanning and repairing corrupted or missing system files.
To run DISM and SFC, follow these steps:
Step 1. Type cmd in the Windows Search bar, right-click on Command Prompt, and select Run as administrator. Click Yes in the UAC window.
Step 2. Copy and paste the following commands one by one, and press Enter after each line:
- Dism /Online /Cleanup-Image /CheckHealth
- Dism /Online /Cleanup-Image /ScanHealth
- Dism /Online /Cleanup-Image /RestoreHealth
Step 3. Once the commands have completed, copy and paste “sfc /scannow” and press Enter.
After the scanning process is finished, restart your PC and verify if the memory management BSOD error is fixed.
Method 9. Repair Disk Errors
Hard drive problems, such as file system errors or bad sectors, can result in memory management issues and BSOD errors.
Performing a disk check (CHKDSK) can help detect and resolve disk-related issues.
Here’s how to run CHKDSK:
Step 1. Run Command Prompt as an administrator.
Step 2. Type chkdsk /f /r in the window and press Enter.
- /f repairs errors.
- /r locates bad sectors and retrieves data that can be recovered.
Schedule the scan to occur during the next restart if asked. Then, reboot your computer to finalize the procedure.
If the above workarounds failed to fix the memory management BSOD error, continue to read the next part to try some in-depth solutions.
How to Fix Memory Management Error if Your PC Is Stuck on a BSOD
If you are stuck at the memory management BSOD interface, try the four more complicated methods to fix the issue. Effective solutions include running a startup repair, system restore, factory reset, or updating BIOS/UEFI firmware.
Solution 1. Use Startup Repair
The Startup Repair tool automatically scans and fixes Windows startup issues caused by corrupted system files or problematic driver updates, helping to resolve the BSOD.
Here’s a breakdown on how to use the Startup Repair tool:
Step 1. Turn on your PC and immediately press and hold the Power button to force it off.
Step 2. When you see the Windows logo or spinning dots, repeat this process (turn on, then force off) two more times.
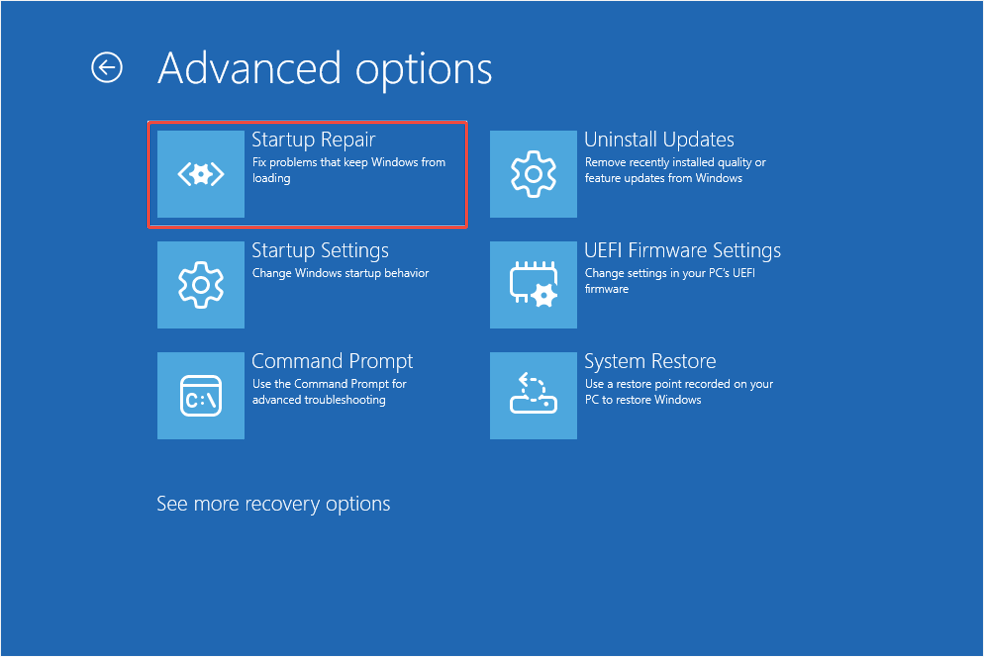
Step 3. After doing so, your computer will begin preparing for Automatic Repair. Next, select Advanced options to get to Windows Recovery Environment.
Step 4. In WinRE, choose Troubleshoot > Advanced options.
Step 5. Click on the Startup Repair module.
If the Startup Repair tool doesn’t work, consider accessing WinRE again and trying Uninstall Updates or System Restore.
Solution 2. Update BIOS/UEFI
Similar to hardware device drivers, the BIOS/UEFI firmware of your motherboard also requires updates.
Certain firmware updates can resolve memory issues, particularly if you’ve recently upgraded your RAM.
When you can’t access Windows, you will need to use a secondary PC to visit the manufacturer’s website and download the updated files onto a USB.
Step 1. Download the most recent BIOS/UEFI update specific to your motherboard model from the official website of the manufacturer.
Step 2. Reboot your computer and press the appropriate key (such as F2, F12, or Delete) to enter the BIOS setup menu.
Step 3. Locate the BIOS Update or EZ Flash option, depending on the model of your motherboard.
Step 4. Follow the instructions provided and select the USB drive containing the update.
Allow the process to complete, restart the system, and see if the BSOD issue has been resolved.
Solution 3. Reseat RAM/Swap Sticks
First, make sure your PC is powered off, then open it up to check that all RAM sticks are securely in place and locked down.
It’s also important to look for adequate airflow; clear away any dust buildup and ensure that your fans are working to prevent overheating.
Even if your RAM stick seems to be functioning correctly, there might be an issue with the slot itself. If that’s the case, remove the RAM stick and try placing it in a different slot.
Additionally, double-check that all other components are properly seated. If you’ve recently added a new RAM stick, ensure it’s compatible with your motherboard.
Solution 4. Reset Windows
This is the final method you should attempt. Only use this if none of the previous solutions fix the memory management error.
Resetting Windows replaces your system files, fixing serious memory management errors and preventing future issues from file corruption or malfunction.
To reset your Windows 11/10, proceed with the following instructions:
Boot to the recovery environment by pressing the Power button several times, then navigate to Troubleshoot > Reset this PC.
When your computer restarts, you will see two options. Select the option that best suits your needs:
- The Keep my files option will only delete apps and settings while preserving your personal files.
- The Remove everything option will wipe out all of your personal files and settings.
Allow the process to finish, and your PC should boot normally.
How to Recover Data From the PC on Which a Memory Management Error Occurred
When you encounter the blue screen memory management error on your computer, the risk of data loss could make the situation worse.
MiniTool Power Data Recovery is a reliable and free data recovery tool for Windows that supports the restoration of various types of files. If your files are missing, use it to recover them.
Key features:
- Recovers various data types, including documents, images, videos, and audio files.
- Recover files in various data loss situations like accidental system crash, virus infection, hard drive failure, and so on.
- Compatible with multiple file systems, including NTFS, FAT, and more.
- Fully compatible with popular Windows versions, including Windows 11/10/8/8.1.
- Offers multiple editions, including a free edition that allows free scanning, previewing, and recovery of up to 1 GB of data.
- Provides a user-friendly interface for an intuitive recovery process, with options to filter and search files.
3 steps to recover data with MiniTool Power Data Recovery:
Step 1. Get this data recovery software on your PC and launch it.
MiniTool Power Data Recovery FreeClick to Download100%Clean & Safe
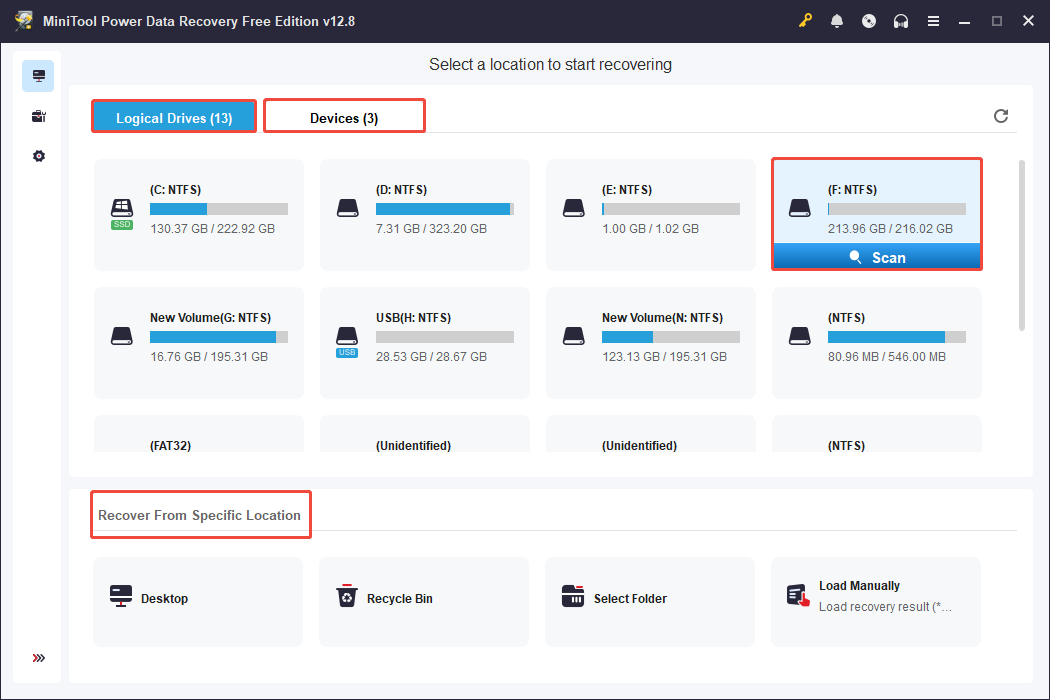
In the main interface, select the area to scan for deleted/lost files from these options:
- Logical Drives: Choose a partition and click Scan.
- Devices: Scan a connected physical disk.
- Recover From Specific Location: Scan a specific place like the desktop, a folder, or Recycle Bin.
Here, we choose to scan the F drive as an example.
Step 2. After the scan completes, browse the desired files to recover. The Path tab shows files by their original folder structure.
To locate the wanted files easily, use Type, Filter, or Search to narrow down results:
- Type: Classifies files by type and format for targeted recovery.
- Filter: Set conditions like file type, size, or date to display only relevant files.
- Search: Type a file name keyword in the search box to quickly find the target file.
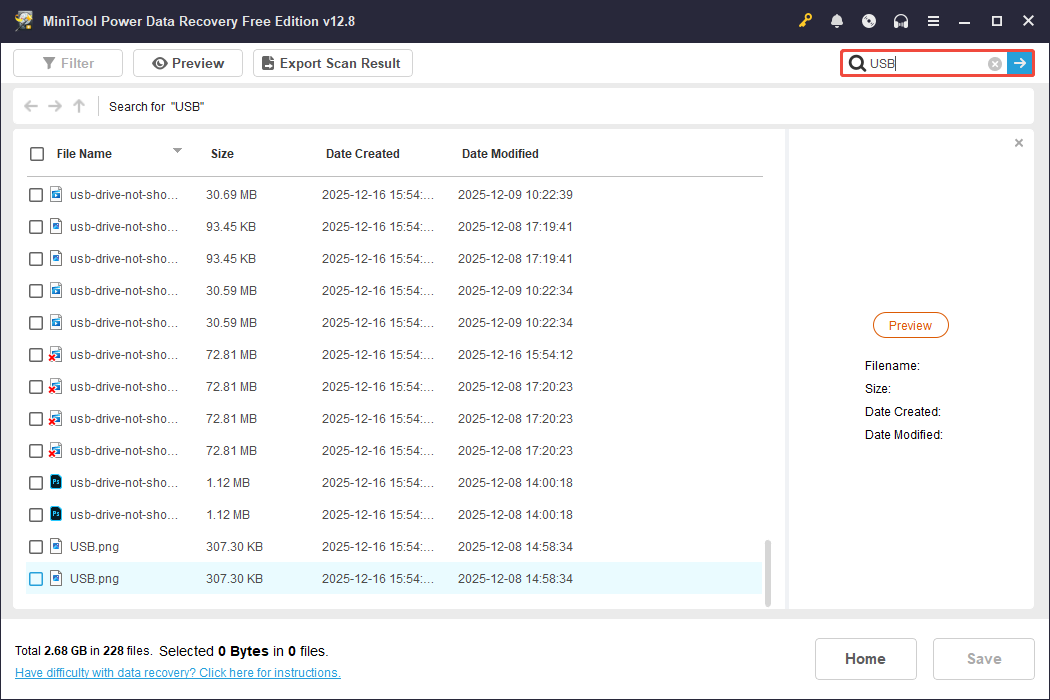
Double-click on each target file to preview its contents.
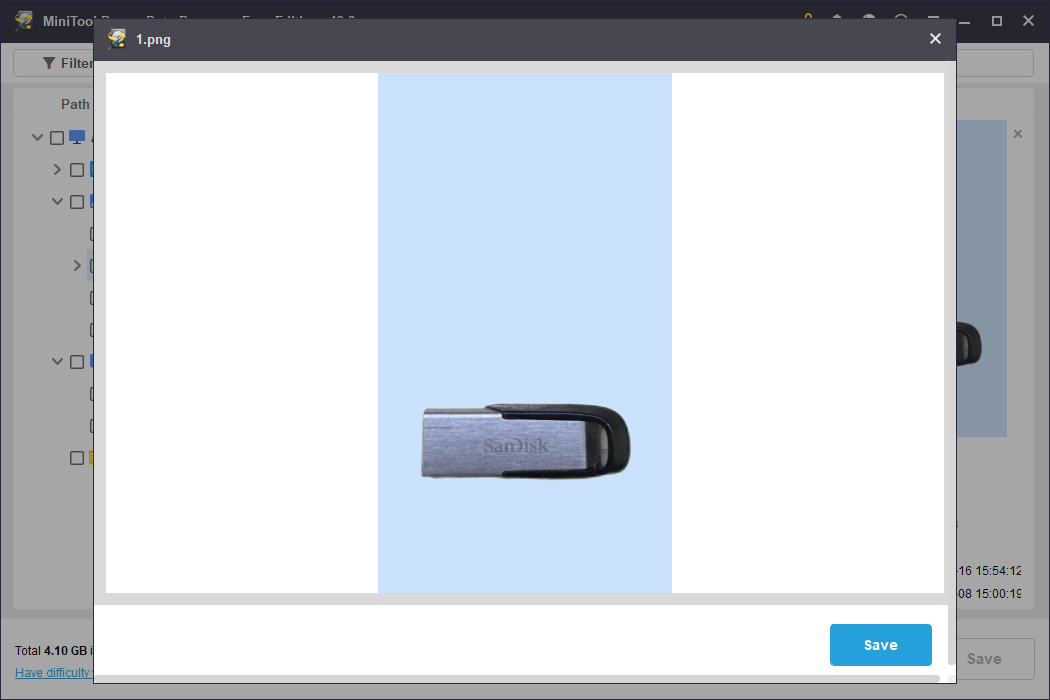
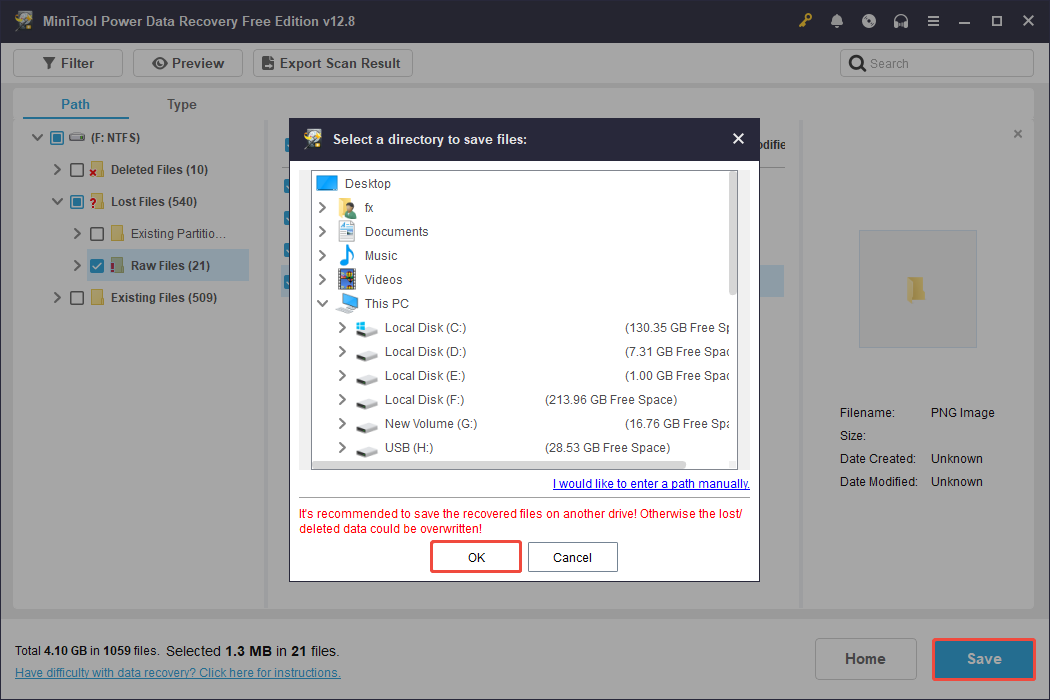
Step 3. Check the boxes next to all the needed files, and then click Save. Next, choose a location that is different from where the original files were, and click OK.
If your Windows can’t boot normally, you need to create a bootable disk to recover your PC data. This task can be achieved by MiniTool Power Data Recovery Bootable.
Kind Reminder: MEMORY_MANAGEMENT vs. 0x0000001a vs. 0xc000000e
While browsing the forum, we found that many users mentioned these three errors simultaneously: MEMORY_MANAGEMENT, 0x0000001a, and 0xc000000e.
Below, we will discuss them:
- MEMORY_MANAGEMENT is a broad term used for a Blue Screen of Death stop code that signifies a critical memory management issue has occurred.
- 0x0000001a is the specific hexadecimal representation for the MEMORY_MANAGEMENT stop code. They both refer to the same error condition.
- 0xc000000e, also known as STATUS_NO_SUCH_DEVICE, relates to issues with Boot Configuration Data, hardware failures, or misconfigured drives, indicating that Windows cannot find the required boot files to start.
While they are usually regarded as distinct issues, they can be linked in specific scenarios.
For example, a failing system disk may lead to a 0xc000000e startup error. If the virtual memory is located on that drive, it may also trigger a MEMORY_MANAGEMENT error.
Bottom Line
In conclusion, this post explores how to fix memory management error on Windows with nine common solutions and four advanced fixes.
Try these methods one by one until your PC works normally.
If you encounter any issues while using MiniTool data recovery software, please contact the support team for help via [email protected].
About The Author

Position: Columnist
Sandy became an English editor after graduation. She is devoted to finding effective solutions for diverse IT problems and provides articles on data recovery, data backup, and computer partitions and drives. In her spare time, she likes listening to music and playing games.
User Comments :