Is your hard disk or computer acting weird? It could be a failing hard drive. Below are some typical warning signs.
7 Signs Your Hard Drive Is Failing or Corrupted
Here are some of the most common signs your hard drive is corrupted or starting to fail:
1. You cannot access the hard drive and see error messages like:
- The device is not ready.
- Drive is not accessible.
- The volume does not contain a recognized file system.
- The file or directory is corrupted and unreadable.
2. Files or folders suddenly disappear or become corrupted.
3. The hard drive becomes extremely slow.
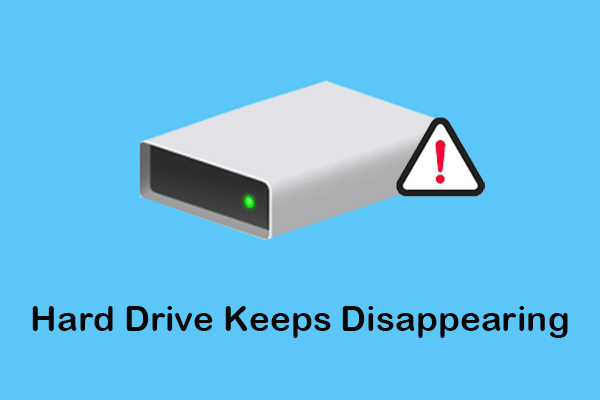
4. The drive keeps disconnecting or disappearing.
5. You hear clicking noises from the disk.
6. You experience frequent system crashes: black screens, blue screens, random shutdowns, etc.
7. Disk health check tools show warnings or say the disk needs repair.
If any of these happen, your first question is likely:
Can I repair my hard drive without losing data?
Read on to get the answer.
Can a Hard Drive Be Repaired
This depends. Let’s break it down.
If your hard drive has logical errors, like file system issues, but is still recognized by your PC, you may be able to fix it using tools like CHKDSK.
If CHKDSK does not work, you can try recovering files and then formatting the drive.
However, if your drive has physical damage due to drops, overheating, bending, etc., repair is usually not possible.
Next, let’s see how to repair a hard drive using both built-in Windows utilities and professional hard drive repair tools.
How to Repair Hard Drive Without Losing Data
Want to do a hard drive repair without data loss? Back up or recover your files first of all.
Important – Recover Files From a Corrupted Hard Drive Before Trying Any Fix
If the drive is still accessible, back up important files to another disk right away.
If the drive is not accessible, use a data restore tool like MiniTool Power Data Recovery to scan the disk and restore your files.
This Windows file restore tool supports recovering files even from corrupted or RAW drives.
Supported file types include documents, pictures, videos, audio, emails, archives, and other types.
In addition to hard drive recovery, this tool also works great on SD card recovery, USB flash drive recovery, CD/DVD recovery, SSD data recovery, and more.
Is MiniTool Power Data Recovery free?
It offers a free edition. MiniTool Power Data Recovery Free allows you to scan your hard drive and preview the found files for free. And, it supports recovering up to 1 GB of files for free.
Now, click the button below to download and install MiniTool Power Data Recovery, and use it to recover files from a corrupted hard drive.
MiniTool Power Data Recovery FreeClick to Download100%Clean & Safe
Step 1. Select the hard drive to scan.
Open MiniTool Power Data Recovery.
On the main interface, you will see a list of detected drives under Logical Drives.
Select the damaged or inaccessible hard drive and click Scan.
Or, switch to the Devices tab to scan an entire hard disk.
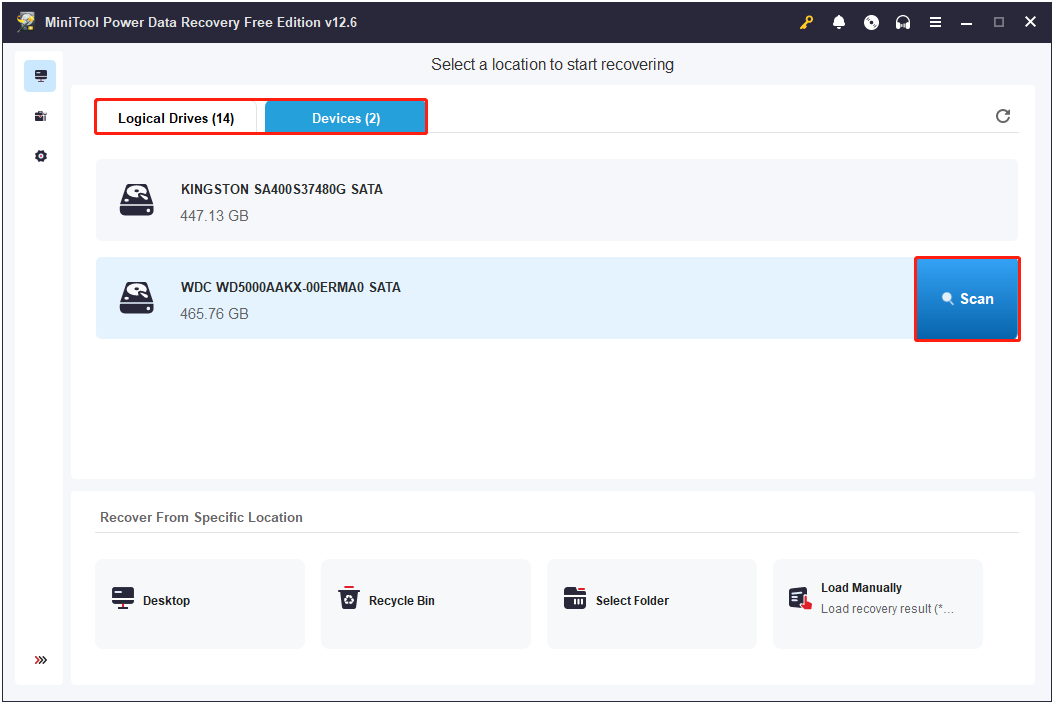
The scan may take some time depending on the drive size, disk condition, or the amount of data.
Step 2. Locate files from Path or Type.
After the scan is complete, check your files in the Path or Type view. To narrow down the file list, use the Filter or Search features.
>> Use the Path tab:
This view shows found files based on their original folder structure. You need to expand the folders to find the files you want to recover.
Do not forget to check the boxes next to the files you intend to restore.
>> Use the Type tab:
This view organizes found files by file type and data format (e.g., docx, ppt, pdf, jpg, mp4).
It is helpful if you are looking for a certain file type.
>> Use Filter and Search to save time:
In addition, the Filter and Search features can also help you find the desired files faster.
- Filter: Filters out unwanted files by setting file type, file modification date, file size, and file category.
- Search: Use a partial or complete file name to search for a specific file or folder.
You can combine all these features to locate required files more quickly.

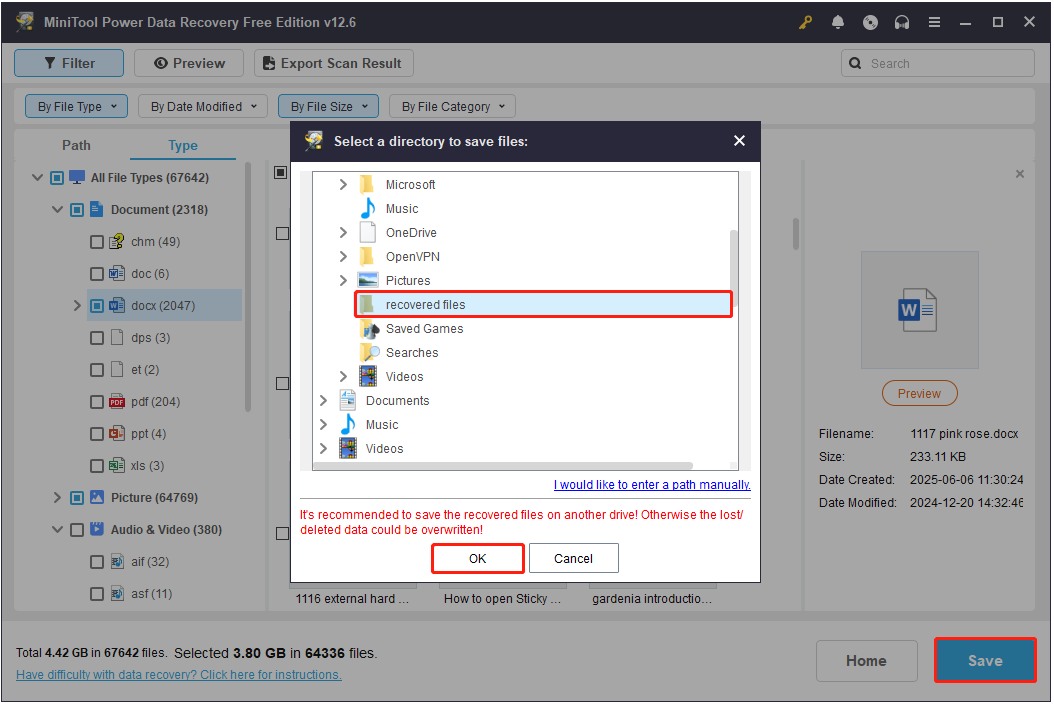
Step 3. Preview and save recovered files.
Double-click on each file to preview its content. This helps ensure the files are complete and not corrupted.
Once you have confirmed the files, click the Save button. Then, choose a different disk and click OK to save them.
Once your data is safe, you can move on to repairing the disk.
To repair a hard drive, first try updating or reinstalling the disk driver. Second, use the error-checking tool or CHKDSK to repair file system errors. Finally, format the hard drive.
Solution 1. Update/Reinstall Disk Driver
Sometimes, the hard dive failure is just caused by an outdated or corrupted disk driver.
In this case, updating or reinstalling the driver from Device Manager can help fix it.
How to update the disk driver:
- Right-click the Start button and choose Device Manager.
- Expand Disk drives.
- Right-click the problematic hard drive and choose Update driver.
- Choose Search automatically for drivers to search for and install the driver automatically.
How to reinstall the disk driver:
- In Device Manager, right-click the disk and choose Uninstall device.
- Click Uninstall to confirm.
- Restart the computer, and the driver should be automatically installed during boot.

Solution 2. Run Disk Error Checking in File Explorer
The built-in error checking tool in File Explorer is designed to repair file system issues of a hard drive or removable disk.
How to run the error-checking tool? Follow the steps below.
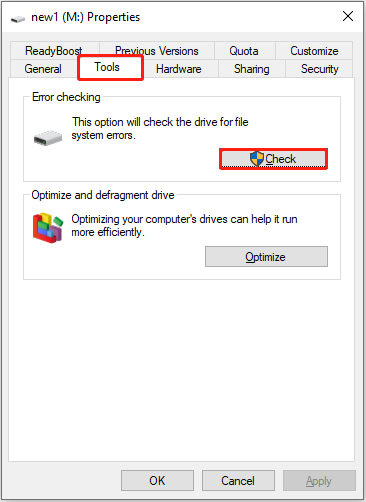
Step 1. Open File Explorer, right-click your hard drive, and choose Properties.
Step 2. Go to the Tools tab.
Step 3. Click the Check button in the Error checking section.
Solution 3. Run the CHKDSK Command
The CHKDSK command is also a Windows built-in tool. It can scan your drive for file system errors and bad sectors and attempt to fix them automatically.
You can use CHKDSK with parameters like /f, /r, and /x.
- /f: Fixes file system errors on the disk.
- /r: Locates bad sectors and recovers readable information.
- /x: Forces the drive to dismount, if necessary.
How to use CHKDSK to repair hard drive? Follow the steps below.
Step 1. Type cmd in the Windows search box. When Command Prompt shows up, right-click it and choose Run as administrator.
Step 2. If the User Account Control window appears, click Yes.
Step 3. Type this command and press Enter to execute it: chkdsk [drive letter]: /f /r /x.
Replace the [drive letter] section with the real drive letter of your hard drive. For example, if you choose to scan the F drive for errors, execute chkdsk F: /f /r /x.
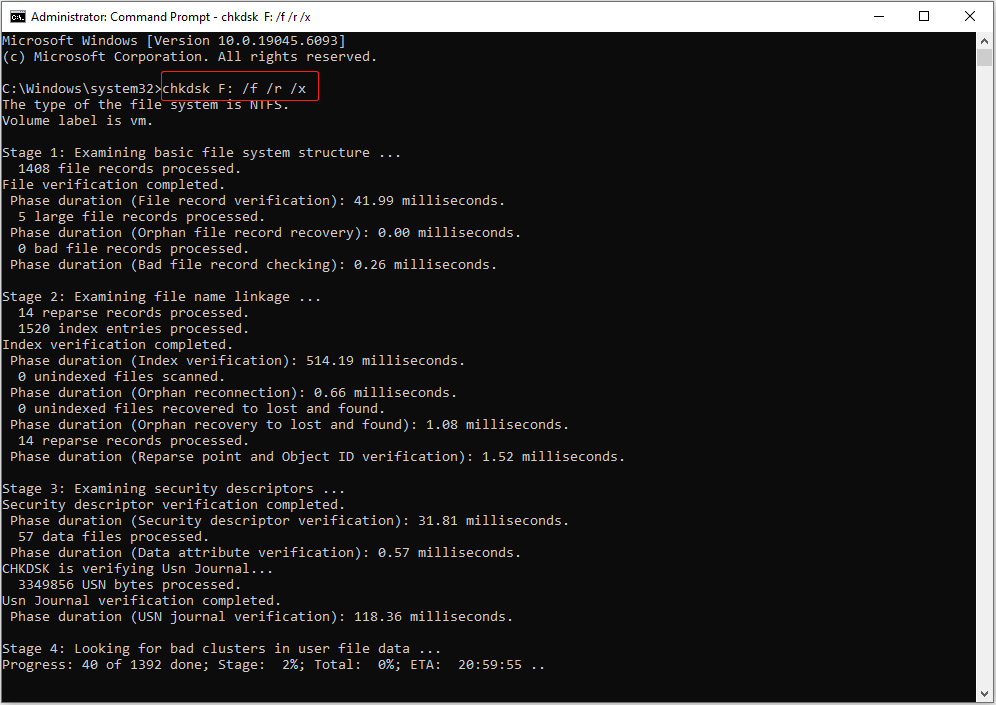
When the check is done, the results will be summarized in the Command Prompt window.
Solution 4. Format the Hard Drive
If your hard drive is still not working after trying the above fixes, formatting may be your final option.
Formatting removes everything on the drive, but it rebuilds a clean and working file system.
There are three easy ways to format a hard drive:
- File Explorer: The fast and easiest way to format a drive.
- Disk Management: An alternative if the drive is not showing up in File Explorer.
- MiniTool Partition Wizard: A powerful and free tool with many disk management features.
Let’s break down each method step-by-step.
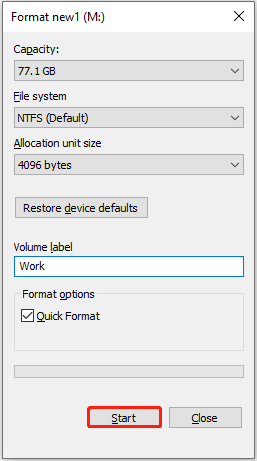
Way 1. Use File Explorer
- Press Windows + E to open File Explorer.
- Go to the This PC section and locate your hard drive.
- Right-click the drive and choose Format.
- Choose a proper file system, type a volume label, tick Quick Format, and click Start.
- Click OK, and wait for the process to complete.
Way 2. Use Disk Management
- Right-click Start and choose Disk Management.
- Right-click the hard drive partition and choose Format.
- Set up the volume label and file system. Make sure the Perform a quick format option is ticked, and then click OK.
- Click OK again to confirm.

Way 3. Use MiniTool Partition Wizard
Step 1. Download and install MiniTool Partition Wizard Free.
MiniTool Partition Wizard FreeClick to Download100%Clean & Safe
Step 2. On the main interface of this software, right-click the disk partition and choose Format.
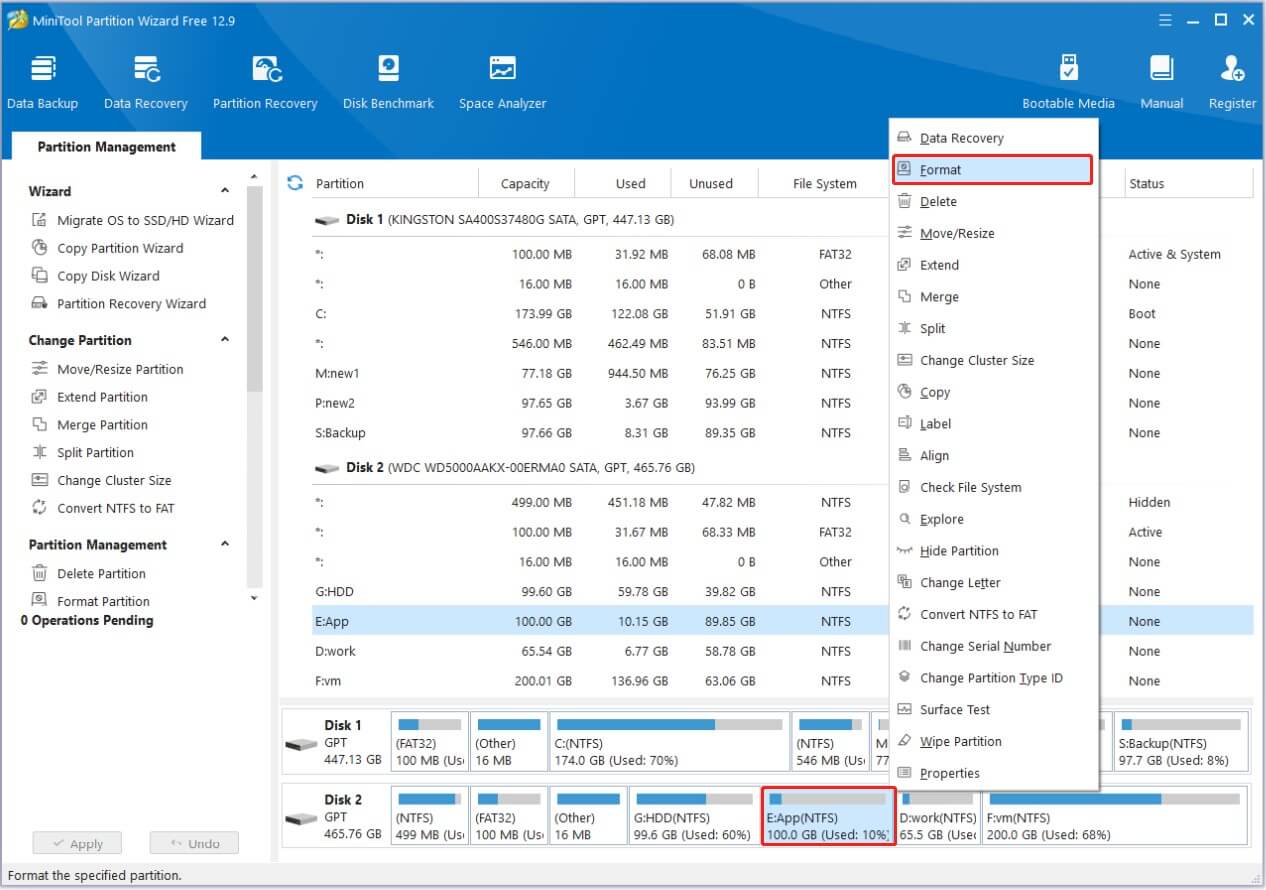
Step 3. Set the partition label, file system, and click OK.
Step 4. Click Apply to apply the formatting.
Solution 5. Contact Professional Hard Drive Repair Center
If none of the DIY methods work, it is time to seek help from professionals.
A professional hard drive repair center can do internal/external hard drive repair with advanced tools and expertise.
Just make sure to choose a trusted agency with good reviews and strong data security policies.
What Causes Hard Drive Corruption & How to Prevent It
As we near the end of this article, I’d like to share some practical tips to help you prevent hard drive corruption in the future.
To prevent this effectively, you need to first understand what causes it.
What Are the Most Common Causes of Disk Corruption
Sudden power outage or disk removal
Interrupting power or removing the hard drive during file transfer can damage the file system.
Bad RAM
Faulty memory may cause the system to store incorrect data. If the system performs data write operations with incorrect data, the disk may be corrupted.
Virus or malware attacks
Malicious programs or viruses can damage files, partition tables, or system structures. This may lead to disk corruption.
Overheating
Excessive heat can damage the disk components and shorten the lifespan of the hard drive.
Improper storage
If you store your disk in a dusty, hot, or humid environment, the disk may be physically or electrically damaged.
Aging hardware
Aging hard drives are more likely to lose data or stop working.
How to Prevent Hard Drive Corruption
Here are some simple but effective tips to avoid drive corruption:
- Before you unplug a disk from your computer, especially if it is an external hard drive, always eject the drive safely.
- Use the Windows Memory Diagnostic tool to test your memory regularly. If issues are found, try reseating the memory modules. If that does not work, consider replacing them.
- Keep Windows Defender or another antivirus software turned on. It scans your computer for viruses and malware and helps protect your system from threats.
- To prevent overheating, clean your computer of dust regularly. You can also use tools such as CrystalDiskInfo to monitor the hard disk temperature.
- Always store your disk in a cool and dry place to avoid physical damage.
However, no matter how careful you are, hard drives can still fail.
So, besides all the tips above, do not forget to back up your files. It is the best protection against file loss.
You can use MiniTool ShadowMaker to back up files or even the whole disk. The Backup feature is free to use.
MiniTool ShadowMaker TrialClick to Download100%Clean & Safe
- Launch this Windows backup tool and go to the Backup tab from the left sidebar.
- On the right side, click SOURCE to select the files/partitions you want to back up. Then click DESTINATION to select a location to store the backup files.
- Click Options to set up backup schemes and backup intervals.
- Click Back Up Now to start the process.

To restore the backup image, go to the Restore tab. From the backup list, find the image you want to restore and click the Restore button next to it.
Bottom Line
Hard drive failures can happen to anyone. Some problems are easy to fix, like updating or reinstalling drivers, or repairing the file system. But other issues are more serious and may require formatting the drive or sending it to a professional service center.
To prevent corruption from happening, make sure to use your hard drive properly. And always back up your files.
If you need help with MiniTool products, contact our support team at [email protected].
About The Author

Position: Columnist
Shirley holds a bachelor’s degree in English and has been an editor at the MiniTool Team for many years. She specializes in IT-related content, with a focus on data recovery, file backup, disk management, and other technical topics. She is committed to delivering clear, accurate, and practical solutions to help users resolve common computer issues.
User Comments :