In this article, you will discover the reasons for Kingston SSD not detected or not showing up on Windows, along with effective solutions. Additionally, we will introduce reliable data recovery software to recover data from your Kingston SSD.
Quick Answer:
A Kingston SSD may not be detected due to loose connections, missing drive initialization, disabled BIOS settings, outdated firmware, or lack of a drive letter in Windows.
| Symptom | Solution |
| SSD not detected in BIOS/UEFI | Check SATA/NVMe connection and BIOS storage settings |
| SSD not showing in File Explorer | Assign a drive letter or create a partition in Disk Management |
| SSD shows as Not Initialized | Initialize the disk and create new partitions |
| Kingston SSD Manager cannot detect SSD | Reconnect the disk or update firmware |
Kingston SSD Not Showing Up
Kingston SSD not showing up in Windows is a common issue that prevents the system from detecting the drive properly. This can affect data access, system setup, or new SSD installation.
Common Symptoms of Kingston SSD Not Detected
A Kingston SSD detection issue may appear in different ways:
- SSD does not appear in File Explorer
- SSD is missing in BIOS/UEFI
- SSD shows in Disk Management but not File Explorer
- Kingston SSD Manager cannot detect the drive
This guide will explore the potential reasons behind this problem and provide solutions to help you get your Kingston SSD up and running.
Reasons for Kingston SSD Not Detected
Here is a breakdown of some common reasons why a Kingston SSD may not be detected:
- Hardware Connection Issues: Loose or damaged cables, such as SATA or power cables, can lead to connection problems, resulting in the SSD not being detected.
- Faulty Port: The SATA or NVMe port on the motherboard may be malfunctioning, preventing proper detection. Trying a different port can help diagnose this issue.
- Missing Drive Letter: If the SSD has no drive letter, it will not show up in File Explorer. But you can see it in Disk Management and add a drive letter then.
- BIOS/UEFI Settings: Incorrect BIOS or UEFI settings, like a disabled port or an incorrect boot order, can cause the SSD not to be recognized.
- Outdated Firmware: An outdated firmware version on the Kingston SSD can lead to compatibility issues. Keeping the firmware up to date is essential for proper functioning.
- Partition and Drive Initialization: Sometimes, the SSD is detected but not initialized or formatted. This can happen if the drive is brand new or has lost its partition information.
- Hardware or Compatibility Issues: In rare cases, the SSD may be faulty, or it might be incompatible with your system, leading to detection problems. Testing the SSD on another computer can help diagnose this.
Knowing the reasons can help you effectively solve the issue of Kingston SSD not detected. Now, we will introduce some effective solutions to make the Kingston SSD work normally again.
Fix 1: Some Simple Checks
A loose or unstable connection is one of the most common causes of an SSD not being detected, especially after upgrades or new installations.
Diagnostic steps:
Shut down the PC completely and unplug the power.
For SATA SSD:
- Re-seat both the SATA data cable (motherboard side and SSD side)
- Re-seat the SATA power connector from the PSU
- Try a different SATA cable if available
For M.2 NVMe SSD:
- Remove the SSD and reinsert it at a 30-degree angle
- Ensure it is fully inserted before tightening the screw
- Check for dust or oxidation on the gold contacts
- Verify the M.2 slot supports NVMe
Next, boot into BIOS/UEFI and check whether the SSD appears.
If the disk is still not detected, connect it to another PC using an external enclosure to isolate motherboard failures.

Fix 2: Initialize the Kingston SSD
You can go to Disk Management to see if the Kingston SSD is detected. If yes, you can check the status of the drive. If the drive shows as: Unknown and Not Initialized, it will not show up in File Explorer. You need to initialize it to MBR or GPT, then create partitions on it to make it available.

Data Recovery Warning: How to Recover Data from Unknown Kingston SSD?
If there are important files in the SSD, you’d better recover files from it to protect your data. You can try MiniTool Power Data Recovery, the best free data recovery software, to do this job.
This SSD data recovery tool can retrieve files like images, videos, audio files, music files, documents, and more from hard drives, SSDs, SD cards, USB flash drives, etc. If the files have not been overwritten by new data, you can use this software to get your needed files back.
To check whether the tool can find the required files, use the free edition first, which supports 1 GB of free recovery.
MiniTool Power Data Recovery FreeClick to Download100%Clean & Safe
Step 1. Download and install MiniTool Power Data Recovery Free Edition on your PC.
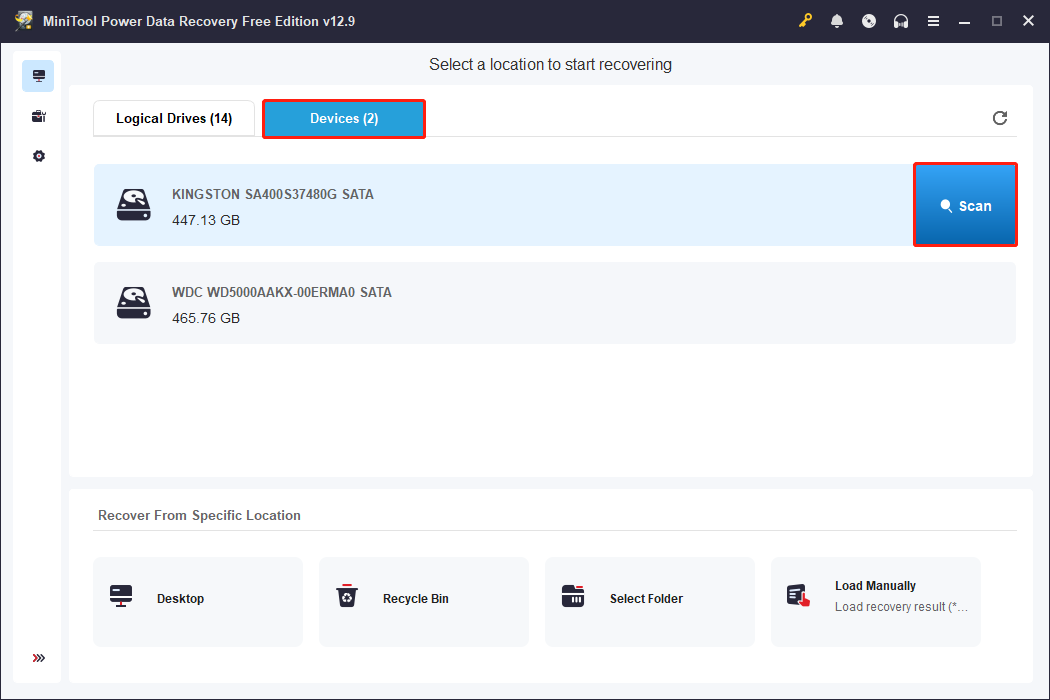
Step 2. Launch the software to enter its main interface. This software will display all drives or lost partitions it can detect under the Logical Drives tab. You can also switch to the Devices tab to check all the detected disks.
Select the Kingston SSD and click Scan to start scanning it.
The entire scanning process will take a few minutes. For the best data recovery results, it is advisable to wait until the scanning process completes.
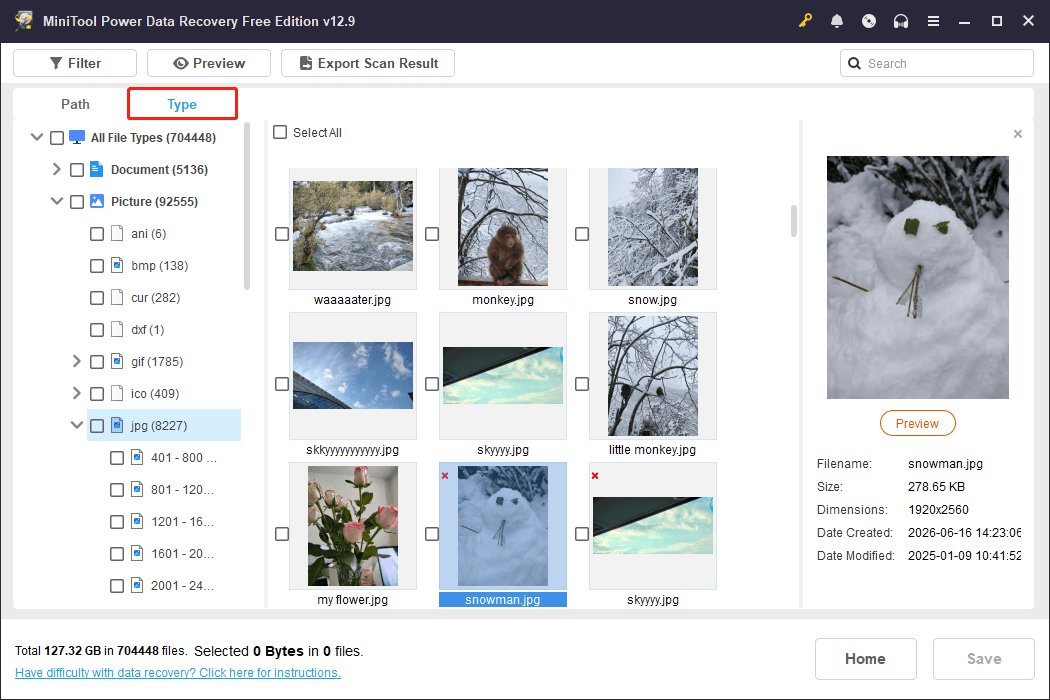
Step 3. After scanning, the software displays found files by path. If necessary, you can switch to the Type tab to view files by data type.
If you are not sure if the file is needed, double-click to preview it for confirmation.
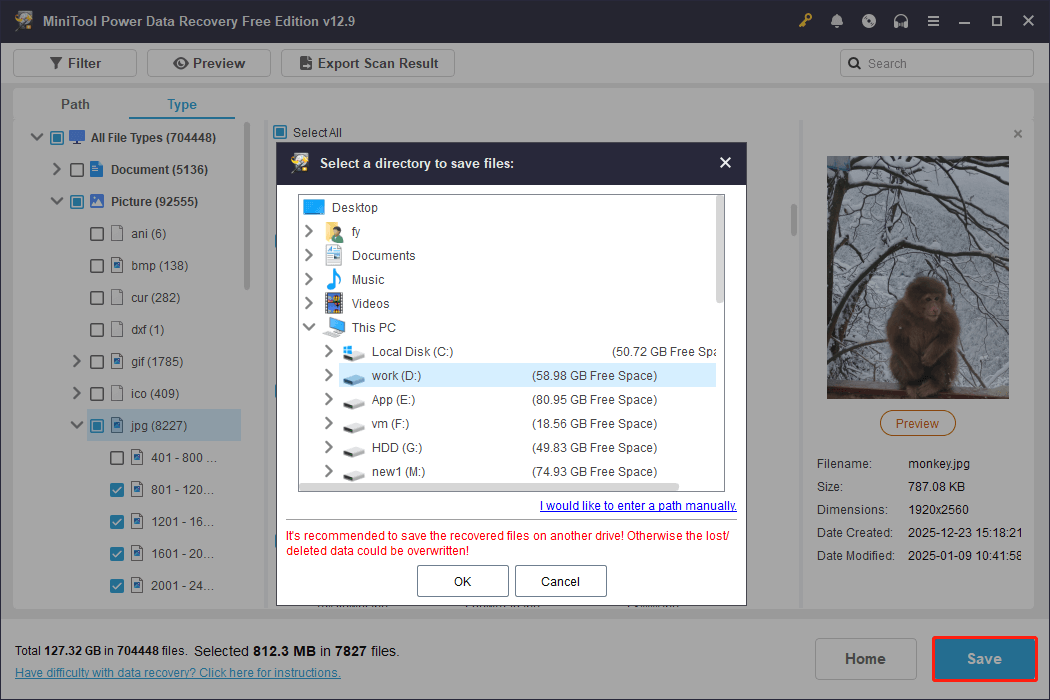
Step 4. Select the needed files. You can select multiple files from different paths. Click the Save button, and then choose another location to save the selected files.
How to Initialize a Kingston SSD?
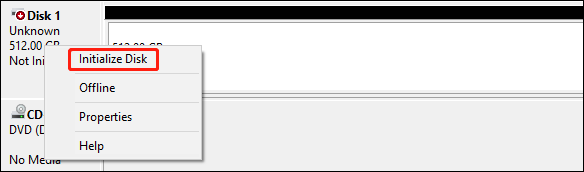
Step 1. In Disk Management, right-click the uninitialized SSD, then select Initialize Disk.
Step 2. Select MBR or GPT according to your requirement.
Step 3. Click OK to save the setting.
Up to this point, the SSD remains invisible in File Explorer because it is recognized as Unallocated. You need to create one or more partitions with assigned drive letters to make it visible.
How to Create Partitions on a Kingston SSD?
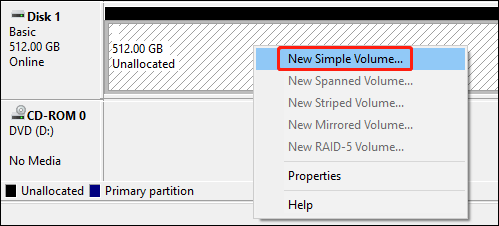
Step 1. Right-click the unallocated space and select New Simple Volume.
Step 2. Click the Next button on the pop-up interface.
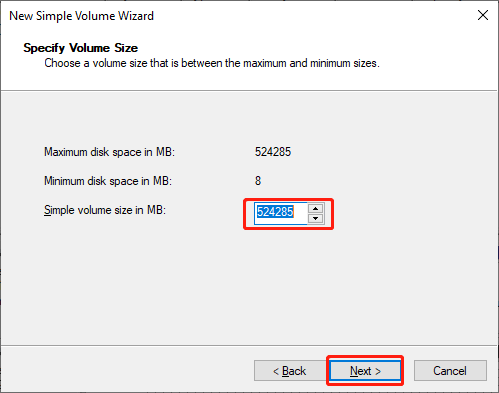
Step 3. Specify the volume size, then click the Next button to continue.
Step 4. Assign a drive letter for the partition on the next interface. Then, click the Next button to continue.
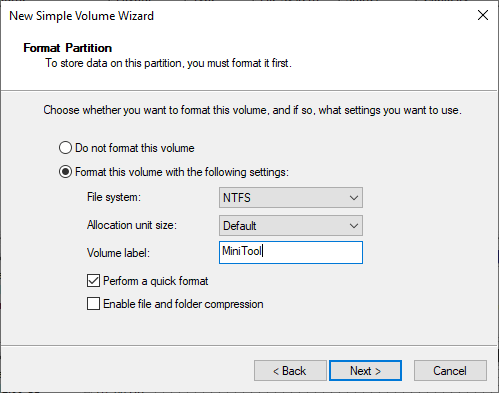
Step 5. Select a file system for the partition and add a volume label. Then click the Next button to continue.
Step 6. Click the Finish button to complete the whole process.
An Alternative Way: Use MiniTool Partition Wizard
In addition, you can also use a third-party partition manager to initialize the SSD and then create partitions on it. You can try MiniTool Partition Wizard. The initialize disk to MBR or GPT features and the create partition feature are available in the free edition of this software.
MiniTool Partition Wizard FreeClick to Download100%Clean & Safe
See these guides:
Fix 3: Add a Drive Letter to the Kingston SSD
If the SSD has no drive letter, Windows will hide it in File Explorer. To make it visible, you need to add a drive letter to it.
You can add a drive letter to the Kingston SSD in Disk Management:
Step 1. Open Disk Management.
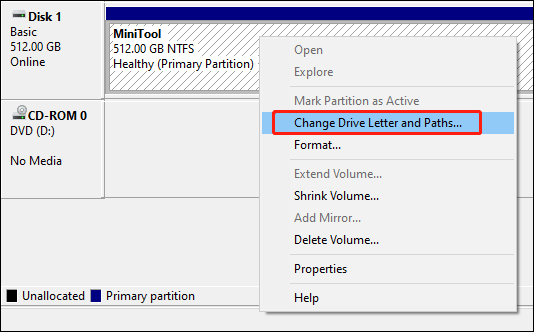
Step 2. Right-click the drive that has no drive letter and then select Change Drive Letter and Paths from the context menu.
Step 3. Click the Add button to continue.
Step 4. Assign a drive letter, and then click the OK button.
After these steps, you can check if the Kingston SSD appears in File Explorer.
An Alternative Way: Use MiniTool Partition Wizard
In addition, you can also use the Change Drive Letter feature of MiniTool Partition Wizard to add a drive letter to the SSD.
MiniTool Partition Wizard FreeClick to Download100%Clean & Safe
Fix 4: Correct the Wrong BIOS/UEFI Settings
Incorrect BIOS or UEFI settings, such as a disabled port or an incorrect boot order, can indeed result in the issue of Kingston SSD not recognized. If you want to use the SSD as a boot drive, you will need to change the BIOS or UEFI settings to set your PC to boot from the drive.
To resolve this issue, follow these steps:
Step 1. Restart your computer and enter the BIOS or UEFI settings. Typically, you can do this by pressing a specific key during the startup process, such as F2, F12, or Delete. The exact key may vary depending on your computer’s manufacturer.
Step 2. Navigate to the Advanced or Integrated Peripherals section in the BIOS/UEFI. Ensure that the SATA or PCIe port to which your SSD is connected is enabled. If it’s disabled, enable it.
Step 3. Go to the Boot or Boot Order section and confirm that the SSD is listed as a bootable device. If it’s not, you should adjust the boot order to prioritize the SSD.
Step 4. Depending on your system, you may need to adjust settings related to Secure Boot or Legacy/UEFI Boot. Make sure these settings are configured appropriately for your SSD and system configuration.
Step 5. Save the settings and exit the BIOS/UEFI. Your computer will restart.
Once your computer boots up, check if the SSD is now recognized.
Fix 5: Update the Firmware of the Kingston SSD
If an outdated firmware version on the Kingston SSD is causing compatibility issues, you can address this problem by updating the Kingston SSD’s firmware.
Back up Your SSD Regularly
Regular backups are recommended to protect data from SSD failure, corruption, or system errors. Tools like MiniTool ShadowMaker allow you to back up files, partitions, or entire systems.
In the event of issues such as system crashes or hard drive failures, you can easily restore your files and system from the backup.
MiniTool ShadowMaker TrialClick to Download100%Clean & Safe
Conclusion
In conclusion, Kingston SSD detection issues are usually related to physical connection problems, BIOS/UEFI settings, or missing initialization. These issues are generally solvable through structured hardware and software troubleshooting.
If the drive remains undetected after all fixes, professional support should be considered.
If you encounter issues when using MiniTool software, you can contact us via [email protected].
About The Author

Position: Columnist
Shirley holds a bachelor’s degree in English and has been an editor at the MiniTool Team for many years. She specializes in IT-related content, with a focus on data recovery, file backup, disk management, and other technical topics. She is committed to delivering clear, accurate, and practical solutions to help users resolve common computer issues.
User Comments :