Common Data Loss Scenarios on Laptop Hard Drive
Laptops are essential tools in our daily lives, but they are not immune to data loss. Understanding the common scenarios can help you choose the most appropriate recovery method.
Common data loss on laptop hard drives is usually caused by human errors, physical damage, or software or logical errors.
Accidental deletion/formatting.
You may mistakenly delete important files or format a drive during file or disk organization. This removes the file entries from the operating system and makes the files invisible.
Careless data overwriting.
Saving new files over old versions replaces the original data on the disk. As a result, the previous versions of your files cannot be restored.
File transfer errors.
If a file copy, cut, or move operation is interrupted or fails, some files may disappear from either the original drive or the target location.
Malware/virus attacks.
Malicious software or viruses may hide or quarantine suspicious files. So, these files may become invisible in the original location.
Hard drive failures.
File system corruption or bad sectors on the hard drive may prevent the system from reading the drive or displaying the files on it. If there is severe corruption on the C drive, the system may not boot normally.
Operating system crashes.
System errors, blue screens, or black screens can block access to your files. In this case, although the files are not deleted, they become temporarily inaccessible.
Physical damage.
Drops or other accidents may cause physical damage to your laptop or internal components. This prevents you from accessing your files.
Overall, these scenarios can be divided into two main cases:
- Files lost on a working laptop: The system can boot normally, allowing file recovery through the Recycle Bin, backups, recovery software, or by showing hidden files.
- Files on an unbootable laptop: The system cannot start normally, requiring Safe Mode, a bootable recovery drive, or secure data recovery services to view your data.
Now, follow the instructions in the section that matches your laptop’s situation to recover files.

How to Recover Deleted/Lost Files From a Working Laptop
Method 1. Check the Recycle Bin
The Recycle Bin is a special folder in Windows that temporarily stores deleted files. In most cases, files deleted from internal hard drives are sent there.
If you accidentally delete a file, open the Recycle Bin and check if it is there.
If you find the file, select it, right-click it, and choose Restore to return it to its original location. Or, you can drag and drop that file to any location you prefer.

If the Recycle Bin has been emptied or is corrupted, try the next recovery method.
Method 2. Show Hidden Files
Sometimes your files may seem missing, but they are not actually deleted, just hidden. To check for this, enable the system option to show hidden files and see if your files appear.
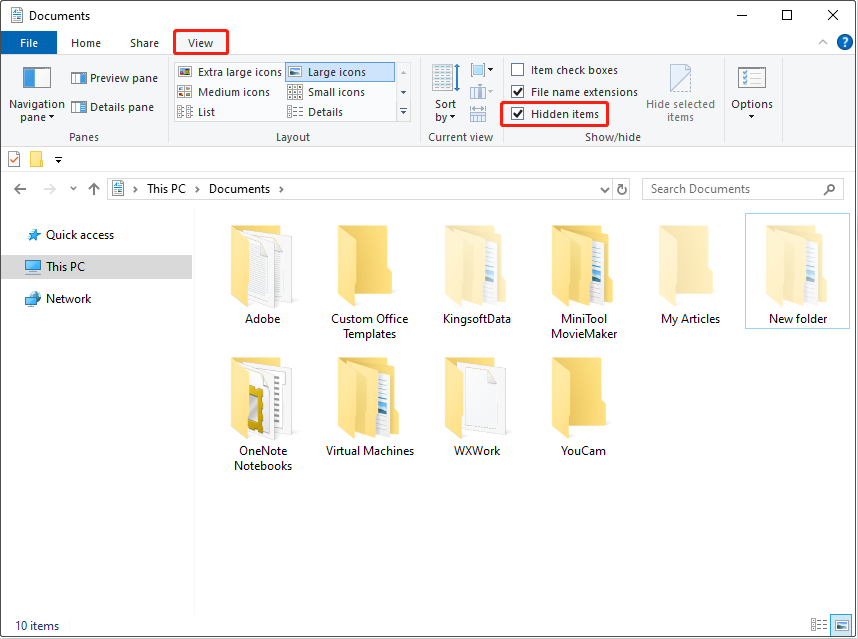
Here is how to show hidden files on Windows 10:
Step 1. Press Windows + E to open File Explorer.
Step 2. Go to the View tab.
Step 3. Tick the Hidden items option to make the hidden files visible.
If you want to unhide a file, right-click it and choose Properties. Untick the Hidden option in the Attributes section, and click OK.
Method 3. Restore From a Previous Version
If you have backed up your files with File History, a Windows’ built-in backup feature, you can now restore your deleted or overwritten files from a previous version.
How to restore backup files by using File History? Here are the steps.
Step 1. Type Control Panel in the Windows search box and press Enter to open it.
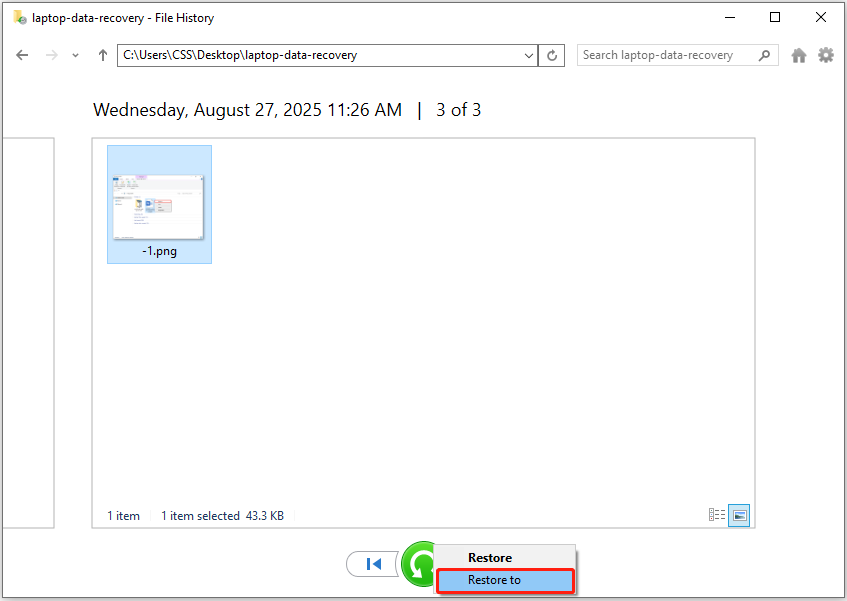
Step 2. Select System and Security > File History > Restore personal files.
Step 3. Select the files you want to restore, and then click the green Restore button to return them to their original location.
To avoid overwriting existing files, right-click Restore and choose the Restore to button to select a different folder.
This feature works only if you have backed up your files and the removable drive is connected to your computer. If it does not work, you will need to use free data recovery software to recover files from your laptop.
Method 4. Use Laptop Data Recovery Software
There are many file recovery tools available, and I will take MiniTool Power Data Recovery for example to demonstrate how to perform laptop data recovery.
MiniTool Power Data Recovery is designed for Windows 11/10/8/8.1 users to recover lost, deleted, and existing files from laptops and desktop computers. It supports various file storage devices, including hard drives, SSDs, and removable drives.
It is also known for its ability to scan for different file types, such as documents, pictures, videos, audio, emails, etc., and its user-friendly interface.
This software offers a free edition that allows you to recover 1 GB of files for free. Now, download, install, and launch it to recover data.
MiniTool Power Data Recovery FreeClick to Download100%Clean & Safe
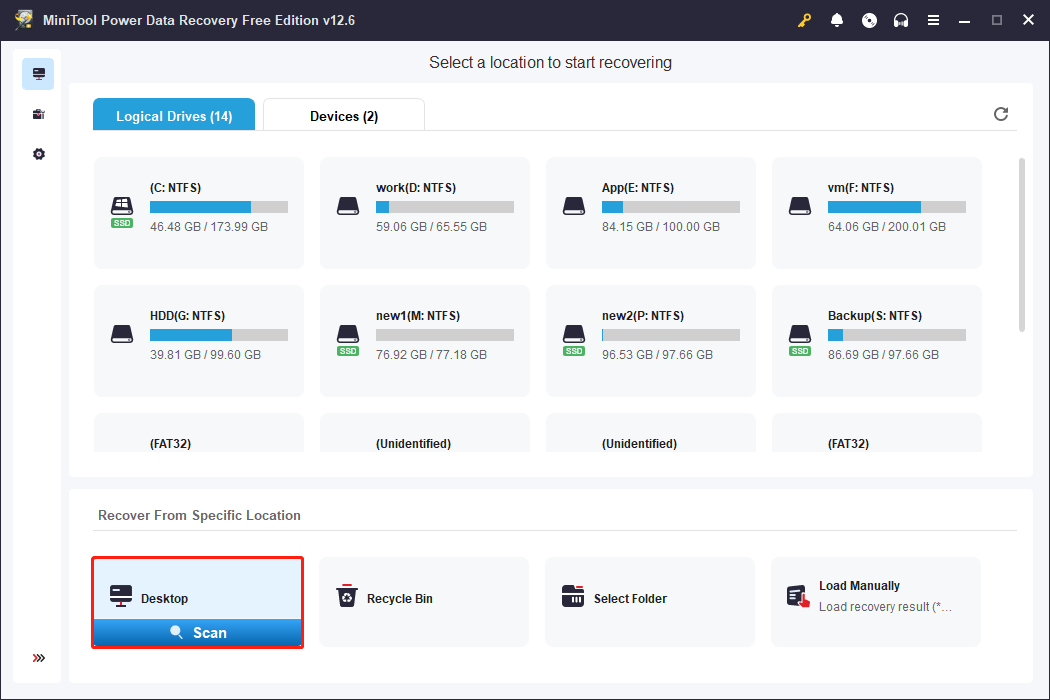
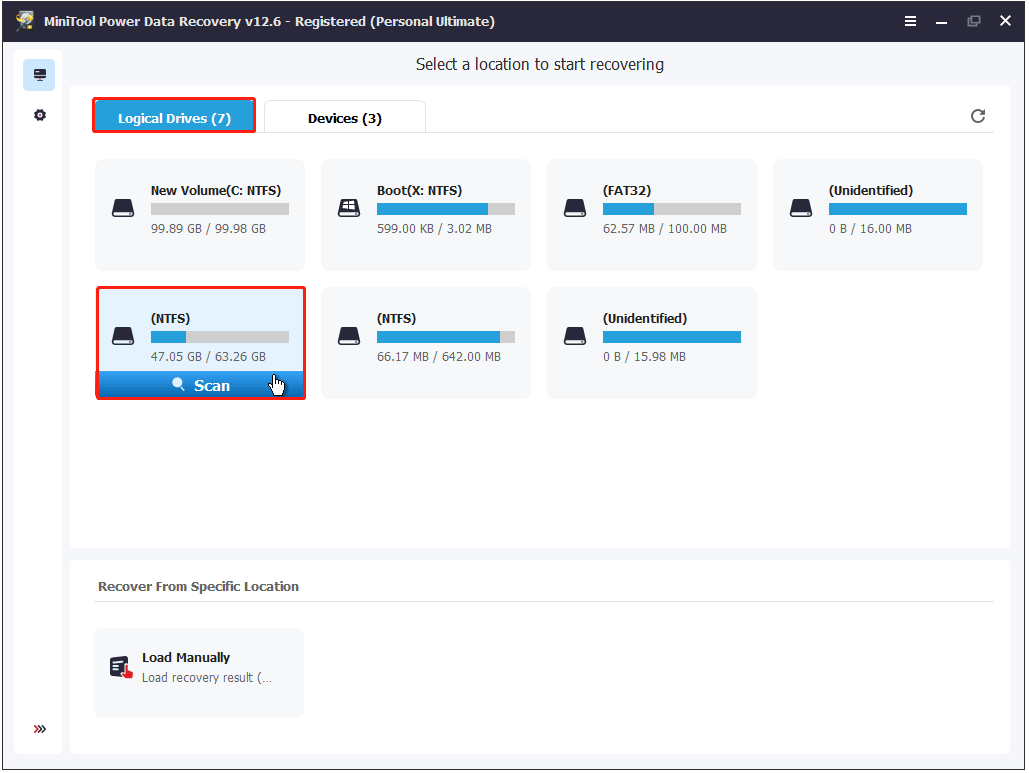
Step 1. Select the Drive, Directory, or Disk to Scan.
After launching MiniTool Power Data Recovery, the first step is to select the location where the lost files should exist to scan. The software provides three options:
- Logical Drives: Scan a specific partition on a disk. Best when files are lost from a certain partition.
- Recover From Specific Location: Individually scan the desktop, the Recycle Bin, or a particular folder. Useful when you know exactly where the files were. It saves time by scanning only that location.
- Devices: Scan the entire disk. Suitable if partitions are missing or if you want to scan multiple partitions on a disk once.
Here, I select the desktop to scan for files.
Step 2. Locate and Preview Target Files.
After scanning, start finding the files you want to recover under Path or Type. The Path tab displays files according to their original folder structure, while Type categorizes files by file type and data format.
Moreover, this software also offers two more features to help locate the files you need faster:
- Filter: It allows you to narrow down the displayed files based on file type, modification date, file size, and file category. This helps you quickly focus on the most relevant files.
- Search: It enables you to directly search for files by a full file name or a keyword. This is especially useful when you know the exact name of the file or part of it. This helps you save time from manually browsing through folders.
Using Path/Type along with Filter and Search can greatly speed up the recovery process.
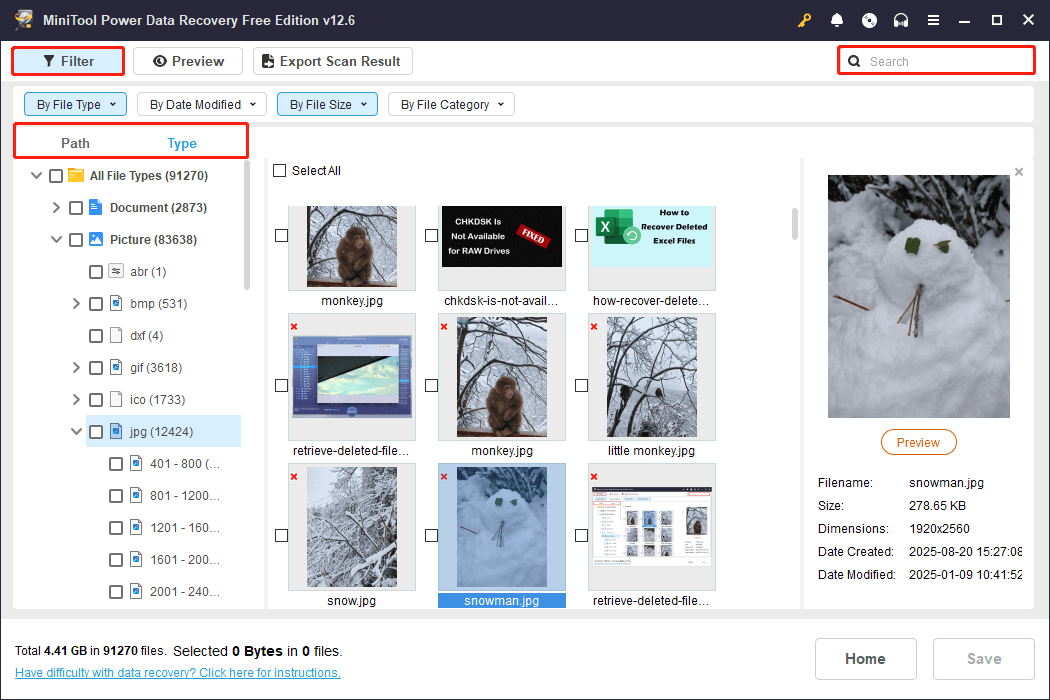
Want to check the file content? Double-click on each file to preview it. Most types of files are supported for preview.
Step 3. Save Required Files.
Ensure that all the files you want to recover are selected. Then, click the Save button and choose a secure location to save them. Do not store them where they were originally stored in case of data overwriting.
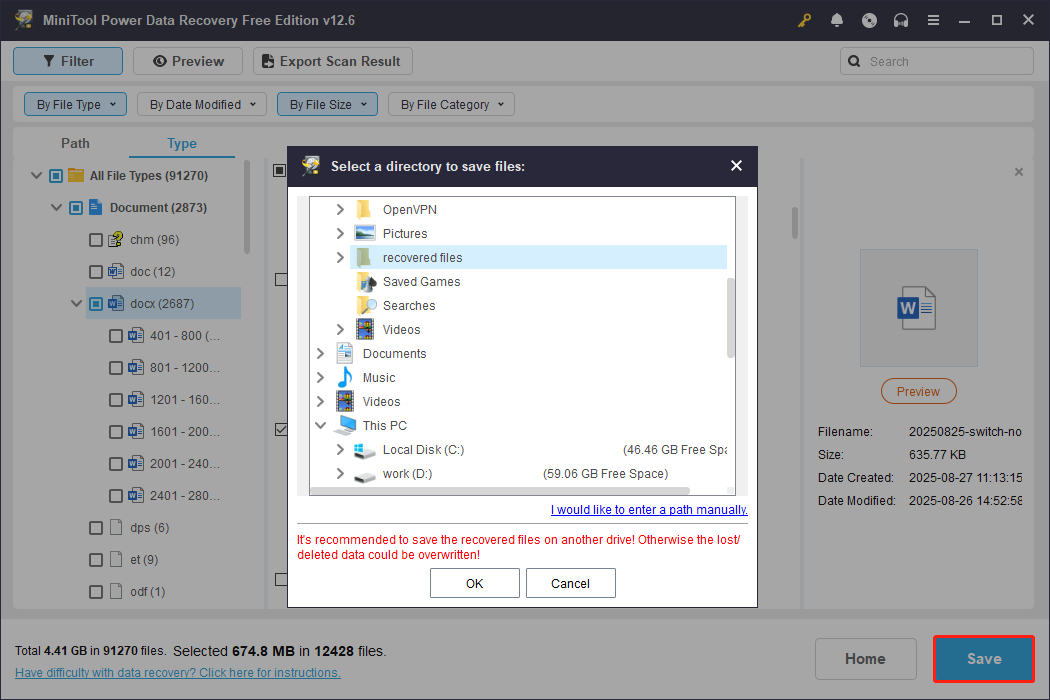
Once the recovery is done, you can go to the selected directory to view and use your files.

How to Recover Data From a Laptop Hard Drive That Won’t Turn On
If your laptop cannot start normally, data recovery becomes more complicated. First, check whether you can boot into Safe Mode. If you can, transfer your important files to an external hard drive.
If you cannot enter Safe Mode, you may need to remove the hard drive and connect it to another computer to access your files.
What if the hard drive is not removable, or you are not familiar with hardware handling? In this case, you can use professional data recovery software to create a bootable drive. It allows you to start your laptop from it and access your files safely.
Let’s break this process down in detail.
Method 1. Boot Into Safe Mode
Safe Mode is a diagnostic mode on Windows computers. In this mode, the system only loads essential executable modules, and many non-core components are disabled. It provides minimal access to features and allows you to transfer important files.
How to boot into Safe Mode and rescue your files? Follow the steps below.
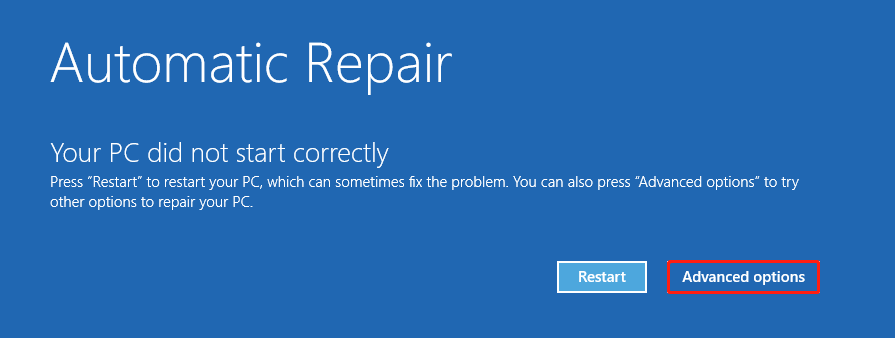
Step 1. Start your device and wait for the Windows logo or the manufacturer’s logo to appear. When the logo appears, press and hold the Power button to shut down the laptop.
Step 2. Turn on your computer and repeat the shutdown process.
Step 3. Duplicate this process 3 times, and the Automatic Repair screen should appear. Select Advanced options.
Step 4. Click Troubleshoot > Advanced options > Startup Settings > Restart.
Step 5. Once restarted, press 5 on your keyboard to enter Safe Mode with networking.
Step 6. Now you can copy and paste important files to a removable drive or upload them to the cloud.
Method 2. Connect the Hard Drive to Another Computer
If Safe Mode is not working, or for some other reason you cannot recover files in Safe Mode, first check whether the hard drive can be removed. If yes, you can:
- Install the hard drive in another working computer to access your files.
- Or, you can use an external drive enclosure to connect it as an external hard drive and recover your files.
This method also applies to how to recover data from an old laptop hard drive.
However, some hard drives cannot be removed, or you may worry about damaging the drive. In this case, you need to use MiniTool Power Data Recovery Bootable Edition. It can safely help you recover files without removing the hard drive. Keep reading.
Method 3. Use a Bootable Data Recovery Drive
MiniTool Power Data Recovery Bootable is specially designed to recover files from a crashed OS. Using the snap-in Bootable Media Builder, you can create a USB or CD/DVD boot disk to start your computer and scan the hard drive for inaccessible files.
Follow the steps below to create a bootable media and rescue files.
Process 1. Create a Bootable Disk.
Step 1. Insert a blank USB drive into a functioning computer. Recommended USB drive size: 4 GB – 64 GB.
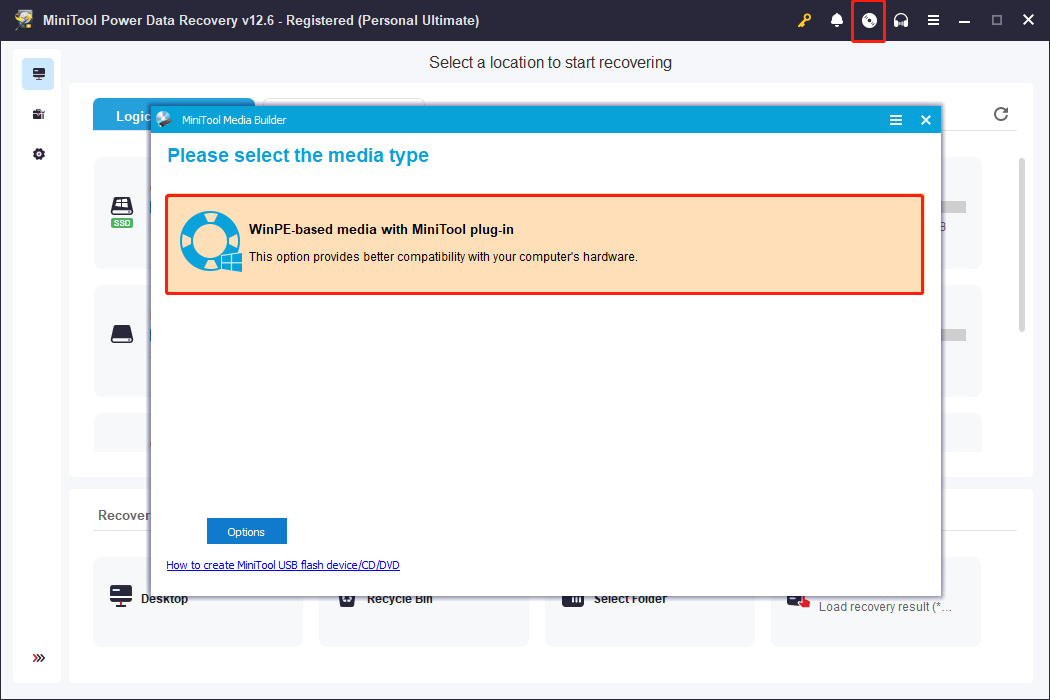
Step 2. Launch the registered recovery software and enter its main interface. Here, click the Bootable Media Builder icon.
Step 3. In the pop-up window, click WinPE-based media with MiniTool plug-in.
Step 4. Choose the option to create a USB boot disk and wait for the process to complete.
Process 2. Boot Your Laptop and Run MiniTool Power Data Recovery.
Step 1. Plug the USB boot drive into the unbootable laptop.
Step 2. Turn on the laptop. During the startup, press the appropriate BIOS key, such as F2, F12, Esc, or Delete, to open the BIOS setup.
Step 3. In the boot menu, use the arrow keys to locate and select your USB drive, then press Enter to boot from it. Or, set up the USB drive as the first boot option to start from it.
Step 4. Follow the on-screen prompts to start the MiniTool data recovery program.
Process 3. Scan Your Disk and Recover Files.
When you enter the main interface of MiniTool Power Data Recovery, select the drive you want to scan for files and click Scan.
Keep in mind that in WinPE, drive letters may differ from what you see in Disk Management. For example, your system drive may not appear as C: here. You can identify the correct drive by checking the file system, volume size, or other details.
Once the scan is complete, locate and select the files you want to recover using the Path, Type, Filter, and Search features. Then, click Save to export the recovered files to an external hard drive.
Read More: Perform a Windows Reinstallation
After retrieving files from the unbootable laptop, you can proceed with a Windows reinstallation to make the system usable again. Here is how to perform a clean installation.
Step 1. Download the Windows installation media creation tool and use it to make an installation drive.
Step 2. Connect the installation disk to the nonfunctional laptop. Then go to BIOS and start from this drive.
Step 3. Follow the Windows Setup instructions to complete the installation.

Method 4. Contact Professional Services
If the computer is seriously damaged, and DIY recovery methods do not work, it is best to consult technology professionals. They specialize in diagnosing and repairing both software and hardware issues.
This is all about how to get data from a dead laptop.
Bonus Tips to Protect Laptop Hard Drive Files
I believe you have successfully recovered important files from your laptop’s hard drive. However, the risk of data loss still exists.
To prevent similar issues in the future, here are some practical tips to help you protect your laptop’s hard drive and keep your files safe.
Tip 1. Back Up Files/System
Backing up your files and system is the most effective way to protect your data from accidental deletion, hardware failure, or system crashes. Here are three ways to do it.
Option 1. Enable File History
File History backs up your personal files from Documents, Pictures, Videos, and the files you add manually. If your files are deleted, you can restore them from a previous version.
Here is how to enable File History:
Step 1. Make sure an external drive is connected or a network location is available to save your backups.
Step 2. Open the Control Panel and click System and Security > File History.
Step 3. Click Select drive to choose the backup destination.
Step 4. Click Run now to start the file backup.
Option 2. Use Windows Backup and Restore
In addition to File History, Windows has Backup and Restore (Windows 7), which lets you back up your whole system or specific folders. File History is good for backing up files, while Backup and Restore protects more of your system.
Here is how to back up the system with Windows Backup and Restore:
Step 1. Open the Control Panel and click System and Security > Backup and Restore (Windows 7).
Step 2. Click Create a system image.
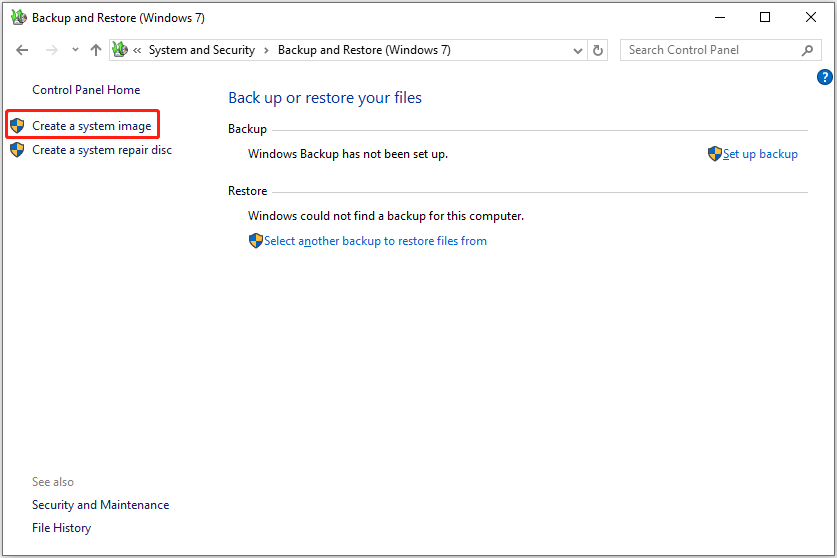
Step 3. Choose a disk with enough free space to save the backup image and click Next to continue.
Step 4. All system-related partitions are ticked by default. Click Next to continue.
Step 5. Confirm all backup information and click Start backup.
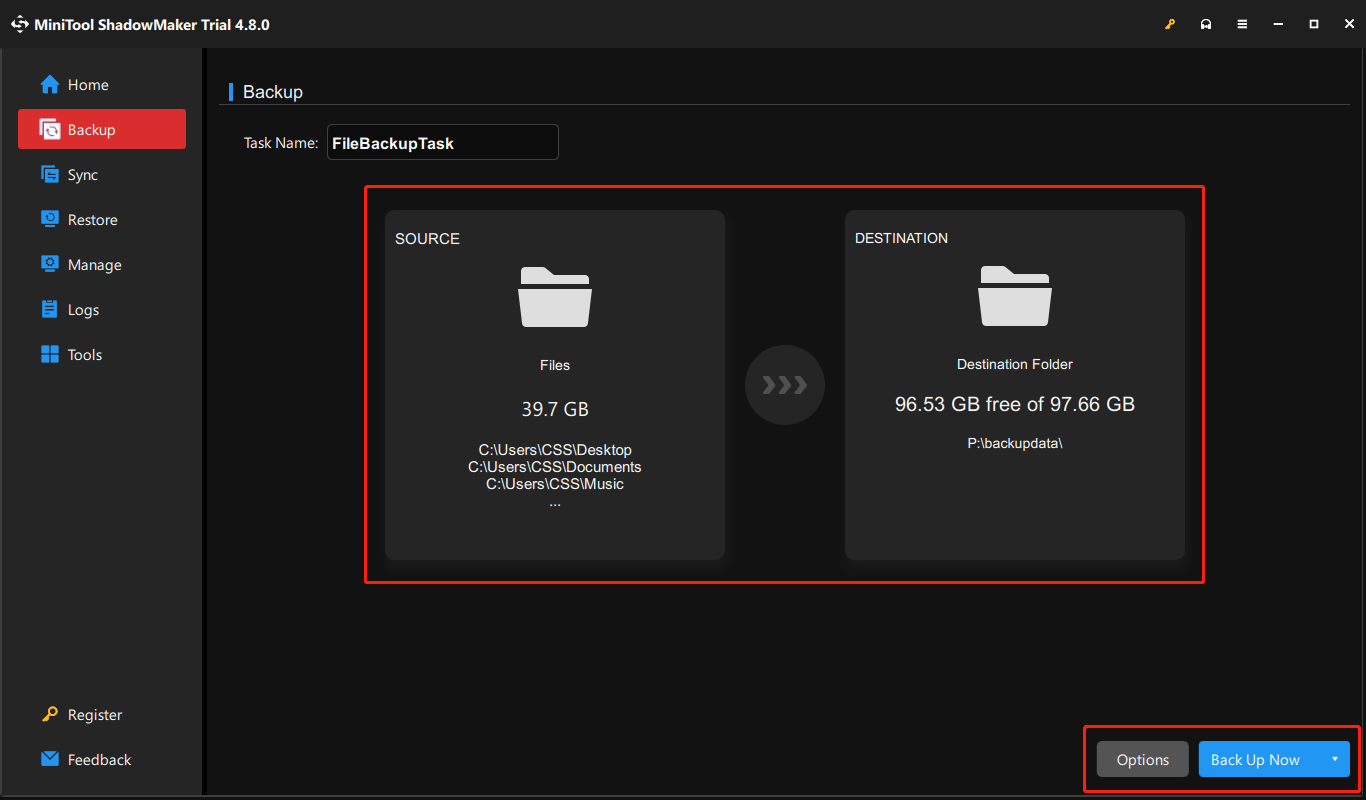
Option 3. Use MiniTool ShadowMaker
MiniTool ShadowMaker is a professional Windows backup tool that can automatically back up your system or files.
Compared to built-in Windows tools, it offers more flexible backup options and schedule settings. You can set up full, incremental, or differential backups to run daily, weekly, monthly, or whenever you log on or off.
Get its trial edition and use it for free for 30 days.
MiniTool ShadowMaker TrialClick to Download100%Clean & Safe
Step 1. Run the backup software and click Keep Trial to proceed.
Step 2. Go to the Backup tab.
Step 3. Click SOURCE to select the files/folders or partitions/disks you want to back up. Then, click DESTINATION to select a location to store the backup image.
Step 4. Click Options to set up backup schemes and schedule settings.
Step 5. Hit Back Up Now to start the backup process.

Tip 2. Enable/Install Antivirus Software
Viruses and malware can damage or encrypt your files, so having reliable antivirus software helps protect your data and system from unexpected threats.
Windows Defender comes pre-installed and is enabled by default on Windows 10/11. It automatically protects your computer from viruses or other threats. So, keep it enabled for system security.
Or, you can install other reliable antivirus software, such as Norton or Avast, to protect your system against viruses.
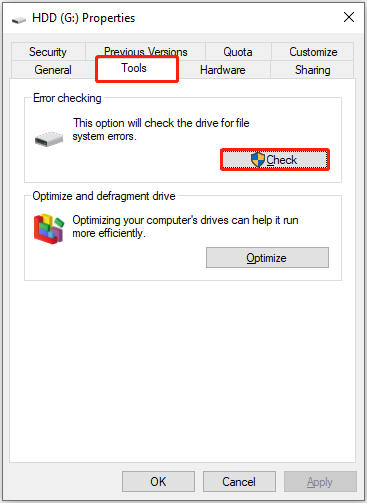
Tip 3. Monitor Hard Drive Health
Hard drives can fail without warning due to various reasons. Regularly checking disk health status allows you to detect problems early and protect your files in time.
You can use the built-in error-checking tool to detect and repair file system issues. Here are the steps.
Step 1. Open File Explorer and go to the This PC section.
Step 2. Right-click your hard disk and choose Properties.
Step 3. Go to the Tools tab. Then click the Check button under the Error checking section.
Tip 4. Handle Your Laptop/Data Carefully
Using your laptop or files properly is also important to prevent data loss or system damage. Here are some precautions:
- Keep your system updated. The latest system and driver updates usually include bug fixes, security patches, and performance improvements. Installing them helps reduce the risk of unexpected system crashes.
- Encrypt the important hard disk. Turning on BitLocker for sensitive drives can protect your data from unauthorized access.
- Organize your files. Keeping your files stored in a clear folder structure reduces the chance of accidentally deleting important files.
- Avoid sudden shutdowns. Do not force shut down your laptop during a system update, BIOS update, or file transfer, as these can corrupt files and the system.
- Avoid overheating. High temperatures can shorten your hard drive’s lifespan or cause your laptop to shut down unexpectedly. So, make sure it has good ventilation and cooling.
- Be careful with movement. Avoid dropping or bumping your laptop when moving it to prevent any physical damage.
Closing Words
In a word, this guide is for anyone who wants to recover data from either a working or a dead laptop. Some methods are free and do not require additional software, while in some cases, you need MiniTool Power Data Recovery.
If your system is not bootable, you can reinstall Windows after recovering your files to continue using your laptop. Besides, be sure to follow the tips provided to protect your system and data in daily use.
If you encounter any problems while using MiniTool’s products, please send an email to the support team at [email protected].
About The Author

Position: Columnist
Shirley holds a bachelor’s degree in English and has been an editor at the MiniTool Team for many years. She specializes in IT-related content, with a focus on data recovery, file backup, disk management, and other technical topics. She is committed to delivering clear, accurate, and practical solutions to help users resolve common computer issues.
User Comments :