Did Norton delete your files without any signs? It can be so frustrating if such third-party antivirus software deletes your important files without asking. In this post on MiniTool, I will show you how to recover Norton deleted files on Mac or Windows and how to prevent data loss in the future.
Situation: Norton Deleted Your Files by Mistake and Without Warning
As we all know, anti-virus programs like Norton are designed to safeguard our computers against various viruses like Trojans and their variants that can jeopardize our data. However, they don’t always work as expected. When we run anti-virus scans to rid genuine threats from our local drives, these scans may mistakenly delete files and folders that are subcategorized to an infected folder. Here is a user’s actual situation:
“Recovering Deleted Files by Norton Clean. I must not have been paying attention, but I ran Norton Clean, the free version, and it must have totally cleaned out my download folder where I store TONS of stuff over the years that I DO NOT WANT TO LOSE, oops!!!! Is there any way whatsoever to recover Norton deleted files?”www.reddit.com
Recovering your files is crucial, as the loss of important data can impact both your professional and personal life. If you’ve faced the loss of important data, in this guide, you will find robust data recovery software to recover files deleted by Norton.
Now, you may wonder: Why has an antivirus like Norton removed my files? So, let’s jump into the possible causes of the data loss triggered by Norton.
Why Does Norton Delete Important Files?
It’s essential to understand how antivirus software operates. They are categorized into two types:
- The first type checks a file against a database of known viruses when you open it.
- The second type scans files and installed programs automatically to detect any issues that could arise from harmful viruses or unknown malware.
If your file contains a virus, the antivirus will immediately quarantine or delete it. Even when using a trustworthy antivirus with a robust virus database, it may still delete important files if they are infected.
Sometimes, in the following situations, the Norton application may mistakenly quarantine or delete a file or folder:
- Norton’s antivirus program may occasionally incorrectly label a safe file as a threat. This may occur for various reasons, such as the specific features of a file or a temporary software issue.
- If your Norton software is not updated frequently, it might fail to recognize new, safe files, resulting in incorrect quarantining.
- Overly sensitive scanning configurations can sometimes identify safe files as potential threats.
- If a file download is interrupted before it finishes, Norton might quarantine it as a precaution.
- Files within compressed files, such as ZIP or RAR, can sometimes cause false positives, especially if they contain executable programs.
- If a file shows abnormal activity, like running automatically or trying to access network resources without authorization, Norton may consider it suspicious.
- …
Faced with lost files caused by antivirus, how to recover Norton deleted files? I outline two solutions to recover Norton deleted files, both useful on Windows and Mac. According to your computer operating system, you can choose an appropriate way to get back your important files effectively. Refer to the following instructions.
Option 1. Recover Norton Deleted Files from Norton Quarantine
Norton Antivirus software provides a feature called Quarantine that can isolate suspicious files instead of permanently deleting them. When the software indicates that some essential files are infected, it will prompt you to either delete them or move them to the Quarantined folder. But sometimes, it may not notice you and delete the files or move them to the Quarantined folder. Once you want to find and use the files, you may find they are missing.
If you need to carry out a Norton deleted file recovery, the first place you can check is the Quarantined folder. Follow the instructions to recover quarantined files by Norton.
How to Recover Norton Deleted Files from the Quarantined Folder on Windows
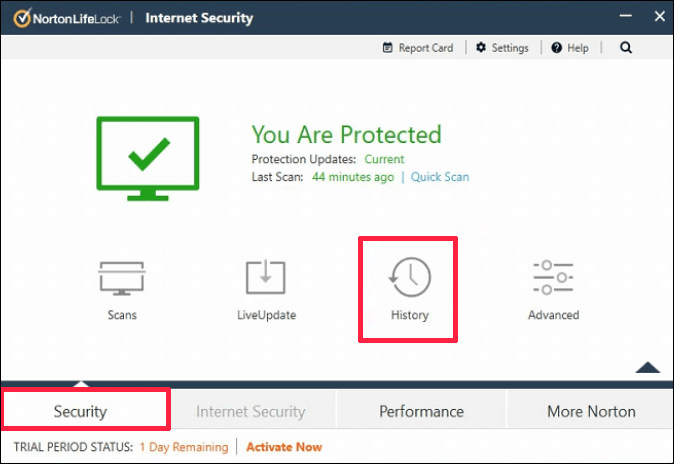
1. Launch the Norton software on your device.
2. Once you see My Norton, click on Open next to Device Security.
3. Go to the Security tab, then select History.
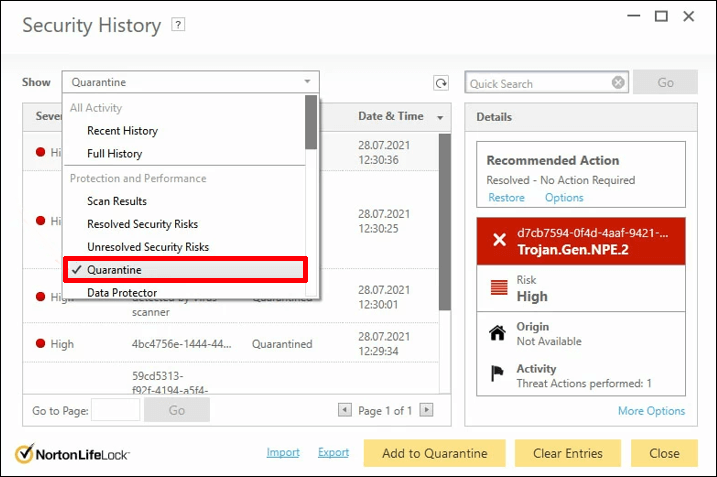
4. In the Security History window, switch to the Quarantine view from the drop-down menu next to the Show section and look for the files that Norton has removed.
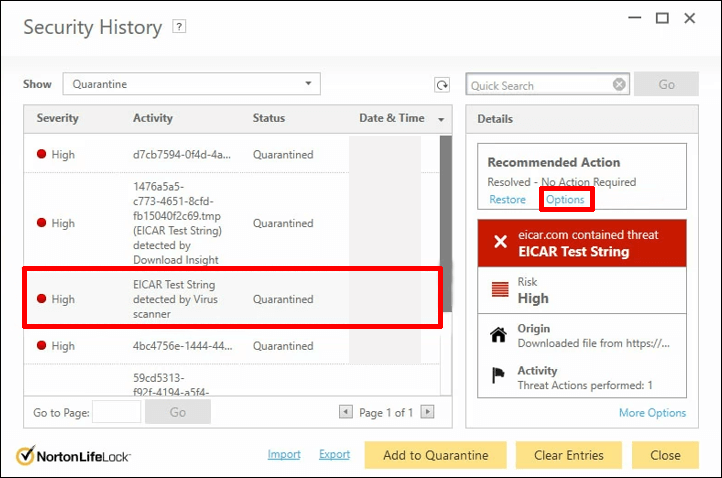
5. Choose the file you’d like to restore and click on Options in the Details panel.
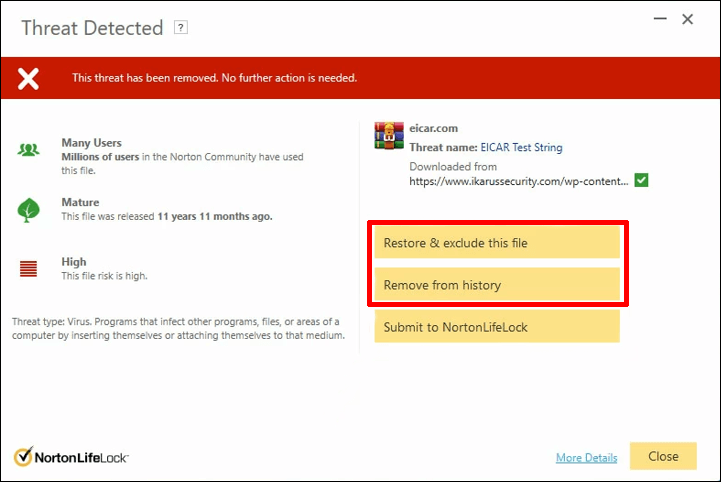
6. In the Threat Detected window that appears next, you can opt for Restore & exclude this file, which prevents Norton from quarantining it again, or Remove from history.
How to Recover Norton Deleted Files from the Quarantined Folder on Mac
1. Open Norton and click on Open next to Device Security.
2. In the following window, choose Advanced or Settings > Activity.
3. In the Security History row, select View.
4. In the Security History window, navigate to Quarantine.
5. Finally, you can review the files deleted by Norton there. Select the file you want and click Restore.
Option 2. Recover Norton Deleted Files Using Third-Party Data Recovery Software
Unfortunately, the above method may give you unsatisfactory results, and you may not find your lost files in the Quarantined folder, which indicates that Norton has already deleted the files from your system. Fret not; on both macOS and Windows, this does not indicate that the files are permanently lost. There are still opportunities to recover Norton deleted files by using file recovery tools. Among numerous available dependable file recovery tools, selecting the right and effective one is crucial. Keep reading to learn which software you can fully trust.
Use MiniTool Power Data Recovery on Windows
MiniTool Power Data Recovery is highly recommended for its flexible file recovery options, optimal recovery results, and extremely low cost.
This free data recovery tool accommodates a variety of data loss scenarios; for instance, it can recover files deleted by virus attack and perform accidentally deleted file recovery, deal with data loss due to file system corruption, power failures, and so on. What’s more, it is compatible with almost all versions of Windows, such as Windows 11, 10, 8.1, and 8.
If you’re using MiniTool Power Data Recovery for the first time to recover Norton deleted files, you can download and install the free version. This edition allows you to recover up to 1 GB of files at no cost.
MiniTool Power Data Recovery FreeClick to Download100%Clean & Safe
Now, please follow the steps below to get your data back.
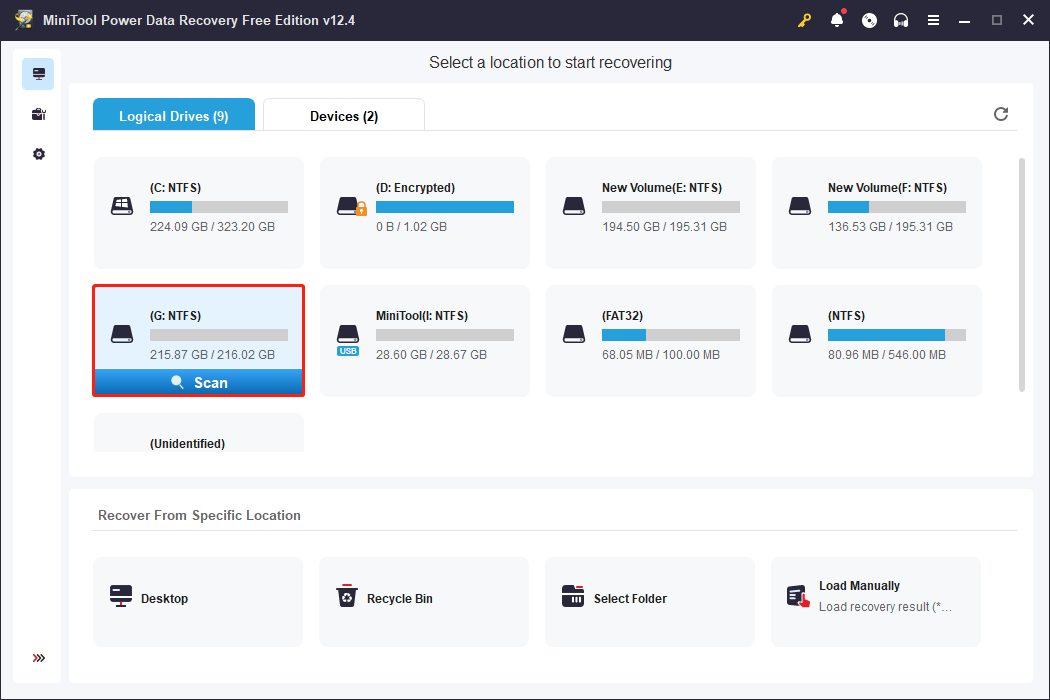
Step 1. Launch MiniTool Power Data Recovery to enter its main interface. On its home page, you are under the Logical Drives section by default. What you should do is to find the target partition where your files are deleted by Norton, and then click the Scan button to start scanning.
Wait for the scanning process to complete automatically to ensure the best results from the scan.
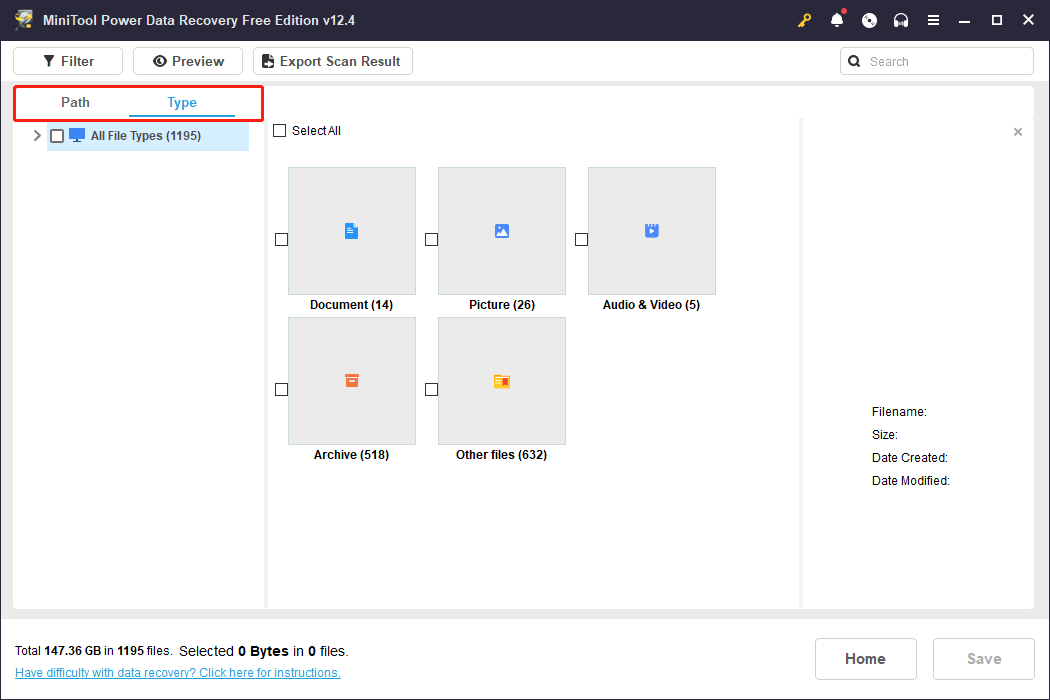
Step 2. After scanning, MiniTool Power Data Recovery showcases the located files by default under the Path tab in accordance with the file directory, making it easier for you to locate files that retain their original organization. However, if you find it challenging to navigate to the necessary files, you can use the following features to expedite your search for the required files.
Type: This category list enables you to filter the scan results based on file type, allowing you to narrow down the results to specific groups such as documents, photos, videos, etc. It is particularly helpful if you’re searching for a certain file type and want to save time sifting through irrelevant results.
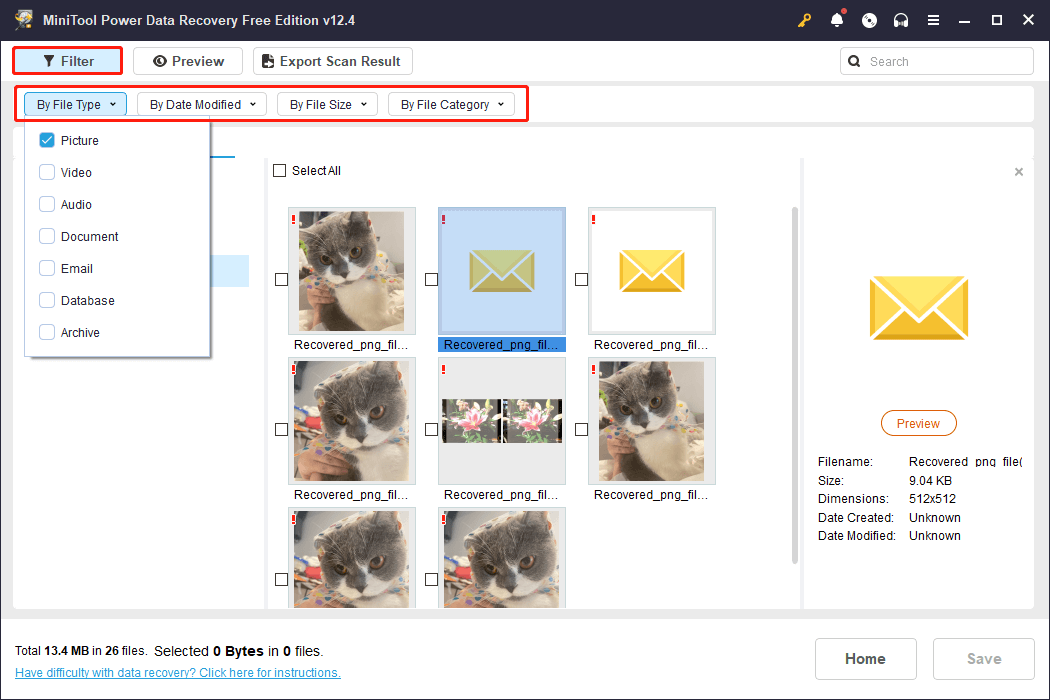
Filter: This feature allows you to make additional refinements based on attributes like file type, file size, date modified, and file category. More detailed filtering criteria can help you filter out unnecessary files.
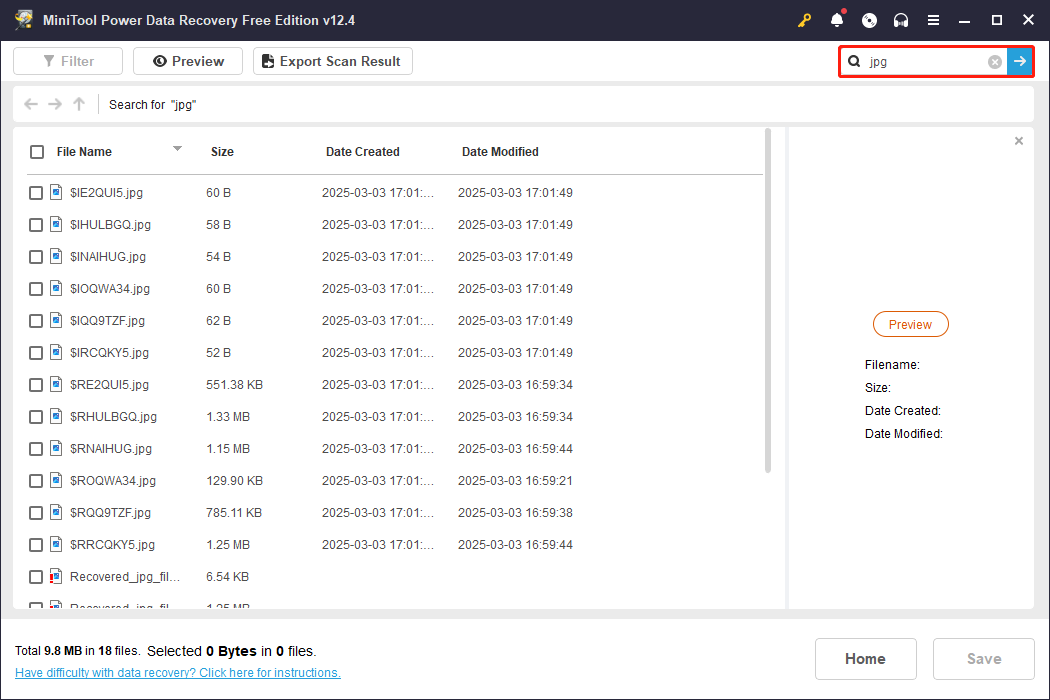
Search: This function plays an essential role, as it allows you to type specific keywords from the file name to locate what you need. If there is a significant quantity of recovered files and you need to quickly find a particular one, this feature can be very useful.
Preview: This feature allows you to view the contents of documents, images, videos, and other file types directly within the application. This can help you confirm the file’s integrity before making the decision to recover it to your computer.
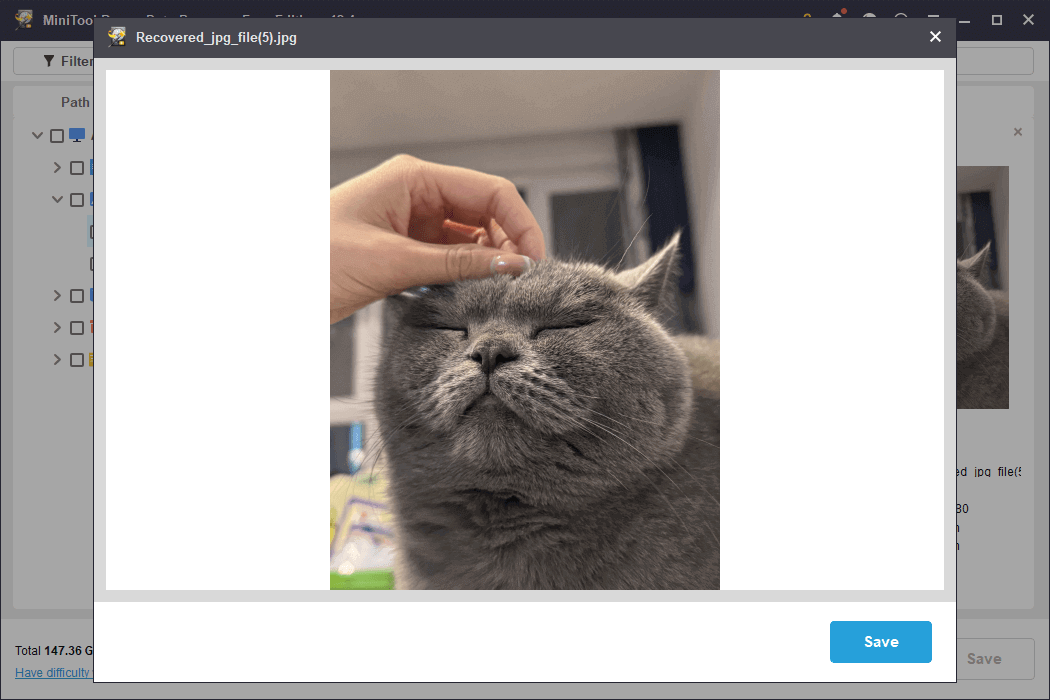
Step 3. Finally, click the Save button located in the lower right corner and select a new location that is different from the original partition to store the files you have selected.
Note that the files exceeding the first 1 GB size won’t be recovered until you upgrade the software to an advanced edition.
Use Stellar Data Recovery for Mac on macOS
To recover Norton deleted files on Mac, Stellar Data Recovery for Mac is preferred. It allows for quick and safe data recovery from different Mac devices and storage disks. You can scan and preview removed files at no cost, and it works with macOS Sonoma 14, Ventura 13, Monterey 12, Big Sur 11, and previous versions. The Premium edition also offers tools for repairing photos and audio.
Data Recovery for MacClick to Download100%Clean & Safe
Here are the instructions to recover Norton deleted files using Stellar Data Recovery for Mac:
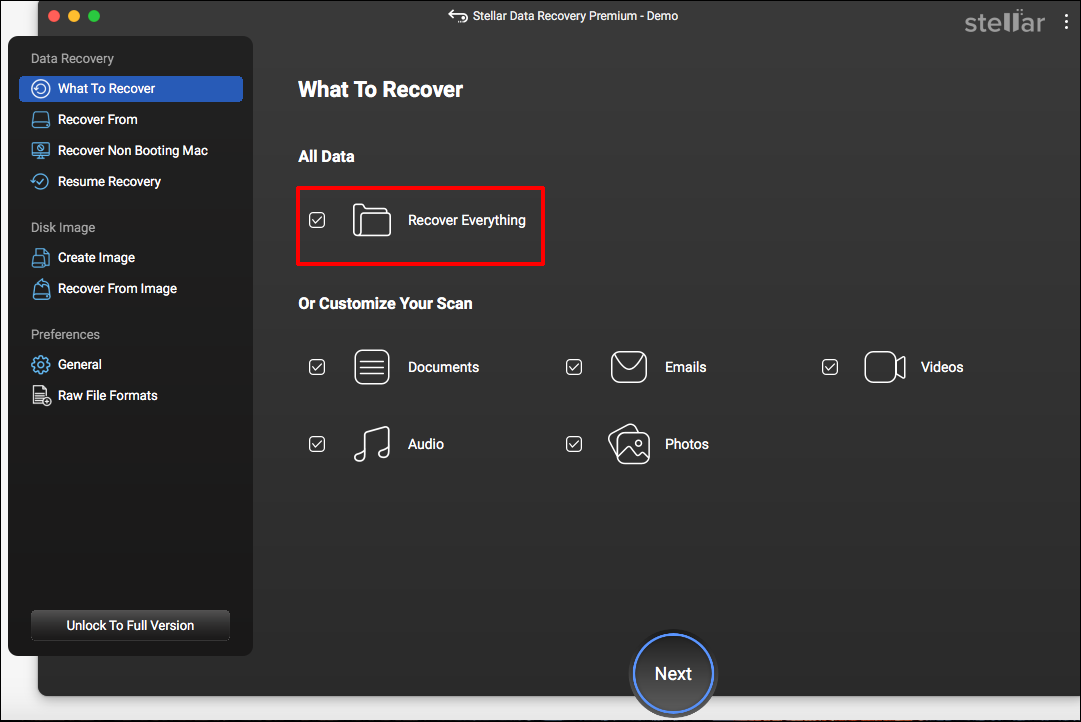
Step 1. Launch the program and choose the types of files you want to restore. You can either select Recover Everything or manually pick the specific file types, then click the Next button.
Step 2. Select the drive that contains the files you want to recover from your Mac and click the Scan button located in the bottom right corner.
Step 3. Check the recovered data and choose the files you wish to restore.
Step 4. Click the Recover button and select the location where you would like to save the files.
Step 5: Press the Save button to confirm your choice and wait for the recovery process to finish on your Mac.
Top Recommendation: Stop Norton from Removing Safe Files & Protect Your Data
Now that you may have successfully rescued your lost data, it does not mean that the same situation will not occur in the future. Therefore, it is crucial to prohibit Norton from moving your safe files and safeguard your data to prevent future loss.
How to Stop Norton from Removing Your Safe Files
If you notice that a specific file you need is repeatedly identified as harmful by Norton, you may want to prevent Norton from removing files and sending them to its quarantine folder. Just follow these steps:
- Launch Norton and go to the Settings menu in the upper right corner.
- Click on AntiVirus and then navigate to the Scans and Risks section.
- Scroll down to the Exclusions/Low Risks area and click on Configure [+] next to Items to Exclude From Scans.
- Choose Add Folders or Add Files and specify the items you wish to exclude from Norton’s future scans.
- Restart Norton to make sure the new settings are applied.
How to Protect Your Data Using MiniTool ShadowMaker
We recommend you use MiniTool ShadowMaker because it offers a comprehensive backup type, flexible backup schedule, intelligent backup management, and rapid file restoration. Specifically, it allows you to back up files and folders, partitions and disks, as well as entire systems on a daily, weekly, monthly, or event-driven basis.
Click the button below to download and install the Trial Edition of MiniTool ShadowMaker, which is available for a free 30-day trial.
MiniTool ShadowMaker TrialClick to Download100%Clean & Safe
To back up files, follow these steps:
Step 1. After launching the MiniTool ShadowMaker Trial, press the Keep Trial button to proceed.
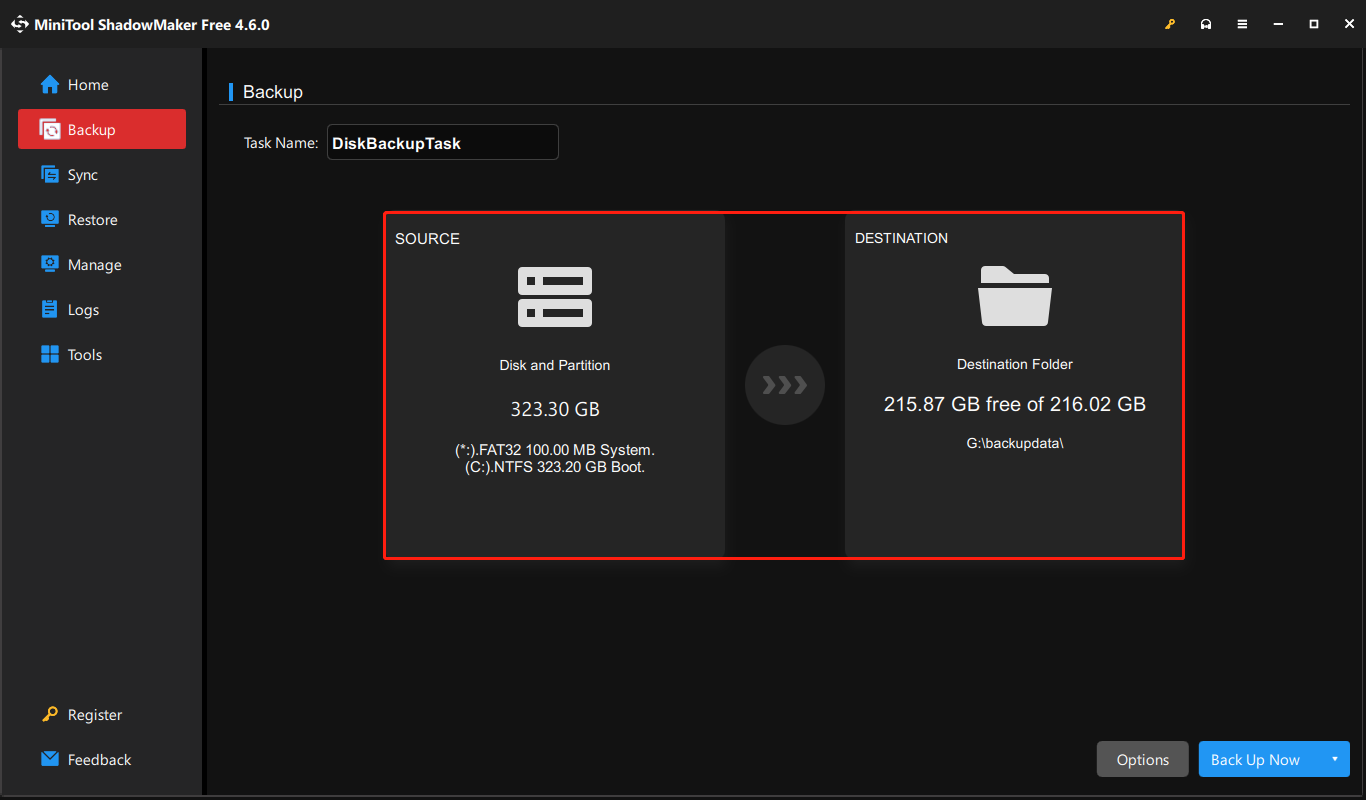
Step 2. Navigate to the Backup tab in the left panel. Click on the SOURCE column to select the files or folders, or the partitions and disks that you wish to back up. Next, click on the DESTINATION column to choose where to save the backup files.
Step 3 (optional). You can select the Options button in the bottom right corner to adjust backup schemes and scheduling settings.
Step 4. Finally, click Back Up Now to initiate the process.
If you need to recover your backup files, launch MiniTool ShadowMaker, go to the Restore tab, find the backup image you wish to restore, and then click the Restore button next to it.
Bottom Line
To sum up, with MiniTool Power Data Recovery and Stellar Data Recovery for Mac at hand, you can easily recover Norton deleted files without worrying about the safety of the original files and the storage device. What’s more, the outlined preventative tips can help you protect your data.
If you experience any issues or have questions while using MiniTool software, please reach out via email to [email protected] for support.
About The Author

Position: Columnist
Sandy became an English editor after graduation. She is devoted to finding effective solutions for diverse IT problems and provides articles on data recovery, data backup, and computer partitions and drives. In her spare time, she likes listening to music and playing games.
User Comments :