Is your SD card corrupted during file transfer? This problem can disrupt your workflow and cause data loss. However, with the right steps, you can recover your files (if needed) and fix the corrupted memory card. Follow this MiniTool guide to restore your SD card to a working condition.
The SD card’s strong portability and compatibility make it a widely used storage device across many devices such as cameras, phones, dashcams, and more. It is commonly used to store or transfer photos, videos, and various other types of data. However, recently, I’ve noticed many forum posts reporting this problem – SD card corrupted during file transfer.
Some users are fortunate enough to complete the file transfer before the corruption occurs. Unfortunately, others are not so lucky – The SD card becomes corrupted, and the files stored on it become inaccessible or damaged.
What are the common symptoms of this issue, and why does it happen? Keep reading to find out.
SD Card Corrupted During/After File Transfer – Symptoms & Reasons
Sometimes an SD card becomes corrupted without any error messages, while other times, an error message appears. Here are some common symptoms of SD card corruption during or after file transfer:
- Errors such as “You need to format the disk before you can use it”, “Read/write error on SD card”, “SD card has unsupported file system”, and other errors pop up.
- The transferred files are neither visible on the new device nor on the original SD card.
- The SD card disappears from your computer and cannot be recognized again.
- The SD card partitions disappear, or the card shows up as RAW.
- …
Common reasons for sudden SD card corruption during file transfer include:
- Power outage or an unstable USB connection during data transfer.
- The SD card has reached the end of its lifespan due to aging.
- The card is infected by viruses during the file transfer process.
- …
When you encounter this problem, the first thing you should do is rule out temporary glitches or connection issues. Try using a different card reader, USB port, or computer to check the disk status. If the SD card is from a phone or camera, remove it and then connect it to a computer to see whether it is working properly.
If you can still access the card and the files remain intact, it is highly recommended to back them up immediately to prevent severe disk damage and data loss. In cases where important files have already been lost or the card is inaccessible, you can refer to the next section for recovery instructions. If you do not need to recover files and only want to repair the corrupted SD card, you can skip ahead to the disk repair section.

How to Recover Files From Corrupted SD Card (if Needed)
When it comes to recovering files from a corrupted SD card, MiniTool Power Data Recovery is a top choice worth considering. This professional and clean recovery tool is designed for Windows 11/10/8/8.1 users, supporting file recovery from various storage media, including HDDs, SSDs, SD cards, USB flash drives, and even CDs/DVDs.
For corrupted SD cards, whether the file system is damaged or the partition is missing entirely, MiniTool Power Data Recovery can perform a deep scan of the disk sectors to locate existing, lost, or deleted files. It supports all major file systems such as FAT32, NTFS, exFAT, and more. Additionally, it recognizes a wide range of file types, including documents, photos, videos, audio files, and other common data formats.
What makes it more user-friendly is not only its intuitive interface but also its free recovery capacity. With the free edition, you can recover up to 1 GB of data without spending a penny.
MiniTool Power Data Recovery FreeClick to Download100%Clean & Safe
If you are not familiar with the data recovery process, follow the step-by-step instructions below.
Step 1. Select the SD Card to Scan for Files.
Make sure your SD card is properly connected to your computer. On the main interface of the MiniTool free file recovery software, the SD card will be displayed under Logical Drives and marked with a USB icon. Find it and click the Scan button on it to start scanning for files.
Be aware that if the SD card partitions are deleted or lost, you need to scan the lost partitions or unallocated space under Logical Drives.
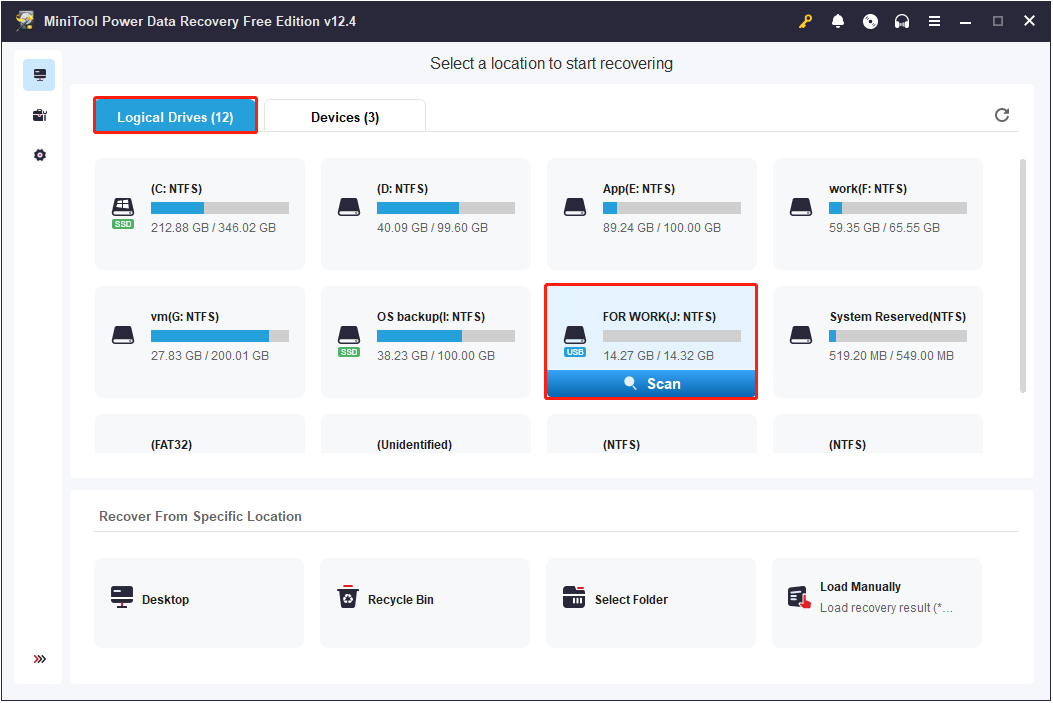
The software will thoroughly scan the SD card for any remaining files. You need to wait for the process to complete to ensure the best recovery results.
Step 2. Find the Desired Files and Preview Them.
Once the scan is complete, you can browse through the listed files to check whether the files you want to recover have been found.
In most cases, the recovered files retain their original folder structure and are displayed under the Path tab by default. Expand each folder to locate the specific files you wish to recover. This tool offers a Preview feature, allowing you to preview various types of files. Simply double-click a file to preview it. Once you are sure it is the file you want, tick the box in front of its name to select it.
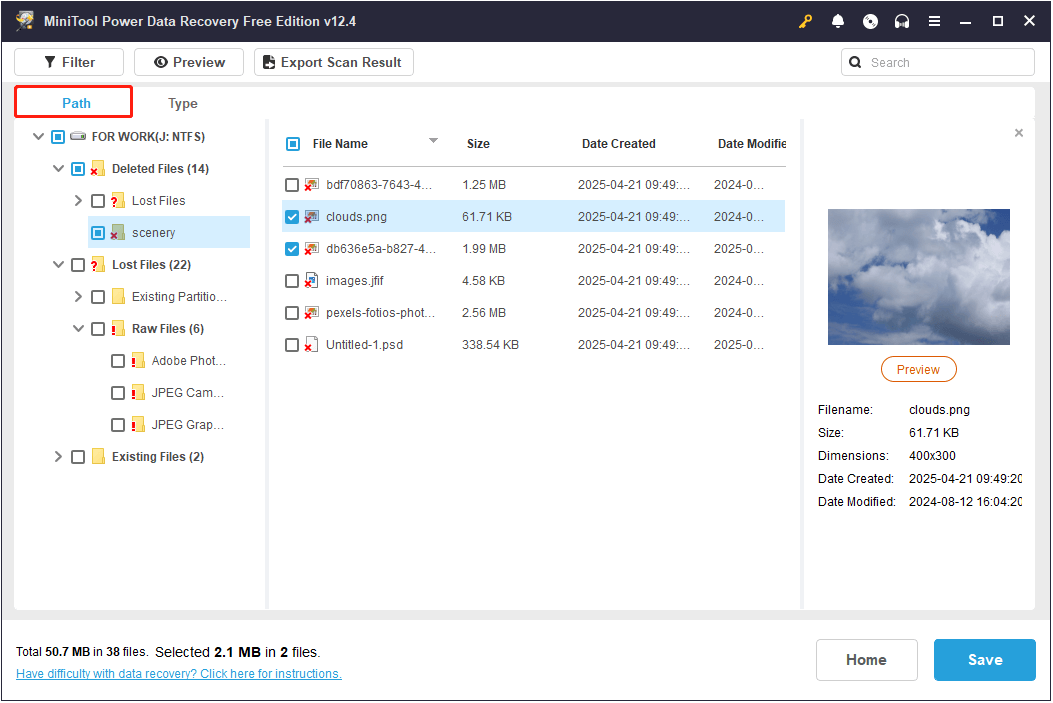
Alternatively, you can switch to the Type tab (next to Path), where the recovered files are grouped by file type and format. If you are looking to recover a specific type of file, such as photos, videos, or documents, this view can make the search easier.
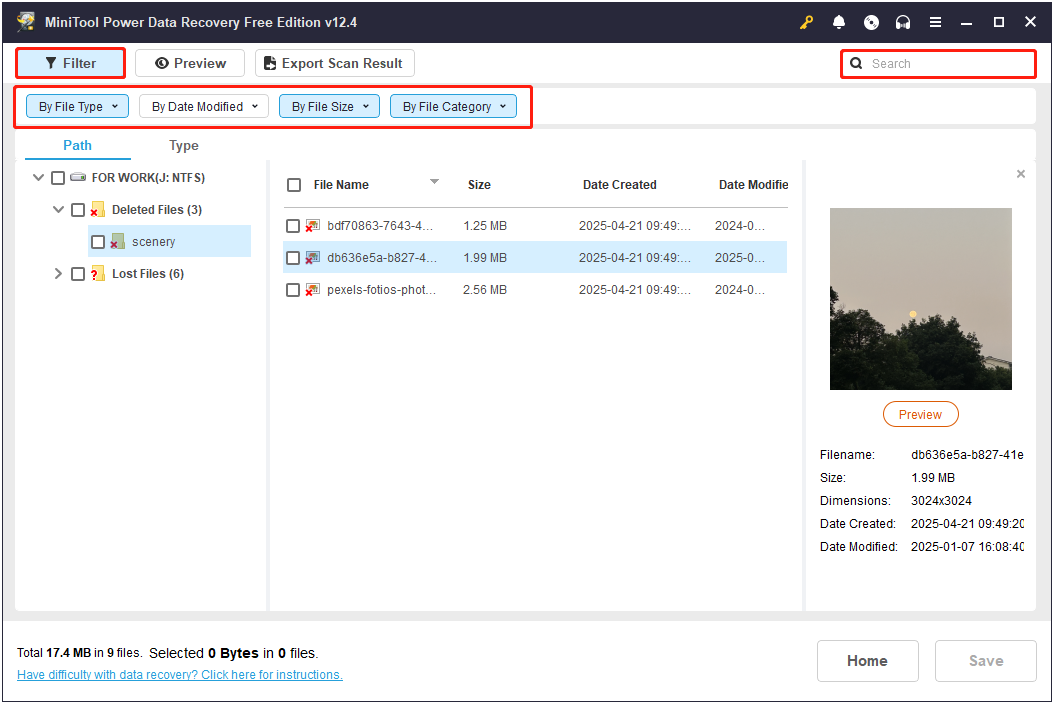
Here are two additional features that can help you narrow down the scan results:
- In the top left corner, click the Filter button to apply multiple filtering rules. You can filter files by file type, file size, last modified date, and file category.
- In the top right corner, use the search box to search for specific files. Just type the partial or complete file name in the box and press Enter to search for the target files.
Step 3. Save All Wanted Files to Another Location.
Finally, browse through the files and ensure that you have checked all the files you want to recover. After that, click Save, choose a safe directory in the pop-up window, and click OK to start saving the recovered files. Avoid saving the recovered files back to the original SD card, since it still needs repair, and doing so may cause deleted data to be overwritten.
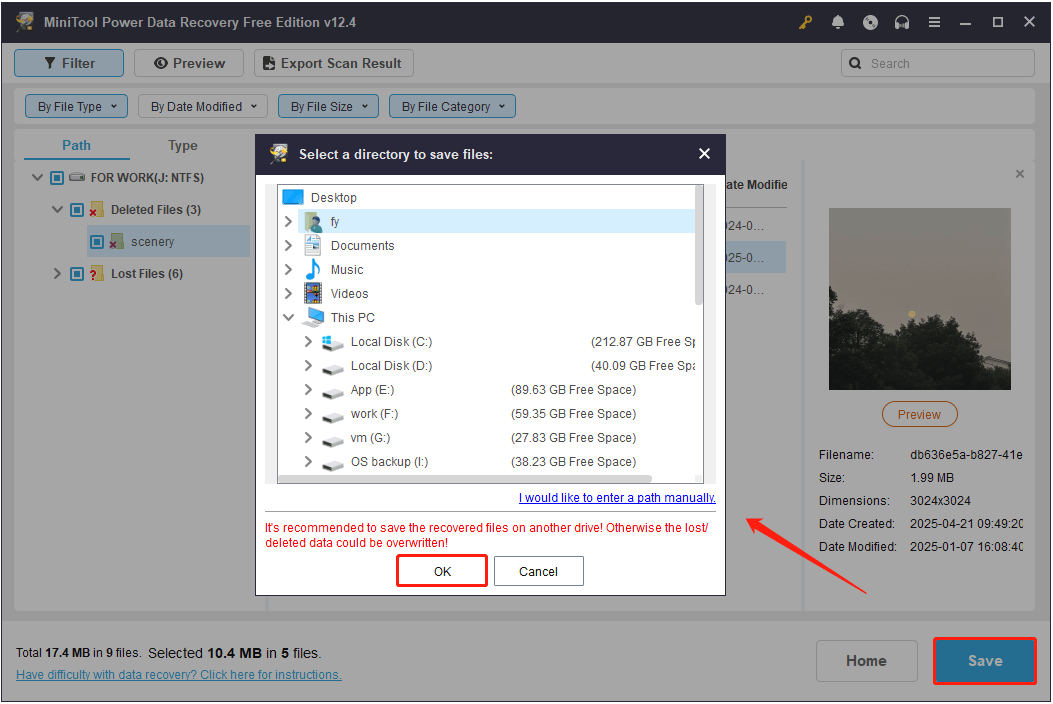
After the save process is completed, you can go to the selected directory to view your files. Next, it is time to repair the corrupted SD card so you can keep using it later on.
How to Fix Corrupted SD Card (Without Formatting)
Fix 1. Run CHKDSK
CHKDSK is a built-in disk check and repair tool in the Windows operating system. It is often the first choice for dealing with damaged disks because it is free to use and capable of detecting file system errors and repairing bad sectors.
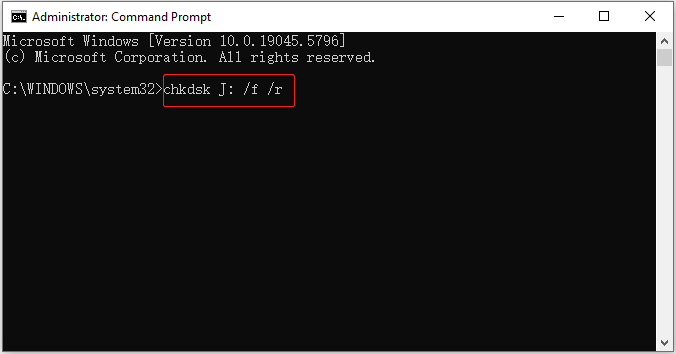
Step 1. Type cmd in the Windows search box. When Command Prompt pops up, right-click it and choose Run as administrator.
Step 2. In the Command Prompt window, input chkdsk drive letter: /f /r and press Enter to execute it. You need to replace the drive letter section with the actual drive letter of your SD card. For example, here I choose to scan the J drive: chkdsk J: /f /r.
Fix 2. Assign a Drive Letter
If the SD card suddenly disappears from your computer, it does not necessarily mean that the card is corrupted. Sometimes, the issue is simply due to a missing drive letter. In this case, the drive will not appear in File Explorer, but it is not actually damaged. Reassigning a drive letter can resolve the issue. Here are the steps to do that.
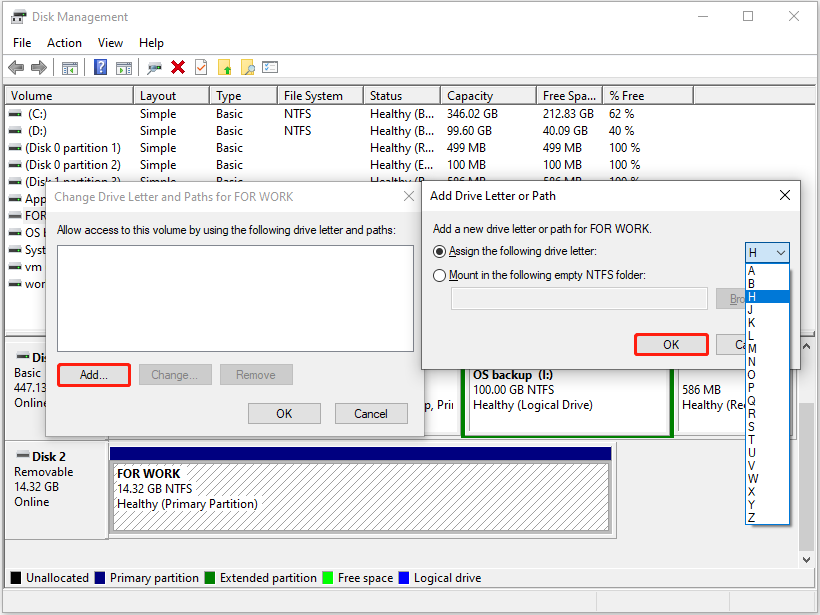
Step 1. Right-click the Start button on the taskbar and choose Disk Management.
Step 2. Find the SD card that lacks a drive letter, right-click it, and choose Change Drive Letter and Paths.
Step 3. In the new window, click Add. Next, choose an available drive letter from the drop-down menu and click OK.
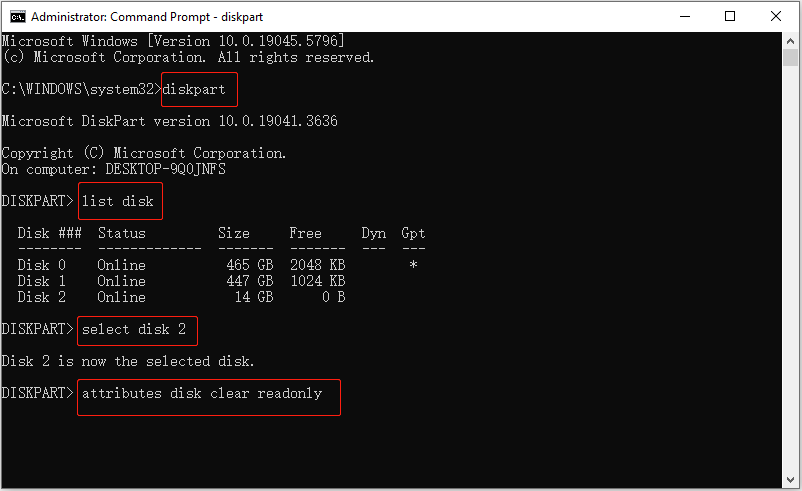
Fix 3. Clear Read-Only Attribute
Sometimes, the SD card may show a write-protected error during or after file transfer, preventing you from reading or writing data. In this case, you can use a command line to remove the read-only attribute and fix the issue.
Step 1. Open Command Prompt as an administrator.
Step 2. Type the following command lines one by one, and press Enter after each command to execute it:
- diskpart
- list disk
- select disk * (replace * with the disk number of your SD card)
- attributes disk clear readonly
Fix 4. Repartition the SD Card
If a virus infects your SD card during the file transfer process, it may delete your files or even remove the disk partitions. When the card appears as unallocated in Disk Management, the first thing you should do is recover your files and then recreate a new partition on the card.
Step 1. Right-click the unallocated region on your SD card, and then select New Simple Volume.
Step 2. Click Next, set up the volume size, and click Next.
Step 3. Choose a drive letter and click Next.
Step 4. Format the disk to a preferred file system and hit Next. Finally, click Finish, and then the card should be displayed in File Explorer.
These are the methods to fix corrupted SD card without formatting.
Fix 5. Format the Memory Card
This is the most thorough solution when your SD card is corrupted. Disk formatting will remove all files on the card and recreate a new file system, effectively fixing any file system errors or other logical issues.
You can format the card directly on your phone or camera if prompted. Alternatively, you can format it on a computer via Disk Management: simply right-click the card and select Format. In the new window, set the volume label and other disk information, check Perform a quick format, and click OK.
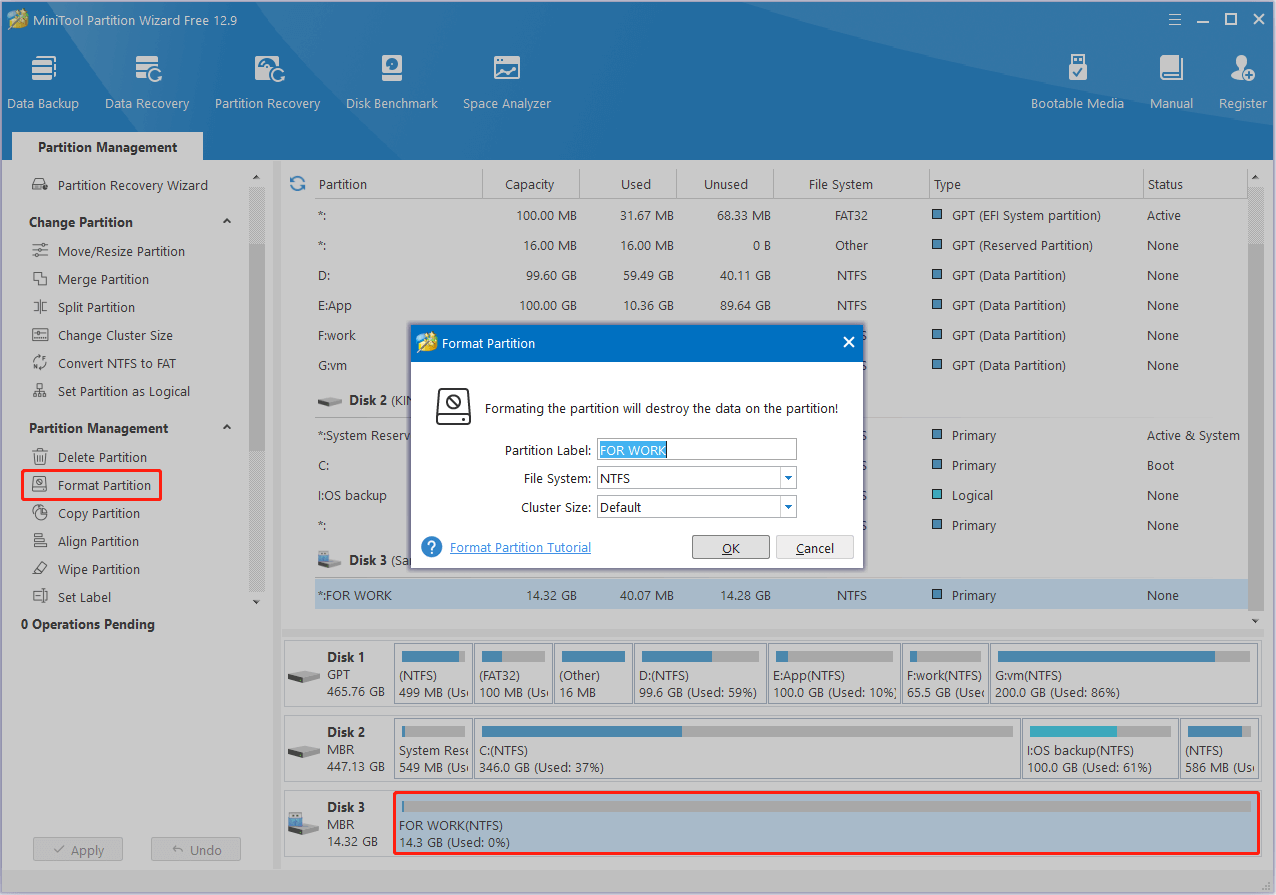
If you encounter any issues during the formatting process, MiniTool Partition Wizard can help. It is a reliable partition tool used for creating, resizing, deleting, wiping, and cloning disk partitions. The Format Partition feature is available for free.
MiniTool Partition Wizard FreeClick to Download100%Clean & Safe
On the home page of MiniTool Partition Wizard, select the disk partition, and then click Format Partition from the toolbar in the left panel. In the new window, set up the partition label and file system, and click OK. Next, preview the formatted partition, and then click Apply in the lower left corner to confirm.
![[SOLVED] How to Recover Photos From a Formatted SD Card Free](https://images.minitool.com/minitool.com/images/uploads/2018/09/recover-photo-from-formatted-sd-free-thumbnail.jpg)
How to Prevent SD Cards From Being Damaged During Transfer
In the next part, I will share several useful tips to help prevent your card from being damaged during file transfers or other operations in the future. This will save you from complicated data recovery or disk repair work.
Tip 1. Stay Powered and Connected
Whenever you are transferring files from your phone, camera, or computer, it is important to keep the device sufficiently powered and ensure that the card remains properly connected throughout the file transfer process.
Tip 2. Transfer Files in Batches
If you copy dozens of files at a time, especially on a small-capacity SD card, the card may easily overheat, slow down, or even encounter errors. Therefore, it is recommended to transfer smaller batches of files at a time.
Tip 3. Eject the Card Safely
Sometimes, the SD card corrupted after file transfer due to violent removal. So, after transferring files, make sure to safely eject the card from your device. For cameras or phones, power off the device before removing the card. For computers, use the Safely Remove Hardware option to disconnect your card properly.
Tip 4. Pay Attention to SD Card Lifespan
An SD card has a limited lifespan. If the card has been used for several years, it may be time to replace it. Moreover, SD cards typically do not offer archival-grade storage quality and should be treated as temporary storage rather than for long-term preservation.
Bottom Line
Faced with the “SD card corrupted during file transfer” issue, you can first rule out the connection problem. If that is not your case, recover your files, and then run CHKDSK, clear the read-only attribute, or format the card to repair it.
For any assistance with MiniTool products, please contact the support team via [email protected].
About The Author

Position: Columnist
Shirley holds a bachelor’s degree in English and has been an editor at the MiniTool Team for many years. She specializes in IT-related content, with a focus on data recovery, file backup, disk management, and other technical topics. She is committed to delivering clear, accurate, and practical solutions to help users resolve common computer issues.
User Comments :