Check this MiniTool post to fix the problem of the SSD not showing up. The methods involve initializing the SSD, repartitioning the disk, or assigning a drive letter. If those methods fail, try deleting existing storage pools, cleaning the disk, or change BIOS settings.
Issue: SSD Not Showing Up on Windows 10/11
My computer runs fine, but doesn’t detect/register the 2.5-inch SSD. There is no problem with the SATA or power cable, and the 2.5-inch SSD doesn’t appear in the BIOS or the Device Manager.www.reddit.com
After installing a new SSD on Windows 10/11, you might encounter a problem: the new SSD not showing up in File Explorer, Disk Management, Device Manager, or even the BIOS.
Keep reading to learn about its causes and solutions.
Why Is My SSD Not Showing Up
There are various reasons why an SSD is not showing up:
- Hardware connection problems
- Uninitialized disks
- Driver malfunctions
- Interface conflicts
- Format incompatibility
- Improper firmware settings
In most cases, this problem can be resolved easily. The following content includes some feasible methods.
How to Fix SSD Not Showing Up
This section explains the specific steps to make your SSD appear. Try them one by one until the problem is fixed.
Here is a video guide:
Fix 1: Reconnect the SSD
When troubleshooting “SSD not showing up”, reconnecting the SSD is one of the most basic steps.
Step 1: Power off the computer and then open the case.
Step 2: Unplug and replug the SATA data cable and power cable firmly. If necessary, switch to another SATA port.
Step 3: Power on the computer and check if Windows can recognize the SSD.
Fix 2: Enlarge the Disk Management Window
The SSD may not be displayed because the Disk Management window is too small to be fully displayed.
Therefore, right-click the Start button and choose Disk Management. Then, expand the view by dragging the edges or separator lines of the window to show all disks and unallocated space.
Fix 3: Repartition the Unallocated SSD
Windows File Explorer will only display volumes that have been partitioned and formatted. An unallocated SSD has no partition or file system, so Windows cannot mount it or display it.
Re-partitioning can restore the SSD to its normal state. However, once repartitioning is performed, all existing data will be deleted.
This is because repartitioning involves:
- Deleting the existing partition structure
- Rebuilding a new partition table
- Overwriting the original file system information
These operations make the original data extremely difficult to recover. Therefore, if your disk has become unallocated by accident, recover data from your SSD in advance.
Before You Do: Recover Data from an SSD That Is Not Showing Up
When your SSD is unallocated, you are unable to access the existing files using Windows’ built-in tools.
However, MiniTool Power Data Recovery can scan the SSD and extract files that still exist but cannot be mounted by the system.
This powerful recovery software has many advantages and can meet your recovery needs.
Besides handling unallocated disks, it can also recover files lost due to file system corruption, accidental deletion, formatting, and more.
In addition to SSDs, this tool is also capable of performing external hard drive recovery, SD card recovery, and USB flash drive recovery. Regarding supported file types, almost all file types can be scanned and recovered.
This free data recovery software enables you to restore 1 GB of files for free. Now, get it installed on your PC to do a recovery.
MiniTool Power Data Recovery FreeClick to Download100%Clean & Safe
Step 1: Launch the software and scan the SSD
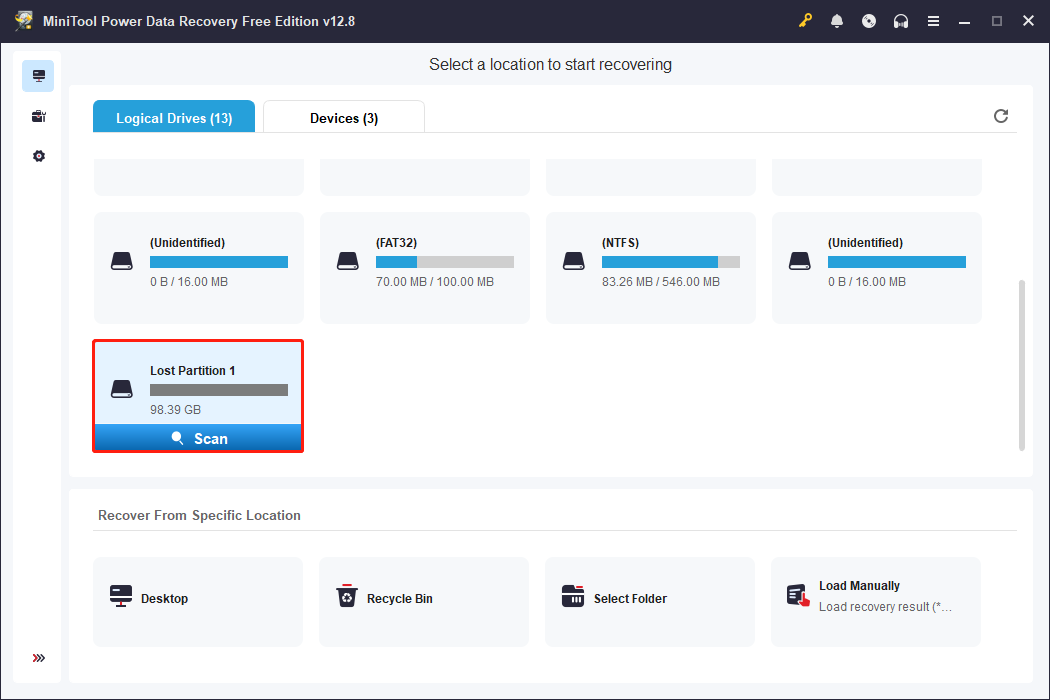
Open MiniTool Power Data Recovery. Here are two sections in the main interface.
- Logical Drives: It lists all partitions, including existing partitions, lost partitions, and unallocated space.
- Devices: It displays all the disks that are connected to your computer.
Select the SSD and click Scan.
Step 2: Locate the target files and preview them
This scan process will take some time. After it is complete, the files will be displayed by file structure under Path and file type under Type.
Besides this, you can use the Filter tool to filter listed files by file type, modification date, file size, and file category. In addition, the Search tool allows you to directly search for filenames to locate the specific file.
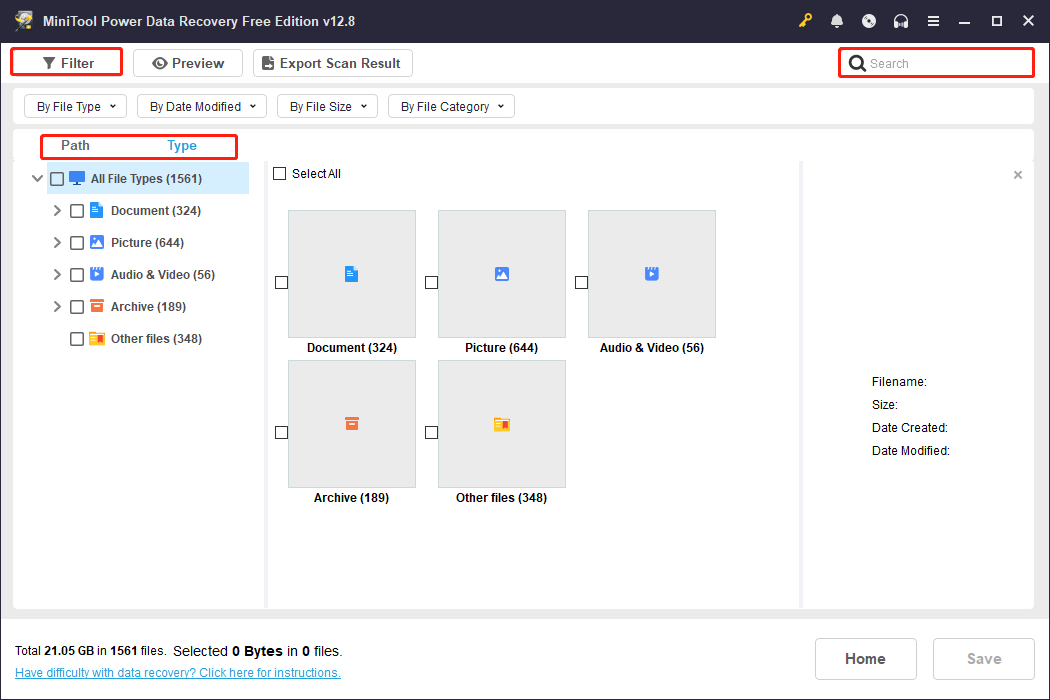
MiniTool’s Preview feature allows you to view file contents before recovery, including common file types such as pictures, documents, audios, and videos.
Double-clicking the file you want to view, the preview window will show up.

Step 3: Save the required files to a safe location
Check all the needed files and click the Save button. Choose a safe path and click OK in the new pop-up window. The recovery will start, and you need to wait for it to complete.

When the Recovery Completed window shows, check your recovered files.
After ensuring data security, the next step is to repartition the drive.
Step 1: Press Win + X and choose Disk Management.
Step 2: Right-click the Unallocated space and choose New Simple Volume.
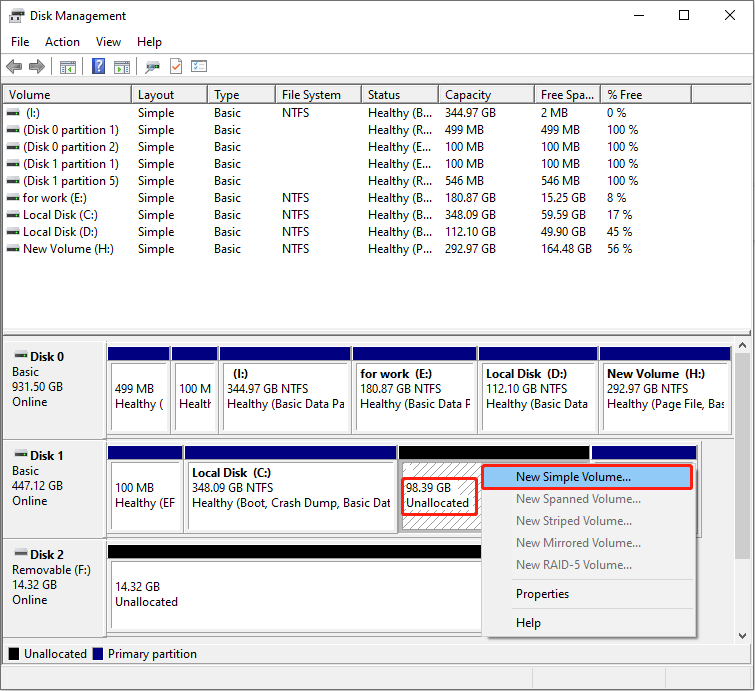
Step 3: Follow the wizard to specify the partition size, drive letter, and file system.
Fix 4: Initialize the SSD
If a newly installed SSD is shown as uninitialized, it must be initialized before it can be used on Windows.
This creates a partition table for the SSD and allows the operating system to recognize and further create partitions and file systems.
Step 1: Right-click the Start button and select Disk Management.
Step 2: Right-click the disk marked Unknown or Not Initialized and select Initialize Disk.
Step 3: For modern systems and drives larger than 2TB, select GPT and click OK.
Step 4: Right-click the Unallocated space on the drive and select New Simple Volume.
Follow the wizard prompts to format the drive and assign it a drive letter.
Fix 5: Check if the SSD Is Showing Up in BIOS
Checking if the SSD is displayed in the BIOS can confirm whether the motherboard recognizes the hard drive.
- If the SSD can be seen in the storage device list in the BIOS, it means that the hardware connection and power supply are normal.
- If it is not displayed, it may be a problem with the interface, cable, power supply, or the SSD itself, requiring further troubleshooting.
To check if an SSD is showing up in BIOS, restart your PC, and press F2, F12, Esc, or Delete during startup to enter BIOS.
Then, open the Storage or Boot configuration menu, and confirm whether the SSD is listed among detected devices.
Fix 6: Set the m.2_2 Interface to Gen 4
The motherboard’s default setting of the M.2_2 slot to a lower PCIe generation will cause high-speed NVMe SSDs to not be recognized properly.
Setting M.2_2 to Gen 4 restores the motherboard’s detection of the SSD by ensuring that the slot operates at the bandwidth required by the SSD.
Step 1: Restart your PC and press the corresponding key to enter the BIOS setup interface.
Step 2: Switch to Peripherals > PCI Express Configuration.
Step 3: Change the setting from Auto or Gen 3 to Gen 4.
Step 4: Press F10 to save BIOS changes and exit.

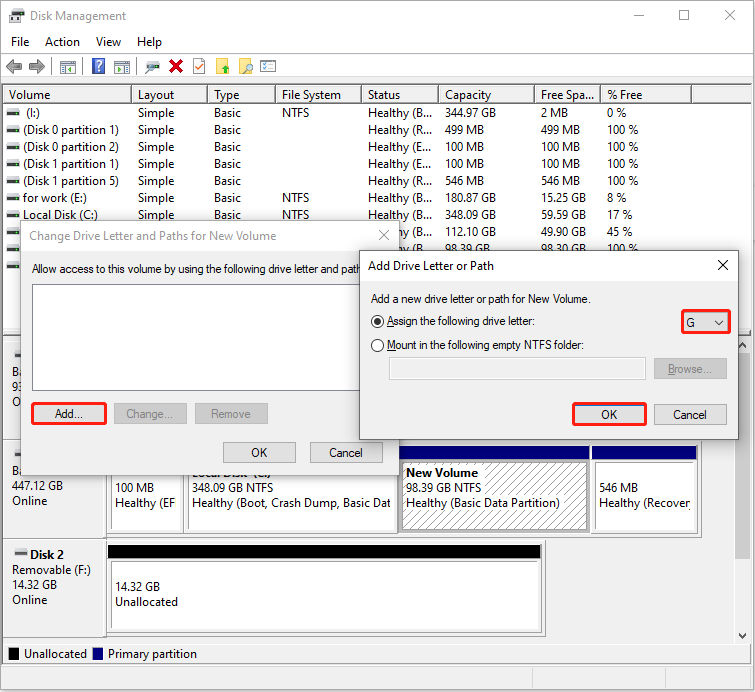
Fix 7: Assign a Drive Letter to SSD
If the SSD is not assigned a drive letter, it cannot be accessed normally on Windows. Assigning a drive letter to the SSD allows the system to mount the partition so that it shows up in File Explorer.
Step 1: Open Disk Management, right-click the SSD, and choose Change Drive Letter and Paths.
Step 2: Click the Add button, choose an unused letter, and click OK.
Fix 8: Update or Reinstall the SSD Driver
Outdated or corrupted drivers may cause the problem of the SSD not showing up in Disk Management. Here is how to update or reinstall the disk driver.
Step 1: Right-click the Start button and choose Device Manager.
Step 2: Expand Disk drives, right-click the SSD, and choose Update driver.
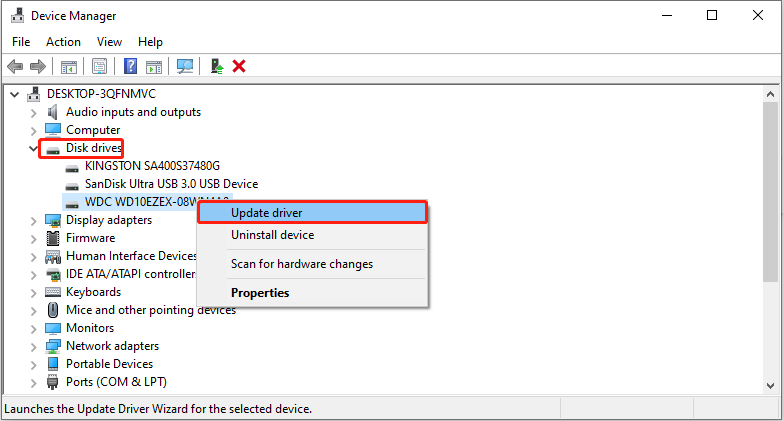
Step 3: Select Search automatically for drivers.
When the new driver is detected, follow the instructions to complete the process.
If there is no available new driver, try reinstalling it:
Step 1: Right-click the SSD in Device Manager and choose Uninstall device.
Step 2: Click Uninstall in the prompt window to confirm the change.
After uninstallation is completed, restart your PC, and then Windows will install the driver automatically.
Fix 9: Delete the Storage Pool
Windows Storage Spaces may retain the old storage pool configuration and consider the SSD to be part of the pool.
As long as the storage pool exists, the system will continue to try to access this “missing drive”, causing the SSD not to show up properly.
Deleting a storage pool clears the old pool configuration and frees up the SSD. This allows the SSD to be re-detected, initialized, and used normally.
Step 1: Type Control Panel in the Windows search box and press Enter.
Step 2: Enter System and Security > Storage Spaces. Then, find the storage pool you want to delete.
Step 3: Click Delete next to the Storage Spaces to delete them.
Step 4: Click Delete storage space and follow the wizard to finish the process.
![[Review] How to Create Windows 11 Storage Spaces/Storage Pool?](https://images.minitool.com/minitool.com/images/uploads/2021/09/windows-11-storage-spaces-thumbnail.png)
Fix 10: Wipe Out the Drive with DiskPart
Corrupted partition tables, storage pool information, or other metadata remaining on the disk may cause anomalies when the system recognizes the disk.
Using DiskPart to wipe the SSD can completely clear these underlying structures and restore the disk to a clean, uninitialized state.
Step 1: Enter Command Prompt in the Windows search box, right-click the best match, and select Run as administrator.
Step 2: Type diskpart and press Enter to launch the tool.
Step 3: Type the following commands one by one and press Enter after each:
- list disk
- select disk # (replace # with your drive number)
- clean
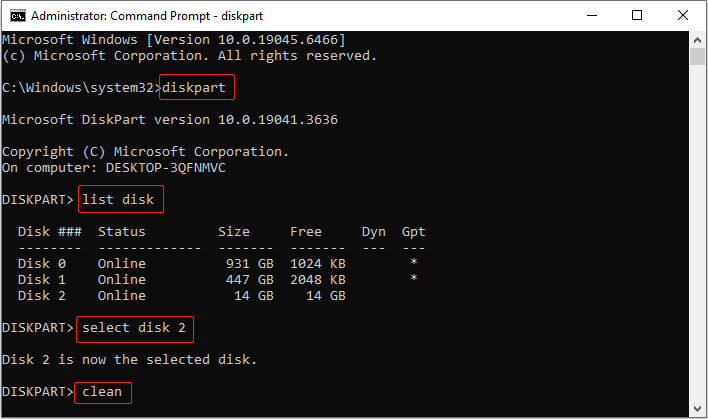
Step 4: Finally, type exit to close DiskPart.
After that, initialize the SSD and create new partitions on it to ensure it appears in File Explorer.
Fix 11: Reinstall Windows
When an SSD doesn’t appear, reinstalling Windows is also an effective solution.
The reinstallation process cleans up old partitions, rebuilds the partition structure, and allows the installer to correctly recognize the drive. This helps restore the SSD to normal operation.
Here are two options to reinstall the operating system.
Option 1: Reset via Settings (recommended for repair)
Step 1: Press Win + I to open Settings
Step 2: Click Update & Security > Recovery.
Step 3: Click Get started under the Reset this PC section.
Step 4: In the pop-up window, choose Keep my files (reinstall the system but keep your personal files) or Remove everything (clean install).
Step 5: Next, choose an installation method: Cloud download or Local reinstall.
Option 2: Clean install using USB (suitable for critical issues)
Step 1: Download the Media Creation Tool from the Microsoft website.
Step 2: Insert a USB drive (at least 8 GB) into your computer.
Step 3: Double-click the Media Creation Tool and follow the instructions to create a bootable USB.
Step 4: Restart the computer and press F2, F12, Esc, or Delete during startup to enter the BIOS settings page.
Step 5: Go to the BIOS/Boot menu, select USB as the first boot device, and boot from it.
Step 6: On the installation interface, select the language, time, keyboard, or input method, then click Install now.
Step 7: Enter your product key or select I don’t have a product key and activate it later.
Step 8: Select Custom: Install Windows only, and choose a location to install Windows.
Wrapping Things Up
In general, issues like “SSD not showing up” can be solved by repartitioning, adjusting BIOS settings, deleting the pool, cleaning up the drive, or reinstalling Windows.
Not only is fixing this issue important, but the data on the SSD is also crucial. Follow the above tip to recover your data if necessary.
For any questions about the MiniTool product, feel free to contact us at [email protected].
About The Author

Position: Columnist
Chelsea graduated from university with a major in English. She has a strong interest in English writing. It is this passion for writing that led her to become an English editor. Her articles mainly focus on data recovery and other computer industry news. As an energetic and outgoing girl, Chelsea enjoys listening to music, singing, riding bikes, and eating in her spare time.
User Comments :