If you encounter a dead SSD, this MiniTool post provides two steps to fix it without risking file loss. First, use MiniTool Power Data Recovery to recover data from dead SSD. Then, perform a power cycle, update the SSD firmware and driver, run CHKDSK, or format the disk for normal use.
Can You Recover Data from a Dead SSD
Solid-State Drives (SSDs) are fast and highly reliable, but they can still fail over time.
A damaged SSD doesn’t always mean complete data loss. Sometimes the system can still detect the drive, while in others, it’s completely unrecognizable.
Identifying the symptoms of an SSD failure is the first step in diagnosing the problem and is crucial in determining whether data recovery is feasible.
Symptoms of a Dead SSD
The following are some symptoms of a dead SSD.
- Unrecognized: The system or BIOS cannot detect the SSD at all.
- Capacity error: It displays as 0 GB and cannot store any data.
- Read/write failure: Frequent errors or data corruption occur when writing to the disk.
- Speed drop: Read and write speeds are extremely slow, far below normal levels.
- Firmware error: Warnings appear in Device Manager, or the firmware fails to load.
- Abnormal physical response: There is no response after insertion or accompanied by abnormal heat generation.
Common Causes of Dead SSD
Dead SSDs can be caused by hardware-level issues, such as controller or flash memory failure, or logical-level issues. Here is a detailed explanation of the common causes:
- Firmware corruption: Firmware update failure or firmware corruption prevents the SSD from initializing.
- NAND flash wear-out: Flash memory cells reach their write endurance limit, and data can no longer be stored.
- Power issues: Unstable power supply or abnormal voltage causes sudden SSD failure.
- File system/partition table damage: Logical structure damage prevents the system from recognizing partitions.
- Overheating: Prolonged high-temperature operation causes hardware damage or performance degradation.
- Physical damage: External impacts or circuit damage directly render the SSD unusable.
The possibility of data recovery from a dead SSD depends on the following situations:
Case 1: The SSD has logical problems such as file system corruption or partition table damage but can still be recognized.
At this point, the data itself is still in the storage unit, but the index or structure is damaged. A common recovery method is to use data recovery software to retrieve lost data.
Case 2: The SSD has a damaged controller, severely worn flash chips, or burned circuit boards.
Such situations often require professional data recovery services, and the chances of successful recovery are extremely low.
After knowing about the dead SSD, the next step is to recover data from the problematic drive.

How to Recover Data from a Dead SSD
MiniTool Power Data Recovery is widely recommended to recover data from dead SSD. It focuses on logical-level recovery and can scan inaccessible drives.
Besides SSDs, it also supports HDDs, external hard drives, USB flash drives, SD cards, and more. This tool supports recovery of almost all file types, including documents, pictures, videos, audios, and more.
Furthermore, it supports common file systems such as FAT, NTFS, and exFAT, and is compatible with Windows 11/10/8/8.1.
The interface is intuitive. Even those without experience can quickly complete the scan and recovery process. The scan uses read-only mode to avoid overwriting data and causing further damage.
This free file recovery software allows you to recover 1 GB of files for free. Download and install it on your computer to recover data from dead SSD.
MiniTool Power Data Recovery FreeClick to Download100%Clean & Safe
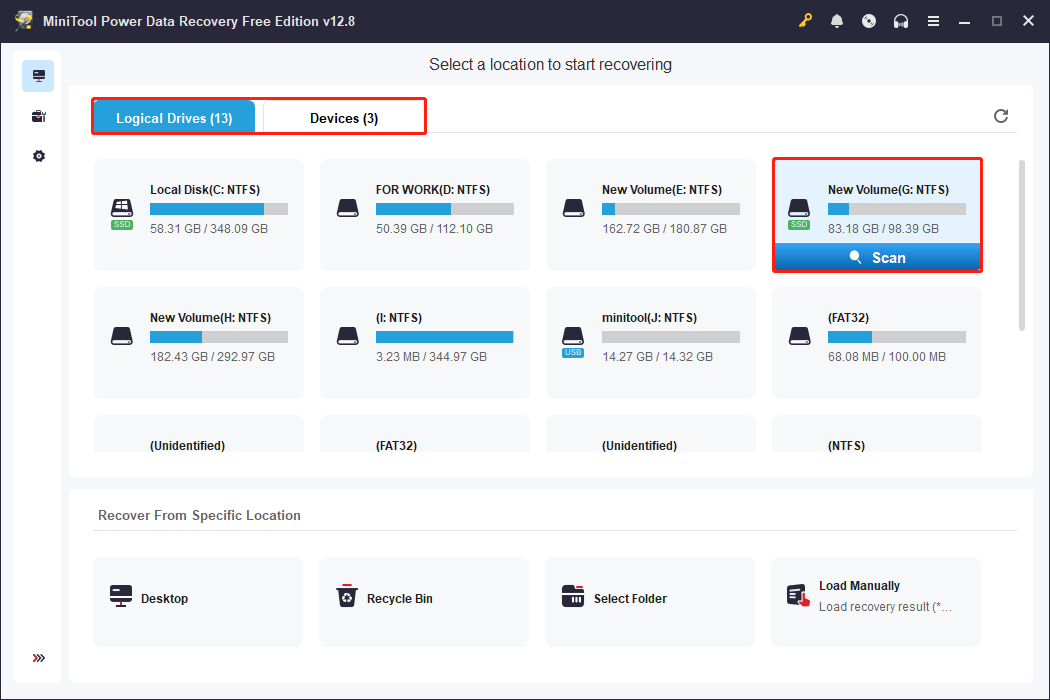
Step 1: Launch the software and scan the partition
Open MiniTool Power Data Recovery and go to the main interface. Select a scan range:
- Logical Drives: All detectable partitions will be shown. Locate your SSD partition (marked with an SSD icon) and click Scan.
- Devices: If you have difficulty finding the SSD partition, switch to Devices, select the entire SSD disk, and click Scan.
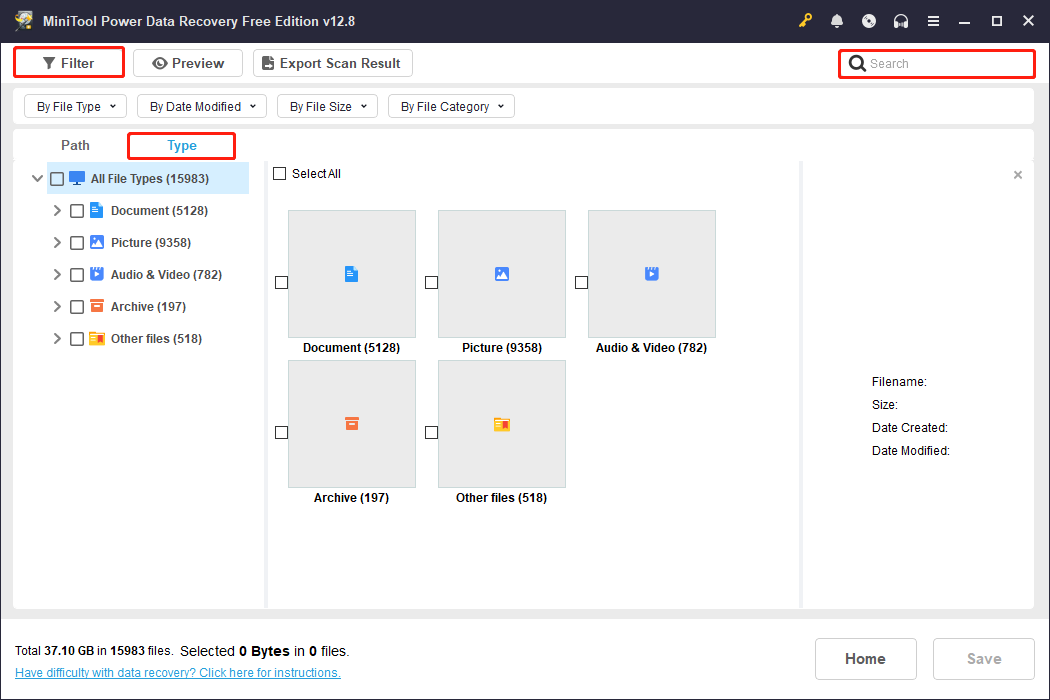
Step 2: Wait for the scan to end and find the target files
Do not stop the scan halfway; a full scan ensures a more complete recovery of lost files. When the scan is finished, the scan results are categorized by Path, where you can view Deleted Files, Lost Files, and Existing Files.
Besides this, you can also use Type, Filter, and Search to locate files quickly.
- Type: Categorizes scan results by file type, such as documents, pictures, videos, etc.
- Editor: Filters scan results by file type, modification date, file size, and file category.
- Search: Allows you to enter a full or partial filename to search for the specific file.
After finding your files, double-click them to preview and confirm they can be opened normally.
Step 3: Select and recover files to a safe location
After files are confirmed, check them and click the Save button. Choose a healthy drive as the save location and click OK to start the recovery.
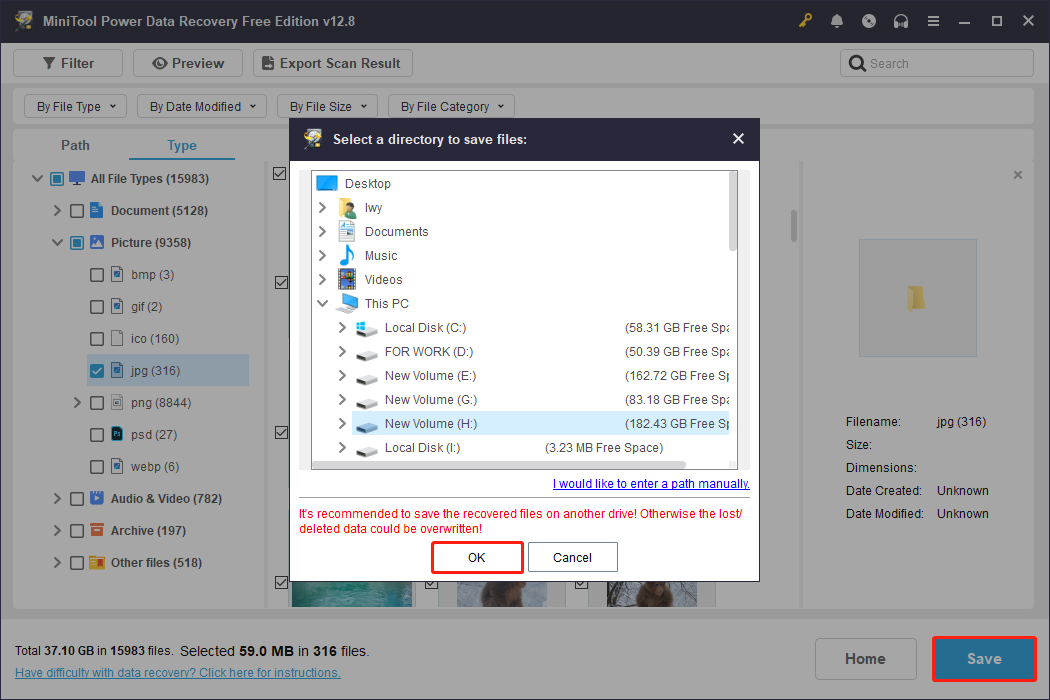
When the files are recovered successfully, click the View Recovered button in the Recovery Completed window to check them.
After the files are safe, the next step is to repair your dead SSD.
How to Fix a Dead SSD for Regular Use
This section teaches you how to repair a dead SSD by checking the connection, updating the SSD firmware and driver, running CHKDSK, and formatting the disk.
Two Initial Checks
To fix a dead SSD, check the physical connection first. Ruling out connection issues first can avoid misdiagnosing the problem and prevent unnecessary repair operations from damaging the drive.
Action 1: Check the connection
When dealing with a dead SSD, checking the connections is the first step in troubleshooting.
Ensure the data and power cables are securely plugged in, and try different SATA/USB ports or cables. If it’s an external enclosure, confirm the enclosure and ports are working properly.
Action 2: Check Disk Management or BIOS
Check if the device is detected in the BIOS or Disk Management.
- In Windows Disk Management: Right-click the Start menu and select Disk Management to see if the SSD is listed. If it shows as Unallocated or has an abnormal capacity, the partition table or file system may be corrupted.
- In BIOS: Restart your computer, press the specified shortcut key (commonly F2, F10, Del, Esc) during startup to enter BIOS. Then, switch to the Storage Information or SATA Configuration menu, and check if the SSD is detected in the storage device list.
If the SSD does not appear in BIOS, it usually indicates a hardware or firmware-level failure. If it is detected, try the following more advanced fixes.
Solution 1: Perform a Power Cycle
Running a power cycle is a common method to troubleshoot whether an SSD is truly dead. The steps are as follows:
Step 1: Disconnect the power
Completely shut down your computer and unplug the power cord.
Step 2: Remove the SSD
Remove the SSD from the motherboard or external enclosure, ensuring a complete disconnection. Keep the power off for approximately 30 seconds to 1 minute to allow residual current to dissipate.
Step 3: Reconnect the SSD
Reinsert the SSD into the motherboard or external enclosure, ensuring the connector is secure.
Step 4: Reboot the PC
Connect the power and start the computer. Enter the BIOS or system to check if the SSD is recognized and working.
Alternatively, follow the instructions below to power cycle the SSD:
Step 1. Ensure the SSD is connected to the power cable, but remove the data cable.
Step 2. Turn on the power and leave it on for 30 minutes.
Step 3. Power off the computer or unplug the power cable, wait 30 seconds, then restore power.
Step 4. Leave the drive powered on for another 30 minutes.
Step 5. Power off again and wait 30 seconds.
Step 6. Reconnect the data cable, and the drive should be responsive.
Solution 2: Update the SSD Firmware
Outdated or faulty firmware can result in detection failures or unstable operation. The new firmware can resolve compatibility issues and restore normal communication between the SSD and the motherboard.
Step 1: Press Win + X and choose Device Manager.
Step 2: Expand Disk drives, right-click the disk, and choose Properties.
Step 3: Switch to the Details tab, expand the Property dropdown, and select Hardware Ids. Remember one of the SSD values (one of the listed values).
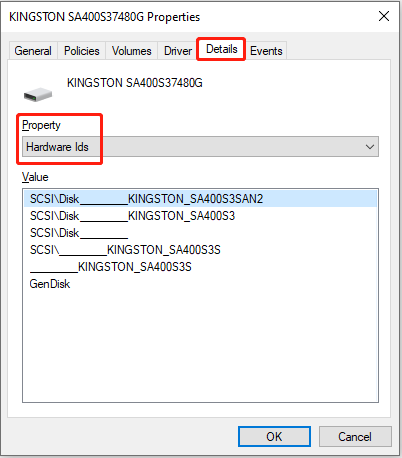
Step 4: Open a web browser and search for the hardware ID you copied.
Step 5: Open the official firmware update page for your SSD model, and download the firmware package.
Step 6: Run the installer to update your SSD firmware to the latest version.
After completing these steps, check whether the SSD works properly. If the issue remains, try updating the SSD driver as a further solution.
Solution 3: Update the SSD Driver
Outdated, corrupted, or incompatible drivers can prevent the system from communicating with the drive properly.
A new driver restores normal recognition, fixes detection errors, and resolves stability issues between the operating system and the SSD.
In many cases, the drive can return to normal once the driver problem is fixed, with no physical damage occurring.
Step 1: Open Device Manager, expand Disk drives, right-click the target drive, and choose Update driver.
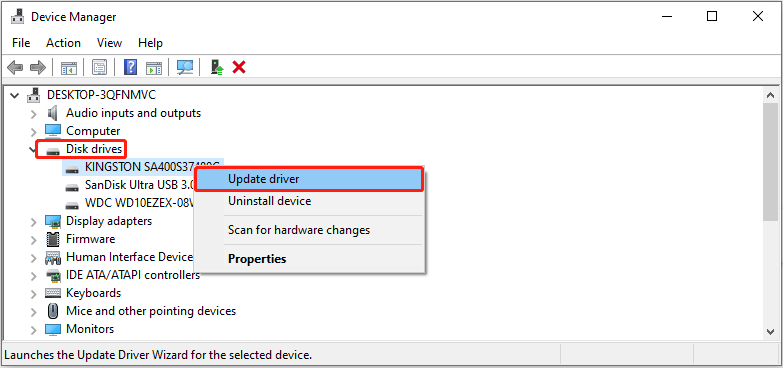
Step 2: In the new window, select Search automatically for drivers.
Once a new driver is detected, follow the prompts to complete the installation and restart your computer if necessary.
Solution 4: Run the CHKDSK Command
CHKDSK can scan and attempt to repair file system errors and block bad sectors. This resolves logical issues that cause a dead drive, restoring normal disk access functionality. Here is how to run it.
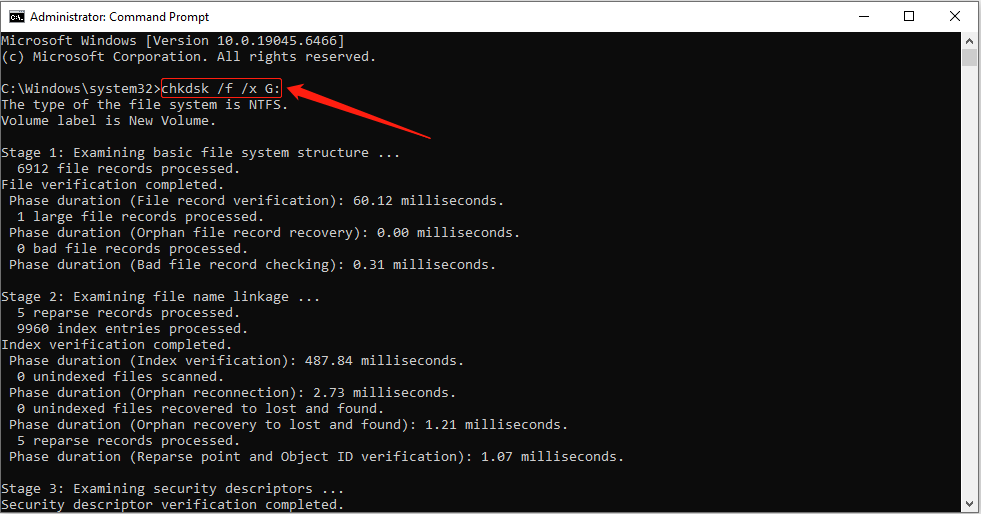
Step 1: Type Command Prompt in the Windows search box, right-click the best match, and choose Run as administrator.
Step 2: Type chkdsk /f /x G: and press Enter to repair disk errors. (Replace G with the actual drive letter of your SSD.)
- /f: Automatically repair file system errors.
- /x: Force the volume to be unmounted first if necessary.
Solution 5: Format the Drive to Normal
If none of the above methods work, formatting can be the last resort. Formatting the drive erases corrupted file systems and invalid partition tables.
It rebuilds a clean file structure, allowing the system to recognize and access the drive normally again. Here are two tools for SSD formatting.
Option 1: Use Disk Management
Disk Management is a built-in Windows tool that is safe and stable, with no additional software required. It supports creating partitions, assigning drive letters, and formatting a disk to NTFS, FAT32, and exFAT file systems.
Step 1: Press Win + X and choose Disk Management.
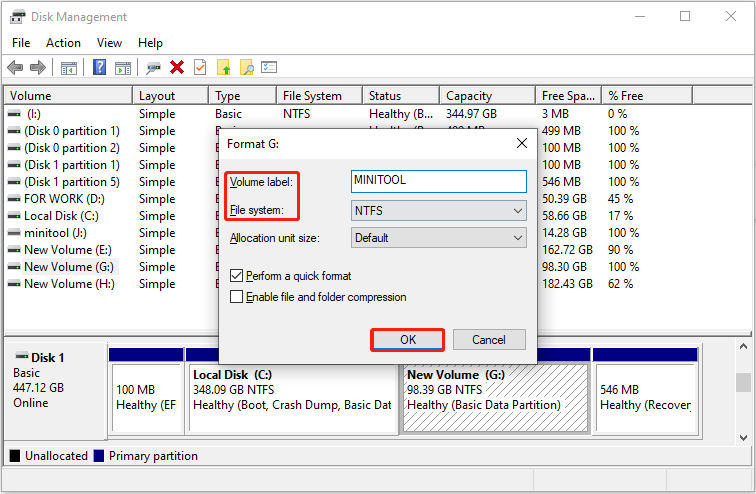
Step 2: Right-click the target SSD and choose Format.
Step 3: Set a volume label, choose a file system, and click OK > OK.
Option 2: Use MiniTool Partition Wizard
You can also use MiniTool Partition Wizard to format the SSD. This is a professional and powerful partition management tool.
It not only supports formatting, but also repartitions and initializes disks, helping fix SSD inaccessibility caused by damaged partition tables.
Furthermore, it supports common file systems such as NTFS, FAT32, and exFAT, making it suitable for different usage scenarios.
Step 1: Click the following button to download and install the software on your computer.
MiniTool Partition Wizard FreeClick to Download100%Clean & Safe
Step 2: Open the software and select the target drive.
Step 3: Click the Format Partition option under Partition Management.
Step 4: Type a partition label, choose a file system, and click OK.

Step 5: Finally, click the Apply button to make the change take effect.
After your SSD is repaired, read the last section to learn how to protect your SSD from being damaged.
Read Also: What Factors Affect an SSD Performance? Answered Here
How to Protect Your SSD in the Future
To ensure your SSD lasts longer and is more stable, consider the following:
- Back up your data regularly. Use cloud storage or an external hard drive to ensure important files have copies.
- Maintain a stable power supply. Use a regulated power supply or UPS to avoid voltage fluctuations that could damage your SSD.
- Avoid frequent writes. SSDs have a limited number of write cycles; reduce unnecessary frequent write operations to extend their lifespan.
- Partition and use your SSD properly. Create separate partitions for your system and data drives to reduce the concentration of heavy loads in a single area.
- Maintain a suitable temperature. Avoid prolonged exposure to high temperatures and ensure good heat dissipation.
Final Words
Repairing a dead SSD is no easy task, but by following the correct steps, there’s a chance to restore it to normal.
First, use MiniTool Power Data Recovery to recover data from dead SSD on Windows, then choose the appropriate repair methods to fix it.
Methods include performing a power cycle, updating the SSD firmware and driver, running CHKDSK, and formatting the disk.
Should you have any questions regarding the MiniTool products, feel free to contact us at [email protected].
About The Author

Position: Columnist
Chelsea graduated from university with a major in English. She has a strong interest in English writing. It is this passion for writing that led her to become an English editor. Her articles mainly focus on data recovery and other computer industry news. As an energetic and outgoing girl, Chelsea enjoys listening to music, singing, riding bikes, and eating in her spare time.
User Comments :