Sometimes, your removable disk drive is facing with some issues and you need to format it, but you may receive there is no media in the specified device error when you format the drive by using HP USB Disk Storage Format Tool. Then, how to deal with this issue? Now, you can find some useful solutions in this MiniTool article.
Help! There Is No Media in the Specified Device
When you are using the removable disk drives, such as USB flash drives, memory cards, SD cards, you may encounter different kinds of issues, such as you need to format the disk before you can use it, the disk is write-protected, USB device not recognized, and so forth.
This post shows you how to fix the external hard drive needs formatting error and how to recover data from not formatted hard drive before formatting.
To solve the USB problems, you can choose to format the devices. However, the formatting process may be not successful with the error there is no media in the specified device, just like the following example:
I tried to reformat my USB drive with HP USB Disk Storage Format Tool, but it says that there is no media in the specified device. It doesn’t even display total size and the free size of the USB. Then, I tried two other software that could reformat USB but the other one couldn’t even see the USB and the other one couldn’t reformat it. What do I do now?Source: techyv.com
The above user says that there is no media in the device issue occurs when using the HP USB Disk Storage Format Tool to format a removable disk drive, and the error message is There is no media in the specified device.
Thus, you will be unable to fix the USB drive issue by formatting it successfully. What should you do then to get rid of this USB drive no media error?
While, if there are some important files in the removable disk no media, you’d better use a free file recovery tool to restore them and then take some measures to handle there is no media in the specified device USB stick problem.
How to Recover Data from USB Drive No Media
To recover data from a removable disk drive with USB stick no media issue, we suggest trying this top data recovery software – MiniTool Power Data Recovery.
This program has four recovery modules, including This PC, Removable Disk Drive, Hard Disk Drive and CD/DVD Drive. With them, you can recover various types of files from internal hard drives, external hard drives, memory cards, USB flash drives, SD cards, and more.
Since you want to recover data from a USB disk drive, you need to choose Removable Disk Drive module to do this job.
It is quite possible that you have never used this program before. Don’t worry. You can firstly use the trial edition of this software to see if it can find the data you want to recover. Now, you can press the following button to download this software on your computer.
MiniTool Power Data Recovery TrialClick to Download100%Clean & Safe
After installing this software on your computer, you can follow these steps to retrieve your needed files.
Step 1: Connect the USB drive to your computer. Then, open the software and you will see This PC interface. Next, you need to choose Removable Disk Drive module from the left list to enter its interface.
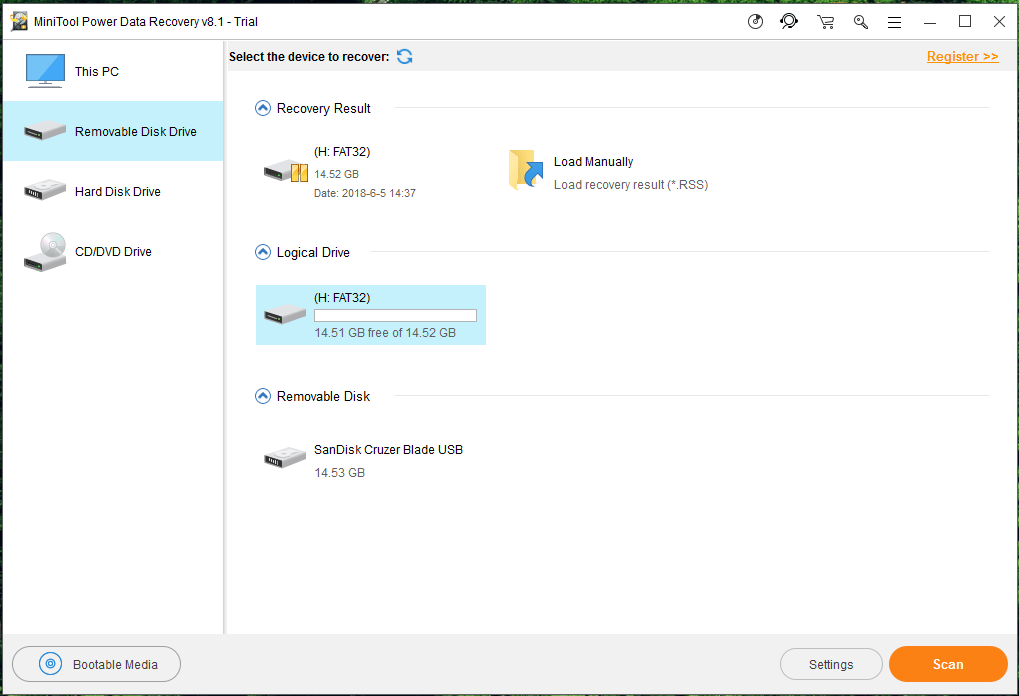
This software can show the target USB drive on the interface automatically.
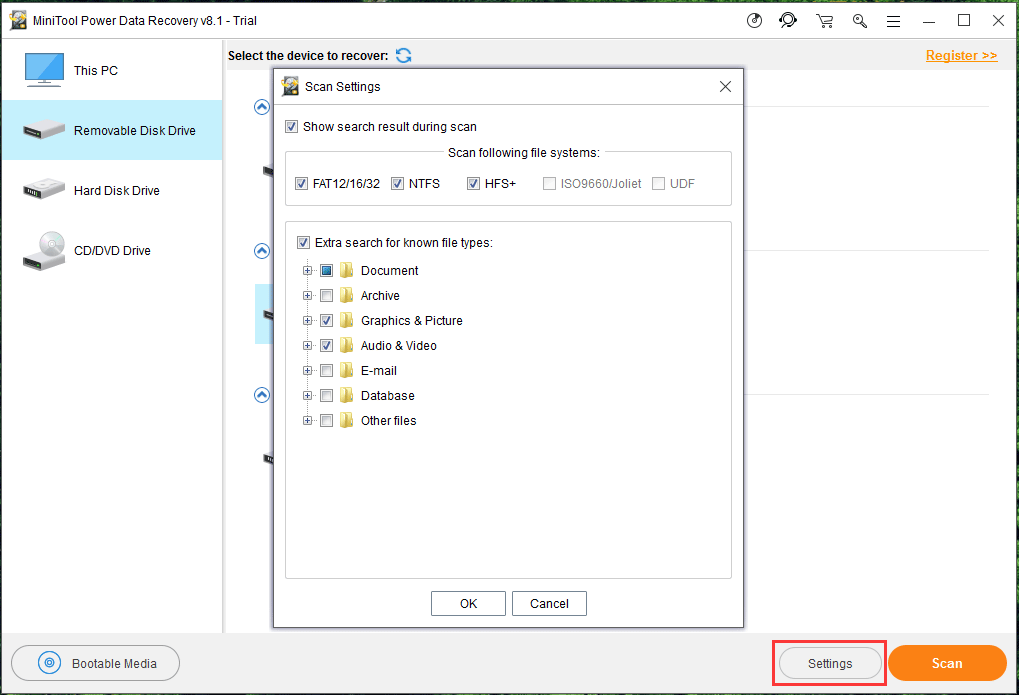
Here, this software has a feature – Settings which enables you to choose the file’s types you only want to recover. If you’re going to make such a selection, you can click on the Settings button to choose the file’s types according to own situation. After that, click on the OK button to quit the Settings window.
Now, you can choose the target USB drive and click on the Scan button to start the scanning process.
Step 2: After some minutes, the scanning process will end and you can see the scan result interface as follows. And here, the scanned files include both the deleted and the existed ones.
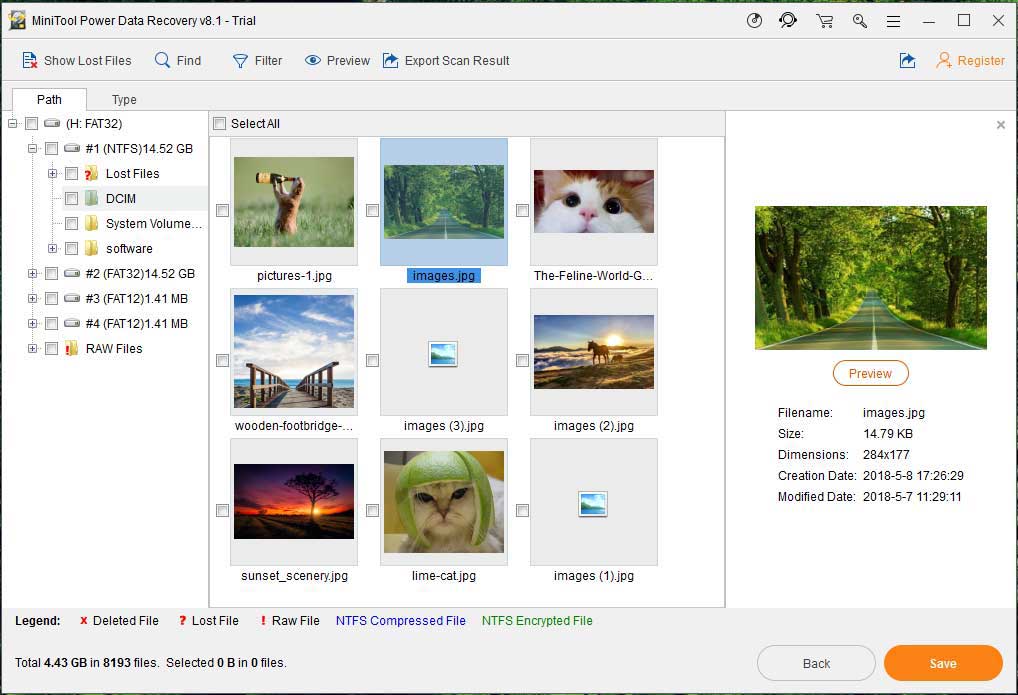
By default, the scanned files are listed by path. You can unfold each folder from the left list, view the files and check the files you want to recover one by one.
However, if there are so many files in the scan result and you think it is difficult to find the files you want to recover, we suggest using some features of this software to assist you to search for your needed items.
These features can be your good options: Type and Find:
1. Type:
If you click on the Type option, this software will show you the scanned files by the data types. The files with the same type will be put into one folder. Thus, you can find the data you want to recover based on the type of data.
2. Find:
If you still remember the name of the file you want to recover, you can use this feature to locate the target file quickly. Please click on the Find feature on the top side of the interface and enter the file name into the popup Find bar.
Besides, you can also check or uncheck Match Case and Match Word according to your actual need. After that, you need to click on the Find button to locate the target file directly.
Step 3: Since you are using the trial edition of this software, you are not allowed to recover the needed files then. However, you can update this software to a full edition to restore them. The Personal Deluxe edition of this software can fully meet your need if you are a personal user.
Here, we kindly remind you that if you decide to get the license key of this software immediately, you can stay on the scan result interface. When getting the license key, you can click on the Register button and input the license key to register it directly.
After registering the program, you can tick the needed files and then click on the Save button to choose a suitable path to store the selected files.
Now, your important files on the issued USB disk are restored to a safe place, and you can fix there is no media in the specified device issue without data loss. The possible solutions are introduced in the next part.
Now, you will discover that how to effectively recover data from 0 bytes drive and how to fix the drive showing0 bytes error quickly.
How to Get USB No Media Fixed
Focusing on there is no media in the specified device USB stick issue, we summarize three solutions for you, and you can try them one by one.
Suppose that the removable disk G: is the drive which is facing the USB stick no media issue.
Solution 1: Use Error Checking Tool to Repair Errors on the Drive
When there is no media in the specified device error happens, you can firstly check whether there are errors on the drive. If yes, try to repair them.
How to do this job? You can just use the Windows built-in Error-checking tool to have a try. Please follow these steps:
The following steps are based on Windows 10.
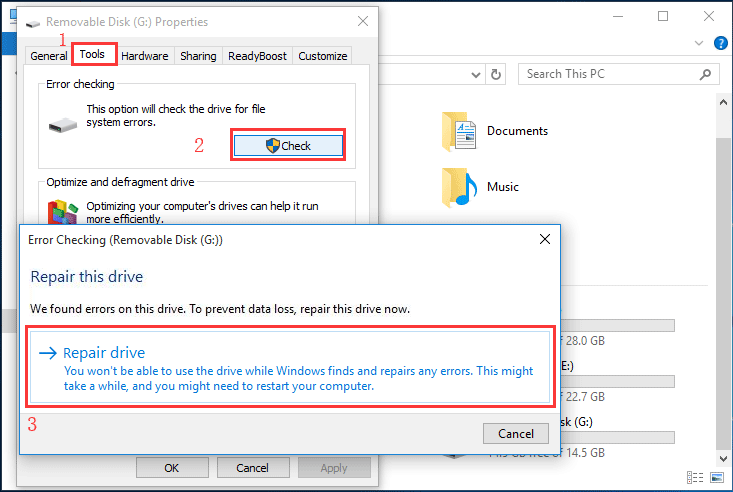
Step 1: Keep the USB disk connected with your computer and open File Explorer. Then, right-click on the target and choose Properties from the popup window. After that, on the Properties window, please choose Tools option.
Step 2: Then, you need to press Check button under Tools option.
Step 3: If there are errors after checking, Windows will inform you that We found errors on this drive. To prevent data loss, repair this drive now. In this situation, you need to click on the Repair drive option to fix the errors.
When the repairing process ends, you can go to check whether the USB stick no media issue disappears.
If this issue still occurs, please move to solution 2.
Solution 2: Use CHKDSK to Fix the File System Errors
If there are file system errors on the USB drive, you may also encounter there is no media in the specified device USB stick issue. Thus, you can run CHKDSK to check and fix the errors.
Still, take Windows 10 as an example.
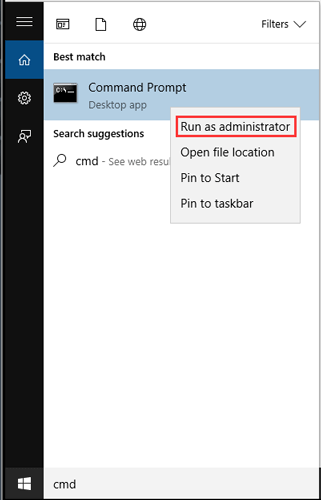
Step 1: Type cmd into the search box. When the search result list appears, right-click on Command Prompt option and choose Run as administrator.
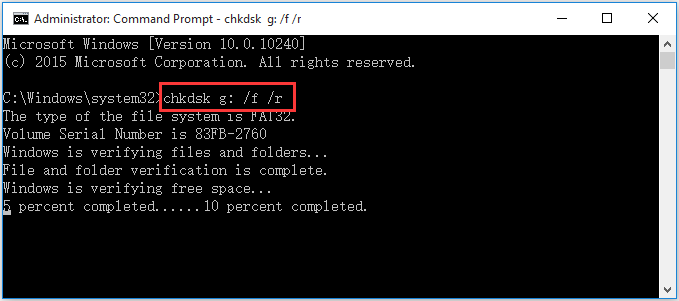
Step 2: Then, you will enter the Command Prompt window. Please type in chkdsk g: /f /r, and press the Enter button on the keyword. Here, g stands for the drive letter of the target USB drive. If your drive letter is another one, just replace it.
When the checking and repairing process is finished, you can close the window and then open the HP USB Disk Storage Format Tool to check whether there is no media in the specified device issue disappears.
If unfortunately, this issue still exists, you can try the next solution.
Solution 3: Try Another USB Drive Format Tool
The HP USB Disk Storage Format Tool can’t help you to format the target due to there is no media in the specified device error. Take it easy. You can try another USB drive format tool to do the job.
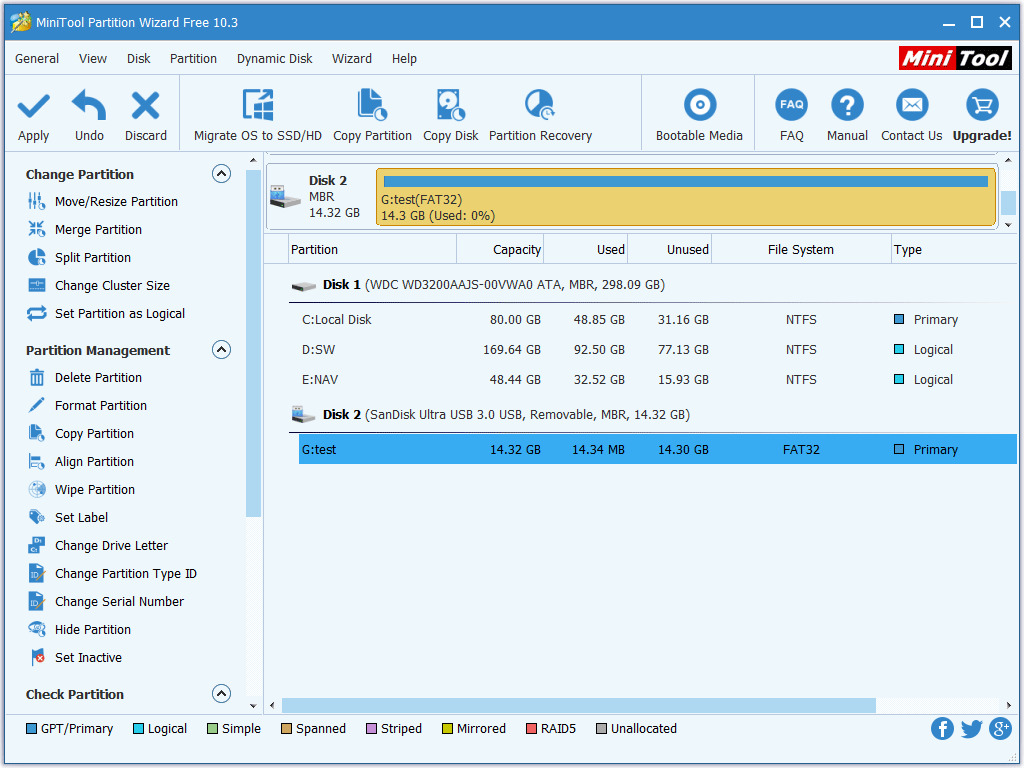
We suggest using this partition magic – MiniTool Partition Wizard and its Format Partition function to format the issued USB disk.
This Format Partition function is available in MiniTool Partition Wizard Free Edition. You can click on the button which is shown as below to download and install this freeware on your computer to format the USB disk.
MiniTool Partition Wizard FreeClick to Download100%Clean & Safe
Step 1: Connect the USB drive to your computer and open the software. Then, you need to right-click on the partition of the target drive and choose Format feature from the pop-out menu.
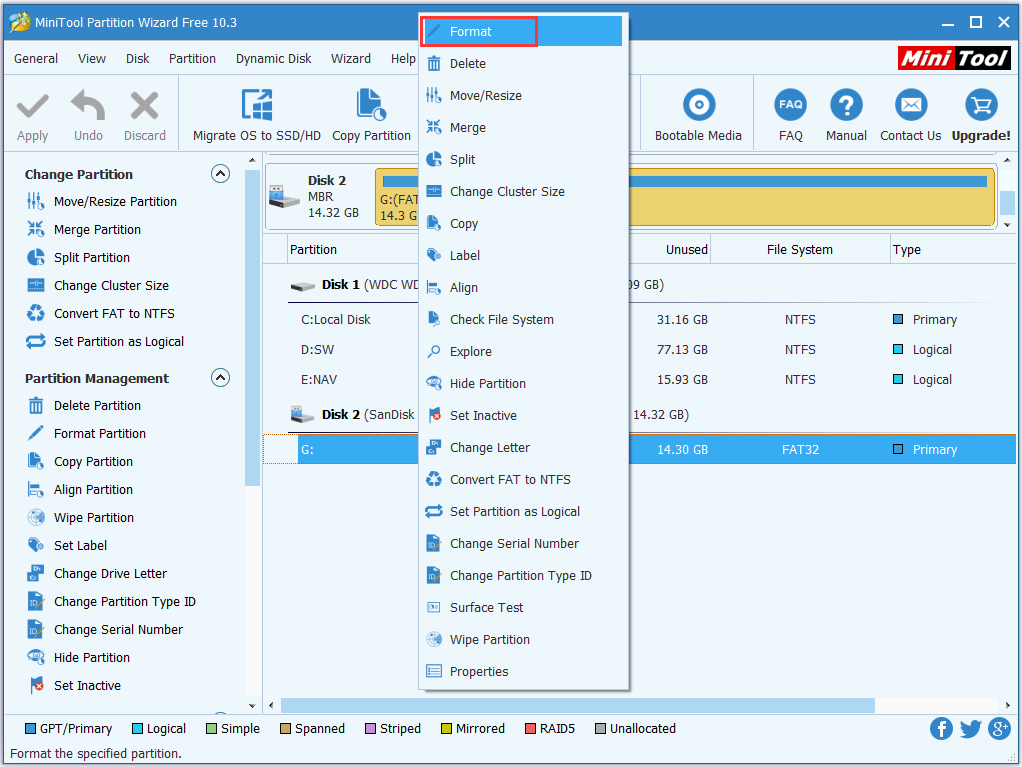
Step 2: The Format Partition window will pop up. On this window, you can define the Partition Label, File System, and Cluster Size according to your own needs. After that, click on the OK button to go back to the software’s main interface.

Step 3: If there is more than one partition on the target drive, please repeat step 1 and step 2. Then, you need to click on the Apply button to execute all the changes.
Now, you can check whether you can use the USB disk as normal.
If all of the above three solutions can’t help you get rid of this removable disk no media issue, there should be some hardware issue with the drive. Perhaps, it’s time to purchase a new one.
Bottom Line
When you encounter there is no media in the specified device issue, please remember to use MiniTool Power Data Recovery to retrieve your important files from the drive firstly to keep them safe. After that, you can utilize the solutions mentioned in this post to fix the error.
When you are using this MiniTool software, you may encounter some issues. In this situation, you can just let us know in the comment, or you can send an email to [email protected]. Any useful suggestions and solutions are also appreciated here.
There Is No Media in the Specified Device FAQ
- A Removable disk can be a USB drive that needs to be connected with the computer via a USB cable and a USB port.
- A Removable disk can also be a disk that needs to be inserted into a drive for reading and writing. Such a kind of disk includes a CD or DVD.
About The Author

Position: Columnist
Stella has been working in MiniTool Software as an English Editor for more than 8 years. Her articles mainly cover the fields of data recovery including storage media data recovery, phone data recovery, and photo recovery, videos download, partition management, and video & audio format conversions.
User Comments :