Snipping Tool is a screenshot utility designed by Microsoft to help Windows system users take a screenshot on computer easily. Knowing this, Mac users are wondering whether there is a snipping tool for Mac. In this post on MiniTool website, some popular snipping tools that can be worked perfectly on Mac will be introduced.
Is There a Snipping Tool for Mac
Microsoft has introduced Snipping Tool, a utility for making screenshots, to Windows systems since Windows 7. Since then, users don’t need to look for third-party snipping tools when they need to take s screenshot on their computers. Using Snipping Tool is the easiest way to make a copy of something on Windows.
What about snipping tool Mac?
Does Mac have a snipping tool? People are wondering about this. Luckily, you do have snipping tool for Mac: there are both built-in tools for image capture Mac and third-party snipping tool alternatives. Let’s take a look at them one by one.
MiniTool Power Data Recovery TrialClick to Download100%Clean & Safe
#1. Default Snipping Tool
How to Use Snipping Tool
Unlike the Snipping Tool in Windows, snipping tool Mac is so integrated into the macOS that it doesn’t even have a name. Now, I’ll show you how to call & use the default screenshot snipping tool on Mac.
How to crop a picture on Mac:
- Start your Mac properly.
- Press ⇧⌘5 or Shift + Command + 5 on your keyboard.
- Select an option from the opening snipping tool kit to continue.
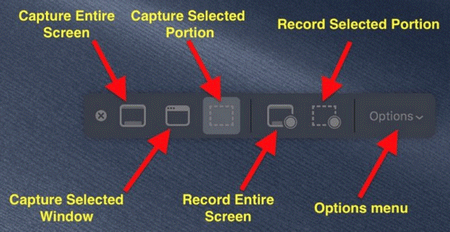
Many options are included in the snipping tool kit:
- Capture Entire Screen
- Capture Selected Window
- Caption Selected Portion (area)
- Record Entire Screen
- Record Selected Portion (area)
- Options (more options menu)
If you are running an older macOS, please make a screenshot on Mac by:
- Shift + Command + 3 (⇧⌘3): take a screenshot of the entire screen.
- Shift + Command + 4 (⇧⌘4): capture a portion of the screen.
- Shift + Command + 4 + Spacebar (⇧⌘4 + Spacebar): capture a window or menu.
How to take a screenshot on Mac exactly?
Where Do Screenshots Go on Mac
Questions like where are screenshots saved Mac and where do I find my screenshots on a Mac are hot among Mac users. Actually, the screenshots taken by the built-in methods will be saved on desktop directly; the name format is Screen Shot [date] at [time]. png. You can change the default location of Mac saved screenshots in a macOS Mojave or later version.
Please don’t worry if you have deleted a screenshot unintentionally since you are able to recover it by following this guide:
![[SOLVED] How To Recover Deleted Files On Mac | Complete Guide](https://images.minitool.com/minitool.com/images/uploads/2018/09/mac-file-recovery-thumbnail.jpg)
You can find the exact methods and steps to recover lost Word files on Mac:
![[SOLVED] How To Recover Lost Word Files On Mac](https://images.minitool.com/minitool.com/images/uploads/2018/09/mac-word-files-recovery-thumbnail.jpg)
Snipping Tool Mac Alternatives
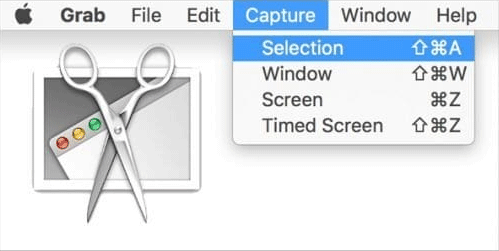
#2. Grab
Grab is a fascinating Mac Snipping Tool alternative that helps you take screenshots easily and save them as image files.
Main features of Grab include:
- It provides various screen-capture modes.
- It gives support to keyboard shortcuts.
- It’s come with all recent versions of macOS; no extra download is needed.
#3. LightShot
LightShot is another popular Mac Snipping Tool alternative; it offers the fastest way to take a screenshot based on your needs.
Main features of LightShot include:
- The user interface is so simple and intuitive that users can select any area & take screenshot via just two button-clicks.
- It allows you to share screenshots with others by saving them on Mac or uploading them to servers of LightShot.
- It’s provided with an intuitive but powerful screenshot editor which allows you to highlight a part of a screenshot or add an annotation without leaving the app.
#4. Snagit
Snagit is regarded as the gold standard of screen capture software; it’s a full-featured screen-capture tool with both built-in advanced image editing and screen recording capabilities.
Main features of Snagit include:
- It allows you to capture screen in several ways: capture entire desktop, region, window, or scrolling screen.
- The complex edits can be finished in just a few clicks within the app.
- The intuitive user interface makes it a pleasure to take a screenshot on Mac.
#5. CloudApp
This is a cloud-based snipping tool for Mac; it can also be used as a screen recorder or GIF maker. You can choose to use CouldApp on the web or on Mac by downloading it.
Main features of Snagit include:
- CouldApp can also be used on Windows, Linux, and even iOS devices, in addition to Mac.
- It’s an enterprise-level application that allows you to capture screen and share screenshots easily.
- Apart from secure sharing, it also provides built-in analytical tools and white-label capabilities.
- It helps you upload screenshots (and videos) automatically to the cloud.
- It allows access from different devices and platforms via a personal cloud account.
Apple Is Killing iTunes On Mac, Not On Windows.
Of course, there are many other snipping tools for Mac waiting for you to discover.
Please click here if you find the screenshots on Mac is not working.
User Comments :