PC Won’t Boot After Enabling Virtualization
Microsoft Hyper-V, also called Windows Server Virtualization before its release, is a native hypervisor that enables you to run multiple OSs as virtual machines on Windows. To know more information about it, refer to our previous post – What Is Hyper V? Some Basics You Should Know about Hyper-V.
Although Hyper-V plays an important role in your Windows PC, it may cause some issues. According to reports, you can’t boot Windows 11 after enabling Hyper-V and enter the lock screen, which happens to many PCs.
Why does this boot issue occur? When analyzing reasons, you may find:
- A certain third-party app blocks Windows 11 from booting when Hyper-V is active.
- Some system files get missing or corrupted.
- You haven’t updated Windows 11 for a long time.
When suffering from this boring issue, take it easy since you can take some measures to easily solve it. Move to the next part to learn how to troubleshoot it via some tips.
Related post: How to Enable Hyper-V on Windows 11? Here Are 3 Ways
Fix 1: Uninstall Trusteer Rapport
You may use Trusteer Rapport to protect your system from financial malware and phishing attacks. But this app can be a culprit that causes Windows 11 to not boot after enabling Hyper-V.
To solve the boot issue, you should go to uninstall this notorious app. So, do these:
Step 1: Boot your PC and then press F2 or Del to enter the BIOS menu. Based on different PC brands, the key to access BIOS may vary and you can see this guide – [5 Ways] How to Get Into BIOS on Windows 11 on Restart.
Step 2: In BIOS, go to the Advanced tab to find the virtualization setting and disable it. Then, the system will boot to the Desktop.
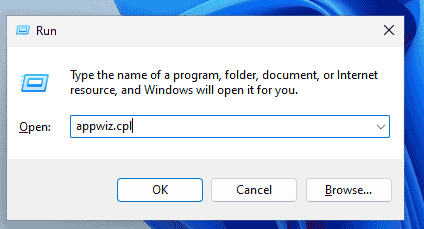
Step 3: Press Win + R, type appwiz.cpl,and click OK to open the Programs and Features window.

Step 4: Locate Trusteer Endpoint Protection, right-click on it, and tap on Uninstall. Then, finish the uninstallation.
Step 5: Restart the PC and then enable virtualization in BIOS, Windows 11 will boot properly.
Fix 2: Disable an Flag in BCD
When you can’t boot Windows 11 after enabling Hyper-V, you can try to run Command Prompt and disable an important flag in the BCD. It is said that this flag is notorious since it always causes Boot Repair Loop in the previous Windows versions. In Windows 11, it may come back after you enable Hyper-V.
To fix it, do these:
Step 1: Boot your PC and restart it when you see the Windows logo. Repeat this operation three times and your PC will enter the Automatic Repair window. Just tap on Advanced options to enter WinRE.
Step 2: Go to Troubleshoot > Advanced options > Command Prompt.
Step 3: Type BCDedit /set hypervisorlaunchtype Off and press Enter.

Step 4: After that, restart the PC and see if the Boot Repair Loop is solved.
Fix 3: Run System Restore
When Windows boot fails after enabling Hyper-V, you have a chance to restore the PC to an earlier state using a restore point if you have one.
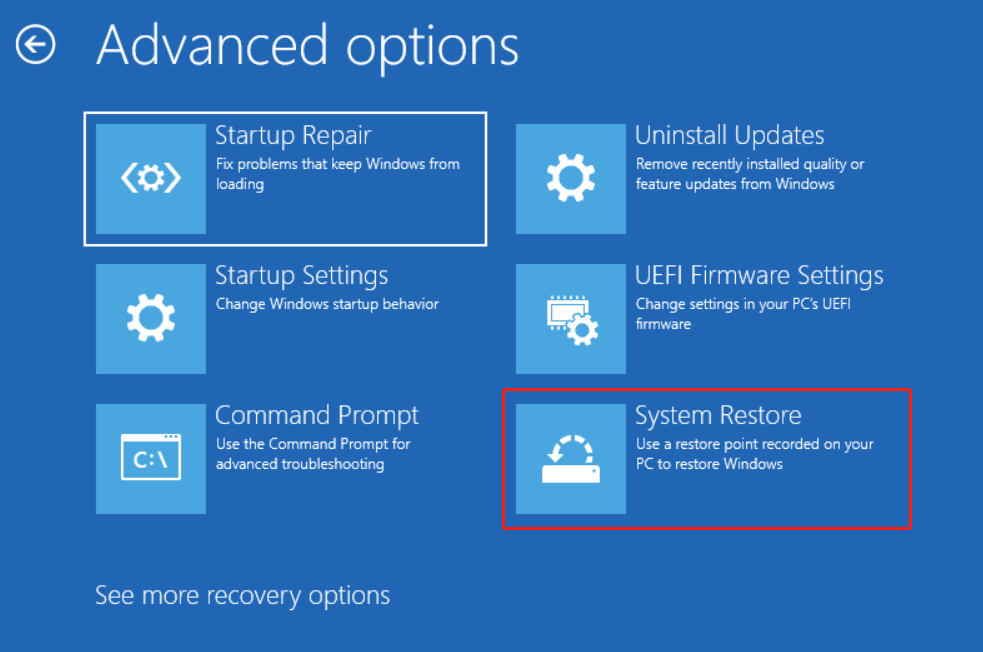
Step 1: Go to WinRE and click Troubleshoot > Advanced options > System Restore.

Step 2: Go to choose a restore point.
Step 3: Confirm the restore information and click Finish.
Fix 4: Reinstall Windows 11
If all the fixes cannot fix Windows 11 not booting after enabling Hyper-V, the only way you can try is to reinstall the operating system.
Before proceeding, we recommend backing up your important files stored in the C drive since the installation can erase everything from the system partitions. To keep data safe, run MiniTool ShadowMaker and then follow the guide – How to Backup Windows 11 to External Drive (Files & System).
MiniTool ShadowMaker TrialClick to Download100%Clean & Safe
Then, reinstall Windows 11 by using one way in this post – How to Reinstall Windows 11? Try 3 Simple Ways Here Now.
Verdict
Can’t boot Windows 11 after enabling Hyper-V? Now, you learn how to solve this boot issue in the given solutions. If you have other workarounds, send an email to us.


User Comments :