Device Setup Manager Service High CPU Usage
DsmSvc is a Windows PC service also known as Device Setup Manager service which is responsible for managing device installation and setup. It ensures that devices are properly installed and configured on Windows PCs.
Sometimes it causes high CPU usage and severely affects system performance. Many causes can lead to this situation, such as corrupted system files, viruses, malware, issues with the DsmSvc and Windows Update services, and more. Here are some methods you can use to fix Device Setup Manager service high CPU usage Windows 10.

How to Fix Device Setup Manager Service High CPU Usage
Fix 1: Install the Latest Windows Update
When Device Setup Manager service high CPU usage occurs, you can first check whether you have installed the latest Windows. If not, please install it. It is possible that the latest Windows has discovered and fixed this problem. Here is how you can check for updates.
Step 1: Right-click on the Start button and choose Settings to open it.
Step 2: Click on Update & Security > Windows Update.
Step 3: In the right pane, click on the Check for updates button.
If any updates are available for you, click Download & install to get it.
Fix 2: Repair Corrupted System Files
Corrupted system files can also cause this problem. Repairing corrupted system files is crucial because when critical system files on your computer get corrupted, they can cause various issues like crashes and slow performance. By repairing these corrupted files, you can restore the stability of your system. In this case, you can check and repair them using DISM and SFC.
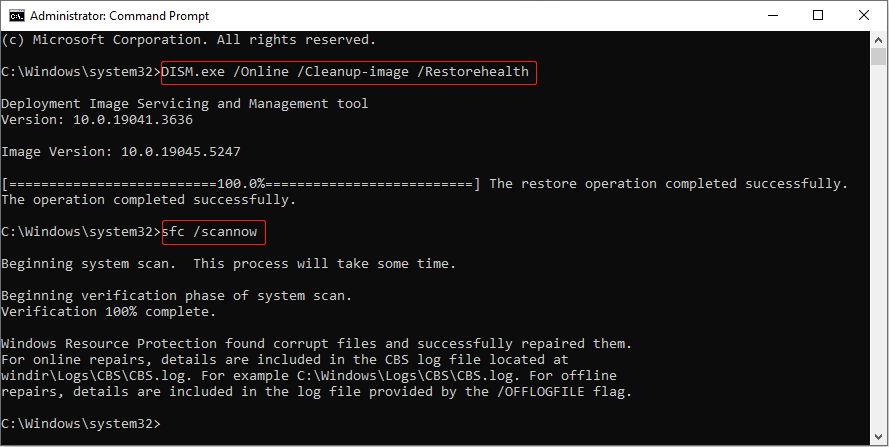
Step 1: Type cmd in the Windows search box and right-click on Command Prompt to choose Run as administrator.
Step 2: When prompted by UAC, click on Yes to continue.
Step 3: Type DISM.exe /Online /Cleanup-image /Restorehealth in the window and press Enter.
Step 4: It will take some time. When this process ends, type sfc /scannow and press Enter.
Related Post: The Detailed Information about System File Checker Windows 10
Fix 3: Run a Malware Scan
As mentioned above, viruses and malware can cause this problem. So, running a malware scan is important, which can proactively identify and remove malicious software from your computer. Here is how to do it.
Step 1: Right-click on the Start button and choose Settings to open it.
Step 2: Select Update & Security > Windows Security.
Step 3: In the right pane, choose Virus & threat protection.
Step 4: Under Current threats, click on Scan options.
Step 5: Choose a scan option and click on the Scan now button.
Fix 4: Run the Windows Update Troubleshooter
Running the Windows Update troubleshooter can detect and identify problems and fix some common problems that prevent Windows Update from working correctly. You can try running it to deal with the problem of DsmSvc high CPU usage. Here is a way.
Step 1: Press the Win + I keys to open the Settings app.
Step 2: Choose Update & Security > Troubleshoot > Additional troubleshooters.
Step 3: Select Windows Update and click on Run the troubleshooter to start the diagnostic process.

Fix 5: Disable the DsmSvc Service
If the above methods cannot solve this problem, it is recommended that you temporarily disable the DsmSvc service to restore normal computer use.
Step 1: Press the Win + R keys to open the Run dialog and then type services.msc and press Enter.
Step 2: Scroll through the list of services until you find DsmSvc.
Step 3: Right-click on DsmSvc and select Properties.
Step 4: choose Disabled from the Startup type dropdown menu.

MiniTool Power Data Recovery FreeClick to Download100%Clean & Safe
Bottom Line
How to fix Device Setup Manager service high CPU usage? I believe you have some actionable ways after reading this article. Hope this fix guide can help you a lot.
About The Author

Position: Columnist
Chelsea graduated from university with a major in English. She has a strong interest in English writing. It is this passion for writing that led her to become an English editor. Her articles mainly focus on data recovery and other computer industry news. As an energetic and outgoing girl, Chelsea enjoys listening to music, singing, riding bikes, and eating in her spare time.
User Comments :