Val 19, is also called Valorant error code Val 19 which is a connection error of the shooting game, Valorant. If you are on the same boat, don’t fret! This troubleshooting post on MiniTool Website will show you some tips and tricks to deal with this annoying issue.
Valorant Error Code 19 Windows 10/11
Val 19 is an error code you might meet when playing Valorant. This error is just a connectivity issue so it is not difficult to tackle. Take it easy! You will find satisfying solutions to address it in the following content.
How to Fix Valorant Error Code 19 Windows 10/11?
Fix 1: Reboot Your PC and Relaunch the Game
When you meet any game bug, the first fix that comes into your mind must be restarting your device and relaunching the game. Valorant error code 19 Windows 10 is no exception. This action can eliminate temporary errors caused by the conflicts among the old cookies & cache or other software in the system.
Fix 2: Close All Riot-related Processes
Any residual Valorant processes working in the background can stop the game from launching hence triggering Val 19.
Step 1. Right-click the taskbar to choose to open Task Manager.
Step 2. In Processes, find all Riot-related processes, right-click each of the programs and choose End task in the drop-down menu.
Fix 3: Run a Clean Boot
There might be some unnecessary applications running in the background and they are conflicted with your game. Running a clean boot will help you close them hence avoiding the appearance of error code 19 Valorant.
Step 1. Press Win + R simultaneously to open the Run dialog.
Step 2. Type msconfig and hit Enter to open System Configuration.
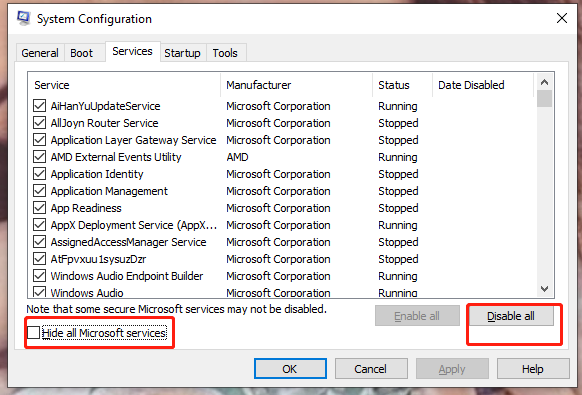
Step 3. In the Services tab, tick Hide all Microsoft services and Disable all.

Step 4. Go to the Startup section, and click on Open Task Manager.
Step 5. Right-click each application and choose Disable.
Step 6. Go back to the services tab, click Apply & OK.
Fix 4: Run Valorant as Administrator
Some games need giving admin privileges, so some errors will occur if you don’t give administrator permission to this game.
Step 1. Type Valorant in the search bar to locate the game.
Step 2. Right-click it and hit Run as administrator.
Fix 5: Clear DNS Cache and Data
Clearing the DNS cache can also help to get rid of Val 19. It will delete all the entries and forces your computer to repopulate those addresses the next time you attempt to access those websites.
Step 1. Type cmd to locate Command Prompt and right-click it to choose Run as administrator.
Step 2. Copy & paste the following commands in the black console and hit Enter after each command.
ipconfig/flushdns
ipconfig/registerdns
ipconfig/release
ipconfig/renew
netsh winsock reset
Step 3. Restart your computer to see if Val 19 disappears.
Fix 6: Reinstall the Valorant
If none of those methods works out for you, you can try to reinstall the game to fix Val 19. The game file might get corrupted due to some virus or bugs and reinstalling the game will recover its uncompleted file.
Step 1. Press Win + R to open the Run box.
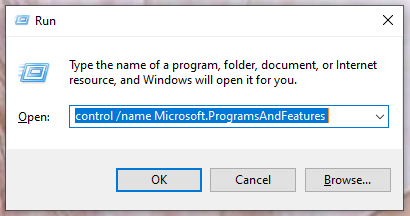
Step 2. Copy & paste control /name Microsoft.ProgramsAndFeatures into the empty box and don’t forget to hit Enter.

Step 3. Look for Valorant and Riot Vanguard and right-click on both of them.
Step 4. In the drop-down menu, choose Uninstall.
Step 5. After the installation process is done, go to the Valorant Website to download the game again.
Other related articles:
Top 5 Workarounds to Fix Valorant Error Code Van 68 Windows 10
[Solved] How to Fix Valorant Error Code Van 81 on Windows 10?
How to Fix Valorant Error Code 0xc0000005? Here Are 6 Tricks!
User Comments :