Windows 10 reserved storage can help you eliminate the update failures which are caused by not enough free disk space. But if you want to free up the maximum amount of space, you need to disable reserved storage. This post will show you a guide on Windows 10 reserved storage and teach you how to disable it.
Overview of Windows 10 Reserved Storage
With the release of Windows 10 May 2019 Update, Microsoft brings some new features, for example, Windows sandbox feature, separation of Cortana and Windows search, the performance improvements, a new light theme for Windows 10 May 2019 update and many others.
The new Reserved Storage feature was also introduced in Windows 10 1903, which may offend many users.
As Microsoft acknowledges, many systems end up not being updated because of the small amount of storage. Typically, the device is filled with apps, music, and photos. Because there is no available space, this can end up impeding the download and installation of operating system updates.
While you may find the update annoying, it’s useful because it ensures all sorts of very important securities. In addition, some regular applications often experience difficulties if they approach storage capacity.
Its main purpose is to improve the functioning of your computer. Many Windows and application scenarios cannot become reliable if you fill storage without using the Windows 10 reserved storage feature. These may not work as expected because there is less free space for the functioning.
When you are using Windows 10 reserved storage, updates, apps, and other temporary files should take up less space and continue to work as before. But it’s worth noting that the very first reserved storage may take up 7GB storage.
Two Main Factors Lead to the Change of Windows 10 Reserved Storage
According to Microsoft, the size of the Windows 10 reserved storage is 7GB. Now, once activated, this part of the space cannot be removed from the operating system, and its size cannot be changed. Therefore, there are two main factors that cause it to the change: the installed languages and the optional features.
Installed Languages
Additional language can help you enlarge the size of the reserved storage and ultimately help you maintain the installed languages.
Optional Features
Optional feature is introduced in the system, so the reserved storage space also increases, which ensures that the Windows 10 reserved storage feature on your device can work well.
Disable Windows 10 Reserved Storage
First of all, you must determine if your PC is using reserved storage feature, so you can enable or disable it.
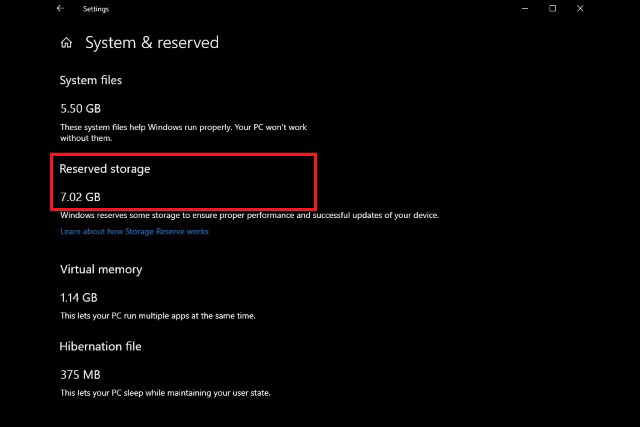
Head to Settings > System > Storage and then click Show More Categories > Systems & Reserved. If you see Reserved Storage with 7+ GB of storage space in use, your system is using reserved storage feature. If there is no Reserved Storage here, which means your system is not using any reserved storage.
Here is how you can disable reserved storage.
Step 1: Type regedit in the search bar and click Registry Editor to enter its interface.
Step 2: In the Registry Editor, navigate to the key: HKEY_LOCAL_MACHINE\SOFTWARE\Microsoft\Windows\CurrentVersion\ReserveManager.
Step 3: Locate ShippedWithReserves and double-click on it.
Step 4: Change the Value data from 1 to 0, and then click OK.
After finishing all the steps above, reboot your computer to apply all changes. The reserved storage will not disappear immediately, but gradually it will disappear a few weeks later before Windows installs an update.
Bottom Line
So to conclude, this post has shown you a brief instruction of the Windows 10 Reserved Storage feature. If you don’t want to use this feature, you can also follow the steps above to disable it.
User Comments :