MiniTool offers various Windows 11 Registry hacks to improve PC performance and customize the OS. The key hacks include restoring the classic context menu, speeding up shutdown times, and disabling automatic Windows updates.
About Windows 11 Registry
Windows Registry is a large and hierarchical database. It stores essential configuration settings, hardware information, and user preferences of the operating system and installed applications. It plays a crucial role in managing both system and user settings.
Furthermore, the registry acts as a framework for system behavior. Any changes, such as adjusting settings or installing applications, are recorded directly within it.
The registry has been a part of Windows since its early versions and continues to fulfill this vital function in Windows 11, although its structure and contents have evolved.
Key aspects of the registry in Windows 11:
- Registry Editor (Regedit): It is a tool used to view and modify entries in the Windows PC.
- Structure: The registry is organized into hives, keys (which act like folders), and values (the actual data), all of which hold specific configuration information.
- Root Keys: The registry consists of five main branches, such as HKEY_LOCAL_MACHINE and HKEY_CURRENT_USER, which categorize various system settings.
- Functionality: It manages a wide range of settings, including user profiles, desktop configurations, hardware drivers, and application preferences.
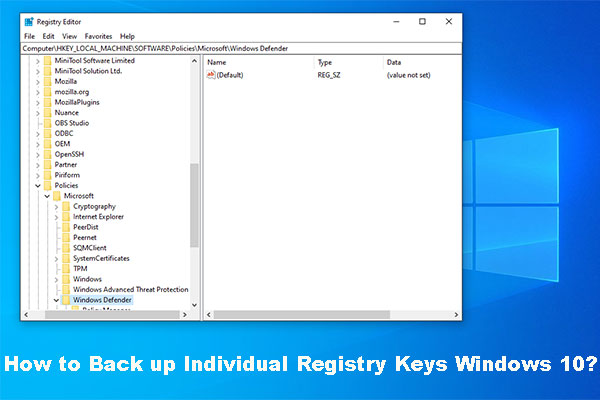
- Risks: Improperly modifying the registry can lead to significant system instability. Therefore, it is essential to create backups (by exporting the registry) before making any changes.
How to Access the Registry Editor
To view and modify registries on a Windows PC, you need to open the Registry Editor. Accessing the Registry Editor is straightforward. Simply follow these steps:
Step 1. Run the command regedit in Search/Run/Command Prompt/PowerShell.
- Search window: Press Win + S to open Search, type regedit, and select Registry Editor from the results.
- Run dialog: Press Win + R to open Run, type regedit or regedit.exe, and click OK.
- Command Line: Open Command Prompt or PowerShell, type regedit, and press Enter.
Step 2. Click Yes in the prompted User Account Control (UAC) window.
Now, Registry Editor opens.
Important Precautions
Windows Registry is critical for system operation. Incorrect changes can cause severe system instability or prevent Windows from starting. It is recommended to back up your registry before making any changes to prevent issues. There are 3 options:
- Registry backup
- Create a system restore point
- Back up important data or the system
Use the Registry Export Feature
The export feature in the Windows Registry Editor allows you to export specific keys or the entire registry to a .reg file for backup, transfer, or troubleshooting.
Follow these steps to back up registry keys:
Step 1. Open Registry Editor
Step 2. Select File > Export, choose Export range, set File name, and select a save location.
- All: It is used to back up the entire registry.
- Selected branch: It is used to back up a specific key.
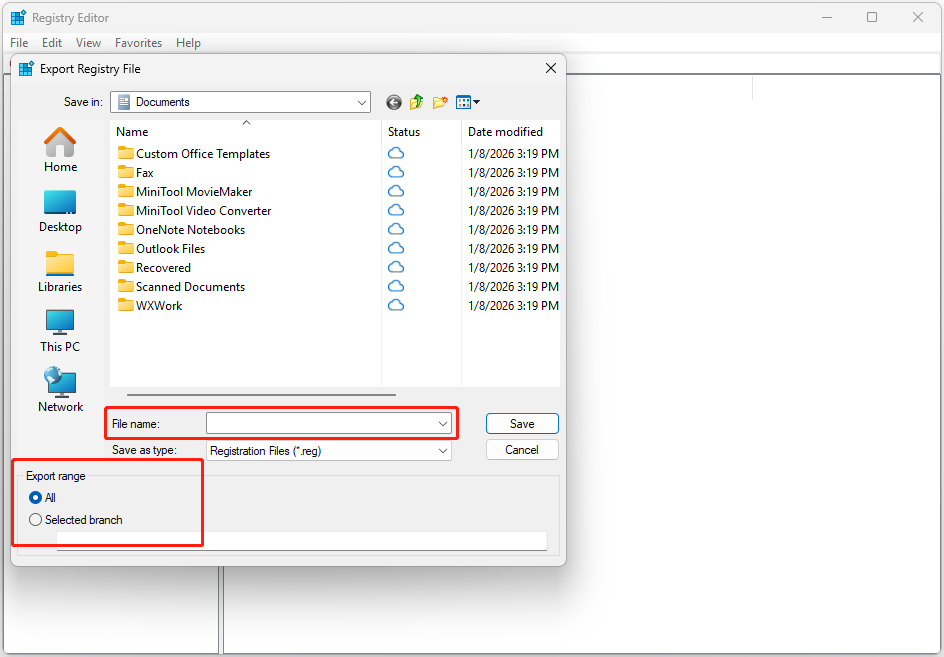
Step 3. Click Save to confirm.
If the system doesn’t function properly after incorrect registry modifications, restore the registry with the following steps.
Step 1. Open Registry Editor.
Step 2. Go to File > Import.
Step 3. Browse to your saved .reg file (e.g., backup.reg) and click Open.
Step 4. Restart your computer.
Create a Restore Point
Another method to prevent incorrect registry changes from causing irreversible damage to your operating system is create a system restore point. It is a snapshot of the system files, registry, and settings, allowing you to revert the PC to a previous, stable state to fix issues.
Here is how to create a restore point in Windows 10 and 11:
Step 1. Open Search, type create a restore point, and select the top result to open System Properties.
Step 2. Under the System Protection tab, check the system drive like C: in Protection Settings. If the protection setting is off, enable it:
- Click Configure.
- Select Turn on system protection.
- Move the Max Usage slider (5% to 10% is generally sufficient).
- Click Apply, then OK.
Step 3. Make sure your system drive is selected. Click the Create… button at the bottom.
Step 4. Type a description for the restore point and click Create.
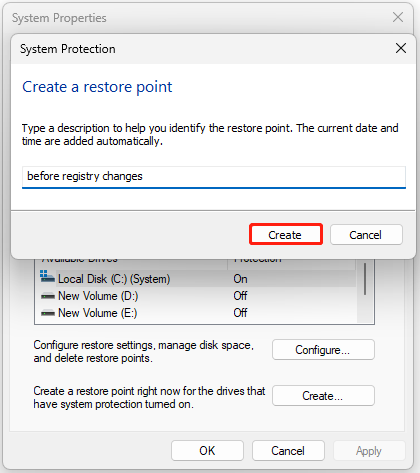
Step 5. Wait for the confirmation message, then click Close.
For details, refer to the Windows 11/10 System Restore guide.
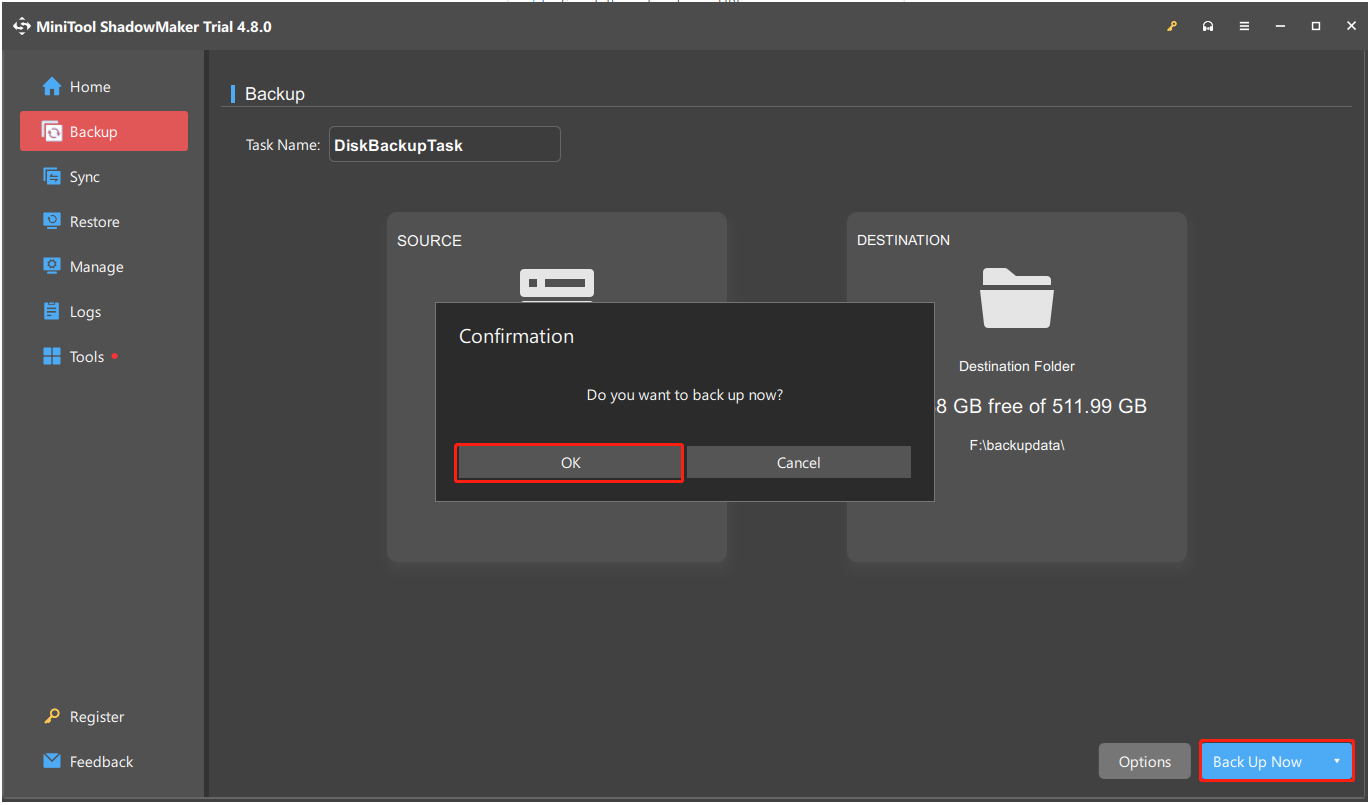
Back Up System
The system restore point only backs up critical system files, Windows registry, drivers, and installed software, not including your personal files, such as files under C:\Users.
Therefore, if you want to get a more comprehensive system and data backup, you should consider a third-party backup tool.
MiniTool ShadowMaker is a good choice. This PC backup software offers the Backup feature to perform system backup and data backup.
Here’s the guide:
Step 1. Download and install MiniTool ShadowMaker on your PC.
MiniTool ShadowMaker TrialClick to Download100%Clean & Safe
Step 2. Launch this software, navigate to the Backup tab, and the system drive is selected by default under SOURCE.
Step 3. Go to DESTINATION, select the target location to save the system backup, and then click OK.
Step 4. Click Back Up Now and OK to confirm.
Popular Windows 11 Registry Hacks
Windows 11 provides numerous features and customization options, and advanced users often utilize Registry hacks to personalize their systems or unlock hidden functionalities.
By modifying specific registry values, you can enhance the system performance, improve security, or add features.
Here are some popular Windows Registry hacks:
Add Seconds to Taskbar Clock
If you need to track time down to the second in the Taskbar clock, use the following Windows 11 Registry hack:
Step 1. Open Registry Editor.
Step 2. Go to the following path:
HKEY_CURRENT_USER\Software\Microsoft\Windows\CurrentVersion\Explorer\Advanced
Step 3. Right-click Advanced in the left panel and select New > DWORD (32-bit) Value.
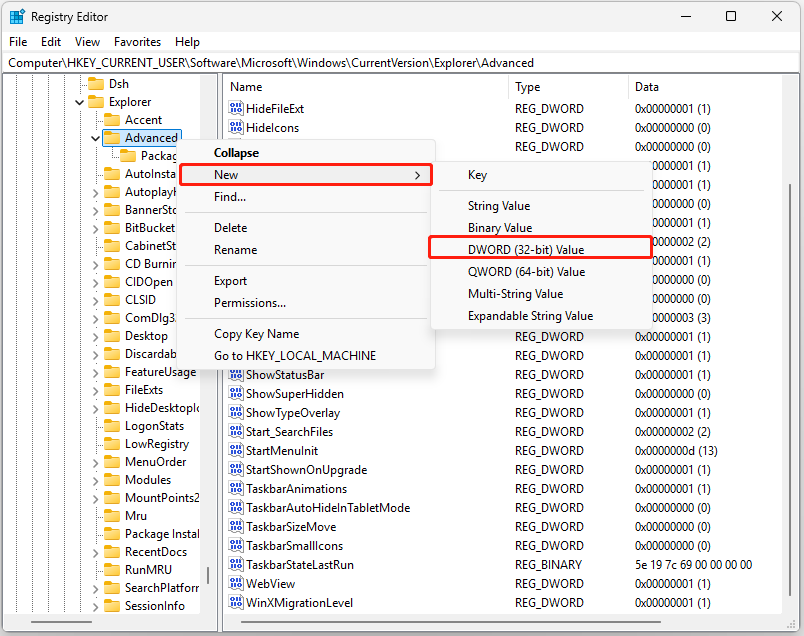
Step 4. Name the newly created value as ShowSecondsInSystemClock, set its Value data to 1, and then click OK.
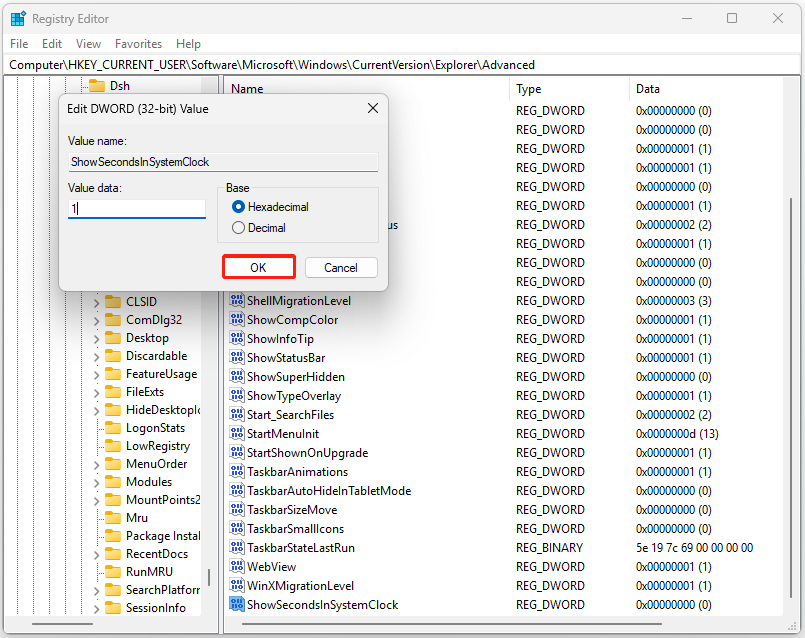
Step 5. Exit Registry Editor and restart your PC to apply the change. Now the clock displays the second.
If you want to remove seconds from the Taskbar clock, just set the Value data of ShowSecondsInSystemClock to 0 or remove this Value.
Bring Back the Classic Context Menu
Windows 11 features a streamlined context menu designed for a cleaner, more contemporary interface. However, if you frequently click the Show more options button, reverting to the classic menu may significantly improve your productivity.
Use this registry trick:
Step 1. Open Registry Editor and go to this path:
HKEY_CURRENT_USER\Software\Classes\CLSID
Step 2. Right-click CLSID, select New > Key, and then name it as {86ca1aa0-34aa-4e8b-a509-50c905bae2a2}.

Step 3. Right-click the newly created key, select New > Key, and then name it as InprocServer32.
Step 4. Double-click on the (Default) value in the right pane, leave the Value data empty, and click OK.

Step 5. Exit Registry Editor and restart the computer.
If you want to revert the modern Windows 11 context menu, just delete the {86ca1aa0-34aa-4e8b-a509-50c905bae2a2} key.
If you want to use Terminal (Admin) to achieve that, perform the following command:
Back to Windows 10 classic menu:
reg.exe add “HKCU\Software\Classes\CLSID\{86ca1aa0-34aa-4e8b-a509-50c905bae2a2}\InprocServer32” /f /ve
Restore modern Windows 11 menu:
reg.exe delete “HKCU\Software\Classes\CLSID\{86ca1aa0-34aa-4e8b-a509-50c905bae2a2}” /f
Disable the Lock Screen
The Windows lock screen can be an annoyance because it displays ads and tips every time. If you want to disable it, follow the guide:
Step 1. Open Registry Editor and go to:
HKEY_LOCAL_MACHINE\SOFTWARE\Policies\Microsoft\Windows
Step 2. If a Personalization key does not exist under Windows, right-click Windows, select New > Key, and name it Personalization.
Step 3. Right-click Personalization and select New > DWORD (32-bit) Value. Then, name it as NoLockScreen.
Step 4. Double-click NoLockScreen and set the Value data to 1.
Step 5. Restart your computer for changes to take effect.
To re-enable the lock screen, follow the steps above and change the NoLockScreen value to 0, or delete the NoLockScreen value.
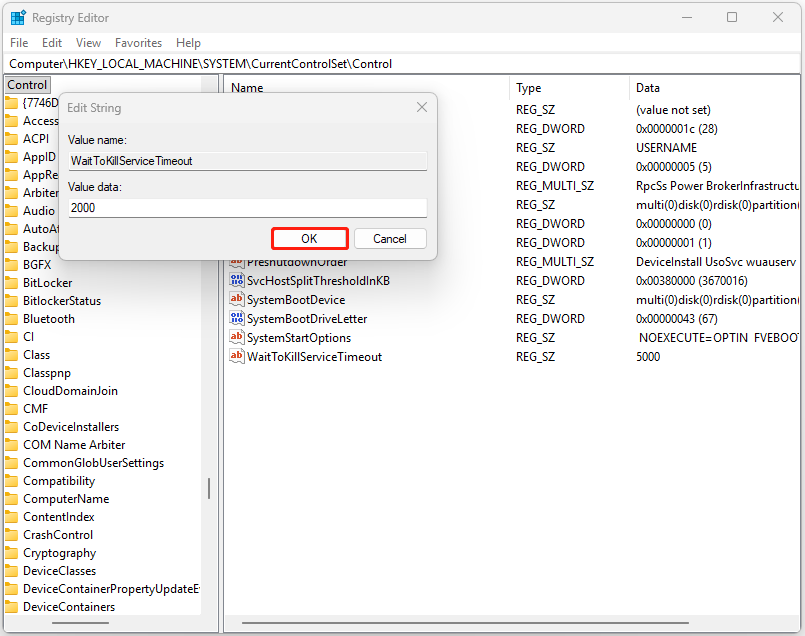
Speed Up Shutdown Time
If the hung applications and services always slow down the system shutdown, use the following Windows 11 Registry tweak to make it much faster:
Step 1. Open Registry Editor.
Step 2. Navigate to HKEY_LOCAL_MACHINE\SYSTEM\CurrentControlSet\Control.
Step 3. Find the WaitToKillServiceTimeout value in the right pane.
Step 4. Double-click it, change the Value data to 2000, and click OK toreduce the service timeout.
Step 5. Go to this path: HKEY_CURRENT_USER\Control Panel\Desktop.
Step 6. Right-click Desktop and select New > String Value. Then, name it AutoEndTasks and set its Value data as 1.
Step 7. Look for HungAppTimeout and WaitToKillAppTimeout, set their values to 2000. If they do not exist, create two new string values with these names.
Step 8. Restart the computer to apply changes.
If you want to return to the default shutdown settings, setthe following values:
- AutoEndTasks = 0
- HungAppTimeout = 5000
- WaitToKillAppTimeout = 20000
- WaitToKillServiceTimeout = 5000
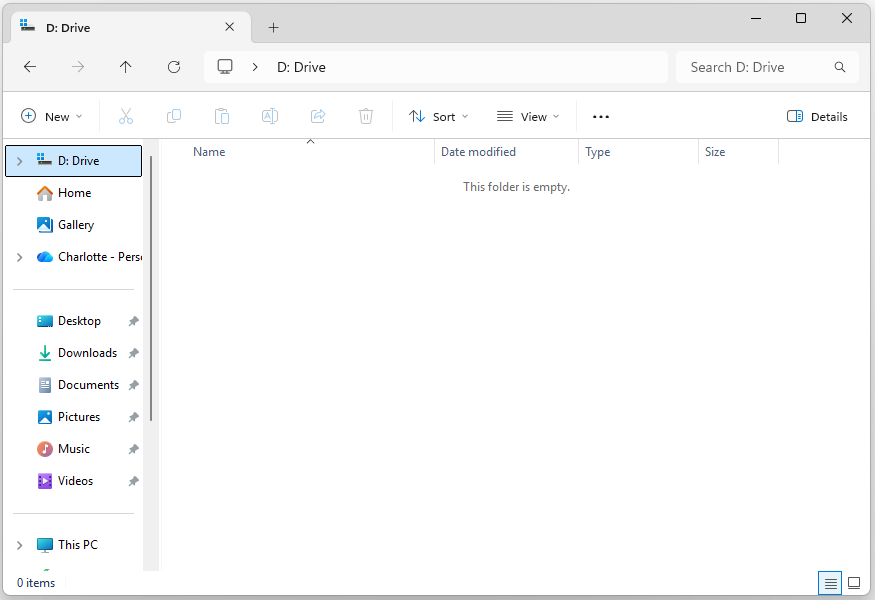
Add the D: Drive to the Navigation Pane
If you frequently use the D: drive, pinning it to the top of the Navigation pane can streamline your workflow. This provides instant, one-click access to any folder, eliminating the need to navigate through This PC or scroll through long directory trees.
Try this Windows Registry hack:
Step 1. Press Win + S to open Search, type notepad and press Enter.
Step 2. Copy and paste the following content in the Notepad window:
Windows Registry Editor Version 5.00
[HKEY_CURRENT_USER\Software\Classes\CLSID\{445a2e0d-9142-4458-a84a-66dee0196d3c}]
@=”D: Drive”
“System.IsPinnedToNamespaceTree”=dword:00000001
“SortOrderIndex”=dword:0000003c
[HKEY_CURRENT_USER\Software\Classes\CLSID\{445a2e0d-9142-4458-a84a-66dee0196d3c}\DefaultIcon]
@=hex(2):69,00,6d,00,61,00,67,00,65,00,72,00,65,00,73,00,2e,00,64,00,6c,00,6c,\
00,2c,00,2d,00,33,00,36,00,00,00
[HKEY_CURRENT_USER\Software\Classes\CLSID\{445a2e0d-9142-4458-a84a-66dee0196d3c}\InProcServer32]
@=hex(2):43,00,3a,00,5c,00,57,00,49,00,4e,00,44,00,4f,00,57,00,53,00,5c,00,73,\
00,79,00,73,00,74,00,65,00,6d,00,33,00,32,00,5c,00,73,00,68,00,65,00,6c,00,\
6c,00,33,00,32,00,2e,00,64,00,6c,00,6c,00,00,00
[HKEY_CURRENT_USER\Software\Classes\CLSID\{445a2e0d-9142-4458-a84a-66dee0196d3c}\Instance]
“CLSID”=”{0E5AAE11-A475-4c5b-AB00-C66DE400274E}”
[HKEY_CURRENT_USER\Software\Classes\CLSID\{445a2e0d-9142-4458-a84a-66dee0196d3c}\Instance\InitPropertyBag]
“Attributes”=dword:00000011
“TargetFolderPath”=hex(2):44,00,3a,00,5c,00,00,00
[HKEY_CURRENT_USER\Software\Classes\CLSID\{445a2e0d-9142-4458-a84a-66dee0196d3c}\ShellFolder]
“FolderValueFlags”=dword:00000028
“Attributes”=dword:f080004d
[HKEY_CURRENT_USER\SOFTWARE\Microsoft\Windows\CurrentVersion\Explorer\HideDesktopIcons\NewStartPanel]
“{445a2e0d-9142-4458-a84a-66dee0196d3c}”=dword:00000001
[HKEY_CURRENT_USER\SOFTWARE\Microsoft\Windows\CurrentVersion\Explorer\Desktop\NameSpace\{445a2e0d-9142-4458-a84a-66dee0196d3c}]
@=”D: Drive”
Step 3. Click File and then select Save as.
Step 4. In the prompted window, select All files from the drop-down menu of Save as type, and then set the File Name as add-d-drive-to-navigation-pane.reg. Next, choose a save location and click Save to proceed.
Step 5. Find the saved .reg file and run it. After that, the D drive has been added to the top of the Navigation pane.
C: Drive: "TargetFolderPath"=hex(2):43,00,3a,00,5c,00,00,00
D: Drive: "TargetFolderPath"=hex(2):44,00,3a,00,5c,00,00,00
E: Drive: "TargetFolderPath"=hex(2):45,00,3a,00,5c,00,00,00
F: Drive: "TargetFolderPath"=hex(2):46,00,3a,00,5c,00,00,00
To remove the D drive from the top of the Navigation pane, create a .reg file with the following registry code and run the created file.
Windows Registry Editor Version 5.00
[-HKEY_CURRENT_USER\Software\Classes\CLSID\{445a2e0d-9142-4458-a84a-66dee0196d3c}]
[HKEY_CURRENT_USER\SOFTWARE\Microsoft\Windows\CurrentVersion\Explorer\HideDesktopIcons\NewStartPanel]
“{445a2e0d-9142-4458-a84a-66dee0196d3c}”=-
[-HKEY_CURRENT_USER\SOFTWARE\Microsoft\Windows\CurrentVersion\Explorer\Desktop\NameSpace\{445a2e0d-9142-4458-a84a-66dee0196d3c}]
Turn Off Power and Network Throttling
Power throttling is a feature on Windows 10/11 that limits CPU resources for background tasks to extend battery life by up to 11%. Although it is beneficial for efficiency, it can cause stuttering or slow apps.
If you want to use Windows 11 Registry hack to disable it, follow the guide below:
Step 1. Open Registry Editor and go to the following path:
HKEY_LOCAL_MACHINE\SYSTEM\CurrentControlSet\Control\Power
Step 2. Right-click Power, select New > Key, and name it PowerThrottling.
Step 3. Inside PowerThrottling, right-click on the right pane, select New > DWORD (32-bit) Value.
Step 4. Name it PowerThrottlingOff and set its Value data to 1.
Step 5. Restart your PC to apply the changes.
If you want to re-enable power throttling, set PowerThrottlingOff’s Value data to 0 or delete the PowerThrottlingOff value.
Network throttling limits performance by reserving bandwidth for background processes like Windows Update. This can cause high ping and lag during online gaming. Try the Windows 11 Registry tweak below to uncap your network and reclaim full bandwidth:
Step 1. In Registry Editor, navigate to:
HKEY_LOCAL_MACHINE\SOFTWARE\Microsoft\Windows NT\CurrentVersion\Multimedia\SystemProfile
Step 2. Locate NetworkThrottlingIndex.
Step 3. Double-click the value, select Hexadecimal, and set its Value data to ffffffff to completely disable throttling.
Step 4. Restart your PC to apply these changes.
If you want to re-enable network throttling, set NetworkThrottlingIndex’s Value data to 0000000a.
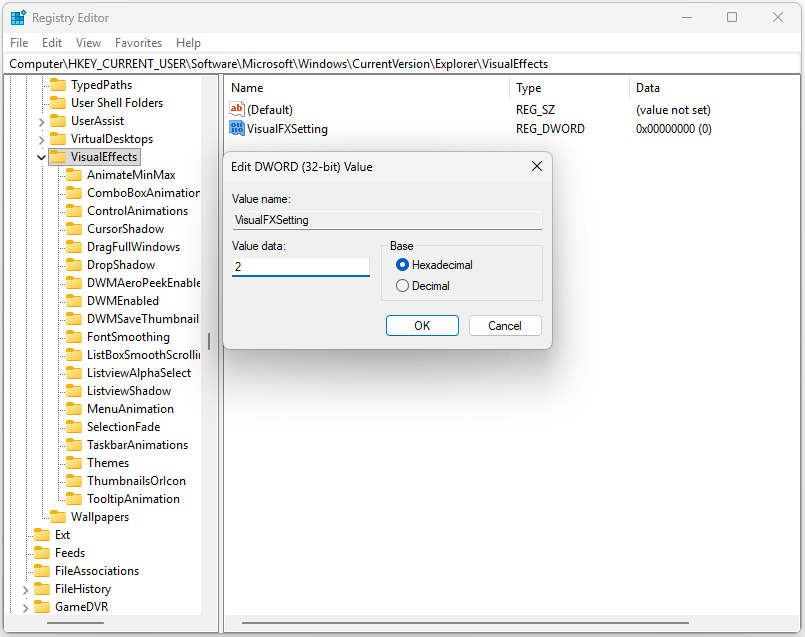
Disable Visual Effects
Too many visual effects can degrade performance on older or low-spec PCs. The following Windows 11 registry tweak disables them all at once to boost speed. Here’s the tutorial:
Step 1. Launch Registry Editor and navigate to:
HKEY_CURRENT_USER\Software\Microsoft\Windows\CurrentVersion\Explorer\VisualEffects
Step 2. Find and locate the VisualFXSetting value. Then, set its Value data to 2.
To return the visual effects to the default, set VisualFXSetting’s value to 0.
Disable Copilot/Bing in Search
Disabling Copilot and Bing search in Windows 11 can improve privacy, reduce distractions, and boost system performance.
If you prefer a faster, distraction-free desktop without web-connected search results or intrusive AI, follow the Windows tweak below to reclaim a cleaner Windows experience:
Disable Copilot:
- Open the Registry Editor.
- Navigate to HKEY_CURRENT_USER\Software\Policies\Microsoft\Windows.
- Right-click Windows, select New > Key, and name it WindowsCopilot.
- Inside WindowsCopilot, right-click on the right pane, select New > DWORD (32-bit) Value.
- Name it TurnOffWindowsCopilot and set its value to 1.
Disable Bing in Search:
- Navigate to HKEY_CURRENT_USER\Software\Microsoft\Windows\CurrentVersion\Search.
- Right-click in the right pane and create a new DWORD (32-bit) Value named BingSearchEnabled.
- Set the value data to 0.
- Restart your computer to apply the changes.
Disable Animations
Disabling Windows 11 animations saves resources and eliminates visual lag for a snappier, distraction-free experience, especially on older hardware. Here are the steps to disable animations via a Windows 11 Registry tweak:
Step 1. Open Registry Editor.
Step 2. Go to HKEY_CURRENT_USER\Control Panel\Desktop.
Step 3. Find the string value named MinAnimate. Double-click it and change the value data to 0.
Step 4. Restart your computer to apply the changes.
Disable Taskbar Chat/Widgets
If you don’t want the Taskbar chat or Widgets in Windows 11, disabling them is also possible. To do that, please perform the following Windows Registry hack:
Disable Widgets via Registry
Step 1. Open Registry Editor and navigate to the following path:
HKEY_CURRENT_USER\Software\Microsoft\Windows\CurrentVersion\Explorer\Advanced
Step 2. Create a DWORD (32-bit) Value named TaskbarDa.
Step 3. Set its Value data to 0 to hide Widgets.
Step 4. Restart your PC to apply the changes.
Disable Chat via Registry
Step 1. In Registry Editor, navigate to:
HKEY_CURRENT_USER\Software\Microsoft\Windows\CurrentVersion\Explorer\Advanced
Step 2. Create a DWORD (32-bit) value named TaskbarMn.
Step 3. Set its Value data to 0.
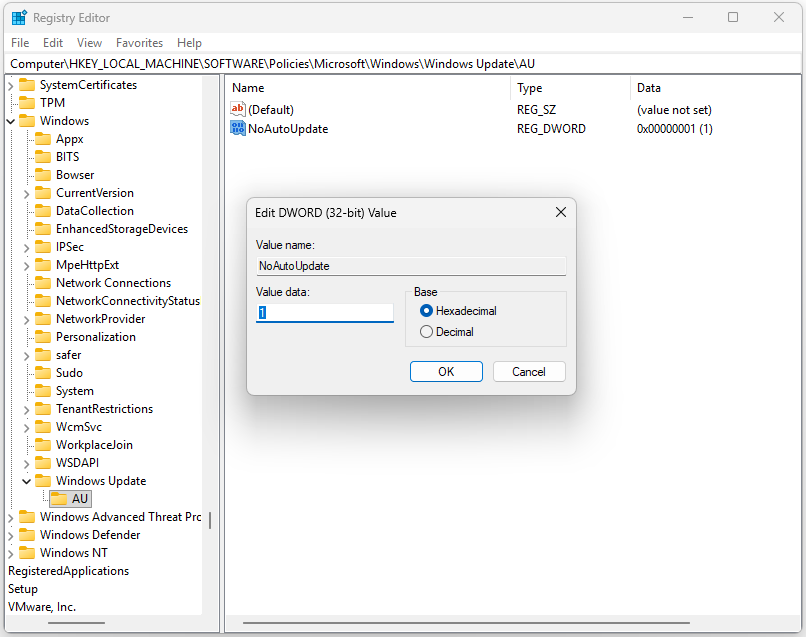
Stop Automatic Windows Update
Windows 11 enables automatic updates by default. However, you may want to defer them to avoid broken drivers, software conflicts, or excessive data usage on a paid internet network. Here is a Windows 11 Registry hack:
Step 1. Open Registry Editor and go to the following path:
HKEY_LOCAL_MACHINE\SOFTWARE\Policies\Microsoft\Windows
Step 2. Right-click Windows, select New > Key, and name it WindowsUpdate.
Step 3. Right-click WindowsUpdate, select New > Key, and name it AU.
Step 4. Right-click on AU, select New > DWORD (32-bit) Value.
Step 5. Name the new value NoAutoUpdate and set its value to 1.
Step 6. Restart your computer to apply the changes.
To re-enable Windows Update, change NoAutoUpdate’s value to 0 or delete it.
In Conclusion
This post offers several effective Windows 11 Registry hacks to boost your computer’s performance and customize some settings according to your preference.
Before performing these Registry hacks, backing up your system and data first is necessary for data security. To do that, MiniTool ShadowMaker is a good choice.
If you encounter any issues while using this software, contact us by sending an email to [email protected].
Windows 11 Registry Hacks FAQ
It is a very convenient shortcut for advanced users to access deep Windows settings without navigating multiple menus. To know more information about this, refer to the Windows 11 God Mode guide.
Alternatively, run Command Prompt as administrator and execute the rmdir /q /s [drive:]path command to remove it.
Moreover, press Ctrl + Shift + Esc to open Task Manager. Go to the Processes tab to see running background apps or the Startup apps tab to find hidden programs that run automatically.
About The Author

Position: Columnist
Charlotte is a technology columnist with a strong focus on the Windows operating system, specializing in disk management, backup, and data recovery. She is passionate about analyzing computer errors, identifying root causes, and delivering practical solutions. In her free time, she stays updated on the latest developments in computer systems and hardware while continuously learning new technologies to broaden her expertise. Her writing style is clear and easy to understand, making complex technical topics accessible even to users with limited computer knowledge.
User Comments :