BIOS (Basic Input/Output System) is the firmware that is used to start the operating system after your PC is powered on. With BIOS, you can select the boot priority according to your preference. However, sometimes you may find the Windows boot drive not showing up in BIOS, preventing your Windows from booting up.
Why does this issue happen and how to fix it effectively? To find out the answers, you can pay attention to the following content.
10 Cases: External Hard Drive Not Showing up & Best Fixes
Why Is Boot Drive Not Showing Up in BIOS
Various reasons can lead to the “boot drive not showing up in BIOS” issue. Here, this post summarizes the most possible reasons for this issue as follows:
- Improper connection of the USB cables and ports
- Incorrect BIOS settings
- The disabled USB
- Corrupted MBR (Master Boot Record)
- Disk errors existing in the boot drive
- …
After knowing the possible reasons, you should take immediate action to get rid of the annoying issue. Below are several workable solutions available.
How to Fix Boot Drive Not Showing Up in BIOS
Method 1: Check the USB Cables and Ports
The loose connection and corrupted USB port may result in the “hard drive not showing up in BIOS” issue. Therefore, when you experience this issue, the first thing you can try is to check the USB cables and ports. To make sure the boot drive is connected properly, you can switch to another USB port or use a different cable.
Method 2: Enable USB in BIOS
In some cases, your motherboard will automatically disable the unused USB ports in BIOS, which may cause the “Windows boot drive not showing up in BIOS” issue as well. To resolve this issue, you need to enable USB from BIOS. The following are detailed steps for this operation.
Step 1: Power on your PC and then press F2 quickly to enter the setup utility.
Tip: The hotkey used to open the BIOS might be different for various PCs. To get the correct key for your PC, you can check your user manual or search online in advance.
Step 2: After you get into the BIOS, go to the Advanced tab.
Step 3: Navigate to Onboard Devices/Integrated Peripherals and press Enter to continue.
Step 4: Select USB Controller. Then set it as Enabled by pressing the proper key.
Step 5: After that, press F10 to save the changes. Then you can restart your PC to see if the “hard drive not showing up in BIOS boot options” issue is solved.
Tip: To get information about UEFI vs BIOS, you can focus on this post: UEFI vs BIOS – What’s the Differences and Which One Is Better.
Method 3: Restore BIOS to Default Settings
Another way you can try to fix the “hard drive not showing up in BIOS boot options” issue is to restore BIOS to default settings. To execute this operation, you can follow the steps below.
Step 1: Boot your PC into the BIOS.
Step 2: Find the Setup Defaults option. It might be named Load Default, Load Setup Defaults, Load Default Settings, Load BIOS Defaults or Load Optimal Defaults. Select the specific option and press Enter to open the Setup Confirmation window.
Tip: Alternatively, you can press F9 or other hotkeys depending on the on-screen instructions of your PC to open the Setup Confirmation window.
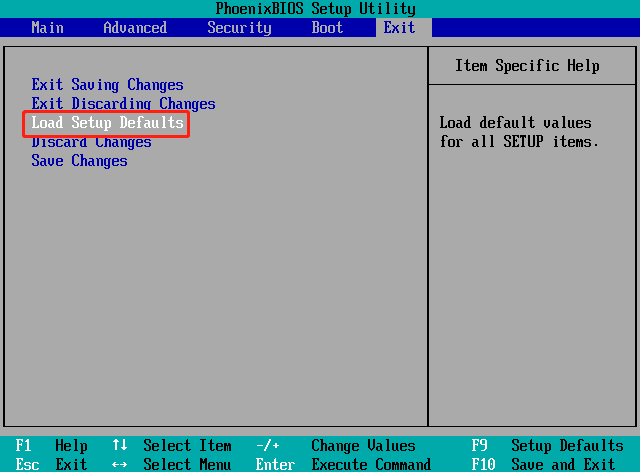
Step 3: After that, click Yes to confirm the operation of restoring BIOS to the defaults. Then your PC will restart. Just check if it can boot up successfully.
Method 4: Rebuild MBR
MBR is a special type of boot sector at the very beginning of your boot drive that helps your computer boot successfully. If the MBR gets damaged, you may run into the “Windows boot drive not showing up in BIOS” issue and fail to boot your PC. To repair this issue, you should try fixing MBR.
Step 1: Turn off your PC and then turn it on. Once the Windows logo appears on your screen, press and hold the Power button to turn off your PC again. Repeat this step until you enter the Recovery window.
Step 2: Once you get into the Windows Recovery Environment (Windows RE), select Advanced options.
Step 3: After that, go to Troubleshoot > Advanced options > Command Prompt.
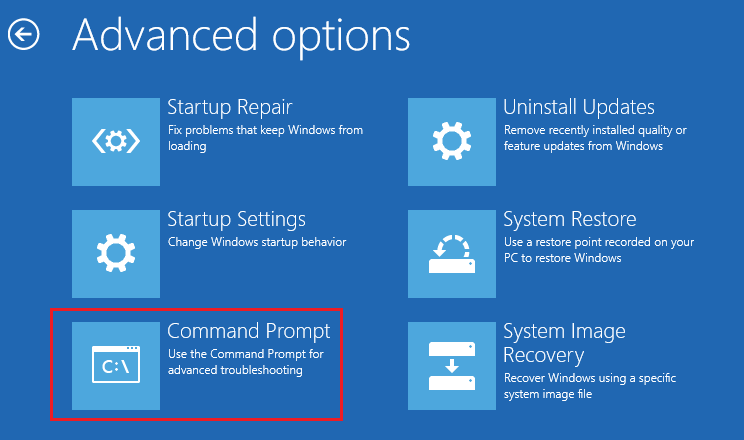
Step 4: Once you enter Command Prompt, type the following commands one by one and press Enter after each.
- bootrec.exe /fixmbr
- bootrec.exe /fixboot
- bootrec.exe /scanos
- bootrec.exe /rebuildbcd
Step 5: Wait for the process to complete. Then boot your PC to see if this issue is resolved.
Fixed: Bootrec Fixboot Element Not Found Windows 10 Error
Method 5: Check Disk Errors
If there are disk errors on the boot drive, you may get stuck in the “boot drive not showing in BIOS” issue too. On this occasion, it’s recommended that you run the CHKDSK utility to fix these errors. It’s simple and you just need to enter Command Prompt in Windows RE, type chkdsk *: /r and then press Enter to execute this command.
This command will help you find and fix file system errors on the target drive. Besides, it can locate bad sectors and recover readable information from the bad sectors. To solve your drive, you should replace * with the drive letter of the problematic boot drive.
Once this process is finished, restart your PC to check if it can boot up successfully.
Here You Are: Solutions to CHKDSK Not Working in Different Cases
Method 6: Replace the Hard Drive
If the “boot drive not showing in BIOS” issue persists after you try the above methods, it may indicate that your boot drive is physically damaged. To repair this issue, you’d better replace your boot drive with a new SSD/HDD.
Tip: To learn about the difference between SSD and HDD, you can read this post.
In general, the stored data including the operating system and personal files on the original boot drive will be lost after you replace it with a new one. Then you have to reinstall the Windows OS and recover other data, which will take a long time.
Fortunately, there are some programs in the market that enable you to finish the hard drive replacement without reinstalling OS. Among them, MiniTool Partition Wizard is highly recommended to you.
MiniTool Partition Wizard is a professional partition manager with a wide range of features, such as creating/formatting/resizing/deleting partitions, copying/wiping disks, migrating OS to SSD/HDD, and so on. To replace your boot drive without reinstalling OS by using MiniTool Partition Wizard, you can follow the guide below.
Part 1: Create a Bootable USB Drive with MiniTool Partition Wizard
Step 1: Connect the USB flash drive to another PC that can run well.
Note: Creating a bootable USB drive will damage all the data saved in the target USB drive. So, in case of data loss, it’s better to make a backup in advance.
Step 2: Download and install MiniTool Partition Wizard first. Then launch it to enter the main interface.
Note: You should upgrade MiniTool Partition Wizard to the Pro or higher editions so that you can use the Bootable Media Builder of this program.
MiniTool Partition Wizard DemoClick to Download100%Clean & Safe
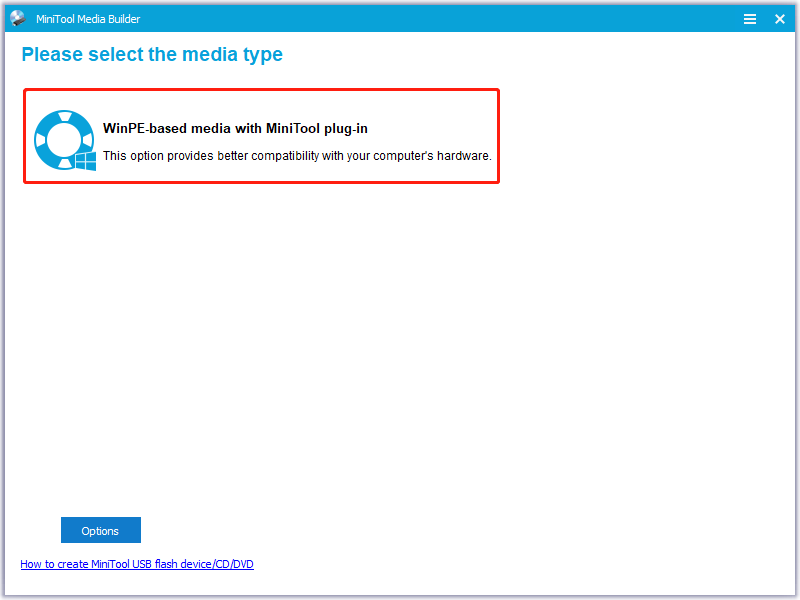
Step 3: Click Bootable Media at the top-right corner. Then click WinPE-based media with MiniTool plug-in.
Step 4: In the next window, select USB Flash Disk and then click Yes if prompted.
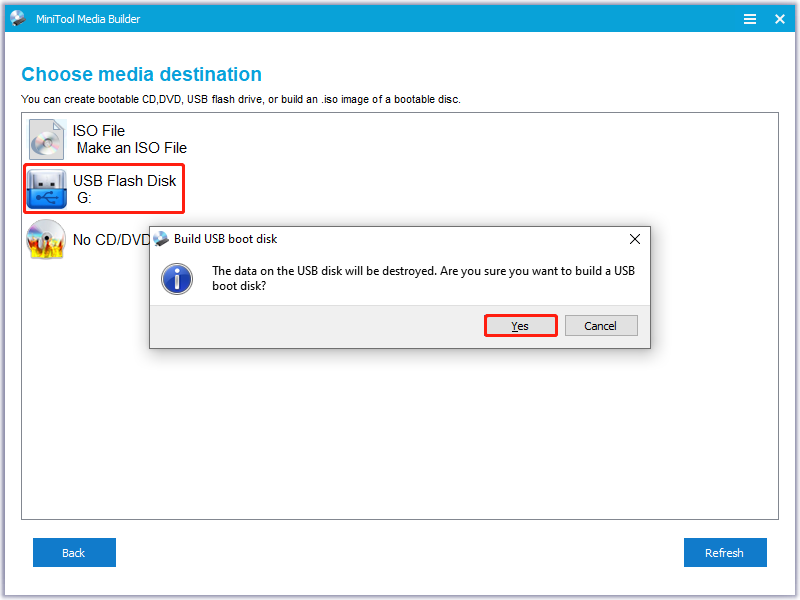
Step 5: After the bootable USB drive is built successfully, click Finish.
Part 2: Migrate OS to the New SSD/HDD Drive
Step 1: Connect the new SSD/HDD to the unbootable computer with a SATA to USB cable. Then connect the created bootable USB drive to the PC and boot it from the USB drive.
Tip: The new hard drive you prepare for migrating OS should be larger than the original boot drive so that it can store all the data.
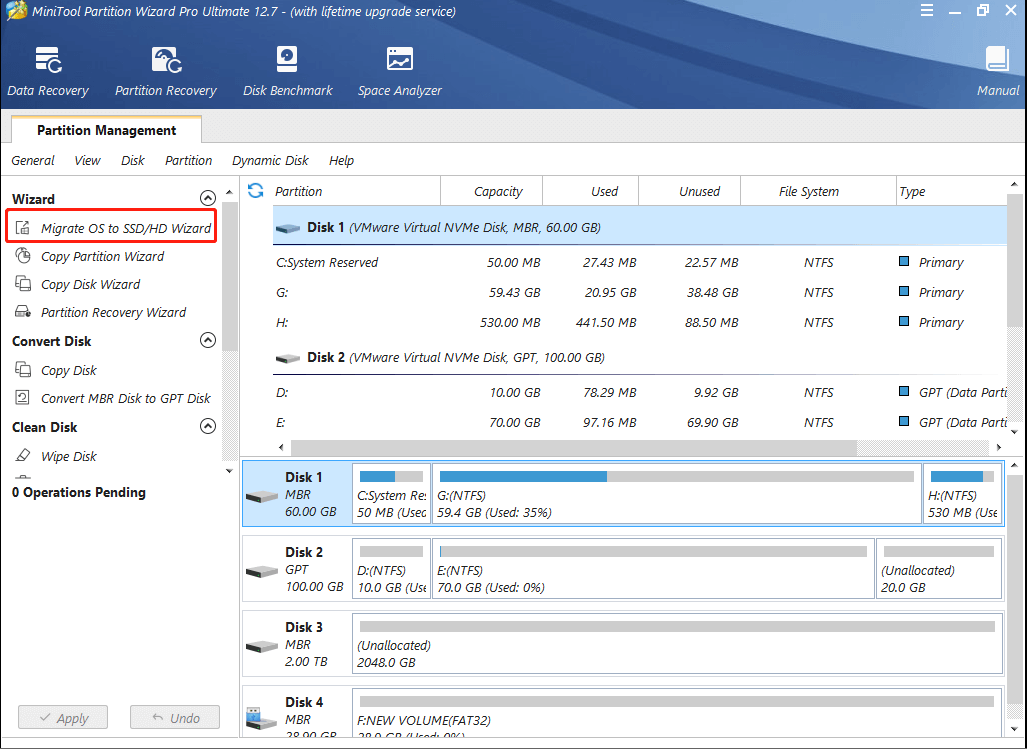
Step 2: After getting into the main interface of MiniTool Partition Wizard, highlight the original boot drive and then select Migrate OS to SSD/HD Wizard from the left action panel.
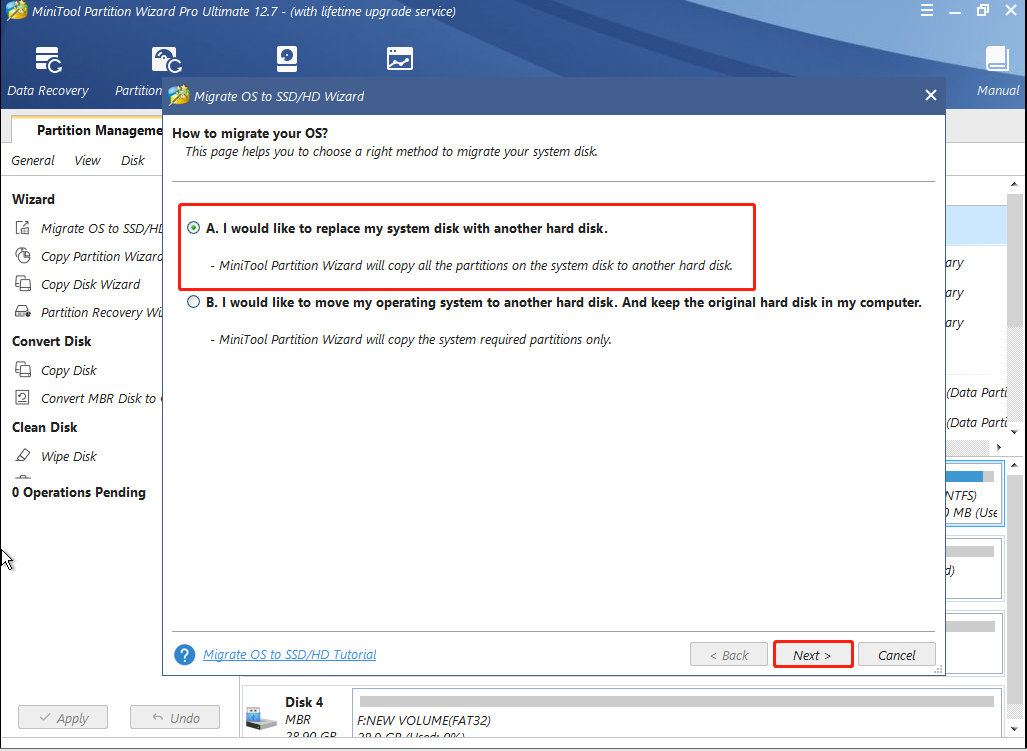
Step 3: In the pop-up window, select the I would like to replace my system disk with another hard disk option and click Next. It will copy all the partitions on the original disk.
Step 4: After that, select the new hard drive as the destination disk and then click Next. If prompted, click Yes.
Step 5: In the next window, choose a copy option and modify other changes according to your needs. Then click Next to continue.
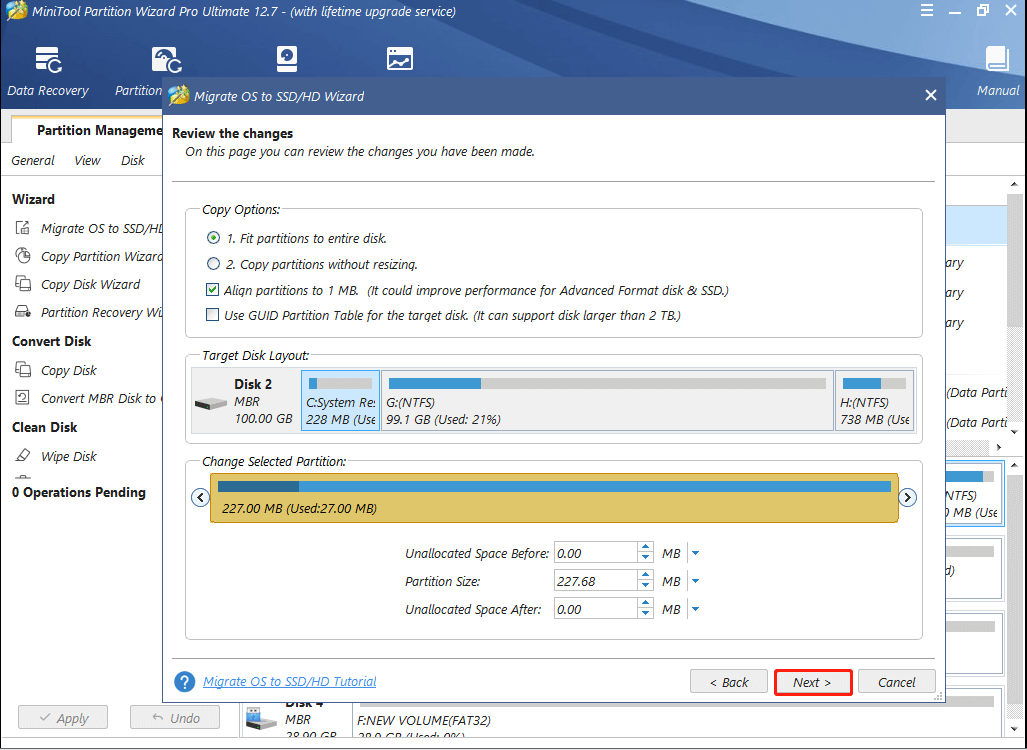
Step 6: Click Finish and then Apply to apply the pending operations. You may need to click Yes to confirm the changes.
Bottom Line
All the methods mentioned in this post are available. When you are faced with the “boot drive not showing up in BIOS boot options” issue, you can follow them one by one until you solve this issue. If you have any other workable solutions to this issue, you can share them with us in the comment part below.
If you encounter problems while using MiniTool Partition Wizard, you can contact us via [email protected]. We will reply to you as soon as possible.
User Comments :