MiniTool introduces secure erase and quick format, including their definition, working principle, as well as pros and cons. Based on that, it discusses secure erase vs quick format, application scenarios, operating methods, and the possibility of recovering data after using either option.
You should remove the data before selling, recycling, donating, or giving the storage device away. There are several ways to reach the purpose. For instance, you can delete, quick format, secure erase, or wipe the data on the storage device.
Among these methods, secure erase and quick format are quite popular among users. However, many users misunderstand the differences between these two methods. They think that secure erase and quick format are similar, especially in terms of data security and storage management.
There are significant differences between secure erase and quick format. In this post, I will first introduce each method and then comparethem to highlight their differences.
What Is Secure Erase
In this section, you can see a detailed overview of secure erase, including its definition, working principle, industry standards & specifications, as well as pros and cons.
Definition of Secure Erase
Secure erase permanently rewrites the hard drive, ensuring that the data is overwritten or destroyed, which leaves no trace for recovery. Once done, the data can’t be recovered by any data recovery software.
Secure erase is a command obtained from the firmware on the PATA/SATA hard drives to clean up the data. It’s unavailable on SCSI hard disks. Since the writing occurs within the drive, no verification is required during the rewrite process. As a result, the secure erase process completes quickly.
After a successful secure erase, all data on the hard disk will disappear forever. The disk will become empty and any previous files or partitions are no longer accessible. Then you can donate, sell, or recycle the disk without the concern of data leakage.
Working Principle of Secure Erase
The secure erase process works by overwriting the data at its location with a binary zero, one, or random data, making the lost data unable to be recovered by data recovery software. The number of overwrite passes varies depending on the standard or tools being used.
Common standards for overwriting include DoD 5220.22-M and Gutmann method. DoD 5220.22-M overwrites data three times with specific patterns, while the Gutmann method overwrites data 35 times with varying patterns for maximum security.
Things are different if you use built-in commands to perform a secure erase on storage devices. Plenty of modern storage devices come with secure erase commands that let the firmware of the disk erase all data by resetting all memory cells to the default state.
How Secure Erase Works on SSD and HDD
Secure erase works differently on SSDs and HDDs due to their different working principles. All the SSDs’ write cycles numbers are limited, ranging from 3,000 to 100,000 write cycles. The lifespan of SSDs is decided by the number of write cycles, so overwriting them multiple times will shorten the lifespan of SSDs and may not completely erase files.
Fortunately, you don’t have to worry about that. The secure erase command on SSDs resets all memory cells to a blank state. For SSDs with the self-encryption feature, secure erase works by wiping the encryption key and making the data unreadable without the key.
As for the HDD, it is a kind of electromechanical data storage device, which uses magnetic platters to save and retrieve digital data. Hence, secure erasing an HDD involves repeatedly overwriting all sectors on the drive with random or specific patterns, making data nearly unrecoverable.
Industry Standards and Specifications of Secure Erase
DoD 5220.22-M and NIST 800-88 are industry standards for secure erase. This means that a qualified secure erase command or software must meet the specifications of these two standards. They help you erase data and ensure that the erased data can’t be recovered.
DoD 5220.22-M, published in 1995 by DoD (Department of Defense), is a widely used data erasure standard. It involves overwriting the previously saved data on the disk with binary patterns of zeroes and ones. It contains 3 overwriting passes.
- Pass 1: Overwrite all addressable locations with binary zeroes
- Pass 2: Overwrite all addressable locations with binary ones
- Pass 3: Overwrite all addressable locations with a random bit pattern
As for NIST 800-88, it is published by the National Institute for Standards and Technology. This standard is known for its media sanitization categories of Clear, Purge, and Destroy, and its principle can be used for magnetic, flash-based, and other storage technologies, such as SSDs, USB drives, etc.
- Clear: It overwrites data with standard read and write commands in all user-addressable storage locations with logical techniques.
- Purge: It utilizes hardware or software to erase data from specific areas of the storage device.
- Destroy: It physically damages the storage media to avoid data recovery.
NIST 800-88 was initially built for government use, but it has been widely adopted and recognized by governments and companies for media sanitization. In a word, it is increasingly the leading standard or data wipe method.
Pros and Cons of Secure Erase
The pros and cons of secure erase are summarized below, helping you get a further understanding of this data sanitization method.
Pros
- Time-saving: As no verification is needed during the rewrite process, the secure erase process will finish quickly. If you want to erase the data efficiently, secure erase is highly recommended.
- High security level: No data recovery software or partition recovery tool can recover the data from the hard disk after a secure erase. So, you can enjoy a high security level.
Cons
- Limited secure erase tools: Not all hard disks (including HDDs and SSDs) come with secure erase tools. Older HDDs/SSDs and many USB drives & external hard drives may not support secure erase commands or tools. You can check if your disk supports secure erase by checking information on the manufacturer’s website, using diagnostic tools like HD Tune, or reading the user manual.
- Data recovery is hard: Data on a securely erased disk can’t be recovered even by professional data recovery software. So, think twice before you secure erase a disk.
What Is Quick Format
In this section, you will learn the definition, working principle, as well as pros and cons of quick format.
Definition of Quick Format
Disk formatting is the process of preparing data storage devices (HDDs, SSDs, USB drives, floppy disks, or memory cards) for initial use. The whole disk formatting process consists of three parts: low-level formatting, partitioning, and high-level formatting.
The low-level formatting operation is usually performed at the factory, dividing a hard disk into one or more regions. Differently, high-level formatting sets up file system formats within a partition or logical volume. That’s why this operation is often fast and is referred to as quick format.
Being a mode of high-level formatting, quick format just deletes files on the partition and rebuilds file system, volume label, and cluster size during the process. In a word, it simply makes the drive appear empty.
Working Principle of Quick Format
Quick format deletes the file system’s information, making data inaccessible. As you see, quick format doesn’t erase the data on the drive. It simply marks the partition as “formatted” and destroys the journal that keeps track of the files and their locations on the hard disk.
The original data remains on the drive, so it can be recovered by professional data recovery software. Compared with full format, quick format is faster but less thorough. However, full format is slower but more secure. It deletes the file system and checks the whole drive for bad sectors. Moreover, it overwrites the data multiple times, which makes data recovery hard.
Quick format vs full format: what’s the difference? You may have the answer now!
Pros and Cons of Quick Format
Why should or shouldn’t you perform a quick format? You will know the answer after learning the pros and cons of quick format.
Pros
- Convenient: If you just want to reuse the drive, quick format is recommended. It is easy to operate.
- Time-saving: It only takes you a little time to complete the operation. Compared with full format, quick format is time-saving.
- Easy data recovery: If you format the disk by accident, you can get the data back by using data recovery software.
Cons
- Not safe enough: After you quick format the disk, data can still be recovered. There’s a risk of privacy leakage. So, quick format is not ideal when disposing of or reselling the storage device.
- Less thorough than full format: Quick format only clears the file system structure, which is less thorough than full format.
- No bad sector detection: Quick format doesn’t scan the drive for bad sectors or other errors.
Secure Erase vs Quick Format
This section illustrates secure erase vs quick format in the terms of data wiping effect, speed and performance, effects on the lifespan of storage device, and security.
#1: Data Wiping Effect
Data wiping effect is the main difference between secure erase and quick format. Once you perform a secure erase on a hard disk, the data saved on the disk will be erased permanently and you can’t get the data back anymore.
In conclusion, the data wiping effect of secure erase is pretty good. If you want to clear the confidential data without a trace, secure erase is strongly recommended. By using this option, you can avoid privacy breaches or confidential information leaks.
As for quick format, it just clears the file system structure, leaving the data intact. It simply makes data inaccessible and lets the drive look empty. In fact, the data remains on the disk. As you see, quick format doesn’t erase the data at all. You’d better not use this way if you need a deep clean.
Secure erase vs quick format SSD: which method to choose? In most cases, quick format is sufficient, especially if you just need to delete the data on it. It takes you a short time to complete and the data is recoverable. You should conduct a secure erase on the SSD to ensure data security or fix potential issues on it. This also applies to other storage devices like HDDs, USB flash drives, and SD cards.
#2: Speed and Performance
The time taken by secure erase varies depending on factors like disk capacity, speed, and the specific method. It ranges from a few minutes to several hours. What you should do is wait patiently. Once the secure erase process starts, you’d better not interrupt the process.
Otherwise, it can result in incomplete data removal or potential damage to the disk drive. If you have to cancel the process, consult the documentation or support resources offered by the storage device models or the software tool you’re using.
Quick format takes only a few seconds to complete. It is faster than full format and secure erase. However, quick format doesn’t scan the disk for errors or mark bad sectors. It won’t make a difference for the performance of the disk.
#3: Effects on the Lifespan of Storage Devices
What effect do secure erase and quick format have on the lifespan of storage devices? This question is inevitable while discussing “secure erase vs quick format”. As quick format doesn’t perform any physical writes to storage devices, its impact on the lifespan of SSDs, HDDs, SD cards, and USB drives is minimal to none.
To be specific, quick format has no impact on the lifespan of HDDs, USB drives, and SD cards. It only has a negligible effect on SSD’s lifespan. Though quick format SSD doesn’t impact its lifespan, the formatting frequency does affect it. So, don’t quick format SSDs too often.
Things are different for secure erase. It has a different extent of impact on the storage devices’ lifespan. Secure erasing HDD typically writes zeros or random data or every sector, which has no obvious impact on its lifespan. Nevertheless, repeated full overwrites can cause mechanical wear over time.
Secure erasing SSD doesn’t impact its lifespan significantly, but each write operation on an SSD causes wear on its memory cells which reduces the disk’s lifespan. Moreover, modern SSDs have a high endurance and can handle numerous write cycles before wearing out.
Compared with SSDs and HDDs, the impact on the lifespan of USB flash drives and SD cards is heavier. Since USB drives and SD cards use NAND flash that has limited write cycles, secure erase consumes write cycles, reducing lifespan.
In a word, it’s not recommended to secure erase HDDs, SSDs, SD cards, and USB flash drives if it’s not necessary. You shouldn’t quick format SSDs frequently either.
#4: Security
The security level is a big difference between secure erase and quick format. Sometimes, it can even affect your decision. Given that fact, you should know the security level of the two data sanitization methods. Secure erase rewrites storage devices with a binary zero, one, or random data, making the data irrecoverable. Hence, secure erase boasts a high security level.
Quick format only deletes the file system table and root folder, making the drive appear empty. However, the actual data remains intact and can be recovered via data recovery software. So, a quick format is not enough if you want to pursue data security. You should securely erase the disk instead.
What is the difference between quick format and secure erase? The main differences between the two methods are summarized above. Secure erase vs quick format SSD: which to select? Pick a suitable way to handle your SSD. If you hesitate between the two methods, you can refer to the section below.
Application Scenarios of Secure Erase and Quick Format
Secure erase or quick format? The answer depends on your needs.
When to Use Secure Erase
If you want to wipe the data permanently, you should secure erase the storage device. This will protect your privacy (including personal data and business information). Situations to use secure erase are listed below.
- Before selling, donating, recycling, or disposing of the storage device
- To erase sensitive or confidential data permanently
- To decommission drives in an organization
- There are issues with the disk
When to Use Quick Format
If you just want to reuse the disk, quick format is recommended. During the process, you are able to configure file system, allocation unit size, and volume label. You should quick format the device in the following scenarios:
- Put the new storage device into use
- Prepare the disk for new uses (like data backup, OS reinstallation, etc.)
- Change the file system or allocation unit size of the device
- Let the disk work again
Secure erase vs quick format USB flash drive/SSD/HDD: which is better? It depends on your needs. Then refer to the given methods in the following section to finish the operation.
How to Secure Erase and Quick Format
In this section, I will show you how to secure erase and quick format storage devices respectively. To avoid data loss, you’d better back up important files in advance. You can clone the hard drive or make a Windows backup to further safeguard your data and OS.
After that, follow the given instructions to secure erase or quick format your device.
How to Secure Erase Storage Devices
Here, I collect 3 available methods to secure erase hard disks. According to your situation, pick a suitable way.
#1: Secure Erase via BIOS/UEFI
Some modern motherboards and UEFI firmware allow you to secure erase disk drives. If so, things are easy. Simply enter the BIOS/UEFI and secure erase your disks.
Step 1: Restart the computer and keep pressing the BIOS key while the PC loads up to enter BIOS/UEFI. The BIOS key can be F2, F10, Delete, Esc, and so on.
Step 2: Navigate to the storage or drive management section and locate the Secure Erase option. On some systems, the option can be Data Wipe, ASUS Secure Erase, or others.
Step 3: Select the disk to secure erase.
Step 4: Follow the prompted instructions to complete the process.
Step 5: Press F10 > Enter keys to save changes and exit BIOS/UEFI.
#2: Secure Erase Using Tools Offered by Manufacturers
Plenty of HDDs and SSDs support secure erase through their firmware or proprietary software provided by manufacturers. According to your disk brand, use the corresponding utility to secure erase the disk. Common disk brands and matched tools are listed as follows.
- Samsung SSDs: Samsung Magician
- Crucial SSDs: Crucial Storage Executive
- Seagate HDD: SeaTools
- Intel SSD: Intel Memory and Storage Tool
- Western Digital HDD: WD Dashboard
In this scenario, I use Samsung Magician to secure erase my Samsung SSD. You can refer to these steps if your SSD is also from Samsung.
Step 1: Download and install the latest version of Samsung Magician on the computer.
Step 2: Launch Samsung Magician and pick the target Samsung SSD from the list.
Step 3: Tap on the Tools tab and select Secure Erase.
Step 4: Check if the disk meets the requirements for secure erase. If it meets, click Yes to restart the computer.
Step 5: Once reboots, Samsung Magician will automatically launch in Secure Erase mode. Choose the target SSD again and click Erase.
Step 6: Confirm the operation and wait until the process ends. After the secure erase process finishes, restart the PC and verify the erase.
#3: Secure Erase via Third-Party Tools
In addition to BIOS/UEFI and proprietary software, third-party tools like MiniTool Partition Wizard and Parted Magic can help you secure erase disk drives as well. You can turn to these tools when the above methods don’t work. Here are quick steps to secure erase disks using MiniTool Partition Wizard.
Step 1: Download, install, and launch MiniTool Partition Wizard on your computer.
MiniTool Partition Wizard FreeClick to Download100%Clean & Safe
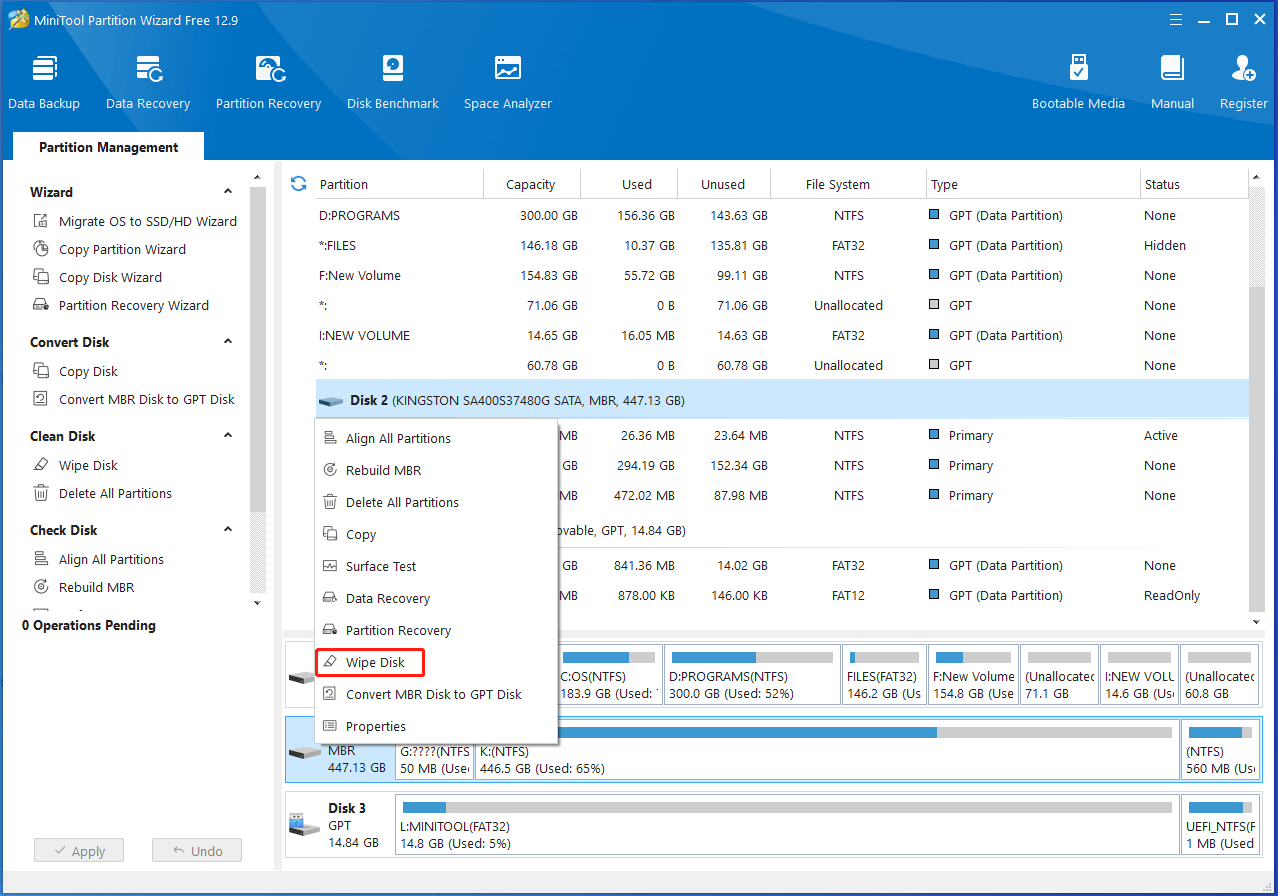
Step 2: Right-click on the target disk and choose Wipe Disk on the context menu.
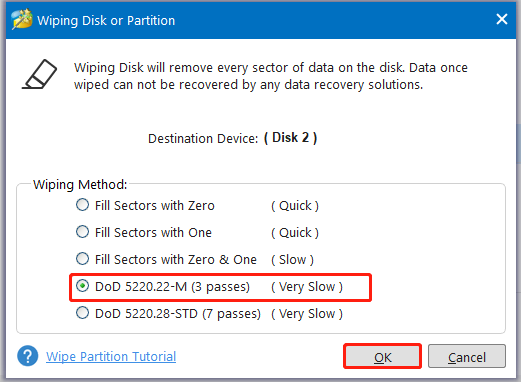
Step 3: From the listed wiping methods, choose DoD 5220.22-M (3 passes): the industry standard of secure erase. Then click OK to save changes.
Step 4: Finally, click on Apply to execute the operation.
How to Quick Format Storage Devices
There are several ways to perform a quick format. In general, you can quick format storage devices like SSDs, HDDs, USB drives, and SD cards using Windows built-in utilities or third-party software. Here, I show you how to do that via Disk Management, File Explorer, DiskPart, and MiniTool Partition Wizard respectively.
#1: Quick Format via Disk Management
Disk Management is a utility preinstalled on the Windows system, which enables you to perform various tasks related to hard disks. For instance, it can create/format/extend/shrink/delete volume, mark partition as active, convert to dynamic, convert to GPT/MBR disk, etc.
In this scenario, you can use it to quick format your hard disk. Here are the steps for doing that.
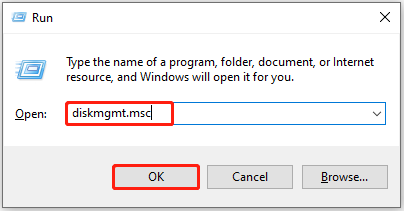
Step 1: Open the Run window by pressing Windows and R keys simultaneously.
Step 2: In the Run dialog window, type diskmgmt.msc and click OK. This will open Disk Management.
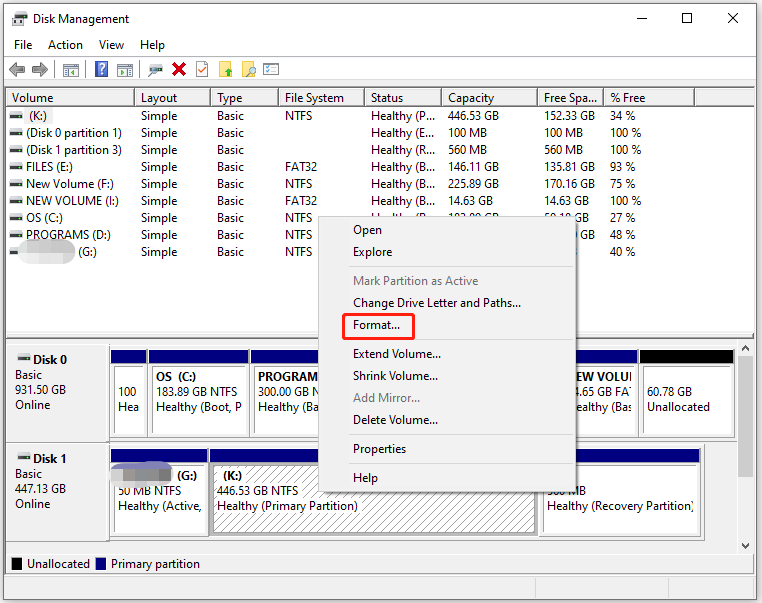
Step 3: Right-click the target volume or disk and hit the Format option.
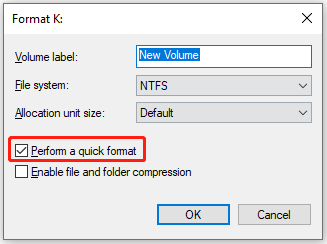
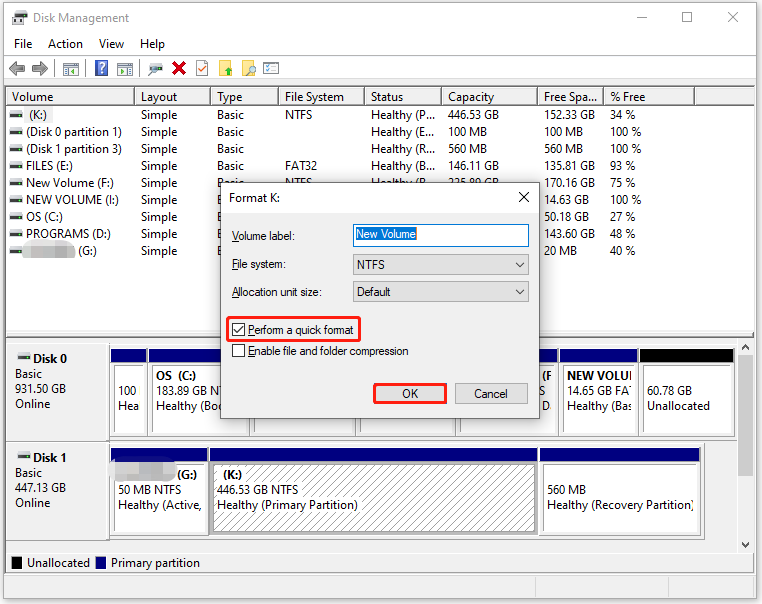
Step 4: In the prompted window, configure parameters like volume label, file system, and allocation unit size based on your needs. Tick the checkbox next to Perform a quick format and click OK to save changes.
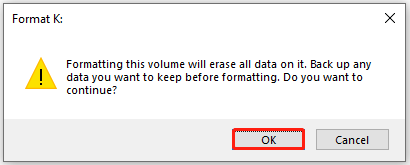
Step 5: In the warning window, click OK to confirm the operation.
#2: Quick Format via File Explorer
File Explorer also includes the Format feature, enabling you to quick format storage devices connected to your PC. The following steps show you the procedure.
Step 1: Press Windows and E keys to open File Explorer.
Step 2: Click This PC in the left pane of File Explorer.
Step 3: Locate the target partition, right-click on it, and then hit the Format option.
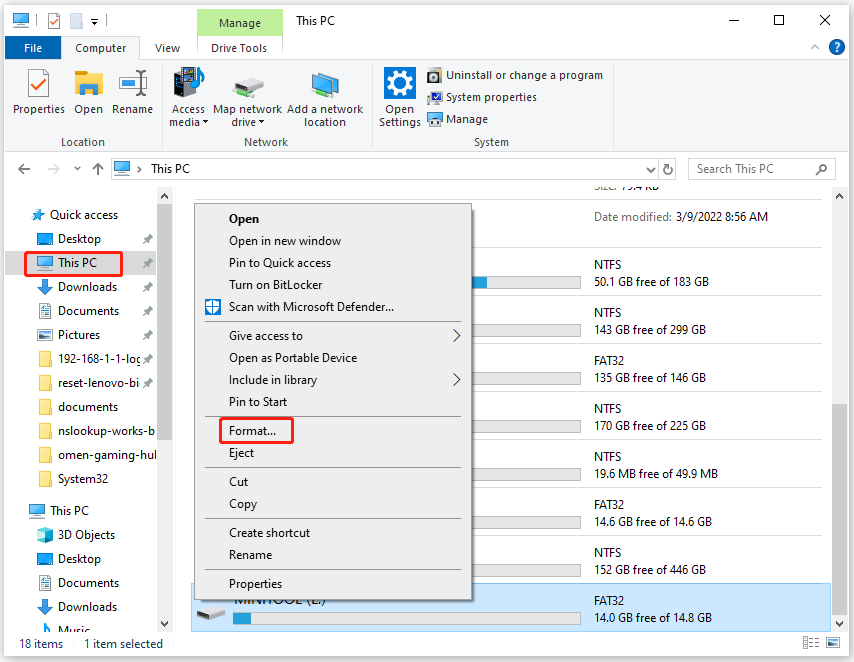
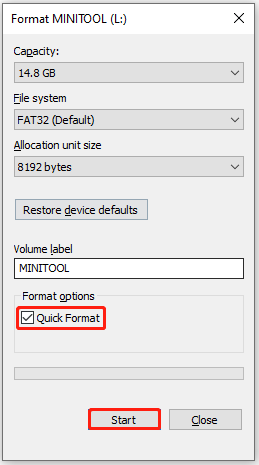
Step 4: Configure file system, allocation unit size, and volume label. Ensure that the Quick Format option is ticked and click the Start button.
Step 5: In the elevated warning window, click OK to allow the operation.
#3: Quick Format via DiskPart
DiskPart is a command-line tool on Windows PCs. It executes various hard disk related tasks by running corresponding command lines. To quick format hard disks using DiskPart, you can refer to these steps.
Step 1: Type cmd in the search box and then click Run as administrator under the displayed Command Prompt app.
Step 2: In the elevated User Account Control window, click Yes to continue.
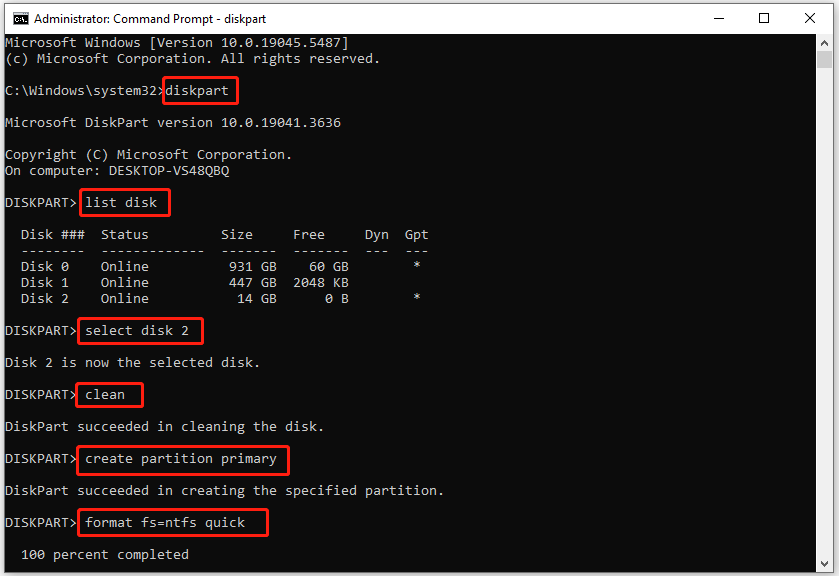
Step 3: In Command Prompt, input the commands below and press the Enter key after each.
- diskpart
- list disk (all disks on the computer will be listed)
- select disk 2 (replace 2 with the disk number of the target disk)
- clean
- create partition primary
- format fs=ntfs quick (you can replace ntfs with other file systems like exfat and fat32)
Step 4: After the operation finishes, type exit and press Enter to leave DiskPart.
#4: Quick Format via Third-Party Software
In addition to the above Windows built-in tools, third-party disk management software allows you to quick format storage devices as well. MiniTool Partition Wizard is an ideal option, which helps you quick format hard disks within a few clicks.
Click the button below to download MiniTool Partition Wizard, and then run the setup file and follow prompted instructions to finish the installation. Then launch the software and follow steps below to quick format your hard disk.
MiniTool Partition Wizard FreeClick to Download100%Clean & Safe
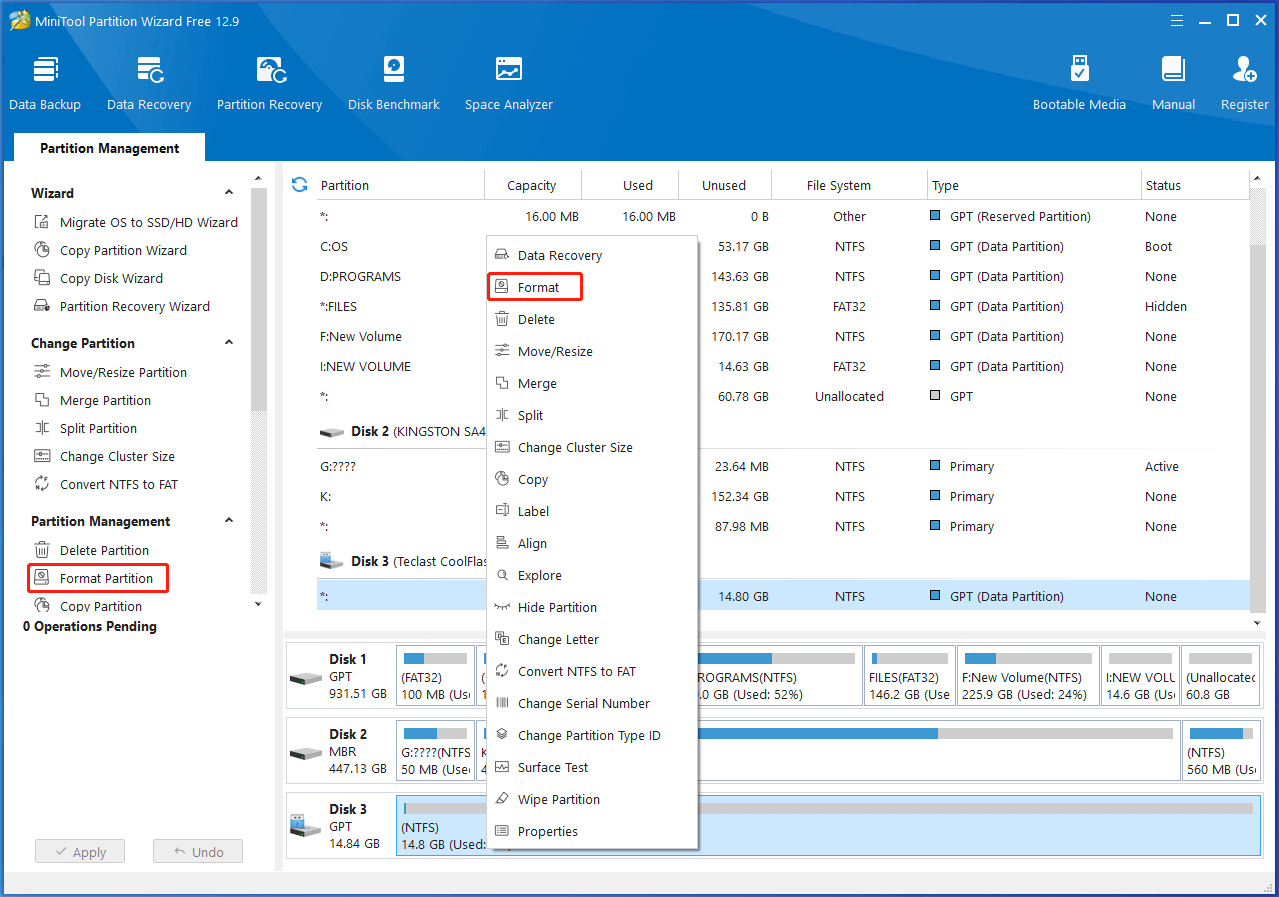
Step 1: Right-click the target partition and click on the Format option on the context menu. Alternatively, click the target partition and hit Format Partition in the left panel.
Step 2: According to your needs, set partition label, file system, and cluster size in the pop-up window. Then click OK to save changes.
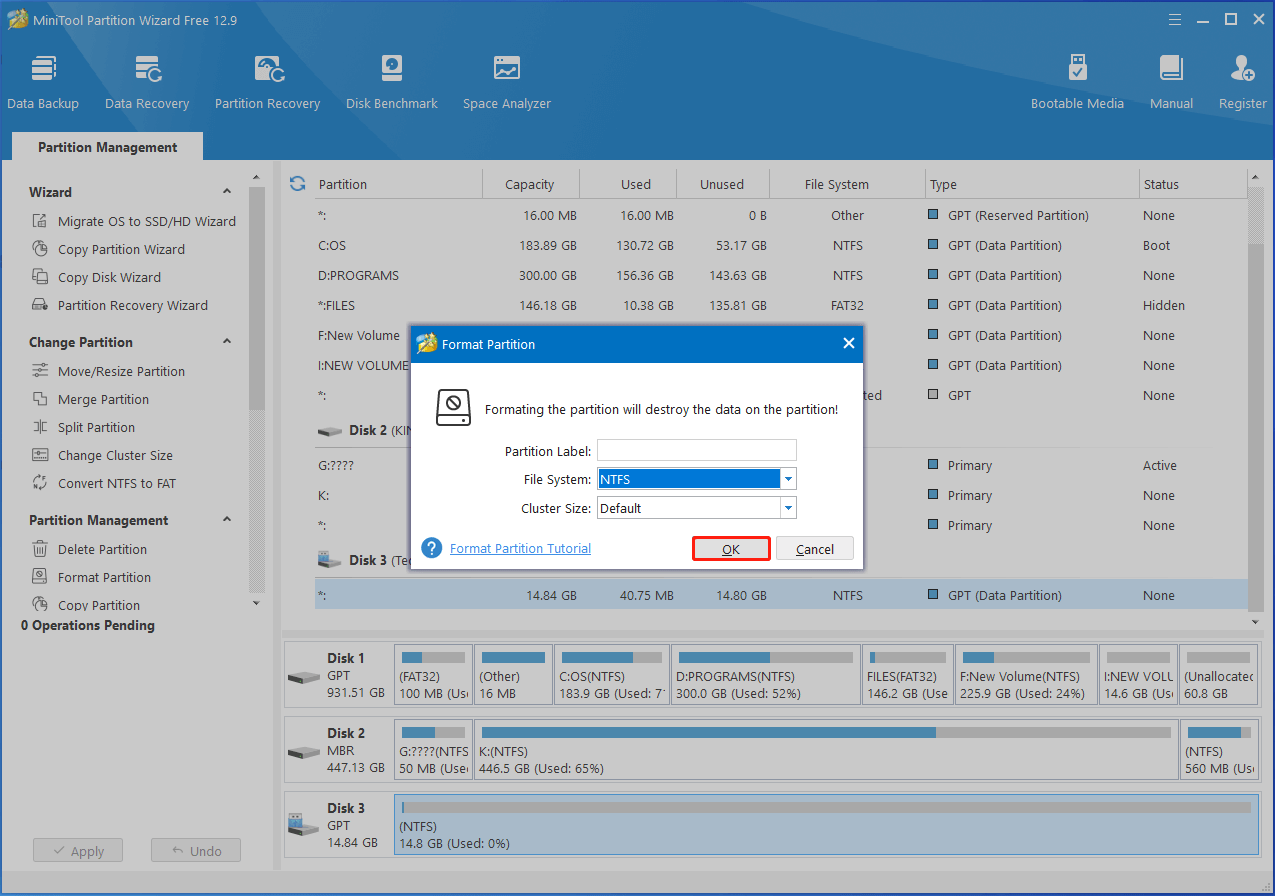
Step 3: Tap on Apply > Yes to execute the pending operation.
Possibility of Recovering Data After Secure Erase and Quick Format
Is there a chance to recover the lost data caused by secure erase or quick format? Users who secure erase or quick format a disk by accident are eager to know the answer to the question, especially if the data is important for them.
Here, I will reveal the possibility of data recovery of quick format and secure erase respectively.
Can Data Be Recovered After Quick Format
Yes, data can be recovered after quick format, but it has some prerequisites. The requirements vary depending on the specific storage device. For SSDs, they should meet the following requirements.
- You have disabled TRIM before quick formatting the SSD.
- You should stop using SSD and disconnect the SSD after formatting it.
- The external SSD should be put inside a USB enclosure, preventing TRIM from reaching the drive.
For HDDs, USB drives, and SD cards, you should ensure that there’s no new data saved to them once they are formatted. Otherwise, it’s impossible to recover the lost data on them.
Effects of Quick Format on File System Structure and Metadata
Quick format clears file system structure. To be specific, it reinitializes the file system structure during the process. This involves creating the data structures and information needed for the OS to read, write, and manage files on the disk/partition.
For NTFS file systems, quick format creates the partition table, file allocation table (FAT), or master file table (MFT). It will rewrite the FAT/NTFS partition’s boot record or the superblock of Ext4 to mark the partition as empty.
The quick format process also removes the existing file system metadata such as the directory structure and file references. Fortunately, the actual data is not erased by quick format. It still remains on the device, offering you the chance to recover it.
As quick format only clears the file system structure and metadata, it is faster than full format and other data wiping methods. Besides, you are able to undo quick format if you format the disk accidently. It doesn’t mean that you can reverse the operation. Instead, it means you can get the lost data back with professional data recovery software.
Recover Lost Data with MiniTool Partition Wizard
If you quick format your disk accidently, use MiniTool Partition Wizard to recover the lost data. Its Data Recovery feature enables you to recover missing/lost data on storage devices like HDDs, SSDs, USB flash drives, SD cards, and so on.
With this software, you can recover file types like documents, archives, graphics & pictures, audio & videos, e-mails, databases, etc. It’s worth noting that it allows you to preview the recovered files, which helps you check if it’s the desired one quickly.
Get this software installed on your computer and then follow these steps to complete the data recovery process.
MiniTool Partition Wizard DemoClick to Download100%Clean & Safe
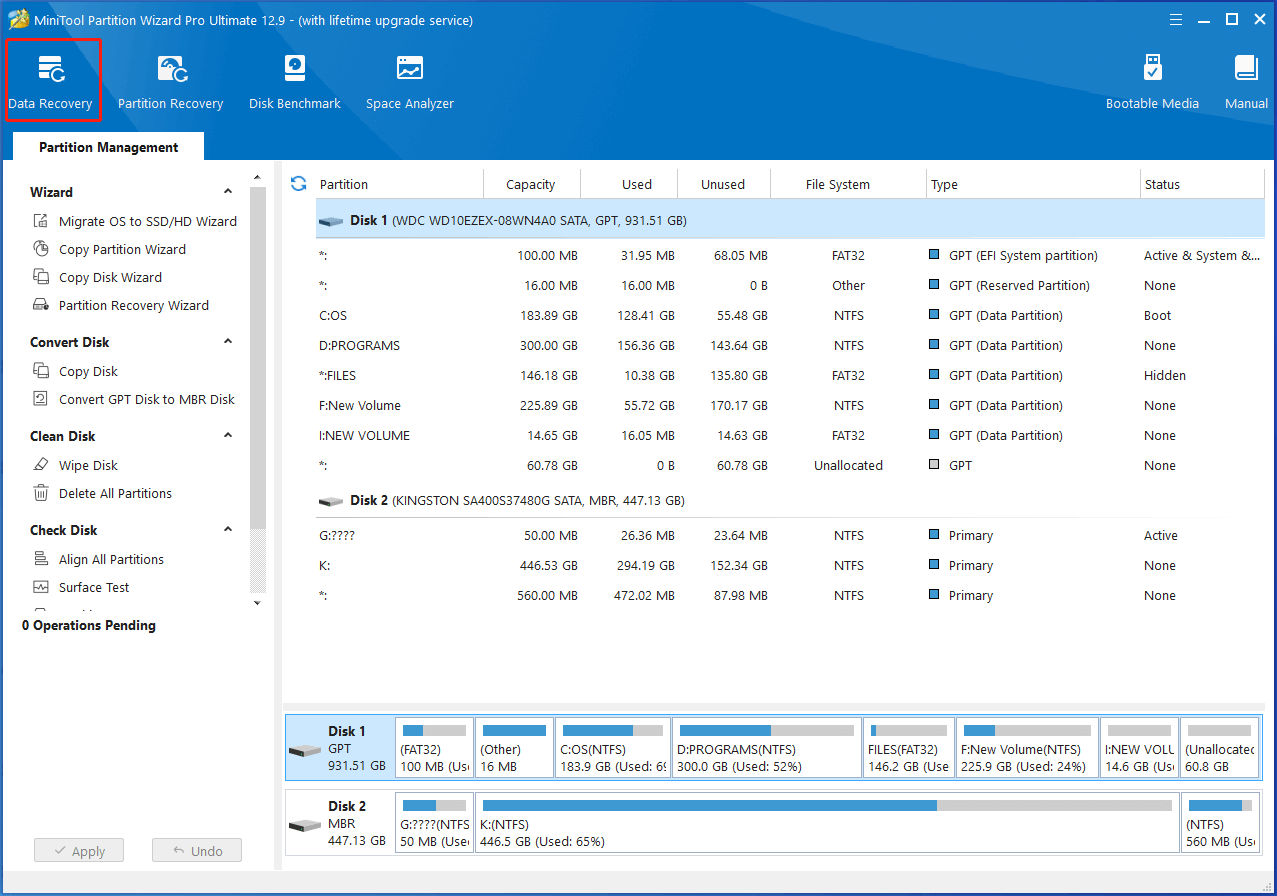
Step 1: Click on the Data Recovery feature on the tool bar.
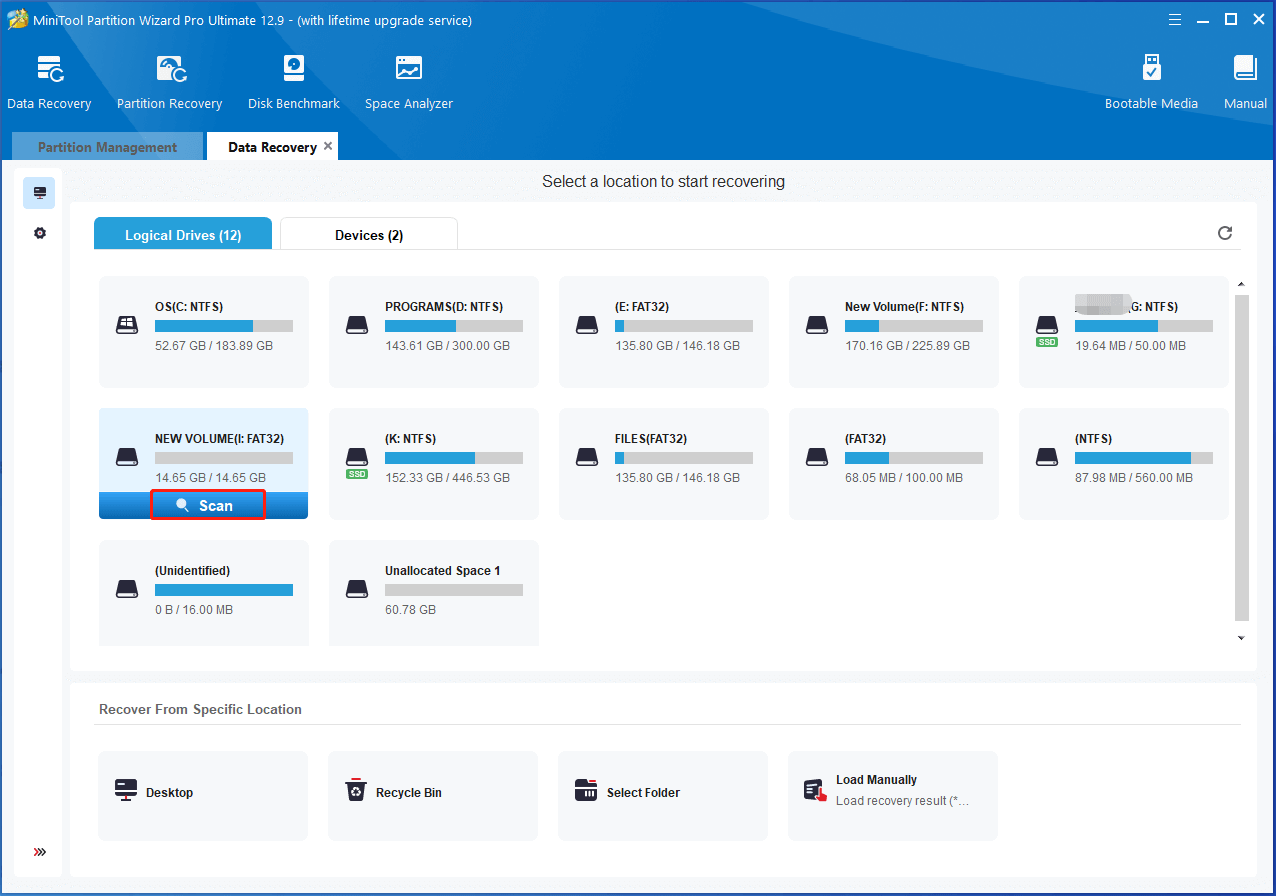
Step 2: In the Data Recovery wizard, hover over the target partition or location and then click the Scan button to start the scanning process.
Step 3: After the scanning process ends, the scan result will be displayed. If you have found all the desired data, you can stop or pause the process by clicking the Stop/Pause button.
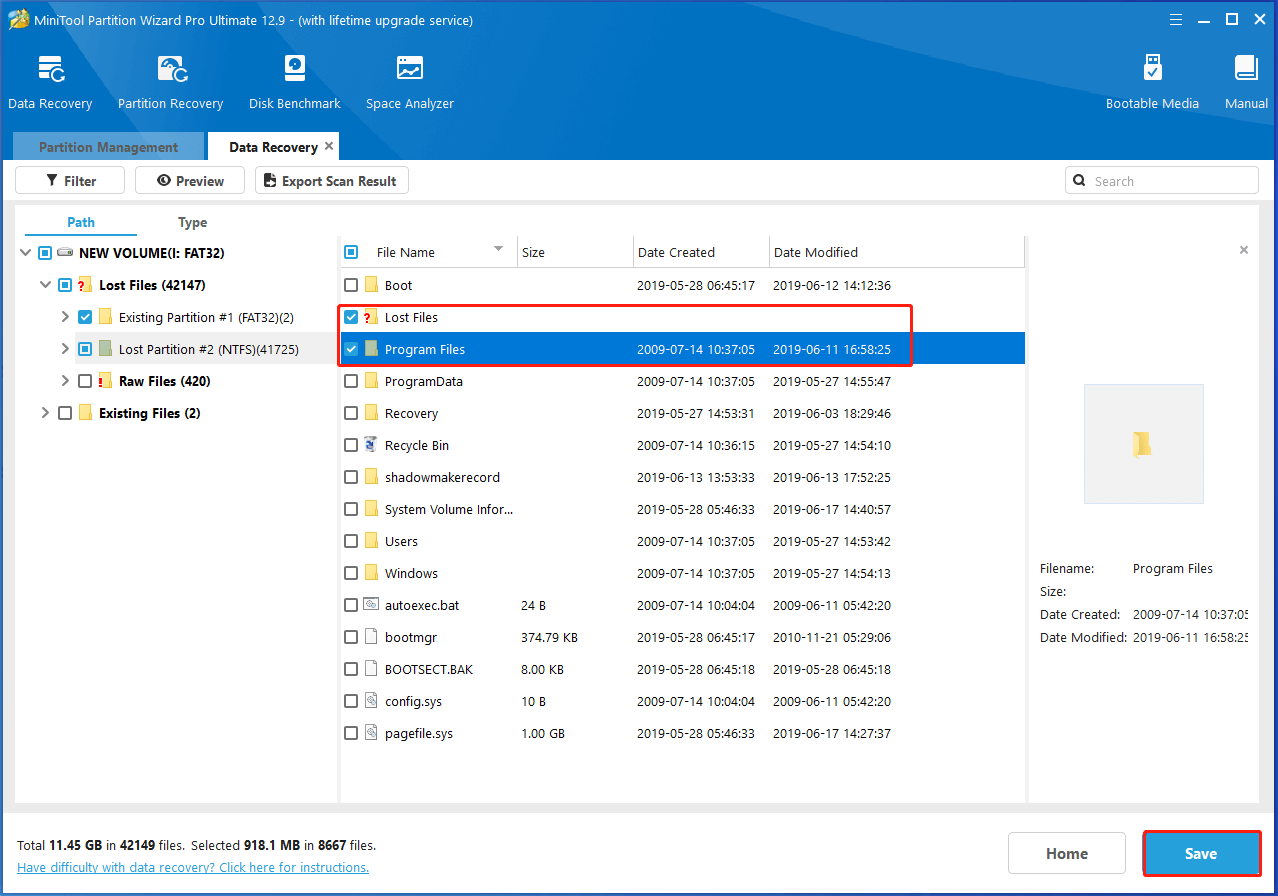
Step 4: Find the needed data by using options like Path, Type, Search, Filter, and Preview. Tick the checkbox in front of the desired data and click on the Save button.
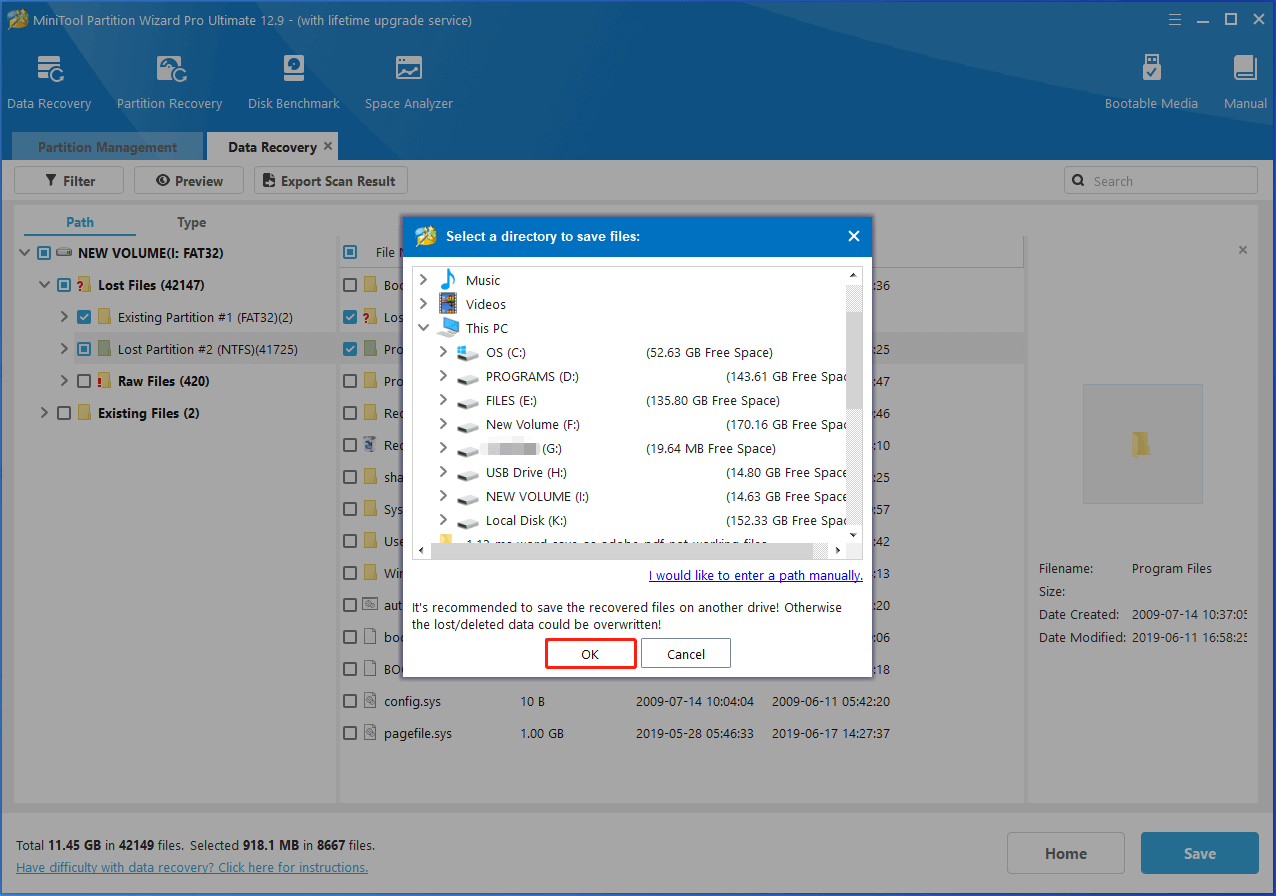
Step 5: In the prompted window, select a directory to save the recovered data and click OK to save changes.
Can Data Be Recovered After Secure Erase
The short answer to the question is “No”. During the secure erase process, specific patterns will overwrite the storage device multiple times. This makes the recovery almost impossible. Therefore, data on a secure erased disk can’t be recovered.
If you want to permanently delete files on a storage device, you can secure erase it via BIOS/UEFI, preinstalled tools, or third-party software. It helps you protect sensitive or confidential data.
Bottom Line
What is the difference between quick format and secure erase? This post introduces the two options respectively, including their definition, working principle, pros, and cons. Based on that, it further discusses the topic “secure erase vs quick format” from the aspect of data wiping effect, speed & performance, effects on the lifespan of storage devices, and security level.
Then it summarizes the application scenarios of secure erase and quick format, helping you use the correct way to handle the storage device in a specific situation. After that, it illustrates how to secure erase and quick format storage devices respectively using different methods.
Finally, it analyzes the chance of data recovery after secure erase and quick format. It helps you choose secure erase or quick format correctly. In a word, it is a comprehensive guide to the topic “secure erase vs quick format”.
Here comes the end of the post. If you encounter any difficulty while using MiniTool software, feel free to contact us. Simply send an email via [email protected]. We will get back to you as soon as possible.
User Comments :