In fact, WD My Cloud Home is not a “standard” type of NAS, but it still is a NAS as its plain storage and its network attached. If you don’t know how to backup PC to My Cloud Home, take a closer look at this guide on MiniTool and you will have a moment of enlightenment.
Overview of WD My Cloud Home NAS
My Cloud Home is a network-attached personal storage device from Western Digital. It serves as a central location for saving and backing up digital content from your mobile devices, Windows or Mac computer.
With enough space to keep all your favorite photos, videos and files in one place at home, you can organize it all your way and access it from anywhere with an internet connection. The drive is very compact in size and straightforward to set up so it is also described as a hybrid between an external hard drive and a NAS.
On the other hand, this device does not have the same advanced file sharing and networking features as compared to the majority of NAS.
When connecting WD My Could Home to your Windows system, it will be recognized as a network device. Thus, you can back up your Windows to My Cloud with Windows built-in tools – Backup and Restore (Windows 7) and File History.
Via 1: Backup and Restore (Windows 7)
Windows PC features an inbuilt backup program called Backup and Restore (Windows 7) that enables you to create an image of the entire Windows system, personal files, and applications and supports scheduled backups. They can be used for recovery in the event of data corruption, hard drive failure, or malware infection. Here’s how to backup PC to My Cloud Home with it:
Step 1. Press Windows and I keys to bring up the Settings app.
Step 2. Select Update & Security > File backup in the left sidebar > click on the Go to Backup and Restore (Windows 7) link.
Step 3. Tap on Set up backup on the top-right of the screen. Then wait for the Windows Backup to start.
Step 4. Hit Save on a network and then enter your IP address in Network Location. Click on the Browse button to find the WD My Cloud Home NAS.
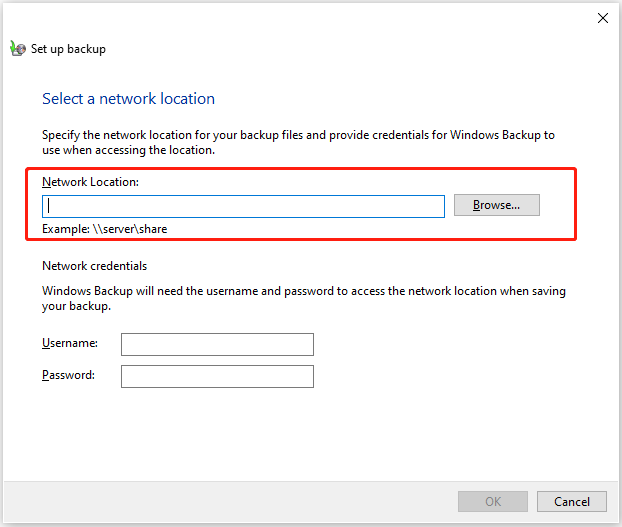
Step 5. After that, you need to type username and password to provide Windows Backup with the necessary access to My Cloud drive. Then click on OK to continue.
Step 6. Select the newly-added network location > hit Next > choose Let Windows choose (recommended) or Let me choose based on your needs > click on Next.
Step 7. It will prompt you to review your backup settings and you can choose Change schedule to perform WD My Cloud auto backup in Windows 10/11.
Step 8. Once done, click Save settings and run backup to start the backup PC to My Cloud Home.

Via 2: File History
Unlike Backup and Restore, File History is file-level backup software, allowing you to create automatic backups daily or at an interval of hours. It saves copies of your files so you can get them back if they’re lost or damaged. Follow the steps to backup PC to My Cloud Home:
Step 1. Type control panel in the Windows Search box and hit Enter.
Step 2. Go to All Control Panel Items > File History > click Select drive from the left side.
Step 3. In the new interface, click on Add network location.
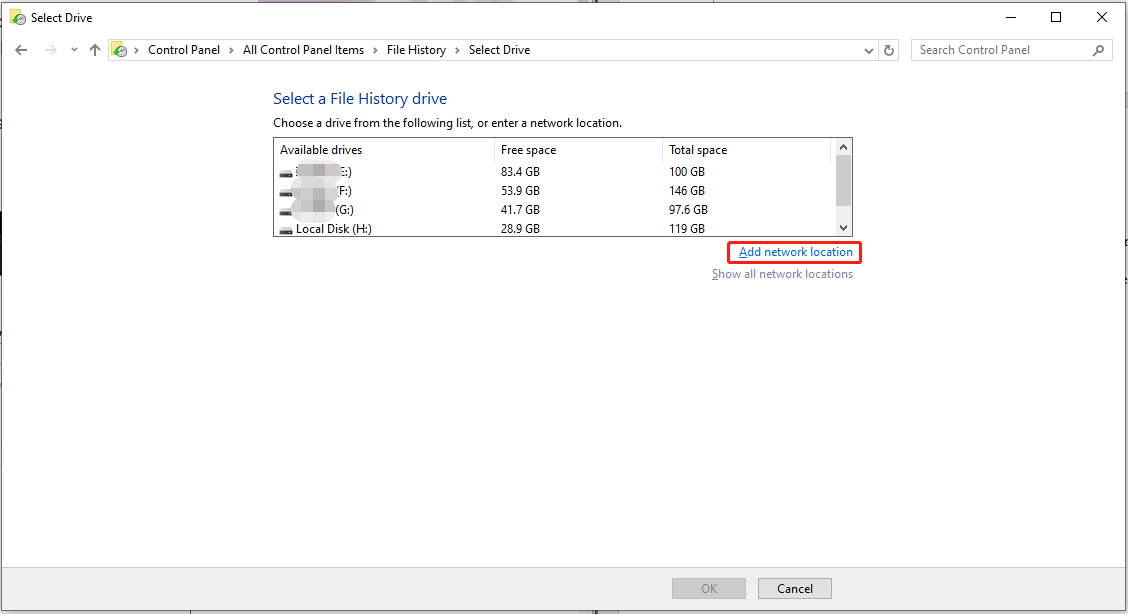
Look for your My Cloud drive (MYCLOUD-xxxxxx) or direct to enter the URL (\\MYCLOUD-xxxxxx) of the drive in the Network address bar if it doesn’t show up in Windows Network.
Step 4. Then select it as the backup destination > click on OK > hit Turn on.
Via 3: MiniTool ShadowMaker
As you can perceive, the two Windows built-in programs – Backup and Restore and Windows File History have their advantages and limitations. Compared to limited backup features, the all-in-one backup software – MiniTool ShadowMaker may be a better choice.
MiniTool ShadowMaker supports multiple backup sources, such as files, folders, system and partitions. You can place the backups on internal/external hard drives, USB drives, network drives and shared folders. In addition, it also features a one-click system backup solution and the Clone Disk function for moving Windows to another drive.
MiniTool ShadowMaker TrialClick to Download100%Clean & Safe
Step 1. Launch MiniTool ShadowMaker and click on Keep Trial.
Step 2. In the Backup tab, click SOURCE to choose what you want to back up.
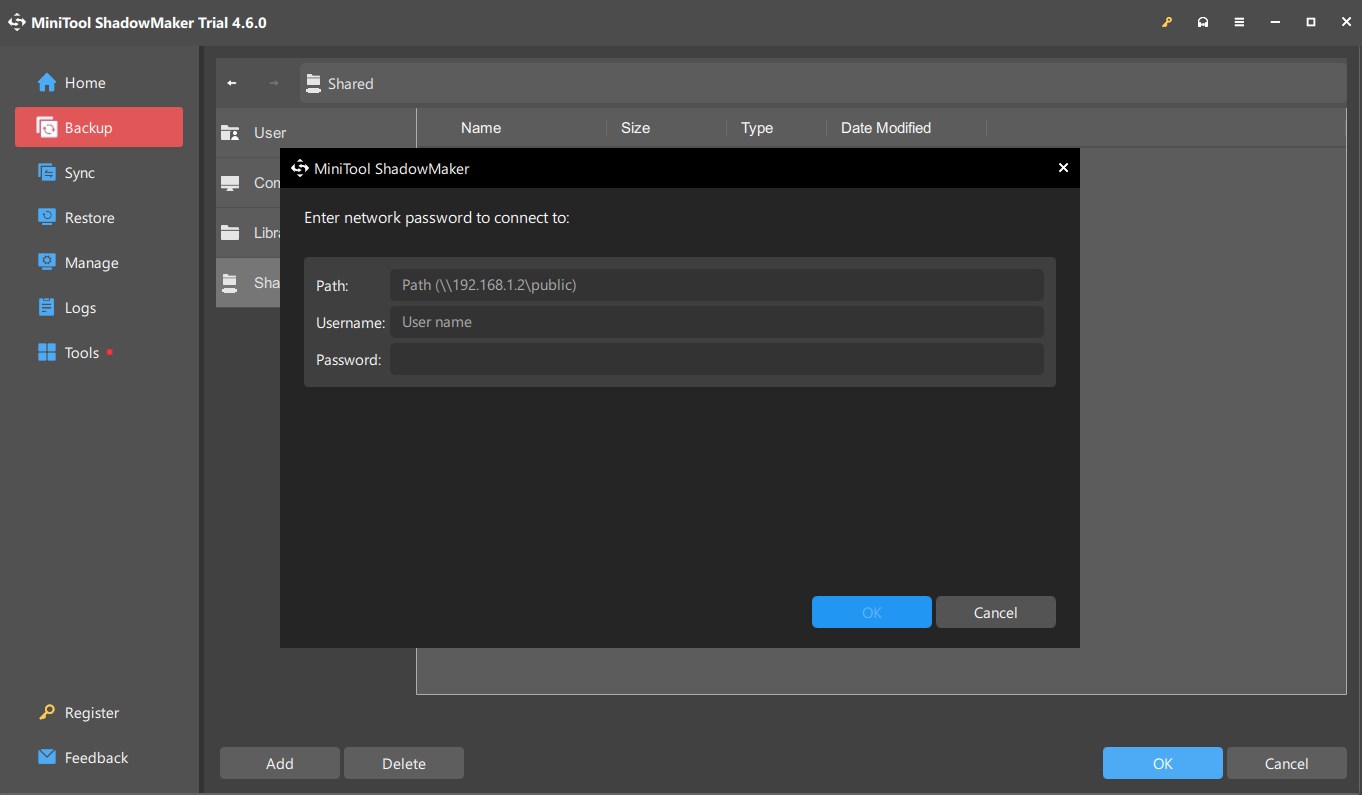
Step 3. Then go to the DESTINATION section > choose Shared > click Add in the lower left > enter your access credentials > click OK.
Step 4. Tap on Back Up Now to start the process at once.
Which One to Choose for WD My Cloud Drive Backup?
Although File History and Backup and Restore can meet your basic requirements without installations and payments, they still have some drawbacks. For instance, File History cannot back up the system, partition, and disk; Backup and Restore does not support encryption and thus lacks of security.
To backup PC to My Cloud Home, MiniTool ShadowMaker makes up for the defects and possesses the basic functions of these two programs. It can offer you more wonderful and convenient services and improve your operating experience of backup.
The End
In a word, we introduce three My Cloud Home backup software – Backup and Restore (Windows 7), File History, and MiniTool ShadowMaker – for you to backup PC to My Cloud Home. You can choose one as per your needs.
Please contact us via [email protected] if there are any mistakes in this guide or problems while using our product. We’ll reply to you as soon as possible.
User Comments :