
Windows 11 File History can stop working due to a disconnected backup drive, stopped services, or incorrect settings. Check the File History settings, restart the service, and clear the local configuration. If the issue persists, use an alternative backup tool such as MiniTool ShadowMaker.
Common Scenarios of File History Not Working on Windows 11
File History is a convenient utility that regularly backs up copies of your files in documents, music, pictures, videos, and desktop folders, and the OneDrive files available offline on your device.
However, File History may stop working for some reasons. The common situations include:
| Common Scenario | Possible Cause | Recommend Fix |
| File History is turned on, but doesn’t back up files | Service or configuration issue | Check File History settings and service |
| File History asks you to reconnect a drive | Backup drive is disconnected or unavailable | Reconnect or reselect the drive |
| Only certain files aren’t backed up | Files encrypted with Encrypting File System | Decrypt the files |
| File History stopped working after an update | Windows or driver issues | Uninstall the problematic update |
How to Fix Windows 11 File History Not Working
Fix 1. Check File History Settings
Ensure File History is configured correctly for file backup first if it doesn’t work.
Follow these steps:
Step 1: Type Control Panel in Windows search and open it.
Step 2: Go to find and select System and Security > File History.
Step 3: Verify that you have selected the correct backup drive or network location. You can also click Select drive to choose another storage drive.
Step 4: Click on Turn off, and later click on Turn on on the right side. This step may solve some glitches or conflicts.
Fix 2. Restart File History Service
Step 1: Open the Services app using the same steps as the previous method.
Step 2: Navigate to File History Service, right-click it, and choose Restart from the dropdown menu.
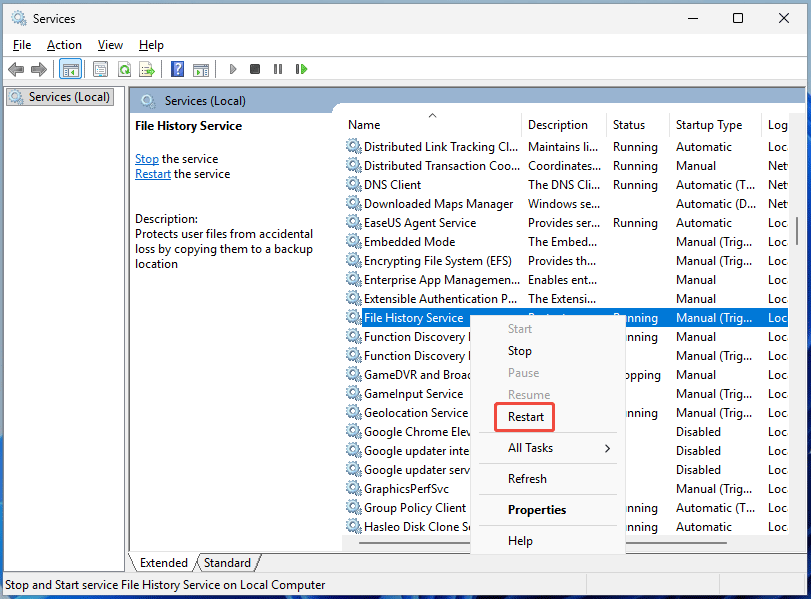
Step 3: Double-click the service to open its Properties window and set its Startup type to Manual (Trigger Start) or Automatic.
Step 4: Apply the change and see if your File History can work properly.
If that does not resolve the problem, try the next solution.
Fix 3. Reset Local Configuration Cache
A corrupted File History configuration cache may prevent backups from working properly. Resetting the cache can help resolve the issue.
Step 1: Open Services and stop File History Service.
Step 2: Go to C:\Users\YourUserName\AppData\Local\Microsoft\Windows\FileHistory in File Explorer.
Step 3: Delete all the files and folders inside that directory.
Step 4: Re-enable the service and turn on File History in the Control Panel to check whether it works.
Fix 4. Decrypt the Encrypted Files or Folders
You may receive the error “File History has found files that are encrypted with Encrypting File System” when backing up certain files. Try encrypting these files.
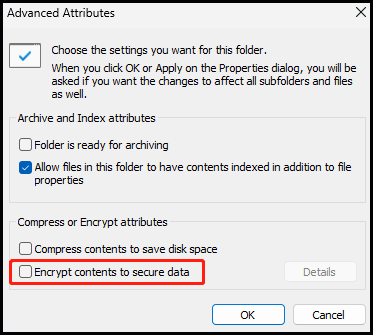
Step 1: Find and right-click on your encrypted file or folder, then select Properties > General > Advanced.
Step 2: Uncheck Encrypt contents to secure data and click OK to confirm.
Fix 5: Uninstall the Problematic Update or Update Windows
A recent Windows update may cause File History to stop working. In this case, uninstall the problematic update and check if the issue is resolved.
Step 1: Navigate to Settings > Windows Update.
Step 2: Click Update history > Uninstall updates.
Step 3: Locate the recent update and click Uninstall.
Try backing up your files with File History.
If it still doesn’t work, go to Windows Update, check for and install the latest Windows update that may offer bug fixes.
Alternative Backup Tool: MiniTool ShadowMaker
If File History continues to fail, you can use MiniTool ShadowMaker as an alternative backup solution.
It offers comprehensive data protection for your PC. Designed for Windows 11/10, it allows you to create files, folders, disks, partitions, and system backups, to USB flash drives, external hard drives, and network locations.
Additionally, it enables you to customize a variety of advanced settings, like setting an automatic backup or changing backup scheme.
Now, we will show you how to create a file backup using it.
Step 1: Download and install MiniTool ShadowMaker Trial. Then launch it and click on Keep Trial.
MiniTool ShadowMaker TrialClick to Download100%Clean & Safe
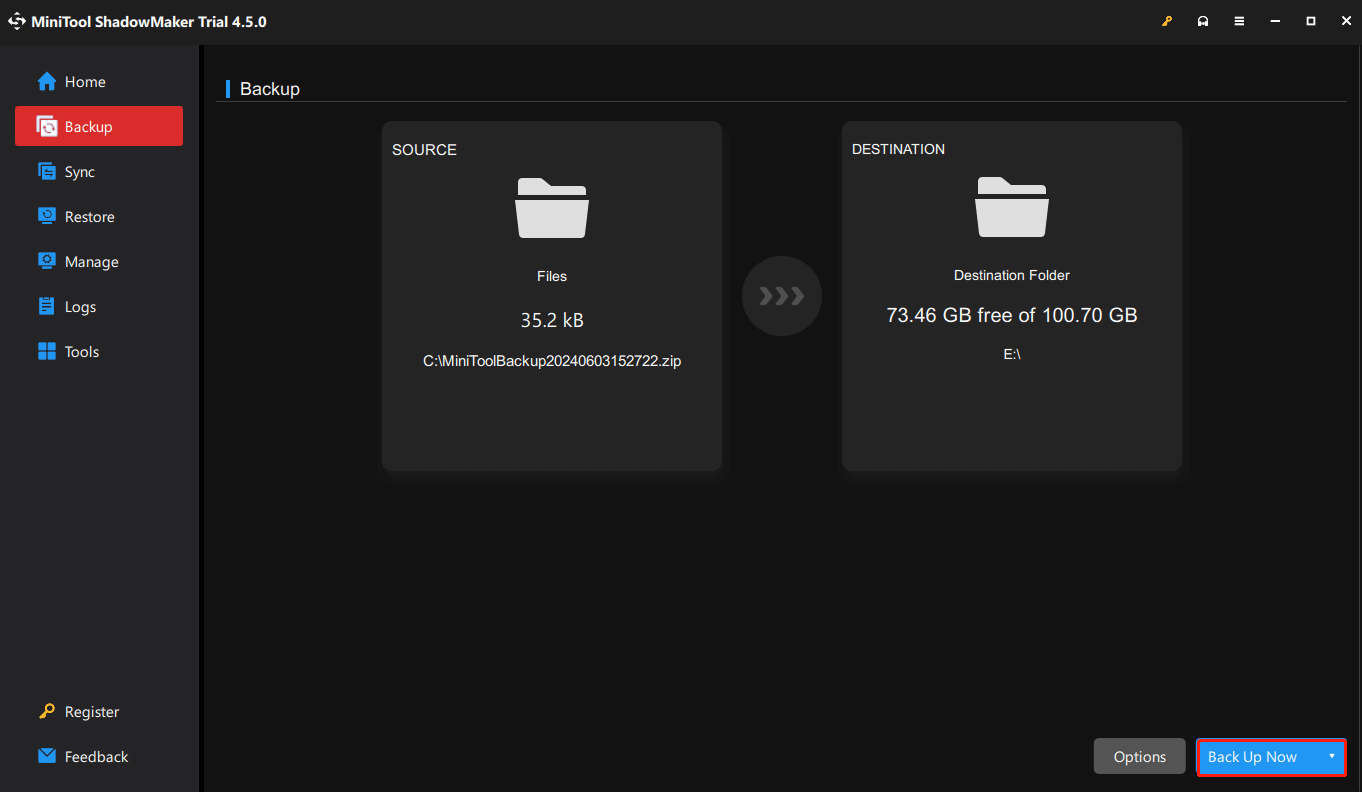
Step 2: Under the Backup section, click on SOURCE > Folders and Files to select the desired files or folders.
Step 3: Go to DESTINATION, choose the target path where you have the backup image saved, and click OK to continue.
Step 4: Click on Back Up Now to start the backup task. You can go to Manage to check the backup process.
Check the following table to know the key differences between these two backup tools.
| Feature | File History | MiniTool ShadowMaker |
| File/folder backup | Yes | Yes |
| System/disk/partition backup | No | Yes |
| Automatic backup | Yes | Yes |
Bottom Line
To resolve Windows 11 File History not working, pick one suitable solution above based on your situation. Additionally, we also recommend you use MiniTool ShadowMaker as an alternative solution.
If you have any issues with our software, feel free to contact us via [email protected]. We will reply to you as soon as possible.
Windows 11 File History Not Working FAQ
About The Author

Position: Columnist
Vera has been working at the MiniTool Team for over 10 years as a technical editor and content writer. She mainly focuses on disk and partition management, data recovery, Windows backup and restore, and PC troubleshooting. Through in-depth software testing and hands-on experience, she has helped users solve a wide range of computer problems and better protect their data on Windows devices.
User Comments :