
DISM error 0x800f081f means Windows can’t find the source files to repair the system image. This MiniTool guide explains the main causes and offers step-by-step fixes, including using install.wim, Component Cleanup, Windows Update Troubleshooter, and an in-place upgrade.
Quick Answer
DISM error 0x800f081f usually occurs because Windows cannot locate the repair source files. In most cases, you can fix it by cleaning the component store, specifying a valid install.wim file, repairing Windows Update, or performing an in-place upgrade.
Applies to
- Windows 11
- Windows 10
- Windows Server 2019
- Windows Server 2022
What Is DISM Error 0x800f081f
Deployment Image Servicing and Management (DISM) is a powerful tool for repairing corrupted Windows system images. Typically used alongside System File Checker (SFC), it scans and restores your PC to a healthy working state.
However, like many built-in Windows utilities, DISM can sometimes encounter errors. A common issue reported by users is DISM Error 0x800f081f, which frequently occurs when running the DISM /Online /Cleanup-Image /RestoreHealth command.
When this happens, Windows usually displays one of the following error messages:
- Error: 0x800f081f. The source files could not be found.
- Windows couldn’t find the required files to complete the requested changes. Make sure you’re connected to Internet, and try again. Error: 0x800f081f.
This error indicates that DISM cannot locate the source files needed to repair the online Windows image in its default location. Because Error 0x800f081f can trigger additional system issues and disrupt other essential operations, it should be resolved as soon as it appears.
Why Does DISM Error 0x800f081f Happen
Common causes include:
- Missing repair source files
- Corrupted Windows component store
- Windows Update issues
- Incorrect install.wim or install.esd source
Suggestion: Back Up Your PC First
Before making system repairs, it’s recommended to create a system backup. If unexpected issues occur during troubleshooting, you can quickly restore Windows to a working state. To do that, it is highly recommended MiniTool ShadowMaker.
This free tool is compatible with almost all Windows systems and allows you to create a file, folder, partition, disk, or system backup on your Windows PC. What’s more, it is very popular among the Windows community because of its one-click system backup solution. Without further ado, let’s see how it works!
Step 1. Download, install and launch this program.
MiniTool ShadowMaker TrialClick to Download100%Clean & Safe
Step 2. After launching it, hit Keep Trial to get a 30-day free trial and then go to the Backup page.
Step 3. On this page and you can see the system-required partitions are selected by default in SOURCE and you only need to choose a storage path for your backup in DESTINATION.
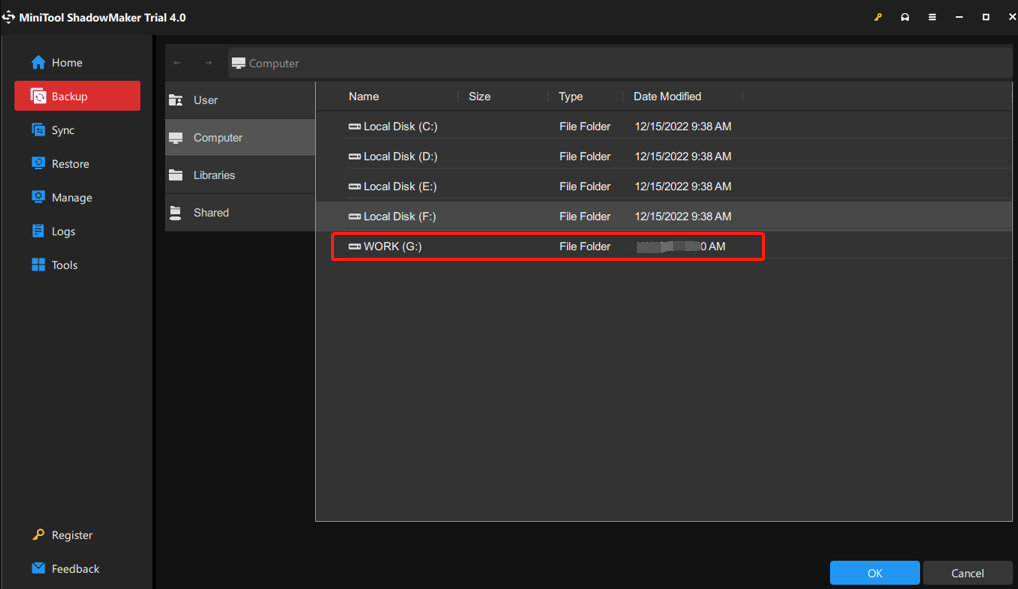
Here, we recommend you to back up your system to a USB flash drive or an external drive.
Step 4. After making your decision, you can either hit Back Up Now to start the backup process or delay the backup task by hitting Back Up Later.
Then, go to Tools > Media Builder > WinPE-based media with MiniTool plug-in > USB Flash Disk to create a bootable drive. If your computer encounters some other radical changes such as black screen, Blue Screen of Death, or system crashes in the future, you can boot your computer from this USB flash drive and perform a system recovery with the system image that you backed up.
As for backing up files, see this tutorial to get detailed instructions - How to Backup Files on Windows 10? Try These Top 4 Ways.
How to Fix DISM Error 0x800f081f
Fix 1: Perform a Component Cleanup
If the Windows component store contains corrupted or outdated files, running StartComponentCleanup can remove unnecessary components and allow DISM to repair the system image successfully.
Step 1. Type cmd in the search bar to locate Command Prompt and right-click on it to choose Run as administrator.
Step 2. In the command window, run the following commands one by one and don’t forget to hit Enter after each command.
dism.exe /online /Cleanup-Image /StartComponentCleanup
sfc /scannow
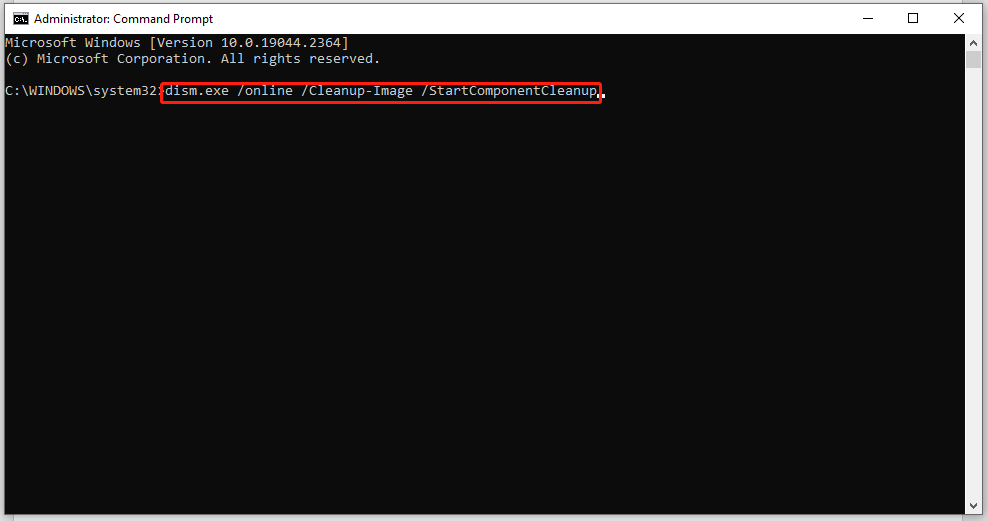
Step 3. When the two commands are complete, run Dism /Online /Cleanup-Image /RestoreHealth again to see if it works properly.
Fix 2: Use a Local Install.wim as the Source
Usually, the DISM /Online /Cleanup-Image /RestoreHealth command is used to fix problems by searching in Windows Update or WUSU to replace the corrupted files. If DISM cannot repair a file required by the Windows image, it will result in DISM error 0x800f081f the source files could not be found.
One of the most effective fixes is to provide DISM with a valid repair source. Mount a Windows ISO that matches your installed Windows edition and build, then use the install.wim (or install.esd) file as the repair source.
Move 1: Download and mount the ISO file
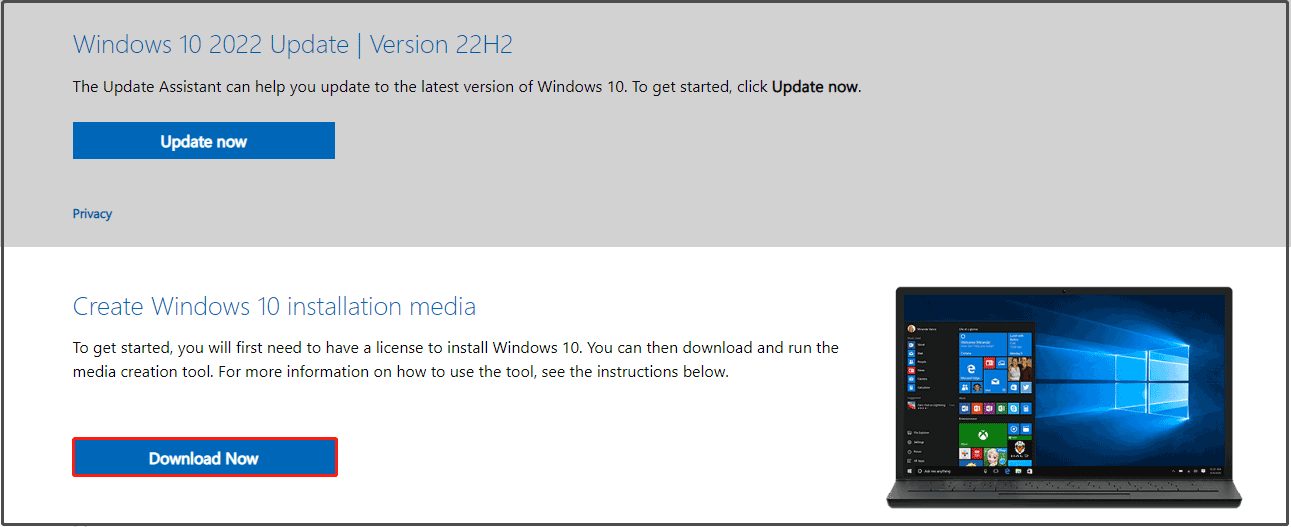
Step 1. Go to the Microsoft Software Download website and hit Download Now under Create Windows 10 installation media.
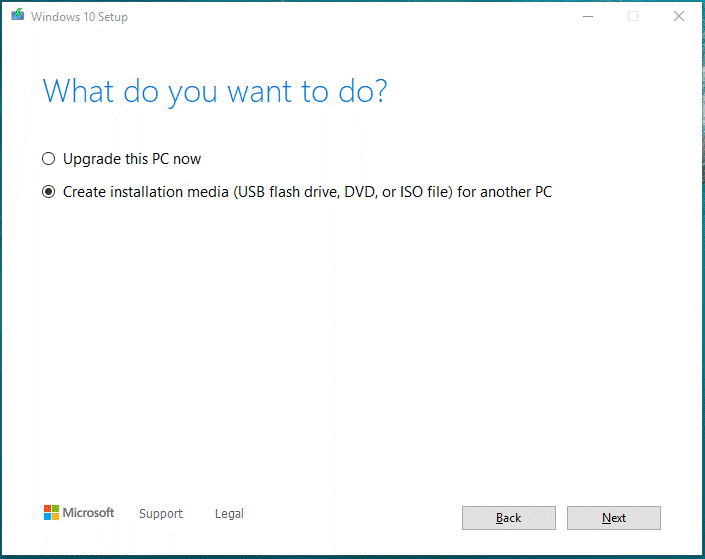
Step 2. Hit Accept to accept the license terms > tick Create installation media (USB flash drive, DVD, or ISO file) for another PC > hit Next > select Language, Architecture, and Edition > hit Next > tick ISO file > hit Next > choose a download location for Windows 10 ISO file > hit Save.
Step 3. Press Win + E to evoke File Explorer and then locate the Windows 10 ISO image file.
Step 4. Right-click on the ISO file and select Mount in the drop-down menu.
Step 5. After the mounting process is finished, go to This PC and you can see a virtual drive in the right-hand pane.
Move 2: Extract the install.wim file from the install.esd file
Step 1. From the mounted Windows ISO file, right-click on the install.esd file from the source folder to copy it to the root folder of drive C:.
Step 2. Launch Command Prompt as an administrator.
Step 3. Type cd\ to go to the root folder of drive C:.
Step 4. Type the following command and hit Enter to find which images are in the install.esd file.
dism /Get-WimInfo /WimFile:install.esd
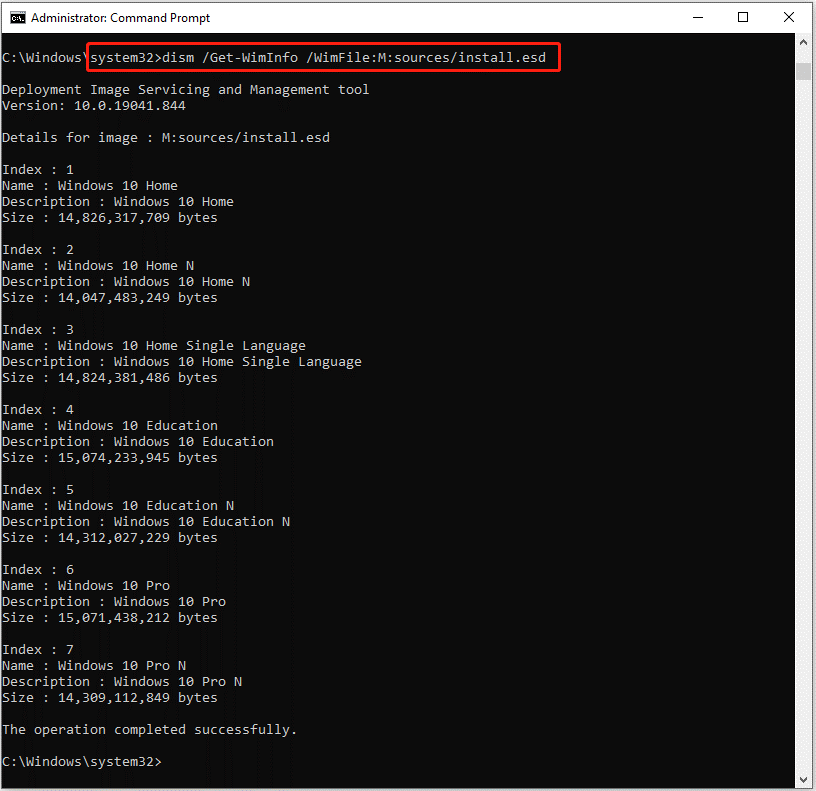
Note down the index number according to the Windows 10 installed version.
Step 5. Run the following command to extract the install.wim file according to your Windows version. Don’t forget to replace the IndexNumber with the corresponding index number you noted down just now.
dism /export-image /SourceImageFile:install.esd /SourceIndex:IndexNumber /DestinationImageFile:install.wim /Compress:max /CheckIntegrity
Step 6. Now, you can find the exported install.win file on the drive C:.
What if Windows Media Creation Tool is not working? Take it easy! Every problem has a fix. Follow this guide - Best Fixes for Windows 10/11 Media Creation Tool Not Working, and you will work it out.
Move 3: Run DISM Tools
Step 1. Launch Command Prompt as an administrator.
Step 2. Run the two commands below and hit Enter.
DISM /Online /Cleanup-Image /StartComponentCleanup
DISM /Online /Cleanup-Image /AnalyzeComponentStore.
Step 3. Run the following command to specify the C:\install.wim as the source of the known good files.
DISM /Online /Cleanup-Image /RestoreHealth /Source:WIM:c:\install.wim:1 /LimitAccess
Step 4. When this process is done, type sfc /scannow and hit Enter.
Fix 3: Run Windows Update Troubleshooter
As is known to all, Microsoft Windows Update Center triggers problems regularly and these problems can prevent you from implementing upgrades or improvements by downloading or installing new updates. In this case, Microsoft offers you a troubleshooting tool called Windows Update troubleshooter which can fix most errors including DISM Online Cleanup Image RestoreHealth error 0x800f081f.
Step 1. Press Win + I to open Windows Settings.
Step 2. In the settings menu, scroll down to find Update & Security and click on it.
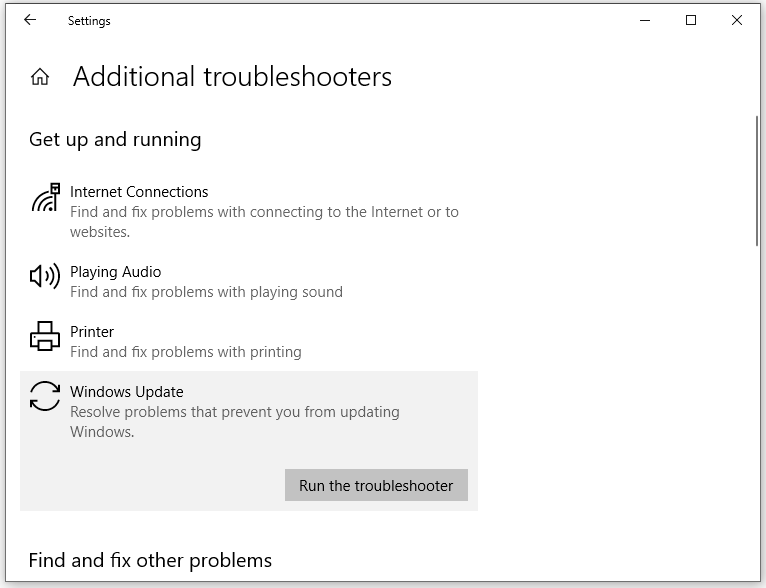
Step 3. Under the Troubleshoot tab, hit Additional troubleshooters.
Step 4. Under Get up and running, hit Windows Update and then press Run the troubleshooter. Once the troubleshooting process is done, it will show a message to inform you of the result.
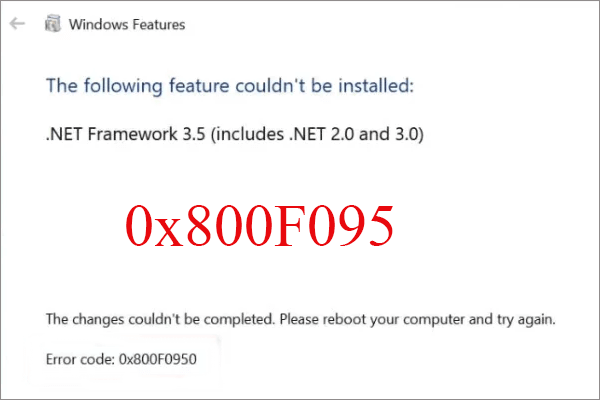
Fix 4: Reinstall Microsoft .NET Framework 3.5
Since DISM error 0x800f081f is related to Microsoft .NET Framework 3.5, it is a good option to reinstall it.
Step 1. Click Start and go to Control Panel.
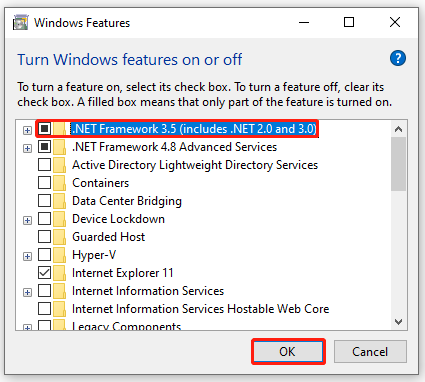
Step 2. Hit Programs and Features > Turn Windows features on or off.
Step 3. Check .NET Framework 3.5 (includes .NET 2.0 and 3.0) and hit OK.
Fix 5: Perform an In-place Upgrade
The last method is performing an in-place upgrade. This process will reinstall the entire Windows core with the latest image from Microsoft. It may take a long time, please wait patiently.
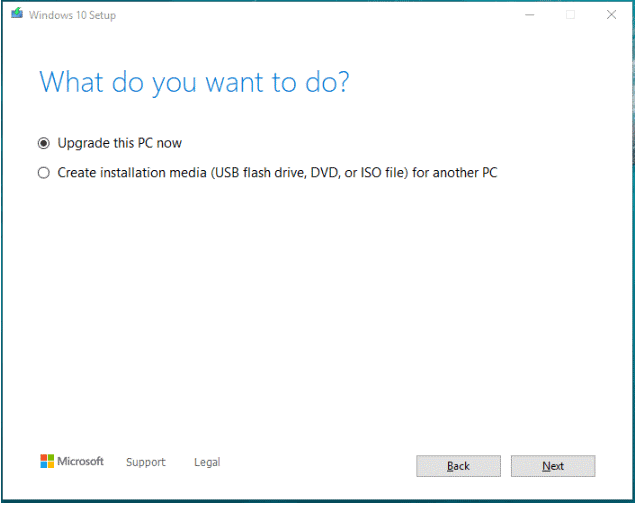
Step 1. Download & Install Windows 10 Media Creation Tool on your computer and run it with administrative rights.
Step 2. Accept the license terms and tick Upgrade this PC now.
Step 3. Then, follow the prompts on the screen to complete the upgrade. After the completion, run Dism /Online /Cleanup-Image /RestoreHealth to see if DISM error 0x800f081f is gone.
If you fail to run the DISM /Online /Cleanup-Image /RestoreHealth command without error code 0x800f081f, this guide might provide you with some feasible solutions - Best Fixes: DISM /online /cleanup-image /restorehealth Is Stuck.
Command Cheat Sheet
| Command | Purpose |
| sfc /scannow | Repair system files |
| DISM /ScanHealth | Detect corruption |
| DISM /RestoreHealth | Repair Windows image |
| StartComponentCleanup | Clean component store |
Final Words
In most cases, DISM error 0x800f081f can be resolved by cleaning the component store or providing a valid install.wim repair source.
If the issue persists after trying all the methods above, performing an in-place upgrade is often the most reliable way to restore Windows without losing personal files.
If you encounter issues while using MiniTool ShadowMaker to back up your PC, feel free to send an email to us via [email protected].
DISM Error 0x800f081f FAQ
About The Author

Position: Columnist
Charlotte is a technology columnist with a strong focus on the Windows operating system, specializing in disk management, backup, and data recovery. She is passionate about analyzing computer errors, identifying root causes, and delivering practical solutions. In her free time, she stays updated on the latest developments in computer systems and hardware while continuously learning new technologies to broaden her expertise. Her writing style is clear and easy to understand, making complex technical topics accessible even to users with limited computer knowledge.
User Comments :