About Msvcr110.dll and Msvcr110.dll Is Missing
What is msvcr110.dll? It is a Windows Dynamic Link Library file, which is needed by some certain programs. The msvcr110.dll file is usually located in the C:\Windows\System32 folder and it is a necessary file for the Visual C++ on your computer.
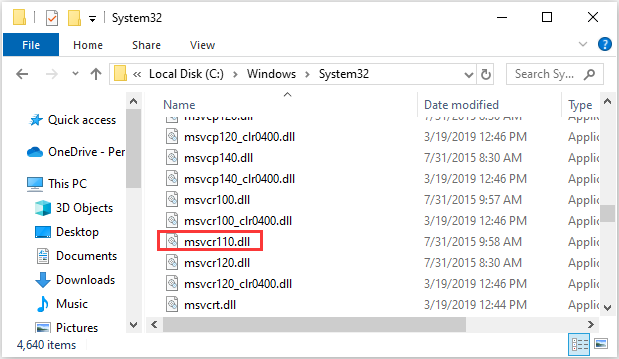
Sometimes, when msvcr110.dll is missing, then you will receive some error messages and some of them are listed below:
- The program can’t start because msvcr110.dll is missing from your computer.
- The file msvcr110.dll is missing.
- This application failed to start because msvcr110.dll was not found. Re-installing the application may fix this problem.
- Cannot start {APPLICATION}. A required component is missing: msvcr110.dll. Please install {APPLICATION} again.
So when will the msvcr110.dll missing error message appear? The error message may occur when you use or install certain applications, when you turn on or turn off your Windows, or even when you install Windows.
Then you may wonder how to fix the msvcr110.dll missing error? All methods are listed below. While all the screenshots were taken on Windows 10, most of these methods are applicable to different versions of the Windows system.
Before you try the methods below, you should log on to your computer as an administrator and confirm that the Internet is stable. And if you cannot access Windows normally, then you should boot your computer into Safe Mode.
Method 1: Check the Recycle Bin
If you try to delete some unnecessary files on your computer, but you delete the msvcr110.dll file by accident, then you should check the Recycle Bin.
If the msvcr110.dll file is in the Recycle Bin, then you can just right-click it to choose Restore. Then relaunch the application that causes the error to see whether the error is fixed.
But if the files in the Recycle Bin have been cleaned up by Storage Sense, or you have emptied all the contents yourself, then you should read this post – To Complete Recycle Bin Recovery, This Is What You Should Know.
Method 2: Reinstall the Program That Uses the Msvcr110.dll File
When you try to use or install certain programs, then you may meet the error message saying that the file msvcr110.dll is missing. Therefore, you should try to reinstall the program to solve the problem and then start the program again to check if the error still persists.
Method 3: Copy the Msvcr110.dll File in the System32 Folder
If neither of the methods has solved the problem, you can copy the msvcr110.dll file in the system32 folder from another computer that runs the same operating system as yours and then paste it to the same path (C:\Windows\System32) on your computer.
And you should notice that the versions (Windows 10/8/7) and the architectures (32-bit/64-bit) of both operating systems must be the same. If you don’t know whether your computer is 32-bit or 64-bit, then you should read this post – Is My Computer 64 Bit or 32 Bit? Try the 5 Ways to Judge out.
After you have pasted the msvcr110.dll file into your computer, try to relaunch the program and the msvcr110.dll missing Windows 10 error should be fixed.
Method 4: Download the Visual C++ Redistributable for Visual Studio 2012 Update 4
You can also try to download the Visual C++ Redistributable for Visual Studio 2012 Update 4 package and install it to get rid of the “msvcr110.dll was not found Windows 10” error. By doing this, the msvcr110.dll file will be replaced or restored with the latest copy provided by Microsoft.
Method 5: Run a Full Virus/Malware Scan
You can meet the msvcr110.dll not found error because of malware or viruses. As you know, malware and viruses could trigger a large number of problems, so you can run a full virus/malware scan on your computer to fix the error.
You can use any third-party antivirus software to do this, and this part takes Windows Defender as an example. Here is a quick guide:
Step 1: Click Start and then click Settings. Then choose Update & Security.
Step 2: Go to the Windows Security tab and then choose Virus & threat protection under Protection areas.
Step 3: Click Scan options and then check Full scan. Click Scan now.
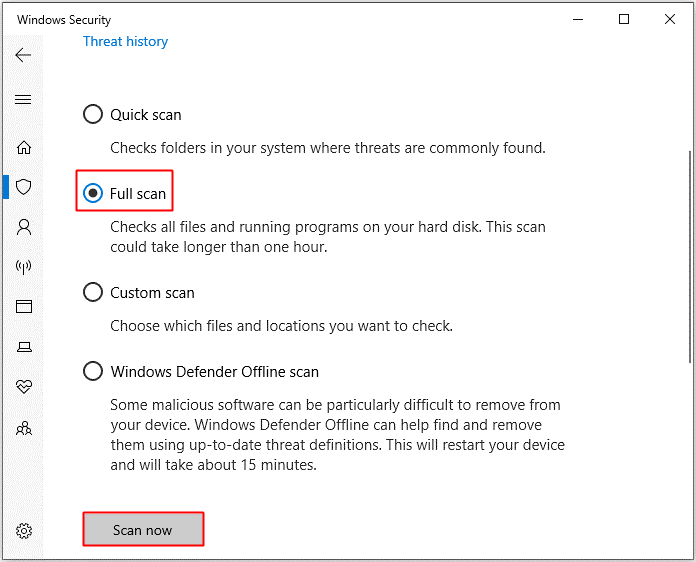
Step 4: Wait for the process to complete, then you can know whether there is any virus or malware. If there is, use Windows Defender to fix it.
Method 6: Update Windows
If there is any available update for your system, then you should update your Windows. And if you don’t know whether there is any update, then follow the instructions below to do that:
Step 1: Open Settings and then select Update & Security.
Step 2: Choose Windows Update and then click Check for updates on the right panel.
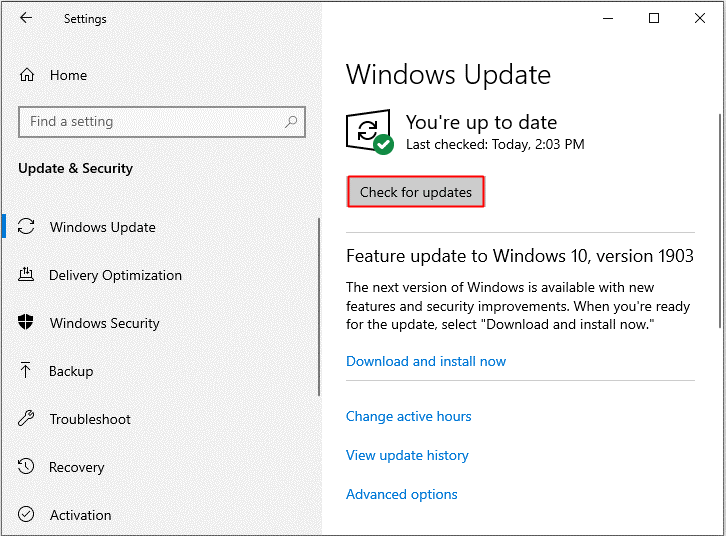
Step 3: If there are available updates, your system will download them automatically. After downloading the updates successfully, reboot your PC to perform the installation process. Then check if the error appears again.
Method 7: Test Your Memory
If there is something wrong with your memory, then the file msvcr110.dll could be missing. Thus, you are supposed to test your computer’s memory. There are two ways you can take to test your memory:
Physically Check
Step 1: Plug in and out your RAM to make sure that you have installed it properly and firmly.
Step 2: Make sure that there is no dust in your RAM and the RAM slot.
Step 3: Reboot your computer to check if the error still appears.
Run Windows Memory Diagnostics Tool
Step 1: Press the Win + R keys at the same time to open the Run box.
Step 2: Enter mdsched.exe and then click OK to open the Windows Memory Diagnostic.
Step 3: Click Restart now and check for problems (recommended).
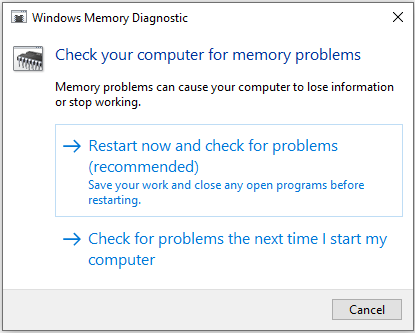
Step 4: Wait for the process to finish, then it will show if there is something wrong with your RAM. If there is, replace the RAM and then restart your computer to check whether the error is gone.
Method 8: Test Your Hard Drive
You should also test your hard drive when the error message “msvcr110.dll is missing” appears. Here is the tutorial:
Step 1: Type cmd in the Search bar and then right-click Command Prompt to choose Run as administrator.
Step 2: Press Enter after typing chkdsk C: /f /r. (C is the letter of the drive where you save your operating system.)
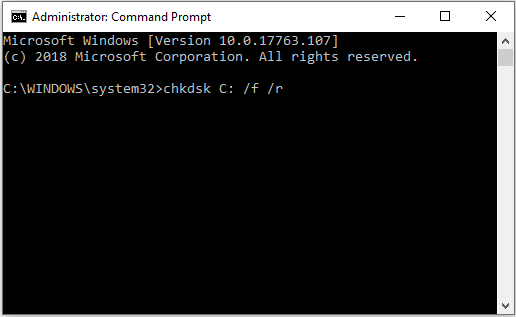
Step 3: Wait for the process to complete, then reboot your PC to see if the error happens again.
Method 9: Run a Startup Repair
Running a startup repair could help you fix the problem that the file msvcr110.dll is missing. Here is a quick guide:
Step 1: Open Settings and then choose Update & Security. Go to the Recovery tab and then click Restart now under the Advanced startup section.
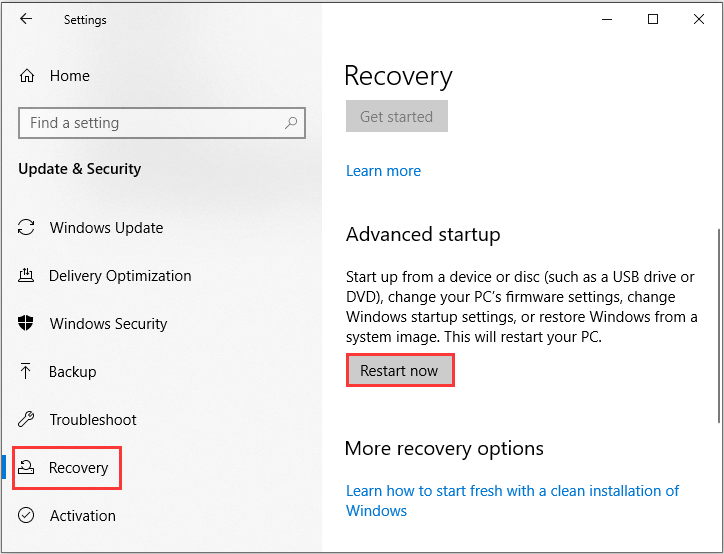
Step 2: Click Troubleshoot and then click Advanced options.
Step 3: On the Advanced options screen, click Automatic Repair or Start-up Repair.
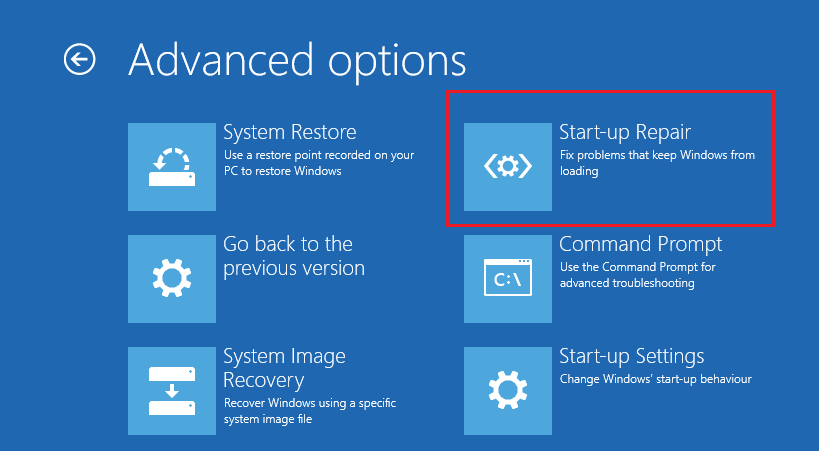
Step 4: Wait for the process to finish and then restart your computer to check if the error is fixed.
Method 10: Perform System Restore
If you made a change to an important file or configuration recently, then the file msvcr110.dll may disappear. Therefore, if you have created a system restore point in advance, then you can run System Restore to undo the system changes.
If you don’t know how to do this, then you can read this post – Make The Most Of System Restore In Windows 10: Ultimate Guide.
Method 11: Run a Clean Installation of Windows
The last method you can try to fix the problem that msvcr110.dll is missing is to run a clean installation of Windows. Obviously, you will lose all the files, folders and settings related to your system on your computer if you try this method. So backing up your important data is necessary before trying this method.
Back up Your Important Files
Which backup tool should I try? It is highly recommended to use MiniTool ShadowMaker. It is a piece of useful and professional backup and restore software.
You can use this software to back up files and folders, disks and partitions and even the system. And it is easy to use the Restore feature to restore the backup images are easy. The Sync feature is also very useful when you want to sync files and folders to different locations. At the same time, the Clone Disk is good at making a bootable external hard drive.
Another reason you should try MiniTool ShadowMaker is that the software lets you use it for free within 30 days.
MiniTool ShadowMaker TrialClick to Download100%Clean & Safe
Here are the instructions to use MiniTool ShadowMaker to back up your data:
Step 1: Install and launch MiniTool ShadowMaker, then click Keep Trial.
Step 2: Choose Connect under This Computer to enter the main interface.
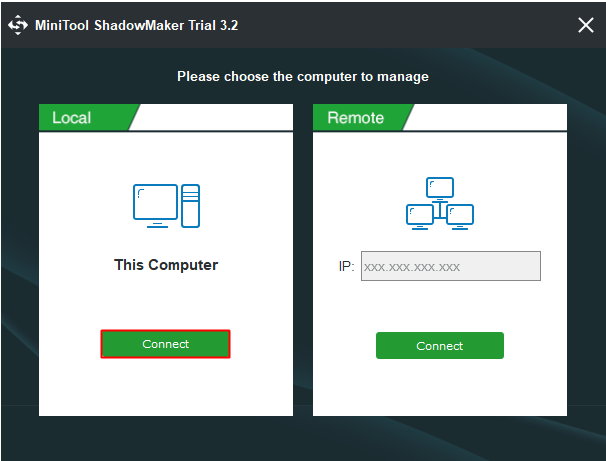
Step 3: Go to the Backup page. Click Source and then select Files and Folders.
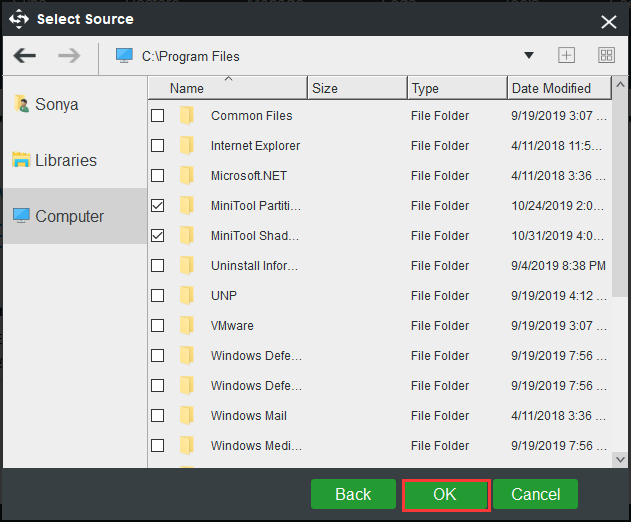
Step 4: Check all the files and folders that you need and then click OK.
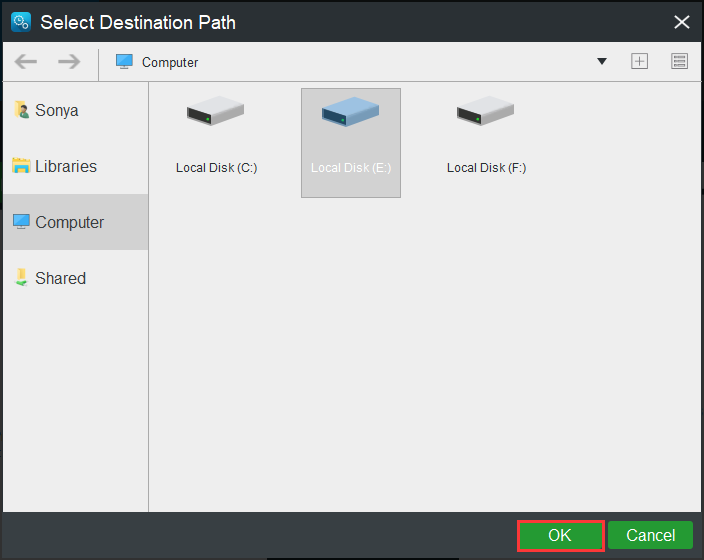
Step 5: Click Destination to choose where you want to save the backup image and then click OK.
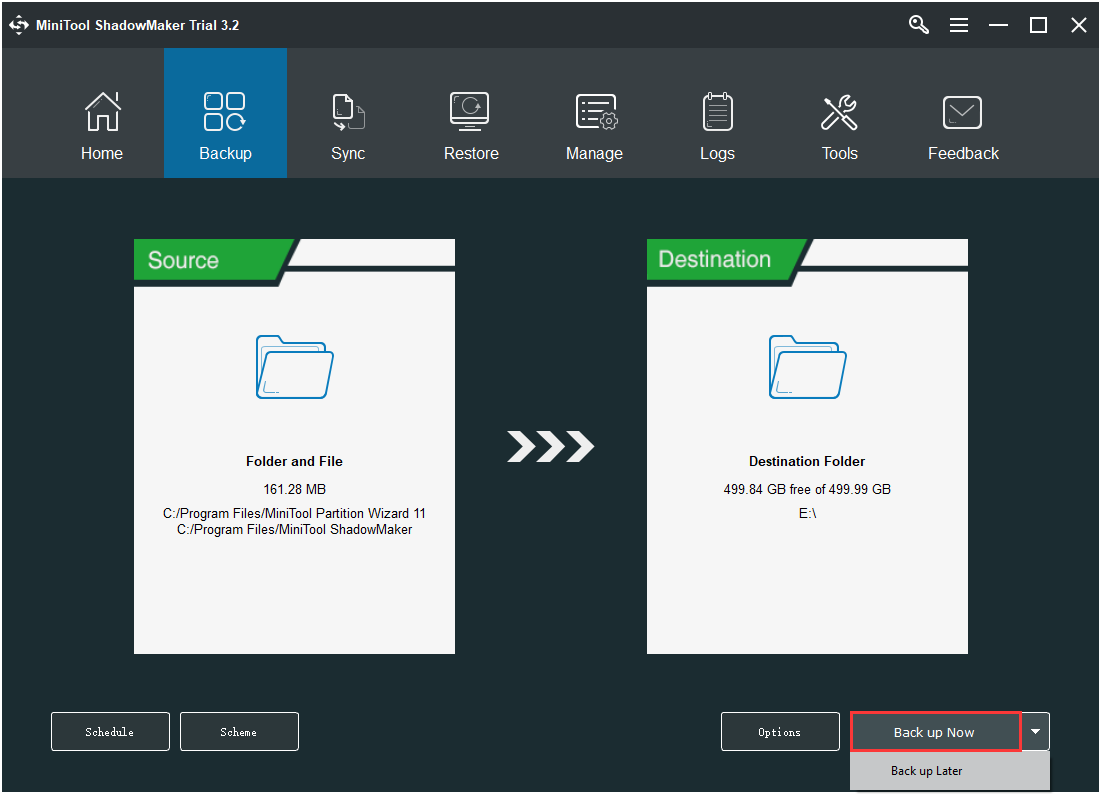
Step 6: After you have chosen the backup source and destination, then click Back up Now to start to back up files and folders.
Step 7: Wait for MiniTool ShadowMaker to finish backing up files and folders.
Reinstall Your System
After you have finished backing up all the important data on your computer, then you can begin to run a clean installation of Windows. Follow the instructions below to do that:
Step 1: Download the Media Creation Tool from Microsoft on a USB flash drive with at least 8 GB storage space and then create a USB bootable drive using this tool.
Step 2: Insert the USB bootable drive to your computer and then boot your computer from the USB (change the boot order).
Step 3: Click Install Now and then follow the onscreen instructions to perform a clean installation.
You can read this post – Windows 10 Reset VS Clean Install VS Fresh Start, Details Are Here! to get detailed instructions. And after performing a clean installation of your system, you should get rid of msvcr110.dll missing error.
Final Words
The file msvcr110.dll is missing? Don’t worry! This post has offered you 11 methods to get rid of the problem. And in order to protect your data, you should use MiniTool ShadowMaker to back up your data.
If you have any confusion about the methods or have any better methods to solve the problem, leave a comment below or send an email to [email protected].
Msvcr110.dll Is Missing FAQ
- Check the Recycle Bin.
- Reinstall the program.
- Copy the file.
- Download the Visual C++ Redistributable Packages.
- Run a virus scan.
- Update Windows.
- Test your memory
- Test your hard drive.
- Start-up Repair.
- System Restore.
- Clean installation of Windows.
- Download the Microsoft Visual C++ 2010 Service Pack 1 Redistributable Package MFC Security Update.
- Make your Windows up to date.
- Run a full virus/malware scan.
- Run the System Restore.
- Test your memory and hard drive.
- Run a clean installation of Windows.
![[SOLVED] Windows Update Cannot Currently Check for Updates](https://images.minitool.com/minitool.com/images/uploads/2018/11/windows-update-cannot-currently-check-for-updates-thumbnail.jpg)

User Comments :