A Windows 11/10 system restore point can be used to undo system changes to restore the PC to an earlier state. This guide explains what system restore points are, when to create them, how to restore the system, and how to fix common System Restore issues.
Quick Answer: What Is a System Restore Point Windows 11/10
A system restore point is a snapshot of Windows system files, installed programs, settings, and the registry. You can use a restore point to return your PC to a previous state without affecting personal files if a recent driver or update causes the system to crash.
What Does a Restore Point Save
A restore point captures critical system files, settings, and drivers to restore Windows 11/10 if something goes wrong. It does not back up personal data.
| Included | Not included |
| System files | Documents |
| Windows registry | Music |
| System settings | Videos |
| Installed drivers | Photos |
| Installed applications | User-created files |

When Should You Create a Restore Point Windows 10/11
Windows can create restore points automatically before major system events if System Protection is enabled. However, it is still recommended to manually create a restore point before making significant changes to the operating system.
The common scenarios include:
- Before installing new software
- Before updating device drivers
- Before modifying the Windows registry
- Before installing major Windows updates
- Before making major system configuration changes
Restore Point vs Backup: What’s the Difference
Many users mistakenly believe that a restore point is a complete backup. However, they actually serve completely different purposes.
A restore point only saves system files, registry settings, and drivers to fix system-related problems by undoing recent changes. A complete backup provides comprehensive protection for the PC against data loss, drive failure, or system crashes.
| Feature | System Restore Point | Backup (System Image/File) |
| Primary Purpose | Fixes recent system issues caused by updates, drivers, or software changes | Restores the entire system or data |
| File coverage | Only Windows system files and registry | Entire drive, including OS, apps, and user data |
| Storage Location | Local system drive | External hard drives, network locations, or cloud services |
| Automation | Automatically created by Windows (or manually on demand) | Requires active user scheduling or manual creation |
| Recovery Type | Restores Windows to a previous state | Restores full system or selected files |
| Failure Protection | Not effective for hardware failure | Effective for data loss and hardware failure |
Run MiniTool ShadowMaker for Complete Protection
As mentioned above, Windows 11/10 system restore points only help undo system changes to fix issues. For complete protection of files, folders, disks, partitions, or the entire system, MiniTool ShadowMaker is a reliable choice.
Additionally, this backup software allows you to configure various backup types, including automatic, incremental, and differential backups. Moreover, it supports cloning a hard drive to an SSD/HDD for system migration or disk upgrade.
Steps to back up your PC:
Step 1: Connect a USB drive or external hard drive to the computer.
Step 2: Download, install, and launch MiniTool ShadowMaker in Windows 11/10.
MiniTool ShadowMaker TrialClick to Download100%Clean & Safe
Step 3: In Backup, this program automatically selects system drives for backup. To back up files, go to SOURCE > Folders and Files, and choose the files you need to back up.

Step 4: Select the connected drive to store the backup copy under DESTINATION.
Step 5: Click Back Up Now.
How to Create Restore Point Windows 10/11?
Here’s a full guide to show you how to create a restore point.
Step 1: Type Create a restore point in the search bar of Windows 10 or Windows 11 and choose it.
Step 2: Find and click the Configure… button from the System Properties window.
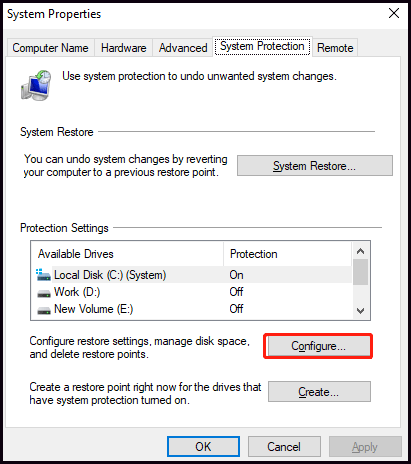
Step 3: Check the switch of Turn on system protection and then click Apply and OK to save the change.

Step 4: Choose the partition associated with the system from the Protection Settings table and click the Create… button.
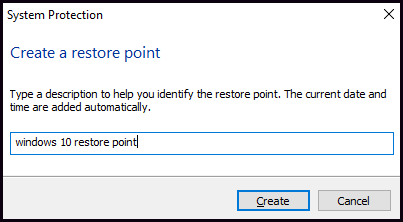
Step 5: Input a description to the system restore point and click Create to continue. The description can help you distinguish different restore points when performing a system restore.
Step 6: Wait for the process to complete. After receiving a message that tells you the restore point was created successfully, click the Close button to exit the window.
How to create a system restore point? When all steps are done, then you can successfully create system restore point Windows 10/11 to reverse some changes. You should also know how to restore system in Windows 10 and Windows 11.
How to Use a Restore Point to Restore Windows 10/11
If your computer can boot correctly when it confronts some errors, you can perform a system restore in the System Properties window.
But if your computer no longer starts properly, you can complete this action from Windows Recovery Environment (WinRE).
Here’s how to restore Windows 10/11 from boot with a step-by-step guide.
Step 1: Press the Power button to power on your PC. When the Windows logo appears, press Power again to stop its start. Then at the third time, the computer will enter Automatic Repair. Just click Advanced options to open WinRE.

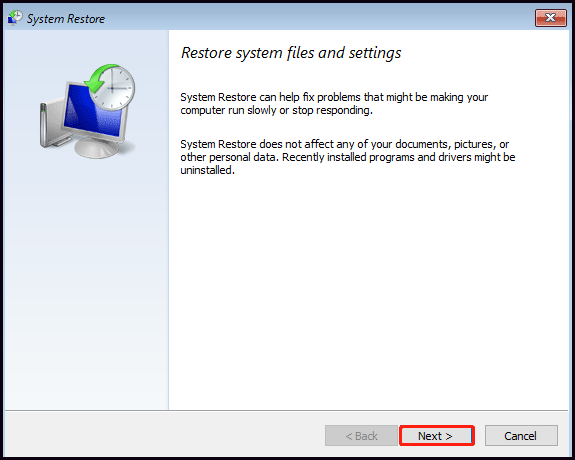
Step 2: Choose Troubleshoot > Advanced options and click the System Restore button to go on.
Step 3: In the next pop-up window, click the Next button.
Step 4: Select a system restore point and click Next. If there are a couple of restore points, you can distinguish the needed one according to your description and the created time and date.
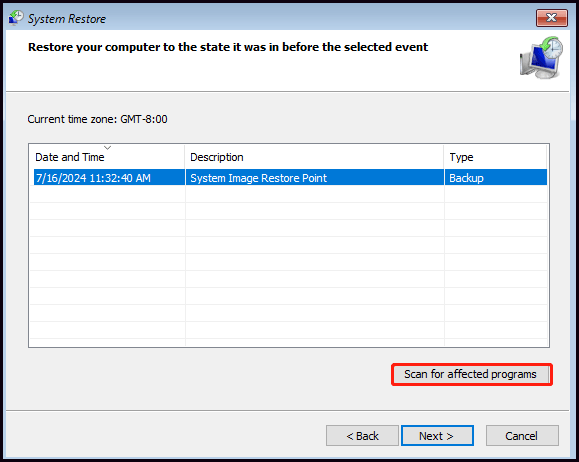
Step 5: Click the Scan for affected programs button to make sure which apps that were added after the restore point was created will be removed. Then click Close and Next in turn.
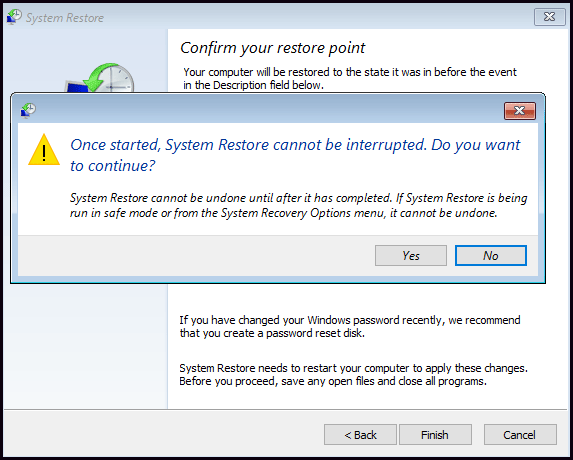
Step 6: Confirm the system restore point and click the Finish option.
After completing the steps, the system restore will recover the computer to its previous working state. Then you can reinstall your affected apps after the process is finished.

Common System Restore Problems in Windows 10/11
System Restore is a useful feature, but it doesn’t always work as expected. The following table lists common issues you may encounter and proven solutions.
| Problem | Recommended solution |
| Restore point missing | 1. Enable System Protection 2. Adjust disk space allocation 3. Start Volume Shadow Copy service |
| System Restore did not complete successfully | 1. Run SFC and DISM scans 2. Perform a system restore in Safe Mode 3. Try another restore point 4. Temporarily disable antivirus software |
| System Restore stuck | 1. Wait or force restart 2. Run System Restore in Safe Mode 3. Perform SFC and DISM scans 4. Run Startup Repair |
| Cannot create a restore point | 1. Enable System Protection 2. Check disk space usage 3. Restart Volume Shadow Copy service |
Conclusion
A Windows 10/Windows 11 system restore point is useful for restoring system-related issues caused by updates, drivers, or software changes. Before creating a restore point, enable System Protection.
However, it cannot protect personal files. For complete protection, it is recommended to combine System Restore with a full backup solution such as MiniTool ShadowMaker.
If you have any problem with our software, send an email to [email protected].
System Restore Point Win10 FAQ
Go to Folder Options > View, and uncheck the Hide protected operating system files option, instead, check Show hidden files, folders and drives.
About The Author

Position: Columnist
Vera has been working at the MiniTool Team for over 10 years as a technical editor and content writer. She mainly focuses on disk and partition management, data recovery, Windows backup and restore, and PC troubleshooting. Through in-depth software testing and hands-on experience, she has helped users solve a wide range of computer problems and better protect their data on Windows devices.
User Comments :