“System Restore did not complete successfully” can arise from software conflicts, corrupt system files, etc. in Windows 11/10. MiniTool outlines several common solutions, as well as some fixes to address specific System Restore error codes like 0x80070005, 0x80070091, 0x8007045b, and more. Also, you can find an alternative to System Restore for Windows backup & recovery.
About System Restore Did Not Complete Successfully
System Restore is a feature in Windows, allowing you to revert your computer to a previous state. It can save the day if system issues occur due to recent changes, such as driver updates, software installations, or system settings modifications.
However, the error message “System Restore did not complete successfully” prevents you from undoing these changes to troubleshoot issues. When checking the Details part in the pop-up window, you may notice various System Restore errors:
- System Restore could not access a file
- System Restore failed to extract the file
- System Restore failed to extract the original copy of the directory from the restore point
- System Restore failed while scanning the file system on the drive C:\
- …
Followed by each message, there may be an error code, such as 0x80070005, 0x80070091, 0x8000fff, 0x8007045b, 0x80070017, 0x800701b1, 0x81000204, etc.
People often ask: Why did System Restore not complete successfully? Here are possible reasons:
- Antivirus interference
- System Protection setting
- Corrupted system files
- Hard drive issues
- Restore point being damaged
Next, let’s explore possible workarounds.
How to Fix System Restore Did Not Complete Successfully
To resolve the System Restore failure, you can try multiple universal ways, such as try a different restore point, enable System Protection, fix corrupted system files, attempt the restoration from Safe Mode, and more.
Here is a detailed breakdown of possible workarounds.
#1. Use Another Restore Point
System Restore fails when you use a corrupted restore point. Just use another one if you previously created several restore points on schedule or manually. Here is how to do that:
Step 1: Open System Protection by typing Create a restore point into Windows Search and pressing Enter.
Step 2: Hit System Restore > Next.
Step 3: Pick the latest restore point from the list and click Next.
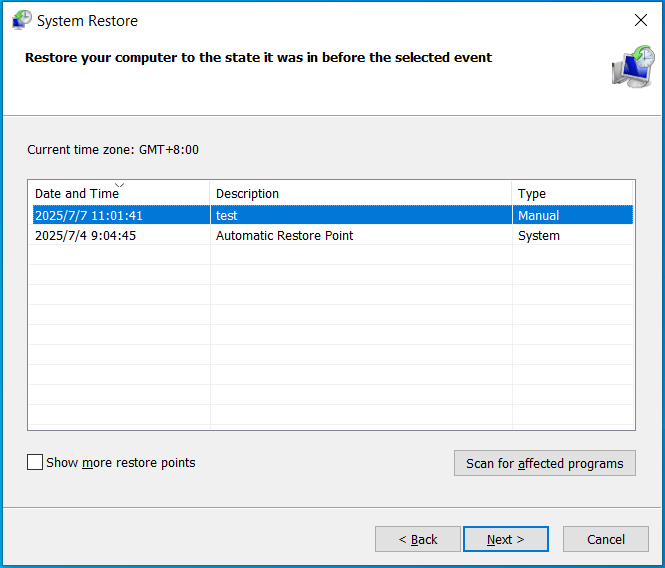
Step 4: Finish the restoration operation by following the prompts.
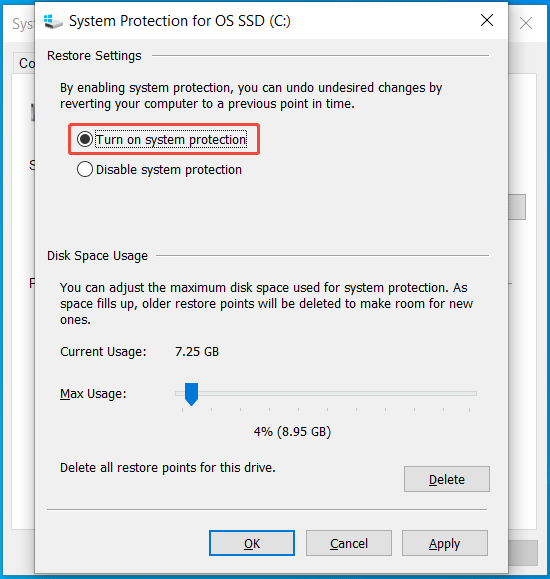
#2. Check System Protection Settings
If System Protection is disabled, “System Restore did not complete successfully” can appear. To easily solve this issue, adjust the settings via these steps.
Step 1: In the System Protection tab, choose the C drive under Protection Settings, and check if the Protection status is Off.
Step 2: If yes, click the Configure button and tick Turn on system protection.
Step 3: Finally, hit Apply > OK to apply the change.
#3. Clean Boot Windows
Sometimes, the “System Restore did not complete successfully” error in Windows 11/10 stems from corrupted or faulty third-party apps.
To rule out software conflicts, perform a clean boot via these steps. This mode runs the system with only the essential drivers and programs.
Step 1: In Windows Search, type msconfig, and press Enter to open System Configuration.
Step 2: Under General, untick Load startup items.
Step 3: In the Services tab, tick Hide all Microsoft services, and then click Disable all.
Step 4: Click Apply and OK.
Step 5: Go to Startup > Open Task Manager and disable startup programs.
Step 6: Apply the changes and restart the system.
Try to perform a system restore again. If the failure error persists, some faulty third-party apps interrupt the restoration process. Just go to uninstall the suspicious programs. After that, reset the PC to boot normally.
#4. Run System Restore in Safe Mode
In addition to running System Restore in normal Windows 11/10, you are allowed to do it in Safe Mode. Safe Mode is a diagnostic mode, starting the system with a minimal set of drivers and services.
Here is how to do that to bypass the “System Restore did not complete successfully” error.
Step 1: In the System Configuration window (open it via msconfig), go to the Boot tab.
Step 2: Check the box of Safe boot under Boot options.
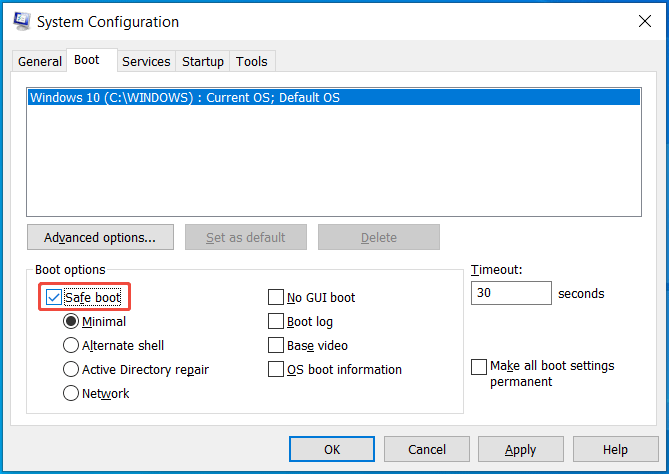
Step 3: Click Apply > OK > Restart.
Step 4: In Safe Mode, press Win + R, type sysdm.cpl, and click OK.
Step 5: Navigate to System Protection > System Restore. Then, complete the restoration process.
#5. Repair Corrupt System Files
System Restore may not complete successfully because of corrupt system files. Running System File Checker (SFC) can be a remedy since the tool checks and repairs the corruption.
To do that:
Step 1: Open an elevated Command Prompt in Windows 11/10: type cmd in Windows Search and hit Run as administrator.
Step 2: Type sfc /scannow and press Enter.
Step 3: After the SFC scan, execute the command: DISM.exe /Online /Cleanup-image /Restorehealth.
#6. Run CHKDSK in Command Prompt
Hard disk errors are a common reason for “System Restore did not complete successfully”. You can run CHKDSK to detect and fix file system or disk issues that interfere with the restore process.
Step 1: Launch Command Prompt with admin permissions.
Step 2: Type chkdsk /f /r and press Enter.
- /f: Fixes errors on the disk, including logical file system errors and other errors preventing the disk from working properly.
- /r: Locates bad sectors and recovers readable information.
Step 3: Type Y to check it next time the system restarts.
Then, check if you still meet the error.
#7. Disable Antivirus Software
Disabling the antivirus program is not a good idea since you can expose yourself to various threats. However, you have to do this if System Restore fails due to antivirus interference.
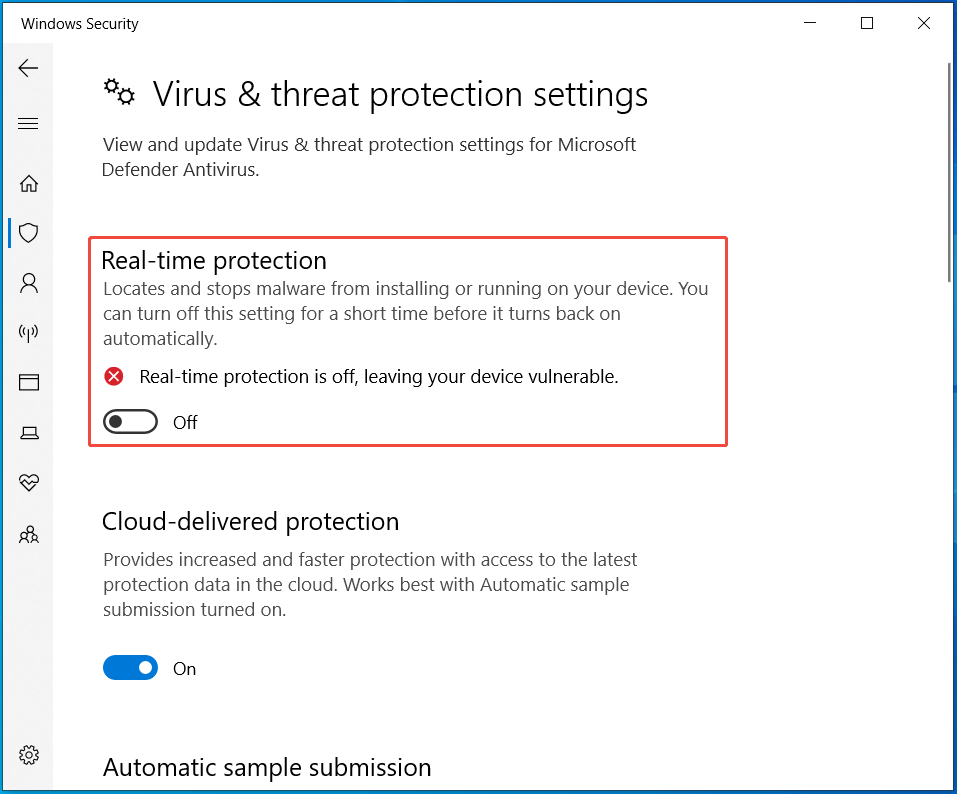
To disable Windows Security:
Step 1: Open Windows Security via the Windows 11/10 Search.
Step 2: Head to Virus & threat protection > Manage settings.
Step 3: Disable Real-time protection.
Those are generic fixes to address the “System Restore did not complete successfully” error. Apply them if you are grappling with this error.
How to Fix 5 Special System Restore Errors
Due to different factors, System Restore doesn’t complete, along with an error code. Let’s focus on how to address System Restore error 0x80070091, 0x8000ffff, 0x80070005, 0x80070017 and 0x8007045b.
System Restore Error 0x80070091
The error pop-up may say:
“System Restore did not complete successfully. Your computer’s system files and settings were not changed. System Restore failed while restoring the directory from the restore point. An unspecified error occurred during System Restore. (0x80070091)”.
To solve the error 0x80070091, try one of two proven solutions given by users on the Microsoft forum.
Option 1: Rename the WindowsApps folder in Safe Mode
Step 1: Boot your PC to Safe Mode. We have mentioned the msconfig way above.
Step 2: Open Command Prompt as an administrator.
Step 3: Type these commands below one by one and press Enter after each one:
- cd C:\Program Files
- takeown /f WindowsApps /r /d Y
- icacls WindowsApps /grant “%USERDOMAIN%\%USERNAME%”:(F) /t
- attrib WindowsApps -h
- rename WindowsApps WindowsApps.old
Step 4: Reboot back into Windows and run System Restore. The System Restore error code 0x80070091 won’t pop up.
Option 2: Rename WindowsApps Folder in WinRE
Step 1: Boot Windows 11/10 into Windows Recovery Environment (WinRE): press & hold Shift and press Start to access WinRE.
Step 2: Head to Troubleshoot > Advanced Options > Command Prompt.
Step 3: Execute these commands:
- cd C:\Program Files
- attrib WindowsApps -h
- rename WindowsApps WindowsApps.old
System Restore 0x8000ffff
Sometimes, System Restore did not complete successfully with error code 0x8000ffff. To fix “An unspecified error occurred during System Restore. (0x8000ffff)”, try these solutions:
- Run SFC & DISM
- Use CHKDSK in CMD
- Use another restore point
The detailed steps can be found in part 2.
System Restore Could Not Access a File 0x80070005
In the System Restore error pop-up, you may note the message “An unspecified error occurred during System Restore. (0x80070005)”. This may be because an antivirus program is running on your computer.
To solve System Restore error 0x80070005, try to disable the antivirus software or exit the third-party antivirus applications.
Also, make sure the Volume Shadow Copy service is running.
Step 1: Press Win + R, type Services.msc, and press Enter.
Step 2: Scroll down to Volume Shadow Copy and double-click on this service to open its Properties window.
Step 3: Choose Automatic from the Startup type field.
Step 4: Save the change.
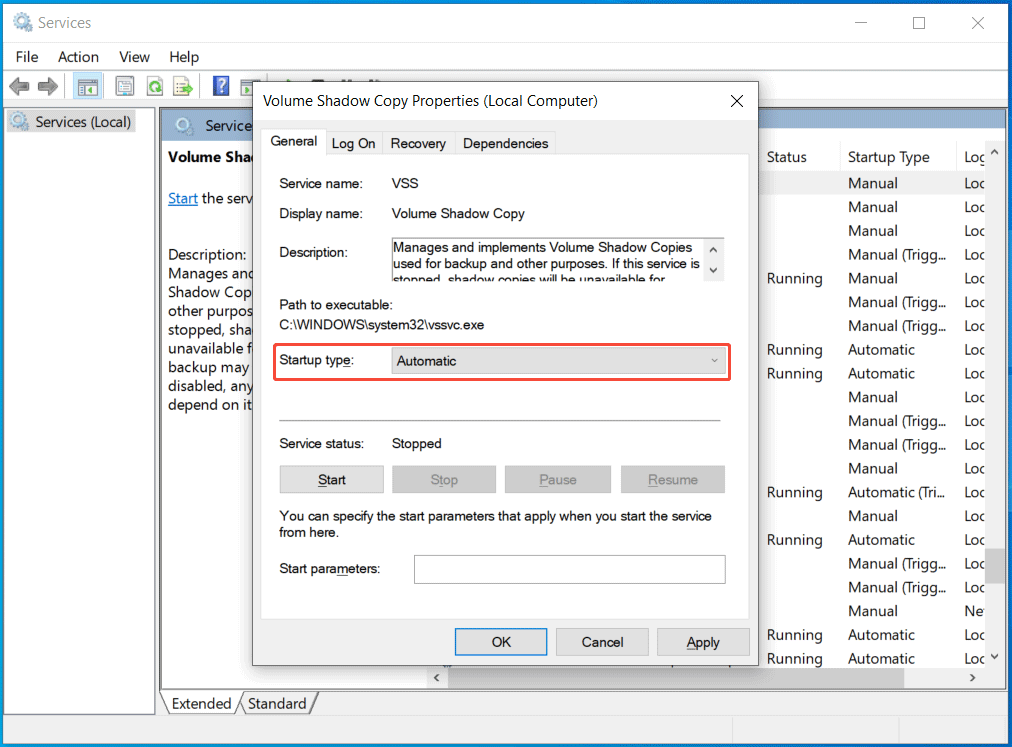
Step 5: Do the same thing for another two services: Task Scheduler and Microsoft Software Shadow Copy Provider.
Then, restart your Windows 11/10 and check if System Restore still fails to work with the error 0x80070005.
System Restore Did Not Complete Successfully 0x80070017
In case System Restore failed to extract the file with error 0x80070017, these solutions may work:
- Run SFC & DISM
- Run CHKDSK
- Perform a clean boot
- Run System Restore in Safe Mode
System Restore Failed with 0x8007045b
System Restore error 0x8007045b typically occurs when any file is being encrypted by the Encrypting File System (EFS) in the restore point.
When restoring the system, the System Restore tool creates a shutdown task. Since the EFS service is stopped, the restoration process fails with the error code 0x8007045b.
So, how can you address this issue? Try a workaround from Microsoft.
Step 1: Run Command Prompt with admin rights.
Step 2: Type reagentc /boottore and press Enter. If it returns Windows RE is disabled, install it and run reagentc /enable.
Step 3: Restart the machine to enter WinRE. In this mode, EFS is always running.
Step 4: Go to Troubleshoot > Advanced Options > System Restore and follow the prompts to begin the process.
How to Run MiniTool ShadowMaker for System Backup & Recovery
The “System Restore did not complete successfully” error always blocks you from reverting the PC to an earlier state in case of system issues. You may wish to look for a reliable backup and recovery solution for Windows, without spending much time finding solutions to System Restore errors.
Here, we recommend running the alternative: MiniTool ShadowMaker to back up the operating system when it is healthy. It is professional backup software compatible with Windows 11/10/8/7 and Windows Server 2022/2019/2016.
In addition to creating a system image backup, it supports disk/partition/folder/file backup and recovery. Although the system fails to boot, you can run it to create a bootable drive, boot the system from that drive, and perform the recovery.
Importantly, it allows you to only back up the changed data via the incremental or differential backup scheme. Besides, you can regularly create backups for important data.
Here is how to back up the system and restore it to a previous state.
System Backup
Step 1: Connect an external drive to your computer. Install and launch MiniTool ShadowMaker.
MiniTool ShadowMaker TrialClick to Download100%Clean & Safe
Step 2: In Backup, the current system is selected as the source. Just go to DESTINATION to choose the connected external drive.
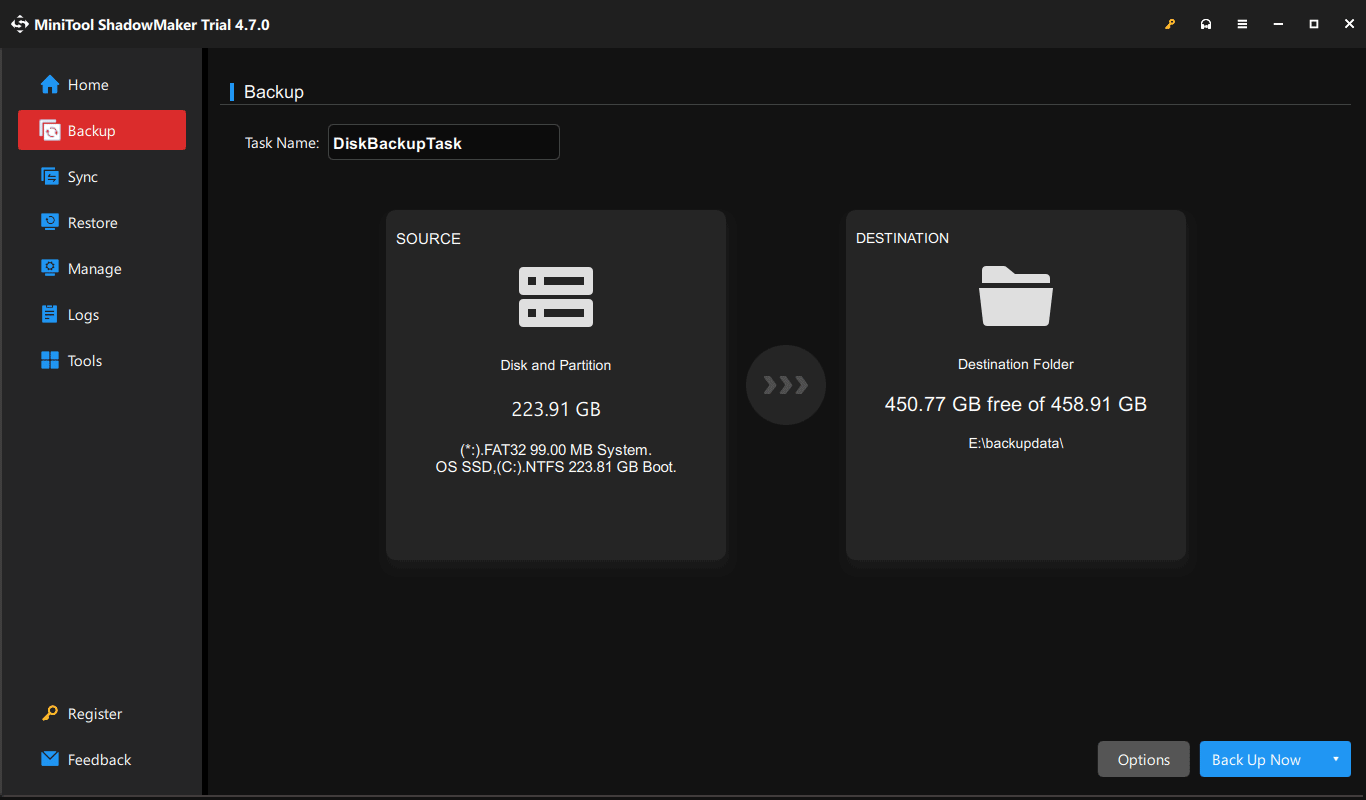
Step 3: Execute the system backup by clicking Back Up Now.
System Recovery
To restore Windows from the created system backup, take these steps:
Step 1: Go to Tools > Media Builder to create a bootable USB drive.
Step 2: Restart Windows from that USB drive and launch MiniTool ShadowMaker.
Step 3: In the Restore page, choose the Restore button next to the created system backup. If it is not listed, hit Add Backup to add it here.

Step 4: Follow the prompts to finish system recovery without any errors.
Conclusion
It is not hard to solve “System Restore did not complete successfully” in Windows 11/10, including specific System Restore errors such as 0x80070091, 0x8000ffff, 0x80070005, etc. Things become easy if you follow the instructions in this comprehensive guide.
What’s more, to back up and restore your PC without encountering any issues, we highly recommend MiniTool ShadowMaker. Run this professional backup program for smooth backup & recovery.
As for the issues with MiniTool software when using it, you can contact us via [email protected].
System Restore Did Not Complete Successfully FAQ
1. Type Create a restore point to Search and press Enter.
2. Click System Restore > Next.
3. Choose a restore point.
4. Click Next > Finish.
About The Author

Position: Columnist
Vera has been working at the MiniTool Team for over 10 years as a technical editor and content writer. She mainly focuses on disk and partition management, data recovery, Windows backup and restore, and PC troubleshooting. Through in-depth software testing and hands-on experience, she has helped users solve a wide range of computer problems and better protect their data on Windows devices.
User Comments :