The “restore point cannot be created” issue is caused by low disk space, corrupted system files, old restore points, etc. To fix it, free disk space, run SFC and CHKDSK, clear old restore points, and more. Read this post from MiniTool to get a complete guide.
About Restore Point Cannot Be Created in Windows 10/11
System Restore is a Windows feature that allows users to use restore points to revert the operating system’s settings, files, and programs to a previous state to fix problems like system instability or software corruption.
However, some people report that the restore point could not be created in Windows 10/11. For example, here is a user report from the learn.microsoft.com forum:
...I am unable to create Restore point today ...got the message after failed: "The restore point could not be created for the following reason: The write experienced a transient error. If the backup process is retired, the error may not reoccur. (0x800423F3) "...I need help...https://learn.microsoft.com/en-us/answers/questions/4340779/unable-to-create-restore-point-windows-10
Have you also experienced the same issue on your computer? If so, continue reading to get reasons and solutions for this issue.
Why Restore Point Cannot Be Created in Windows 10/11
The restore point could not be created because of these reasons:
- Insufficient disk space
- Not enough disk space to store restore points
- Corrupted system files
- Disabled System Restore
- Antivirus software interference
- Disabled or stopped Volume Shadow Copy service
- Corrupt previous restore points
- System issues
- Disk issues
- Necessary services not running
Alternative Tip: Use MiniTool ShadowMaker to Create a System Backup
System restore point can help you revert to a previous status. But after performing a system restore, programs and drivers installed after the chosen restore point will be removed. Additionally, if the volume that holds the system restore point is corrupt, it won’t work.
In this case, it is recommended to use MiniTool ShadowMaker. It offers backup features to help you perform system backup and file backup with ease.
Here’s how to use it to back up the system:
Step 1. Download and install MiniTool ShadowMaker on your PC.
MiniTool ShadowMaker TrialClick to Download100%Clean & Safe
Step 2. Launch this app to access the main interface, and then select Backup from the left panel.
Step 3. Here, the system-required partitions are checked by default, and the destination folder is created automatically.
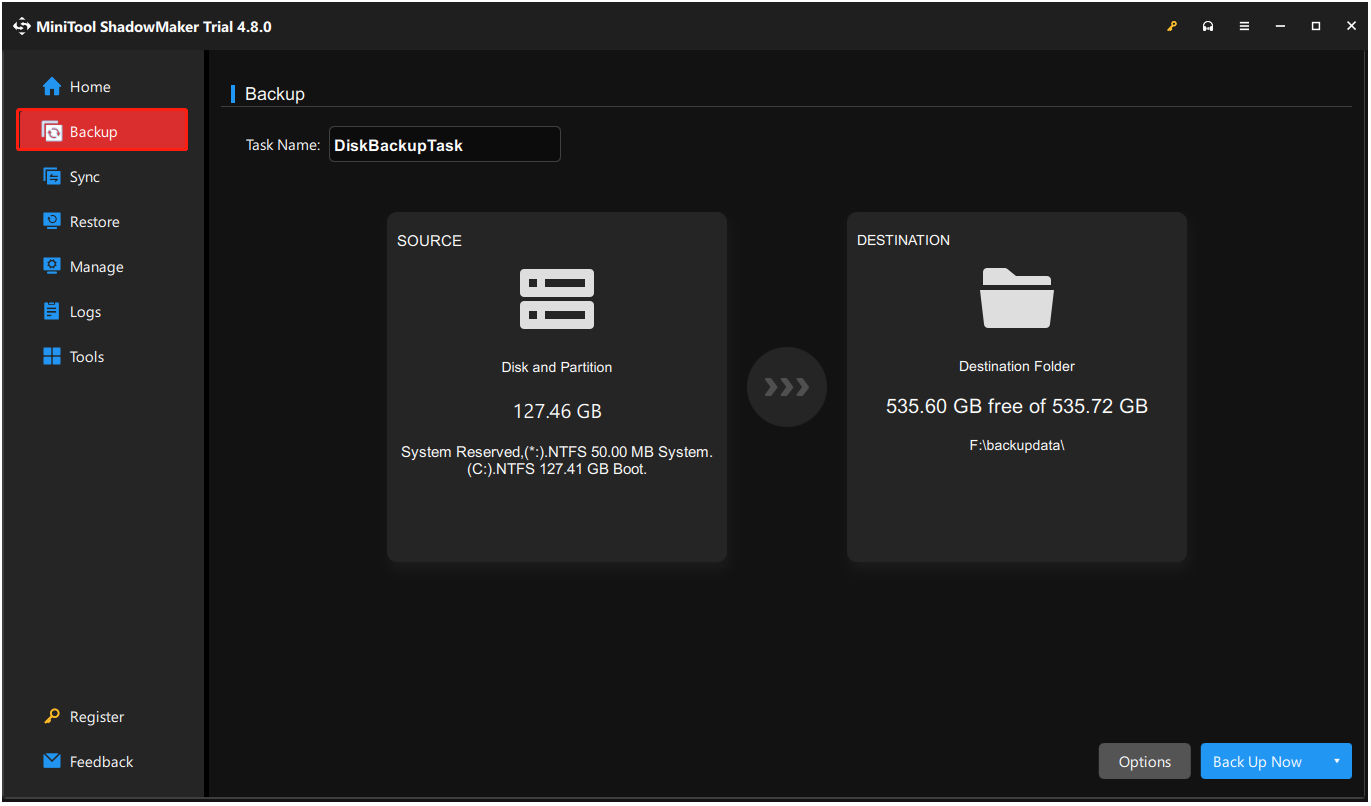
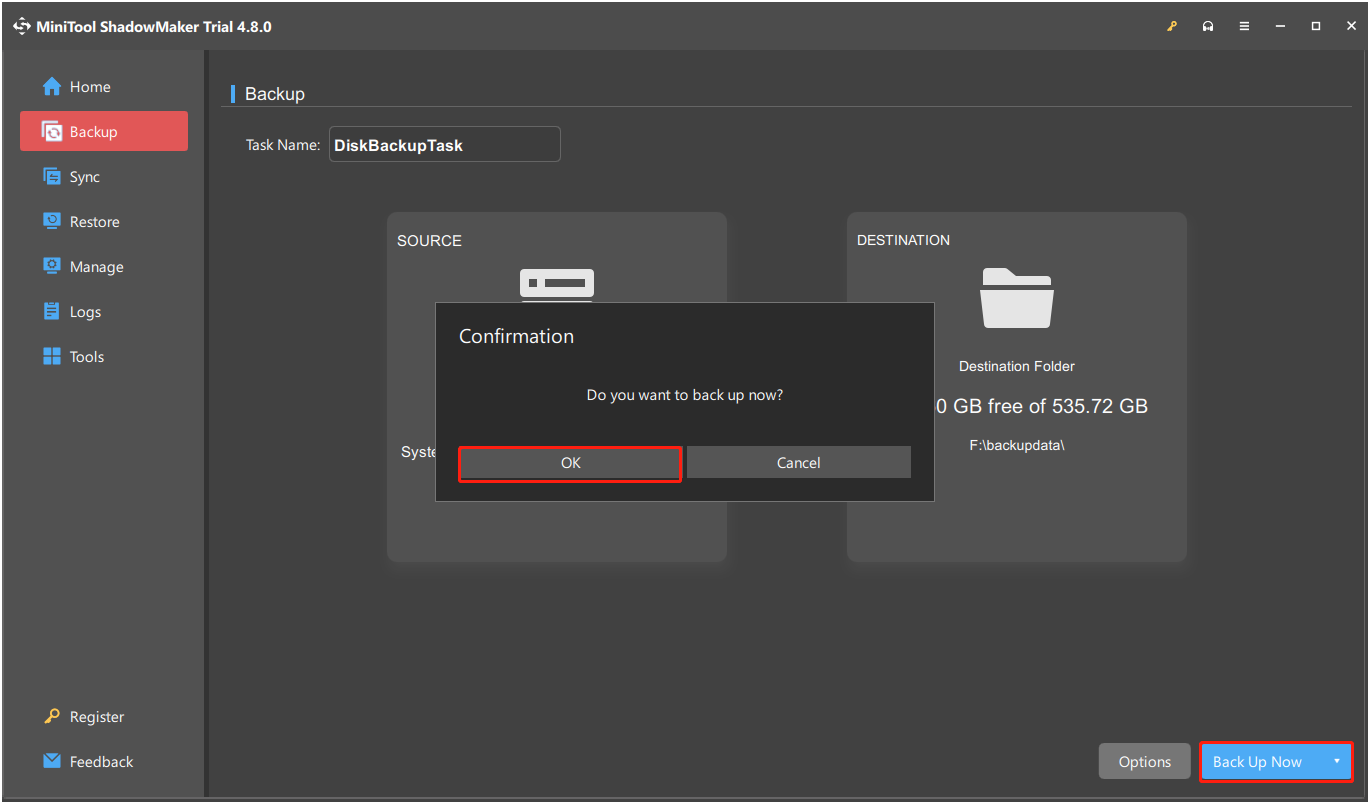
Step 4. Click Back Up Now at the bottom right corner and click OK in the pop-up window to confirm.
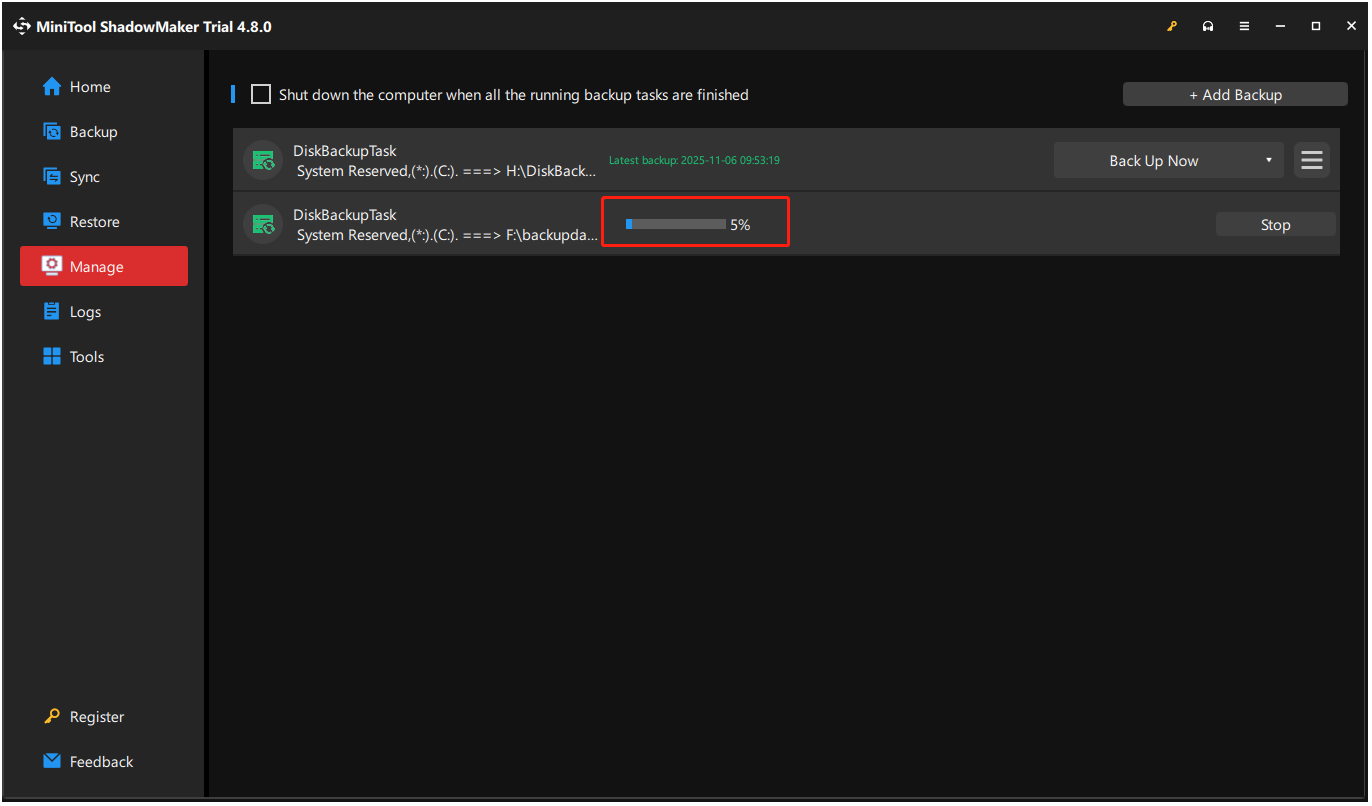
Step 5. Wait for the process to complete in the Manage page. Once the progress bar is full, the backup is successful, and you will see some green text indicating how long ago your last backup was.
How to Fix the “Restore Point Cannot Be Created” Issue
To fix the “restore point not working” issue, try enabling System Protection, checking max disk usage, clearing old restore points, running SFC/DISM/CHKDSK, renaming system restore file, and other useful methods.
Method 1. Enable System Protection
If you turn off or haven’t enabled System Protection of your system drive, the option of the Create button will be grayed out. In this case, enable System Protection to fix the “restore point not working” issue. Here’s the guide:
Step 1. Press Win + R to open Run, type “sysdm.cpl”, and press Enter.
Step 2. Go to the System Protection tab, select your system drive (usually C:), and click Configure.
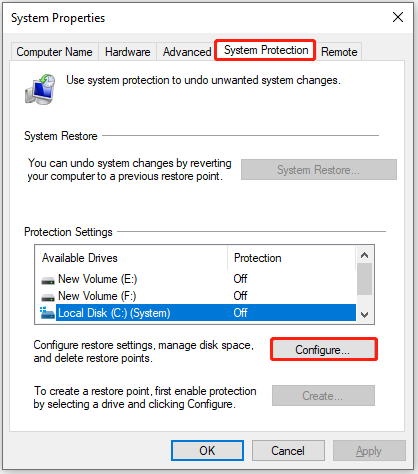
Step 3. Choose Turn on system protection, click Apply, and OK.
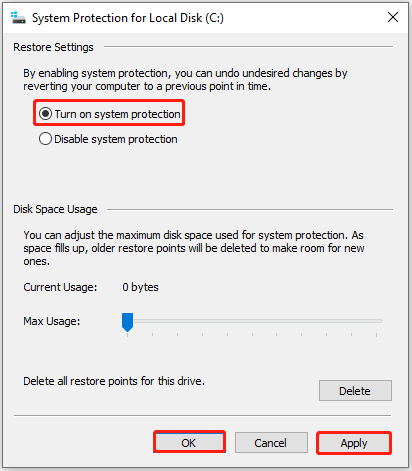
Once done, you could successfully create a restore point.
Method 2. Enable System Restore via Group Policy Editor
If the Create and Configure buttons are grayed out in System Protection, use Group Policy Editor to enable System Restore and fix the “unable to create restore point” issue. Here’s how to do that:
Step 1. Open the Run window, type “gpedit.msc”, and press Enter.
Step 2. In the Group Policy Editor window, select Computer Configuration > Administrative Templates > System > System Restore.
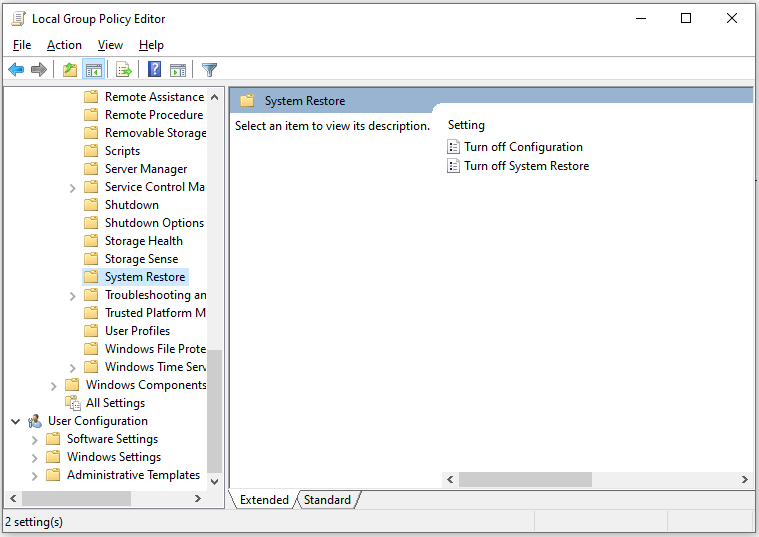
Step 3. Check the state of Turn off Configuration and Turn off System Restore. If any of them is Enabled, double-click it and choose Not Configured.
Step 4. Click Apply and OK to save the changes. Then, create a restore point again and check if the issue is fixed.
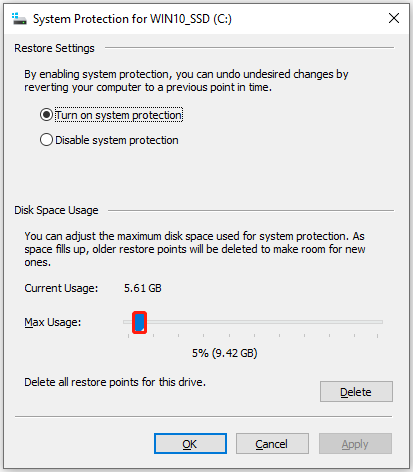
Method 3. Ensure Enough Storage Is Assigned to System Restore
Also, if you assigned insufficient max disk usage for System Protection, it’s easy to encounter the “unable to create restore point” issue. In this situation, try adjusting the slider of max disk usage to fix the issue. Here’s the process:
Step 1. Open the System Properties window and go to the System Protection tab.
Step 2. Click the Configure button.
Step 3. At the bottom of the pop-up window, a slider is here. Use the slider to adjust the max disk space usage for system protection. Note 3-10% of the total storage space is suitable.
Method 4. Clear Old Restore Points
Old restore points may take up space and cause the “restore point could not be created” issue. In such circumstances, clearing all old restore points to fix it with the following steps:
Step 1. Open the System Protection tab in System Properties again.
Step 2. Ensure that your system drive is selected and click Configure.
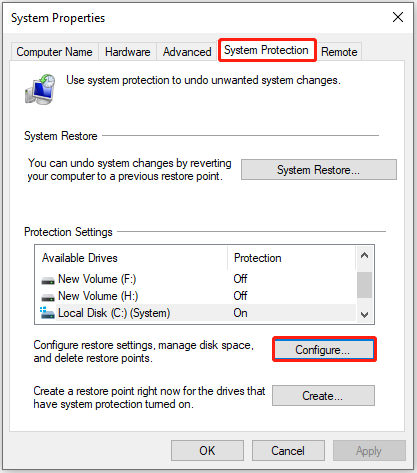
Step 3. In the pop-up window, click Delete to delete all restore points for this drive. Then, click the Continue button in the warning window.
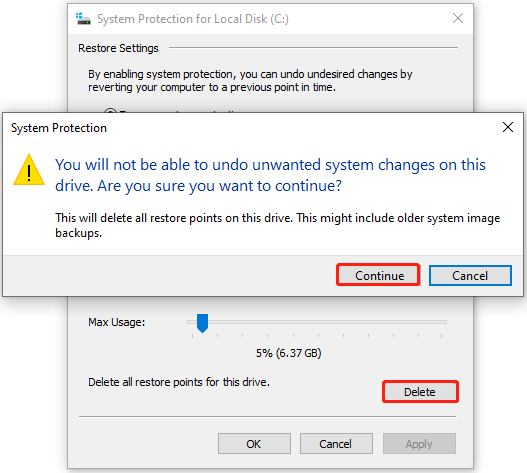
Step 4. Once done, all the restore points are deleted, and click Close in the prompt window. Now, try to create the system again to check if the issue is fixed.
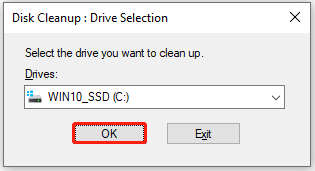
Method 5. Free Up Disk Space
If there are not enough free space on your system drive, restore point cannot be created as well. In this situation, use Disk Cleanup to remove unwanted files, caches and junk files to troubleshoot the issue. Here are the detailed steps:
Step 1. Open the Search window, type “disk cleanup” in the box, and press Enter.
Step 2. Choose the system drive from the dropdown menu and click OK.
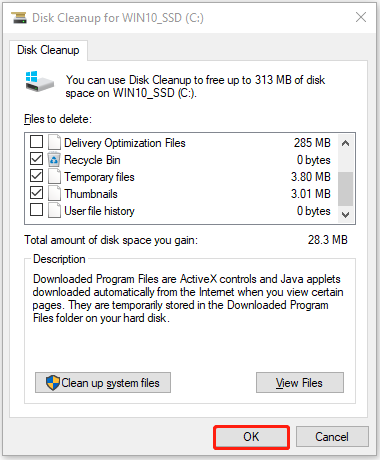
Step 3. In the File to delete list, check the boxes of “Recycle Bin“, “Temporary Internet Files“, and “Temporary files“.
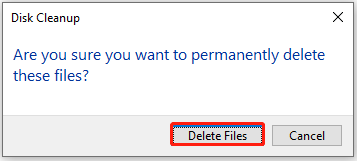
Step 4. In the pop-up confirmation window, click Delete Files to continue.
Step 5. Once the process is finished, click the Clean up system files button. Then, select the system drive again and click OK.
Step 6. Check the boxes of files to delete. Next, click OK and Delete Files sequentially to delete the selected files.
After clearing all the unwanted files, try to check if a restore point can be created successfully.
Method 6. Run SFC and DISM
Corrupted system files may cause various issues on a computer, including being unable to create a restore point. If you suspect the issue on your PC is caused by this reason, run the SFC and DISM commands to fix the issue. Here’s the tutorial:
Step 1. Open the Search window, and type “cmd” in the search box.
Step 2. Right-click Command Prompt under Best match, and select Run as administrator.
Step 3. In the elevated Command Prompt window, type “sfc /scannow” and press Enter.

Step 4. If SFC cannot fix the corruption, run the following DISM commands:
- DISM.exe /Online /Cleanup-Image /ScanHealth
- DISM.exe /Online /Cleanup-Image /CheckHealth
- DISM.exe /Online /Cleanup-Image /RestoreHealth
Once the process is complete, restart your PC and check if you can create a restore point successfully.
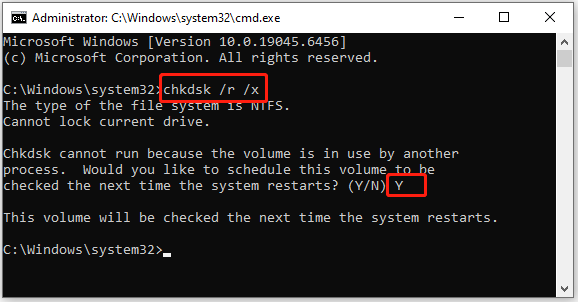
Method 7. Run CHKDSK
If there are disk errors on your PC, you may fail to create a restore point easily. Therefore, perform the CHKDSK command with the following steps to fix the issue:
- Run Command Prompt as administrator.
- Type “chkdsk /r /x” and press Enter.
- Now, you will receive a question: “Would you like to schedule this volume to be checked the next time the system restarts?” Then, type Y and press Enter to continue.
- Restart the PC to start the check.
- Once done, it will fix all the issues and boot your PC into normal Windows. Now, check if you can create a restore point.
Method 8. Disable Antivirus Software
Sometimes, the antivirus software that you’ve installed or used on your PC may interfere with the process of creating a system restore. In such circumstances, try disabling antivirus software to fix the “cannot create restore point” issue. Here’s the guide on disabling Windows Security:
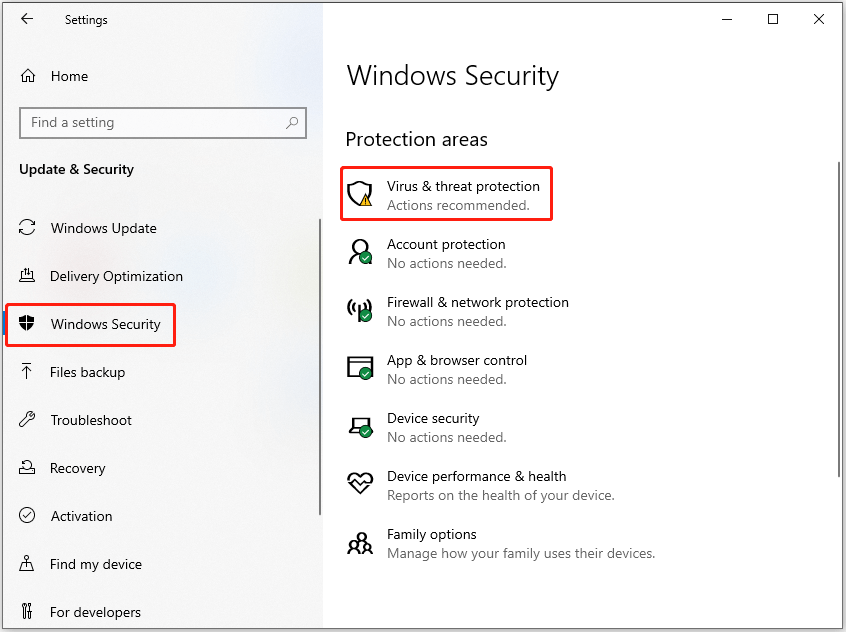
Step 1. Press the Win + I to open Settings and go to Update & Security > Windows Security.
Step 2. Under the Protection areas section, click Virus & threat protection.
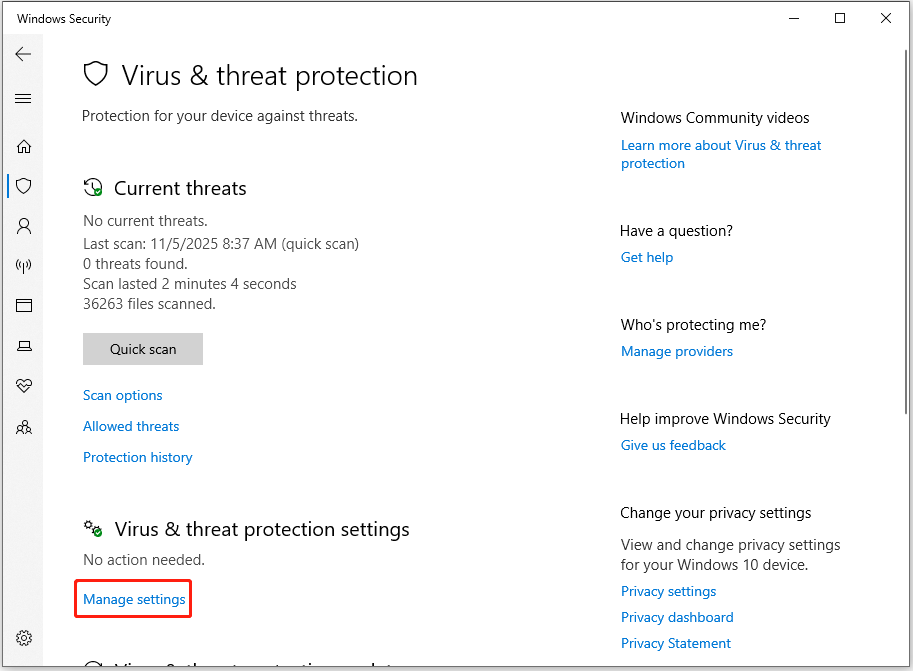
Step 3. Find Virus & threat protection settings and click Manage settings under it.
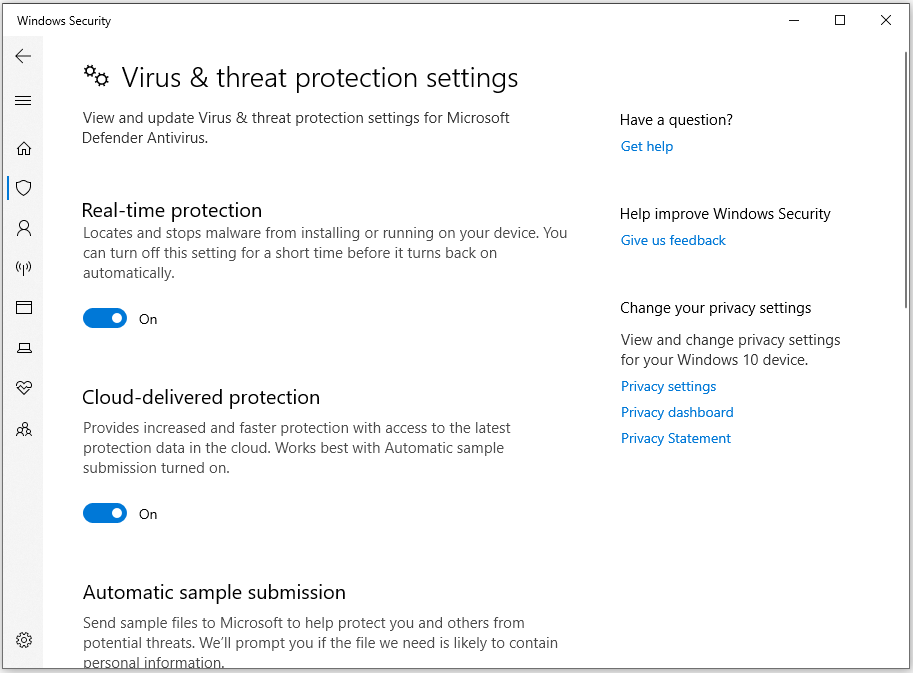
Step 4. On the next page, toggle off the following switches:
- Real-time protection
- Cloud-delivered protection
- Automatic sample submission
- Tamper Protection
Step 5. Now, the Windows antivirus is disabled temporarily. Try creating a restore point again to check if the issue has been resolved.
Method 9. Restart the Volume Shadow Copy Service
Volume Shadow Copy is a service that is responsible for creating a snapshot of a storage volume at a specific point in time, allowing the creation of a restore point.
Therefore, if you failed to create restore point in Windows 10/11, check whether the service is working properly. Here’s the guide:
Step 1. Open the Run window, type “services.msc”, and press Enter.
Step 2. In the pop-up Services window, scroll down to find the Volume Shadow Copy entry.
Step 3. Right-click it and select Properties.
Step 4. Select Automatic from the drop-down menu of Startup type. Then, check the Service status. Click Start it if it is not running; select Stop and Restart it if it is running.
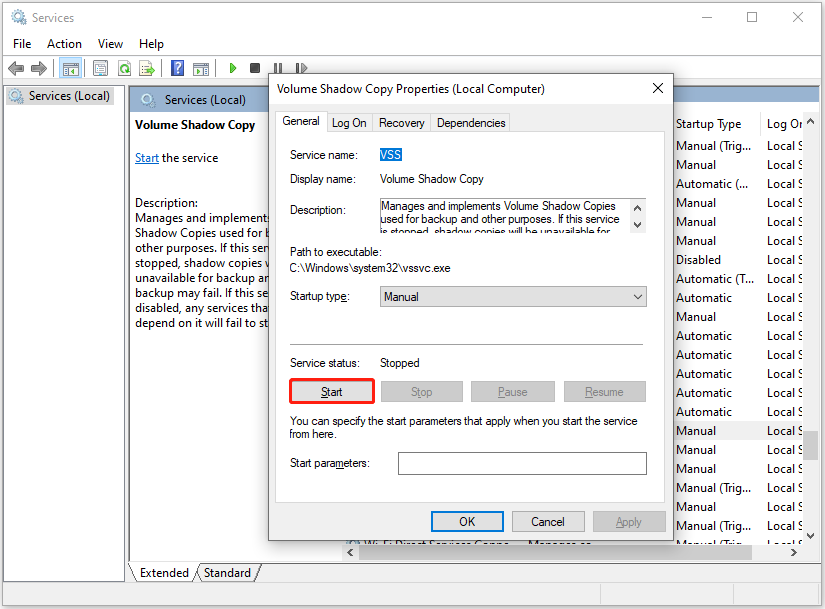
Step 5. Click Apply and OK sequentially to save the changes. Then, try creating a restore point again and check if the issue is fixed.
Method 10. Rename System Restores File
Some people report that they fix the “failed to create restore point” issue successfully by renaming system restore file. If you want to have a try, please do the following steps:
- Open the Run window.
- Type “%windir%\System32\Tasks\Microsoft\Windows\SystemRestore” in the box and press Enter.
- In the pop-up window, find the SR file and rename it to SR.sav.
- After that, go to create a system restore point and check if the issue has been resolved.
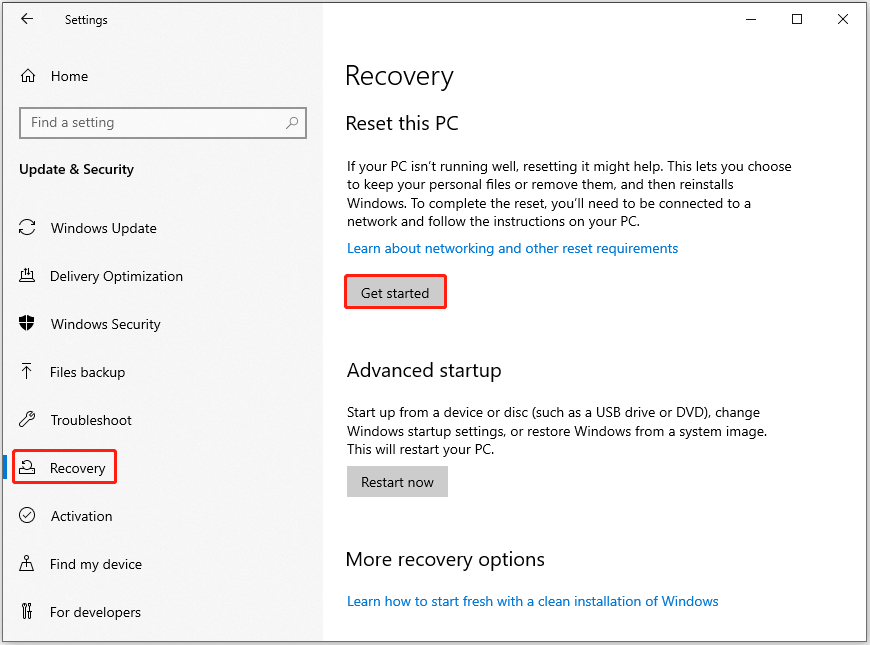
Method 11. Reset Your PC
If none of the above methods can help you troubleshoot the “restore point could not be created” issue, try resetting your PC without losing your personal data. Here are the detailed steps:
Step 1. Open Settings, go to Update & Security > Recovery, and then click Get started under the Reset this PC section.
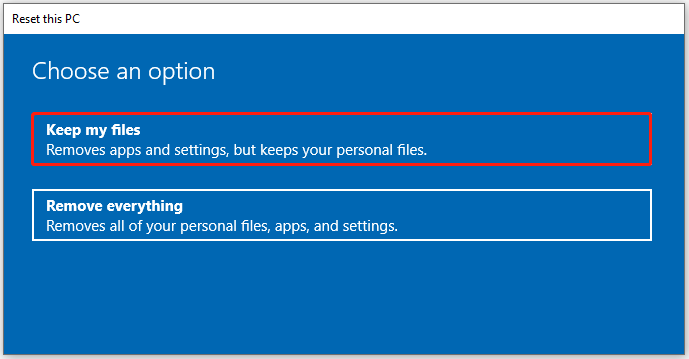
Step 2. In the prompt window, choose Keep my files to reset your PC without losing your personal files.
Step 3. In the next screen, choose an option from Cloud download and Local reinstall to reinstall Windows. After that, click Next to move on.
Step 4. Now, Windows tells you what resetting will do. Click Reset to execute this operation.
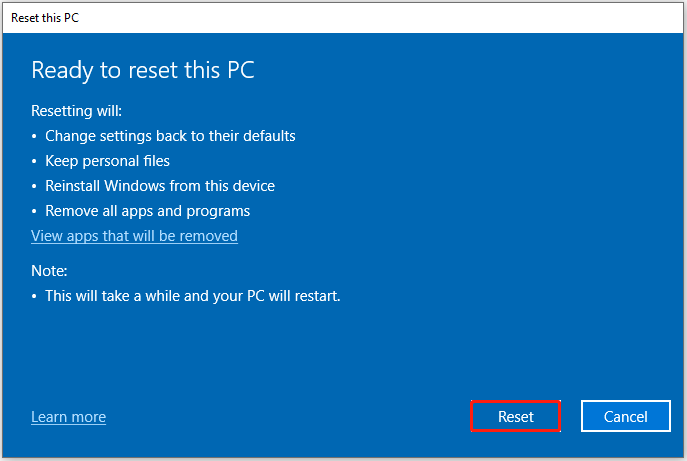
After resetting your computer, try creating a restore point again to check if the issue is resolved.
Final Words
This post lists the reasons for the “restore point cannot be created” issue in Windows 10/11, and offers some useful solutions. Also, it introduces a powerful backup tool, MiniTool ShadowMaker, to help you back up your system with ease.
What’s more, if you encounter issues with this software, send an email to [email protected] to contact us.
Restore Point Cannot Be Created FAQ
1. Type “create a restore point” in the search box and press Enter.
2. In the System Protection tab, find the target drive (usually the C: drive).
3. Check if "Protection" is set to On. If it’s Off, click Configure, select Turn on system protection, click Apply, and then OK.
4. Click Create.
5. Type a name and click Create.
6. Once it’s finished, click Close and then OK.
About The Author

Position: Columnist
Charlotte is a technology columnist with a strong focus on the Windows operating system, specializing in disk management, backup, and data recovery. She is passionate about analyzing computer errors, identifying root causes, and delivering practical solutions. In her free time, she stays updated on the latest developments in computer systems and hardware while continuously learning new technologies to broaden her expertise. Her writing style is clear and easy to understand, making complex technical topics accessible even to users with limited computer knowledge.
User Comments :