SMART hard disk error imminent failure means the monitoring system has detected critical issues, and the disk is about to fail. Follow the instructions from MiniTool to back up data first and then run HP Diagnostics, use CHKDSK, or try other approaches to solve the issue.
About SMART
Modern hard drives (HDDs) and SSDs have the built-in Self-Monitoring, Analysis, and Reporting Technology (SMART) system. It tracks various performance attributes, such as temperature, read/write errors, reallocated sector count, and power-on hours.
After predicting potential failures, the SMART system alerts users to take preventive action to avoid data loss before a serious issue occurs.
What Is SMART Hard Disk Error Imminent Failure
Each manufacturer uses unique error codes to identify specific problems with hard disks. For example, HP may display different codes, such as SMART hard disk error 301, 302, 309, 30A, 30B, 30C, 3F1, and 3F2. Below, we focus on these HP-specific error codes.
When starting up your computer, the error message may appear:
“The SMART hard disk check has detected an imminent failure.”

These errors are an early warning, indicating an impending hard drive failure. You cannot predict the exact moment the hard drive will fail; it could carry on for a few months or fail tomorrow.
What Causes SMART Errors
SMART hard disk errors are caused by a combination of hardware issues, software problems, and environmental factors.
We list possible reasons for the 3 categories of error codes.
SMART Hard Disk Error 301, 302, and 309
#301
SMART error 301 is a broad warning, indicating an imminent failure of the primary hard drive where your system is installed. The possible reasons include:
- System file corruption
- Outdated or misconfigured BIOS
- Physical damage
- Loose connection
- Overheating
- Unexpected shutdowns
- Virus or malware
#302
Error 302 (Hard Disk 2) refers to a secondary hard drive, such as a second internal disk or an additional storage device.
It can be caused by the following factors:
- Physical damage
- Internal component wear and tear
- Bad sectors
- Overheating
- Loose connection
#309
It signifies a critical drive failure and usually requires replacement. Various factors can give rise to SMART hard disk error 309:
- Bad sectors
- General wear and tear
- Physical shock
- High temperatures
SMART Hard Disk Error 30A, 30B, and 30C
SMART error codes 30A, 30B, and 30C are all less critical warnings, instead of an immediate hard drive failure.
They are primarily caused by:
- High temperature
- Physical damage
- Loose connection
- Wear and tear
- Power surges
- Unexpected shutdowns
HP Hard Disk Error 3F1 and 3F2
3F1 refers to the primary boot drive, while 3F2 refers to the secondary storage device. They often result from:
- Loose hard drive connection
- Corrupted system files
- A rare failure of the hard drive controller
- Failing hard drive
No matter which error code above your HP computer displays, it means your hard drive is likely to fail eventually. The immediate action is to back up important data to an external hard drive or cloud.
Back up Files to Avoid Data Loss
For cloud backup, we recommend OneDrive, Google Drive, or Dropbox. Learn how to backup your computer to the cloud in our detailed guide.
To back up files to an external hard drive, it is recommended to use MiniTool ShadowMaker, a reliable PC backup software for Windows 11/10/8/7.
This tool protects your data by creating backups of files, folders, partitions, disks, and the entire system. It offers various backup options, including full, incremental, and differential backups.
Moreover, this backup and disaster recovery software also supports other features, such as scheduled backups, disk cloning, and file sync.
MiniTool ShadowMaker TrialClick to Download100%Clean & Safe
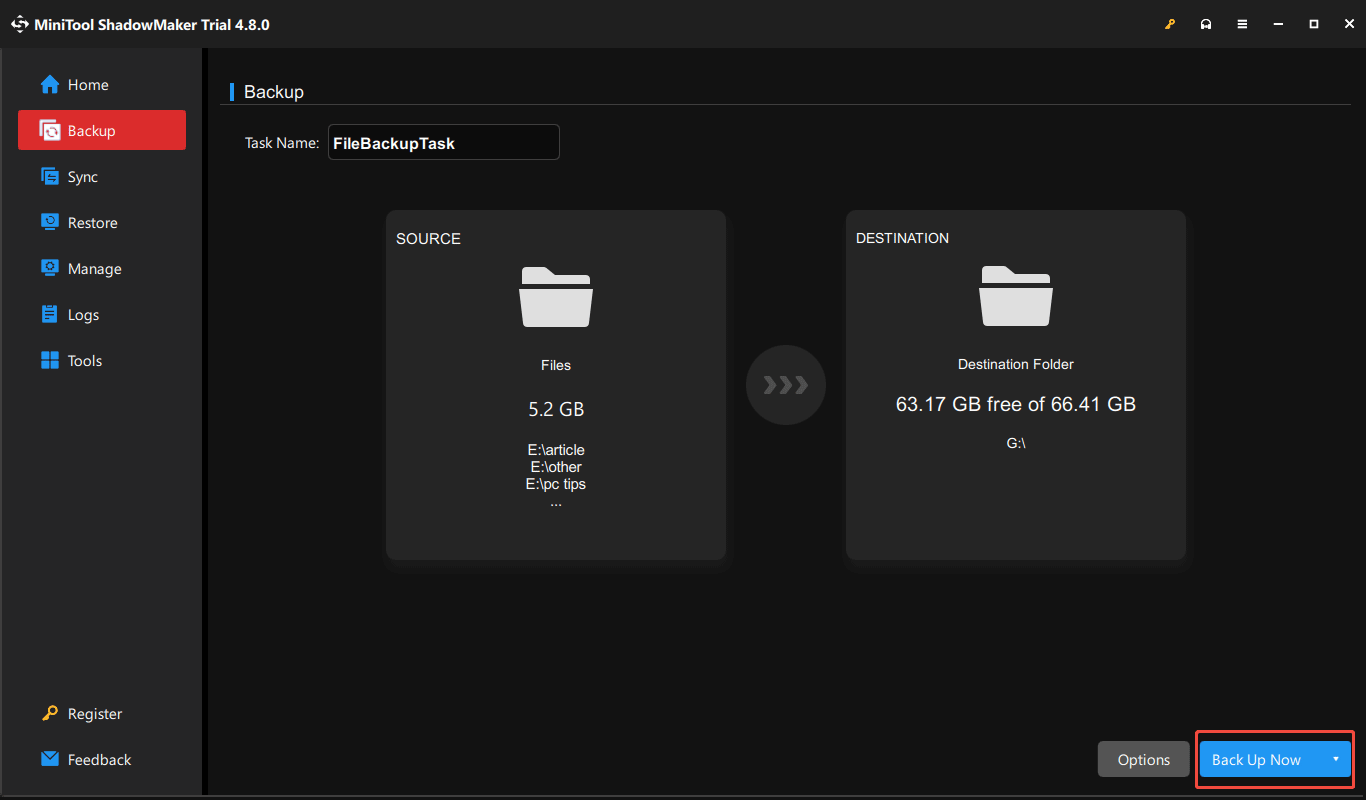
Here is how to backup files to an external hard drive.
Step 1: Connect your external hard disk to your HP computer and launch MiniTool ShadowMaker.
Step 2: Navigate to the Backup tab, click SOURCE > Folders and Files, and select what you want to back up in Computer.
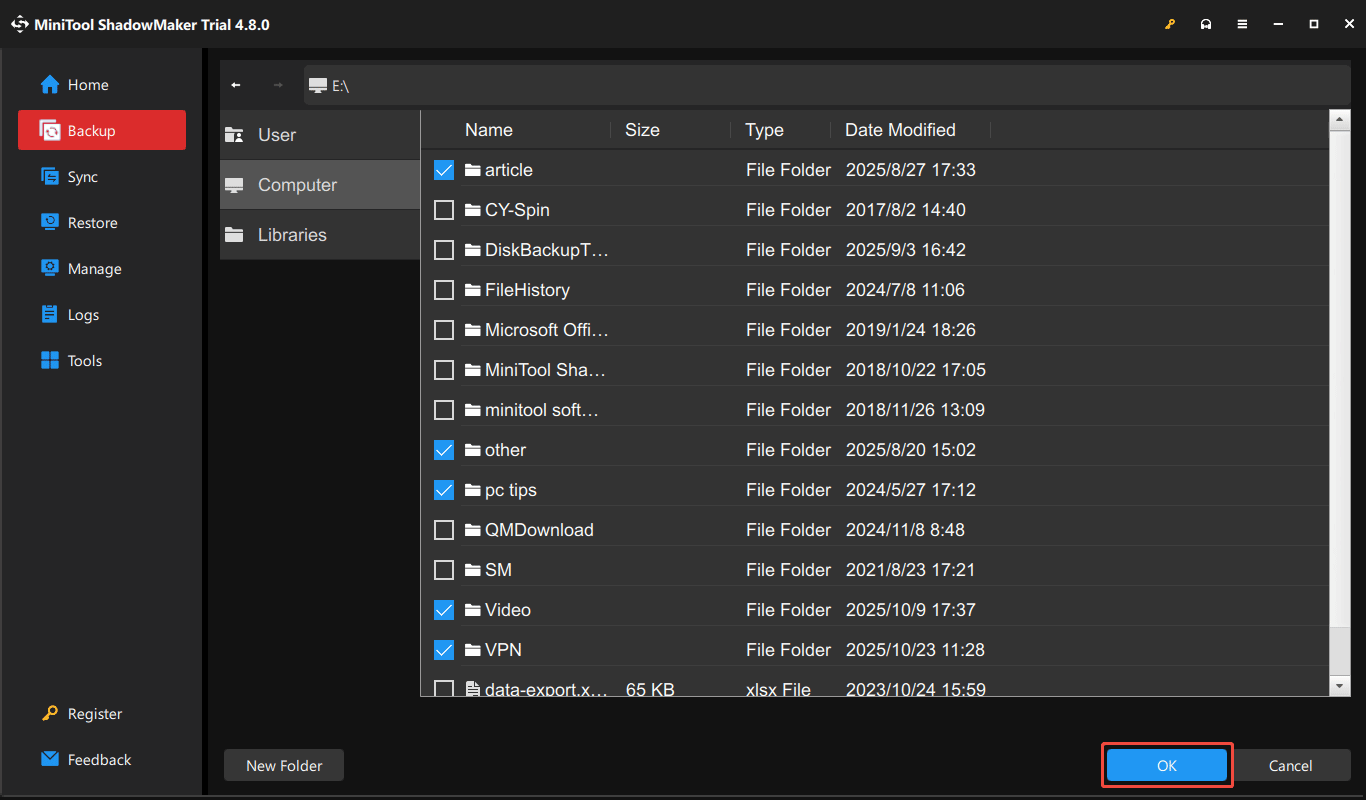
Step 3: Choose DESTINATION and pick the external drive as the storage device.
Step 4: Execute the backup by clicking Back Up Now.
After data backup, your next steps should be diagnosing the SMART error code before replacing the hard drive.
How to Fix SMART Hard Disk Error 301/302/309/30A/30B/30C/3F1/3F2
To resolve your issue, try some simple fixes, like performing a hard reboot, running CHKDSK, using the HP diagnostics tool, checking the disk connection, resetting the BIOS, and using other methods. If these steps fail, the hard drive needs to be replaced.
Option 1: Perform a Hard Reset
Occasionally, a hard reset or hard reboot resolves short-term issues. Do this if SMART hard disk 301, 302, 309, or 30A occurs.
Follow these steps:
Step 1: Shut down the HP PC completely and unplug it from its power source.
Step 2: Disconnect all unnecessary external devices, such as USB drives, printers, scanners, headphones, and others.
Step 3: If possible, remove the battery.
Step 4: Press and hold the Power button for approximately 15 seconds to discharge the residual power.
Step 5: Reinsert the battery, plug in the power supply, and power on the computer.
Check if you still receive an error. If yes, continue with other troubleshooting tips.
Option 2: Run HP PC Hardware Diagnostics
On the screen that displays the SMART disk error, Windows advises you to run the hard disk test.
The HP computer offers a professional tool, HP PC Hardware Diagnostics, to test and diagnose hardware problems regarding the CPU, RAM, hard drive, and other components.
You can run this software either through the UEFI utility or the Windows desktop app. Here, we show you how to perform the disk test using HP PC Hardware Diagnostics UEFI.
Step 1: Hold the Power button for at least 5 seconds to shut down the computer.
Step 2: Turn on the machine and immediately press Esc repeatedly (about once per second) until the Startup Menu appears.
Step 3: Press the F2 key and click Component Tests on the main menu.
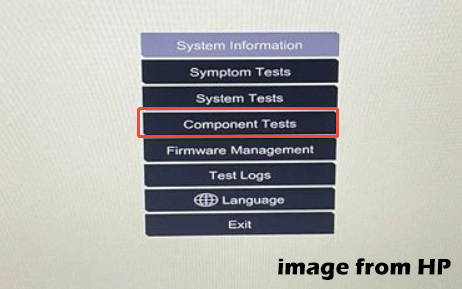
Step 4: Click Storage or Hard Drive and then select Quick Test.
Step 5: Click Run once, and the quick test begins.
Step 6: You need to run the Extensive Test if the quick test passes, but you still experience problems with the hard drive.
This is a thorough check that can take two hours or longer, as it includes the SMART Check, Long DST (Drive Self Test), Short DST, and Optimized DST. To perform these tests separately, go to the Hard Drive Tests menu.
Step 7: Click Troubleshoot if there is a failure of the disk test.
Step 8: Resolve the detected problems by following the instructions on the screen.
If HP PC Hardware Diagnostics UEFI fails to fix the problems, contact HP Customer Support by clicking Yes, scanning the QR Code, or writing down the failure ID and product ID.
Alternatively, proceed with the methods below to solve SMART hard disk error 309/302/301/30A/30B/30C/3F1/3F2.
Option 3: Check Hard Drive Connections
A connection between the hard drive and computer is likely loose, causing hard disk error 3F1/3F2/301/30A or another error.
Check the connection. If you are unsure if your disk is inserted correctly into the hard drive slot, remove and reseat it.
Step 1: Turn off your HP PC, disconnect it from the power, and open the case.
Step 2: Locate the hard drive and gently disconnect any data and power cables connected to that disk.
Step 3: Unscrew the disk from its bay and pull the drive out.
Step 4: Place the drive back and secure it with screws.
Step 5: Plug the data and power cables into the drive and make sure they are securely seated.
Step 6: Reassemble the computer case and turn on the PC to see if the issue is resolved.
Option 4: Update/Reset BIOS
HP hard disk 3F1/3F2/301/302/309/30A/30B/30C often stems from the outdated or incorrect BIOS settings.
First, check if your BIOS needs an update.
hp-bios-update
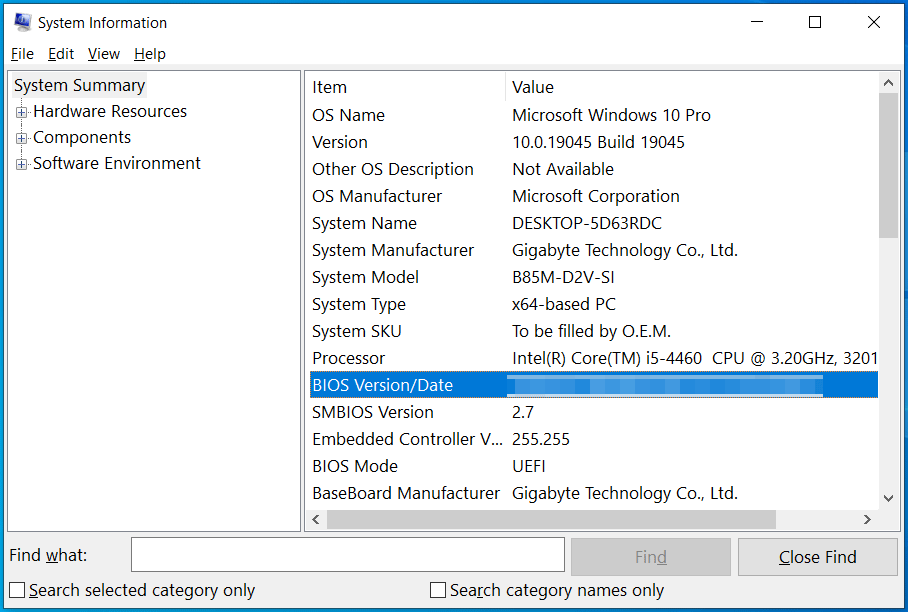
Step 1: Press Win + R, type msinfo32, and click OK to open the System Information window.
Step 2: Locate the BIOS Version/Date line and check your current version.
Step 3: Go to the HP website, select a product, enter your computer model, and begin a search.
Step 4: Find the latest BIOS version and compare it with the version you found in System Information.
Then, consider an update if your PC uses an older BIOS version. As for the details, refer to our BIOS update guide.
If you don’t need to update the BIOS, resetting the BIOS to default settings is an excellent option.
Step 1: Restart the computer and repeatedly press the Esc key immediately.
Step 2: In the Startup Menu, press F10 to open the BIOS Setup Utility.
Step 3: Use the arrow keys to navigate to the Exit or Main tab.
Step 4: Choose Restore Defaults, Load Setup Defaults, or a similar option to reset the BIOS.

Step 5: Confirm the reset and click Save Changes and Exit to restart the computer.
Then, see if hard disk 1 301 or another error persists.
Option 5: Check Fans in PC
One of the most common causes of a disk failure is overheating. Therefore, check your computer’s fans and ensure they work correctly and the vents are not blocked.
To check fans:
- See if the fans are physically spinning when the computer is on.
- Listen for any unusual or loud noises.
- Check for any dust accumulation in the air vents or on the blades.
Alternatively, you can use a tool like HWMonitor to monitor temperatures, voltages, and fan speeds in real time.

Option 6: Run CHKDSK
SMART hard disk error 302, 309, or another error can occur due to bad sectors. You should perform a disk check and mark bad sectors unusable.
To do that:
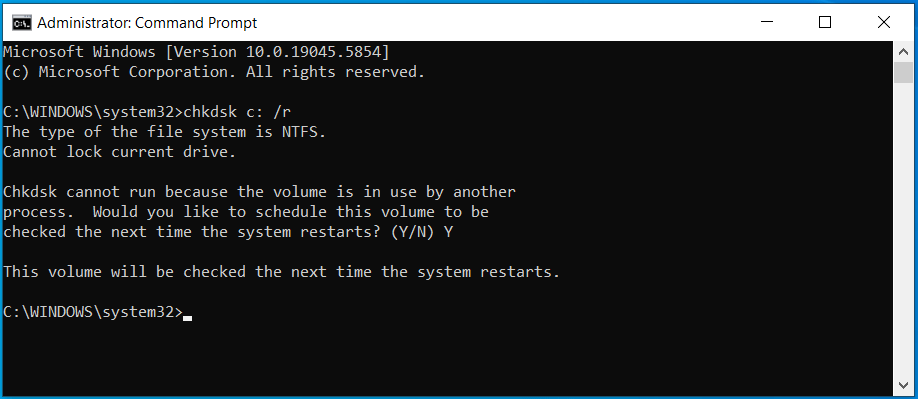
Step 1: Type cmd in the Search bar and click Run as administrator.
Step 2: Type chkdsk c: /r and press Enter.
Replace c: with the driver letter of the partition that you wish to check.
Here /r locates bad sectors and attempts to recover readable information. Moreover, it includes the functionality of the /f parameter, which fixes file system errors.
Step 3: Type Y to schedule the scan for the next restart if the drive is in use.
MiniTool Partition Wizard FreeClick to Download100%Clean & Safe
When the drive has many bad sectors, we strongly recommend replacing the hard drive as soon as possible. Continuing to use the drive may lead to system instability and complete failure.
Option 7: Replace the Hard Drive
If you have backed up important files, you can directly replace the failing disk with a new HDD or SSD and reinstall the system.
But if you don’t want to reinstall the OS, consider cloning the old hard drive to the new disk and then replacing it.
To clone a hard drive, we also recommend MiniTool ShadowMaker. It offers the Clone Disk feature to effectively transfer all the disk data, including the operating system, personal files, and other data, to another disk.
MiniTool ShadowMaker TrialClick to Download100%Clean & Safe
Step 1: Connect your new hard drive to the PC using a USB adapter and launch the software.
Step 2: Go to its Tools page and click Clone Disk to proceed.
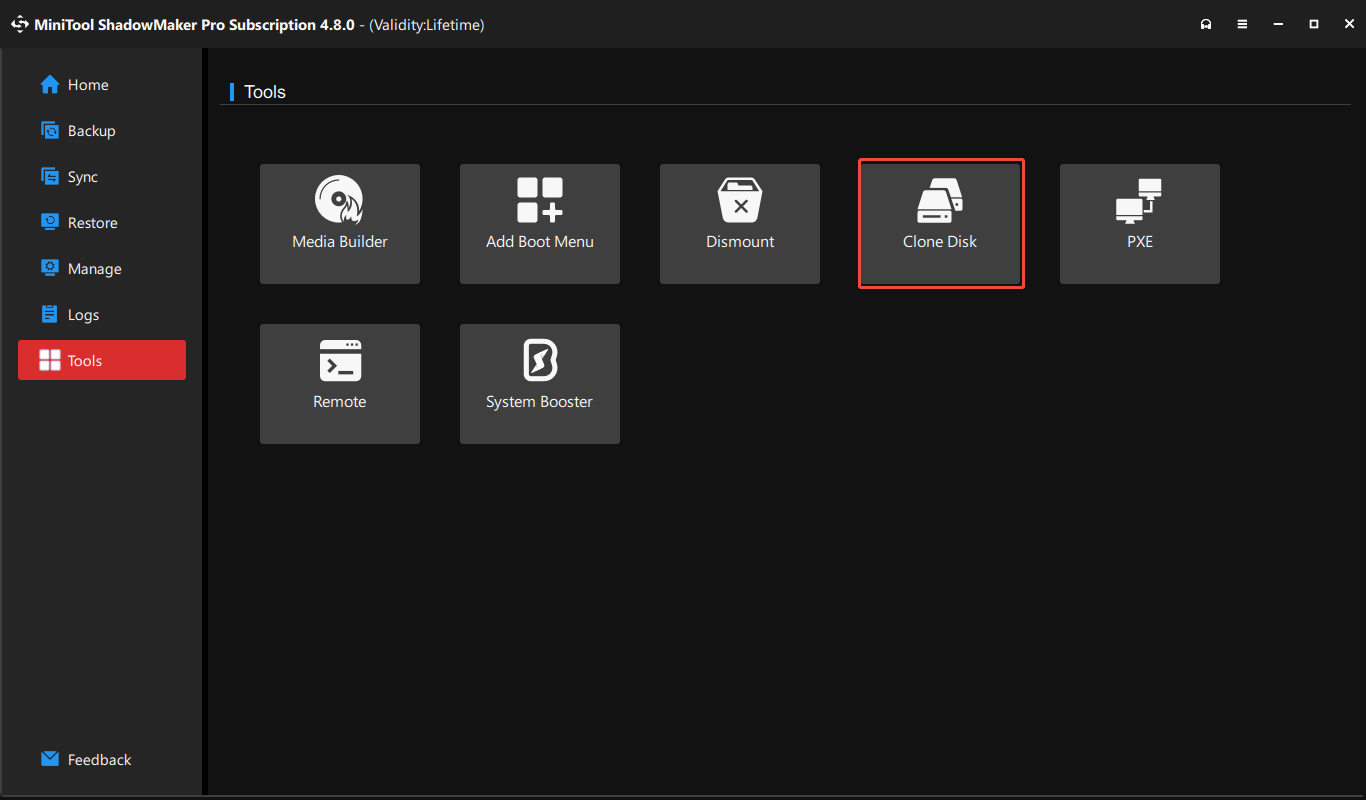
Step 3: Select the disk with bad sectors as the source drive and choose the new disk as the target drive.
Step 4: Click Start to begin cloning.
After cloning, replace the faulty hard drive with your new one. Your computer can boot successfully from that new disk.
Bottom Line
This post outlines multiple SMART hard disk errors, such as 301, 302, 309, 30A, 30B, 30C, 3F1, and 3F2, the potential causes, and effective solutions. Follow the comprehensive guide to back up crucial data and take troubleshooting steps when receiving a disk error.
If you have any issues with MiniTool ShadowMaker, send an email to [email protected].
SMART Hard Disk Error FAQ
2. Try a different port
3. Run CHKDSK
4. Uninstall and reinstall the disk driver
5. Format your HDD
1. Check physical connections
2. Load default BIOS settings
3. Run HP PC Hardware Diagnostics
4. Adjust BIOS settings
5. Replace the hard drive
About The Author

Position: Columnist
Vera has been working at the MiniTool Team for over 10 years as a technical editor and content writer. She mainly focuses on disk and partition management, data recovery, Windows backup and restore, and PC troubleshooting. Through in-depth software testing and hands-on experience, she has helped users solve a wide range of computer problems and better protect their data on Windows devices.
User Comments :