There’s nothing more frustrating than encountering Sony VAIO laptop black screen. Once it occurs, you cannot access anything on your computer. What can you do to tackle this annoying issue? Try these solutions outlined in this guide from MiniTool Solution to bring your computer back to life now!
Sony VAIO Laptop Black Screen
Although Sony VAIO offers laptops of high quality, you might still meet some problems while using them. For example, sometimes, your Sony VAIO laptop is unable to boot and shows a black screen. Once Sony VAIO laptop screen goes black, it might lead to lower productivity, the loss of unsaved work, or the permanent loss of data.
Most of the time, the screen goes black because the CPU shuts down to avoid overheating. All you need to do is to turn it off and put it to a cooler place. Besides, Sony VAIO laptop black screen can also be boiled down to the following elements:
- A damaged monitor.
- Conflicted external devices.
- Loose connection between RAM sticks and their slots.
- Incompatible graphics drivers.
- Malfunctional Windows Explorer.
- A buggy Windows update.
How to Fix Sony VAIO Laptop Screen Black on Windows 10/11?
Before taking further actions, the tips below might be useful to you:
- Plug your computer into an AC outlet to fully charge it.
- Make sure all the cables are inserted correctly or check if they are damaged.
- Press Shift + F8 + Power button simultaneously.
- Press and hold Ctrl + Alt + Delete to reboot the OS or evoke Security Options.
Preparation: Boot Your VAIO Laptop into Safe Mode
Since your Sony VAIO laptop cannot boot in the normal mode, you might need to enter Safe Mode to fix most issues like outdated drivers, software conflicts, and more. This mode only loads the most basic drivers and services necessary for Windows to function. Follow these steps:
Step 1. Shut down your Sony VAIO laptop.
Step 2. After it completely powers off, press and hold the Assist button until the VAIO Care Rescue Mode screen.
Step 3. Use the arrow keys to highlight Start Rescue & Recovery [F10] and hit Enter.
![Start Rescue & Recovery [F10]](https://images.minitool.com/minitool.com/images/uploads/2024/09/sony-vaio-laptop-black-screen-1.png)
Step 4. Choose your keyboard layout and then you will enter Windows Recovery Environment.
Step 5. Click on Troubleshoot > Advanced options > Command Prompt.
Step 6. In the command window, input bcdedit /set {default} bootmenupolicy legacy and hit Enter.
Step 7. Once done, quit Command Prompt and hit Turn off your PC in the Choose an option screen.
Step 8. Press the Power button to turn on your computer and then press the F8 key repeatedly.
Step 9. On the Windows Start menu, choose to enable Safe Mode (or enable Safe Mode with Command Prompt or Networking as per your needs).
Fix 1: Remove All Unnecessary External Devices
External hard drives, USB flash drives, webcam, printers, scanners, or other accessories are also likely to spark off problems during boot. If your Sony VAIO laptop screen goes black on startup, please unplug all the unnecessary peripherals (except your monitor, mouse, and keyboard) and restart your computer. To do so:
Step 1. Shut down your Sony VAIO laptop and disconnect all the unnecessary devices mentioned above.
Step 2. Press and hold the Power button for 10-15 seconds to drain the rest power of your computer.
Step 3. After that, reboot your system. If your Windows machine can boot normally, then the culprit of the black screen issue must be one of these peripherals. To find out the conflicted device, you need to connect it to your computer one by one until your screen turns black again. Then, replace the problematic device with a new one.
Fix 2: Reseat RAM Modules
Another common cause for Sony VAIO laptop black screen might be a loose connection between memory modules/sticks and slots. Therefore, you can reseat each or them and then restart your computer to see if it works. To do so:
Step 1. Power off your computer and remove the power cable.
Step 2. Open the laptop cover and locate your RAM modules.
Step 3. Clean the RAM modules and their slots in time and then reseat each component or switch their slots.
Fix 3: Test the Monitor
Chances are that your Sony VAIO cannot detect the monitor or the monitor is damaged by accident. To exclude its influence, you can connect your computer to an external monitor. To do so:
Step 1. Power off your Sony VAIO laptop.
Step 2. Connect another monitor to your computer.
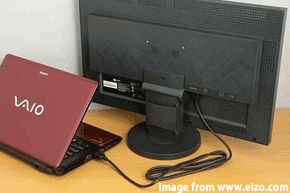
Step 3. To select display output, press Fn + F7 to toggle LCD Only, Display Only, or Both. If the external monitor still displays nothing on the screen, the culprit might be the conflict between the graphics card driver and LCD display.
Also see: How to Set up Dual Monitors on Windows 11/10
Fix 4: Update Graphics Driver
The graphics driver is of vital importance because it can facilitate the communication between your operating system and graphics card. Once the graphics driver is corrupted or outdated, it will create hardware malfunctions, file errors, and communication hazards in Windows 10/11. To fix this error, it’s essential to update your graphics driver in time. Follow these instructions:
Step 1. Right-click on the Start menu and select Device Manager.
Step 2. Expand the Display adapters category to show your graphics card and right-click on it to choose Update driver.
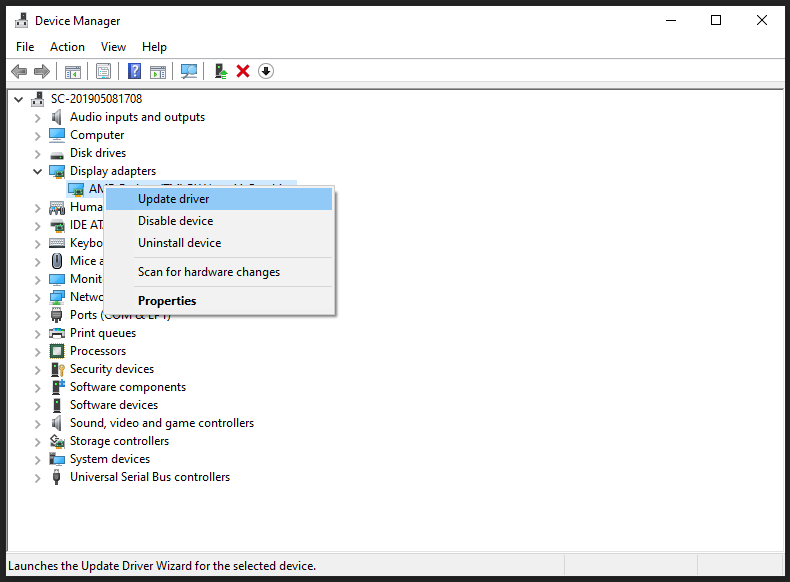
Step 3. Click on Search automatically for drivers and follow the on-screen guideline to complete the reset process.
Fix 5: Uninstall Recently Installed Update
Microsoft releases some updates periodically to fix some bugs reported by users and add some new features to improve the user experience and security of your system. At times, Windows updates can also trigger some issues like black screen or slower operation speed after Windows update. In this case, uninstalling the problematic update might be helpful. To do so:
Step 1. Press Win + R to open the Run box.
Step 2. Type appwiz.cpl and hit Enter to launch Programs and Features.
Step 3. In the left pane, click on View installed updates and then you can see a list of updates installed on your computer.
Step 4. Find the most recent installed update and right-click on it to select Uninstall.
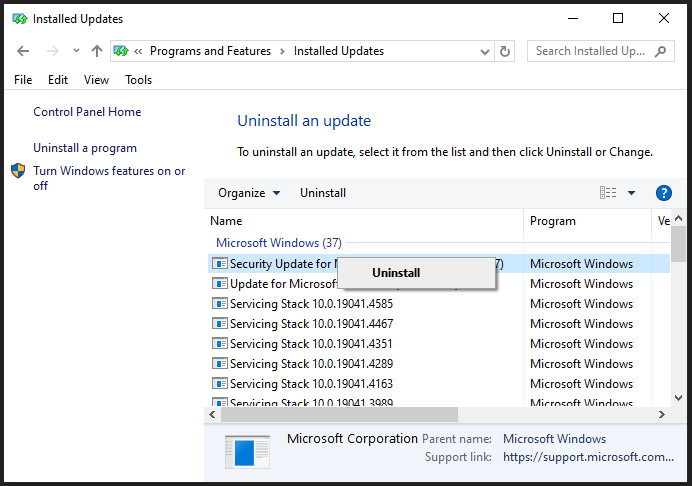
Step 5. Confirm this operation and wait for its completion.
Fix 6: Restart File Explorer
Windows Explorer is responsible for loading your desktop and icons. Consequently, when there is a malfunction in this feature, it can also result in Sony VAIO black screen with cursor or taskbar. So, you can restart it to check for any improvements. To do so:
Step 1. Press Ctrl + Shift + Esc to open Task Manager.
Step 2. In the Processes tab, locate Windows Explorer and right-click on it to choose End task.
Step 3. Click on File in the top left corner and select Run new task.
Step 4. Type explorer.exe and click on OK to launch Windows Explorer again to check if Sony VAIO laptop black screen but still turning on is gone.

Fix 7: Perform System Restore
If you have made any significant changes on your Sony VAIO laptop before black screen appears, consider performing a system restore. By doing so, you can cancel these changes you’ve made and restore the operating system to a selected state. Here’s how to do it:
Step 1. Press Win + R to open the Run box.
Step 2. Type rstrui and hit Enter to launch System Restore.
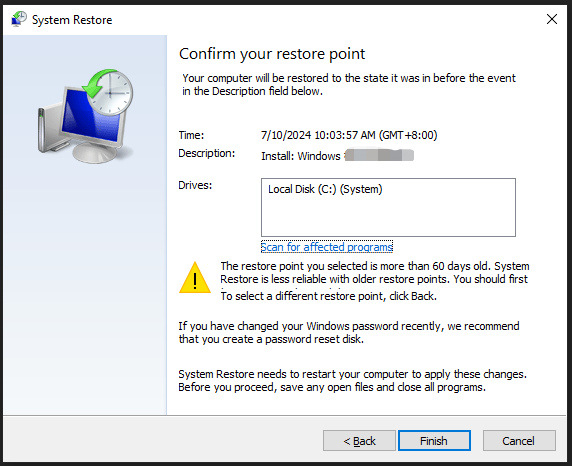
Step 3. Click on Next > pick a restore point according to the created time and description > hit Next.
Step 4. After confirming all the details, hit Finish and wait for the process to complete.
Fix 8: Factory Reset Your Computer
If Sony VAIO laptop black screen still exists, the best bet is to factory reset your Sony VAIO laptop to its factory settings. This is an effective solution for a variety of problems on your computer including virus infection, computer black screen, software glitches, system performance issues, and more.
However, this operation might erase all the data on your hard drive, so you had better back up all the crucial files with MiniTool ShadowMaker before a factory reset. In this way, it will be much easier for you to restore your data if accidents occur.
MiniTool ShadowMaker TrialClick to Download100%Clean & Safe
Here’s how to perform a factory reset of your PC:
Step 1. Enter Windows Recovery Environment.
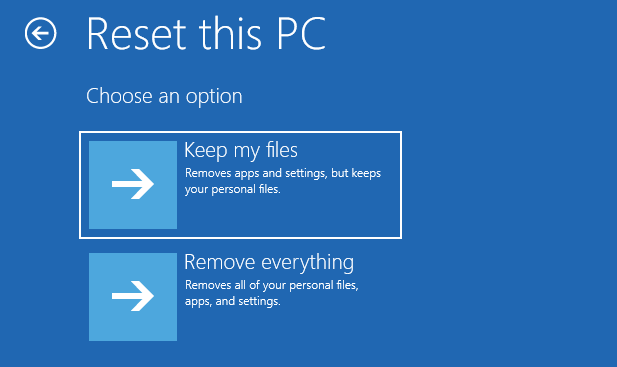
Step 2. In the Choose an option screen, select Troubleshoot > Reset this PC.
Step 3. Then, there are 2 options for you:
- Keep my files – deletes all the settings and programs, but keeps your personal files.
- Remove everything – removes all the content on your computer, including installed apps, customized settings, and individual files.
Step 4. Choose a way to install your Windows and then follow the instructions on the screen to complete the rest process.
Suggestion: Create a System Image with MiniTool ShadowMaker
Now, you must be free from Sony VAIO laptop black screen. Although these solutions above seem pretty easy, you still need to spend much time looking for the root cause of the problem. To streamline the troubleshooting process, you can consider creating a system image.
In this way, you can directly restore your OS to a working state rather than excluding the causes one after another. To do so, MiniTool ShadowMaker is a good choice. This PC backup software offers robust data protection ability and it is renowned for its one-click system backup solution. In other words, it only takes a few clicks to back up your system.
With a file backup, partition backup, system backup, or disk backup in hand, it will be much easier to restore your data and system in the event of severe issues in your system like black screen of death, system crashes, malware attacks, hard drive failures and more. In addition, if you want to enhance the overall system performance of your computer, cloning HDD to SSD or moving Windows to another drive is also permitted.
Now, let me show you how the one-click system backup works:
Step 1. Launch MiniTool ShadowMaker and hit Keep Trial to enter its main interface.
MiniTool ShadowMaker TrialClick to Download100%Clean & Safe
Step 2. In the Backup page, you can choose what to backup and where to save the backup image file. As you can see, the system-required partitions are selected by default in SOURCE, so you only need to pick a storage path in DESTINATION.
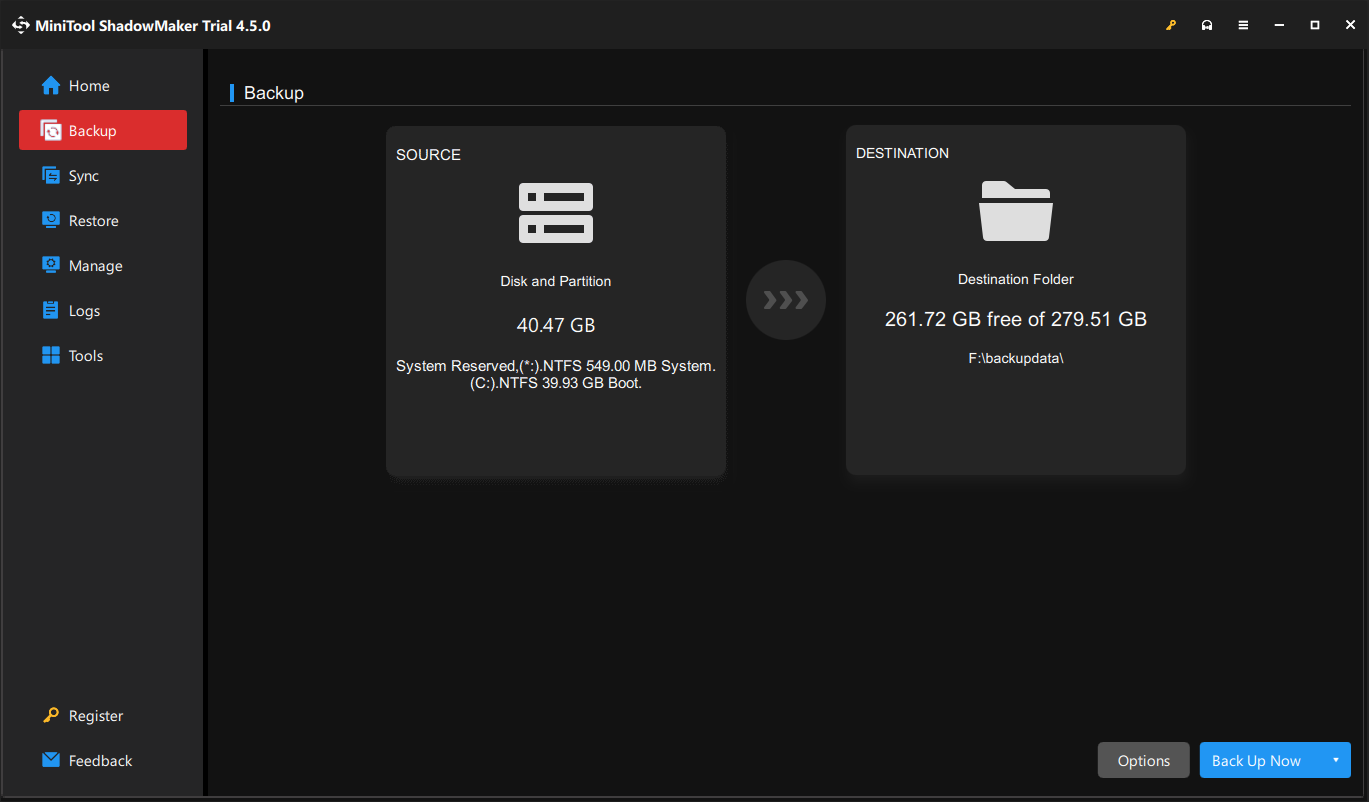
Step 3. Click on Back Up Now to start the process at once.
We Need Your Voice
This guide gets into the nuts and bolts of Sony VAIO laptop black screen of death. What’s more, with a system image by your side, it will save much time to restore your system. For more problems about our product, please contact us via [email protected]. We are looking forward to receiving your feedback!


User Comments :