
“We couldn't connect to the update service” usually appears when Windows Update cannot communicate with Microsoft update servers. This guide outlines the common causes and provides practical step-by-step solutions to fix the issue on Windows 10 and Windows 11.
Quick Answer
The “We couldn’t connect to the update service” error can prevent Windows updates, Windows Security updates, and Microsoft Store downloads/installations from working properly.
To fix this issue in Windows 11/10, try the following solutions, from basic fixes to advanced troubleshooting steps.
- Restart the Windows Update Service
- Run Windows Update Troubleshoot
- Change DNS Servers
- Delete the SoftwareDistribution Folder
- Repair Corrupted System Files
- Disable Third-Party Antivirus Software
- Install the Windows Updates Manually
We Couldn’t Connect to the Update Service
Sometimes, when you perform a Windows update, you may receive the following error message – “We couldn’t connect to the update service. We’ll try again later, or you can check now. If it still doesn’t work, make sure you’re connected to the Internet.”
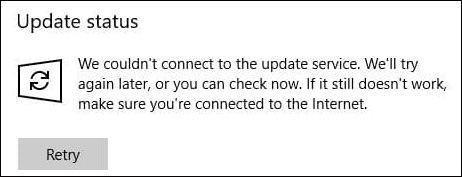
Also, you may find that you can’t update Windows Defender and Microsoft Store is not working.
This issue may affect laptops and desktops from various brands, including Dell, HP, Lenovo, ASUS, and Acer, running Windows 10 or Windows 11. It often appears with specific error codes, such as 0x80072EE2, 0x80070005, 0x80070057, and so on.
Why Can’t Windows Connect to the Update Service?
It can be caused by several reasons, including:
- The Windows Update service is stopped or disabled.
- There is a corrupted Windows Update cache.
- Network settings or DNS problems block the update.
- Third-party antivirus is blocking Windows Update.
Solutions to Fix the “We Couldn’t Connect to the Update Service” Issue
Before trying the following solutions, you should follow these steps:
- Verify your Internet connection
- Restart your PC and router
- Check if your computer has enough space
After doing these things, if the “Windows 10 we couldn’t connect to the update service” still appears, you can navigate to the next solutions.
Solution 1: Restart the Windows Update Service
The first solution is to restart your Windows Update Service and see if that fixes the “we couldn’t connect to the update service” problem. The steps are as follows:
Step 1: Press the Windows and R keys at the same time to open the Run dialogue box. Type services.msc and click OK to open the Services application.
Step 2: From the list of applications, right-click Windows Update to select Restart.
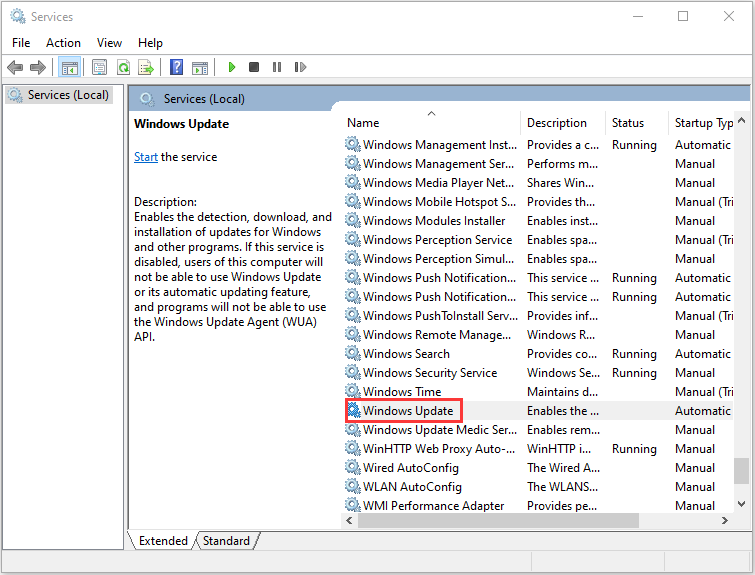
Then update your Windows again and check to see if the “Windows 10 can’t connect to update service” has gone. If not, try the next solution.
Solution 2: Run Windows Update Troubleshoot
You can also use the Windows Update Troubleshooter since it can help you to find out the cause of the “Windows update couldn’t connect to the update service” issue and fix it. You can refer to the guide below.
Step 1: Press the Windows key and I key together to open the Settings application.
Step 2: Then go to the Troubleshoot tab and choose Windows Update.
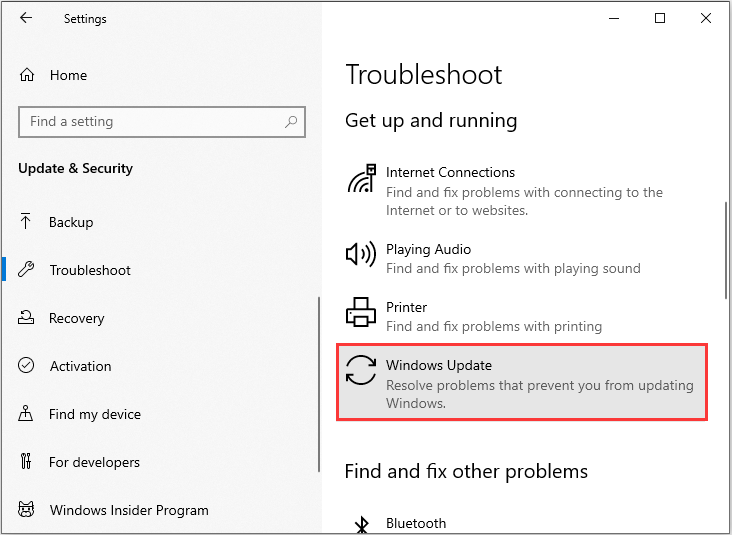
Step 3: Click Run the troubleshooter to continue. Then the Windows Update Troubleshooter will start detecting problems. Then, you just need to click Apply this fix.
Then Windows Update Troubleshooter will continue detecting and fixing the problem. When the whole process is finished, you are required to reboot your computer to take effect and run Windows update to see whether the “Windows update says service not running” issue is solved.
Solution 3: Change DNS Server to Google Public DNS
If running Windows Update Troubleshooter is not working, you should consider changing the DNS servers of your PC to fix the “we couldn’t connect to the update service Windows 10” issue. Follow the steps below:
Step 1: Open Control Panel by pressing the Windows + R keys, typing control panel, and pressing Enter.
Step 2: Click Network and Sharing Center and click Change adapter settings.
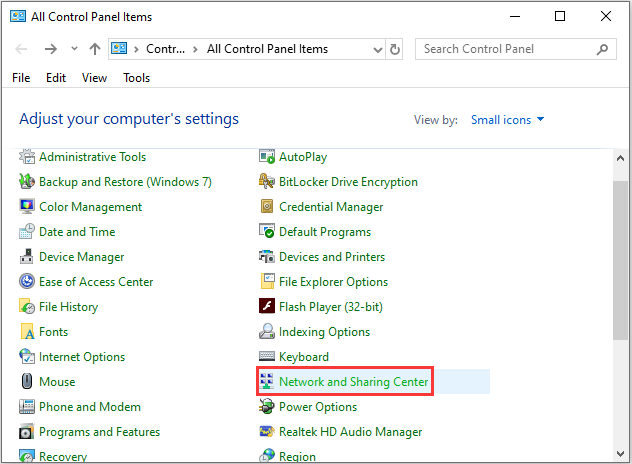
Step 3: Right-click your network connection icon and select Properties.
Step 4: Choose Internet Protocol Version 4 (TCP/IPv4) and click Properties.
Step 5: Click the General tab and click Obtain DNS server address automatically if it is not selected, then click OK. If it is already selected, then you can click Use the following DNS server address, input 8.8.8.8 in Preferred DNS server and 8.8.4.4 in Alternate DNS server, and click OK.
After that, launch Windows Update and then scan for updates to see if the “we couldn’t connect to the update service” issue has gone.
Solution 4: Delete SoftwareDistribution Folder
In this section, we walk through the fourth method – delete the SoftwareDistribution folder to fix the “Windows 10 we couldn’t connect to the update service” issue. To do that, you can follow the steps.
Step 1: Type Command Prompt in the Search menu. Then right-click it to choose Run as administrator:
Step 2: Run the following commands one by one and press Enter:
net stop wuauserv
net stop cryptSvc
net stop bits
net stop msiserver
Step 3: Now go to the C:\Windows\SoftwareDistribution folder and delete all the files & folders inside by pressing the Ctrl+A keys to select all and then right-clicking to choose Delete.
After emptying this folder, you can either restart your computer or type the following command one by one in Command Prompt and press Enter to restart Windows Update related services:
net start wuauserv
net start cryptSvc
net start bits
Now, run Windows Update again and check to see if you still meet the “Windows update says service not running” issue. If the error still exists, try the next fix – repair corrupted system files.
Solution 5: Repair Corrupted System Files
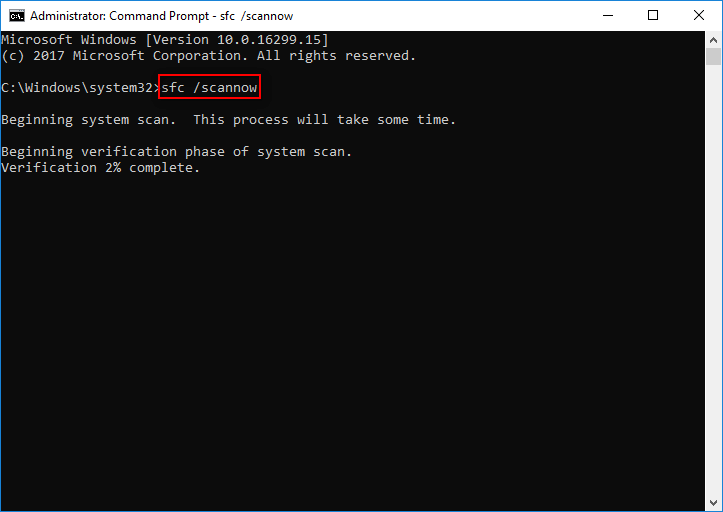
Windows system files corruption can cause the “we couldn’t connect to the update service” issue. In such an event, you can use two command-line utilities – SFC (System File Checker) and DISM(Deployment Image Servicing and Management) to fix your Windows system files.
Here is how to use DISM and SFC to fix corrupt system files:
Step 1: Input Command Prompt in the search bar and click Run as administrator from the context menu.
Step 2: Type the following command and press Enter.
Dism /Online /Cleanup-Image /RestoreHealth
Step 3: Run an SFC scan using the command:
sfc /scannow
Solution 6: Disable Third-Party Antivirus Software
If Windows update couldn’t connect to the update service, the culprit might be third-party antivirus software. So if you have installed one on your computer, it is recommended to disable it to fix the error.
However, if this way doesn’t work, then you can try to uninstall your third-party antivirus completely and then update your operating system. This post – Multiple Ways to Disable Avast for PC and Mac Temporarily/Completely may be the one you need.
You don’t need to worry about your computer’s safe because there is a strong built-in antivirus on Windows 10 – Windows Defender protecting your PC. If you have uninstalled the third-party anti-virus software, you still can’t connect to the update service, then you need to try the last solution.
Solution7: Install the Windows Updates Manually
The last solution for you is installing the Windows Updates manually. Here is how to do that:
Step 1: Open the Settings application again and go to the Update & Security section. Then click View update history.
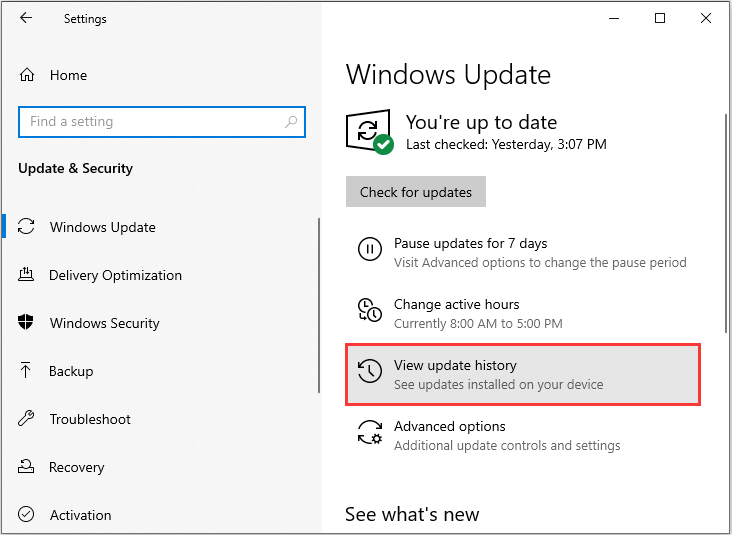
Step 2: Copy the recent KB number of the Windows Update package.
Step 3: Go to the Microsoft Update Catalog website. Paste the KB number of the Windows Update package in the Search box and press Enter.
Step 4: Click the Download button and a popup window will appear. In the popup window, click the .msu file link to download it.
When the file has finished downloading, double-click the .msu file and Windows will install the new update. Now, the “we couldn’t connect to the update service Windows 10” issue should be fixed.
Top Recommendation: Back up Your Windows System
After fixing the “we couldn’t connect to the update service” error, what should you do? It is recommended to create a system image. Speak of creating a system image, it is highly recommended to use MiniTool ShadowMaker – a piece of professional and powerful backup and restore software.
You can use MiniTool ShadowMaker to back up files and folders, disks and partitions, and also the operating system. And in addition to restoring the system backup to the original device, you can also do the universal restore when restoring to a different computer with dissimilar hardware.
What’s more, you can use it to sync files and folders to other locations and use the Disk Clone feature to create a bootable external hard drive. And you can use it for free within 30 days. Now, click the following button to download MiniTool ShadowMaker Trial.
MiniTool ShadowMaker TrialClick to Download100%Clean & Safe
Here is how to create a system image with MiniTool ShadowMaker.
Step 1: Launch MiniTool ShadowMakeer. Click Keep Trial.
Step 2: Then, go to the Backup page. MiniTool ShadowMaker chooses the system as the backup source by default.
Step 3: Click the DESTINATION module to choose the backup destination. Here are four available paths including User, Computer, Libraries, and Shared.
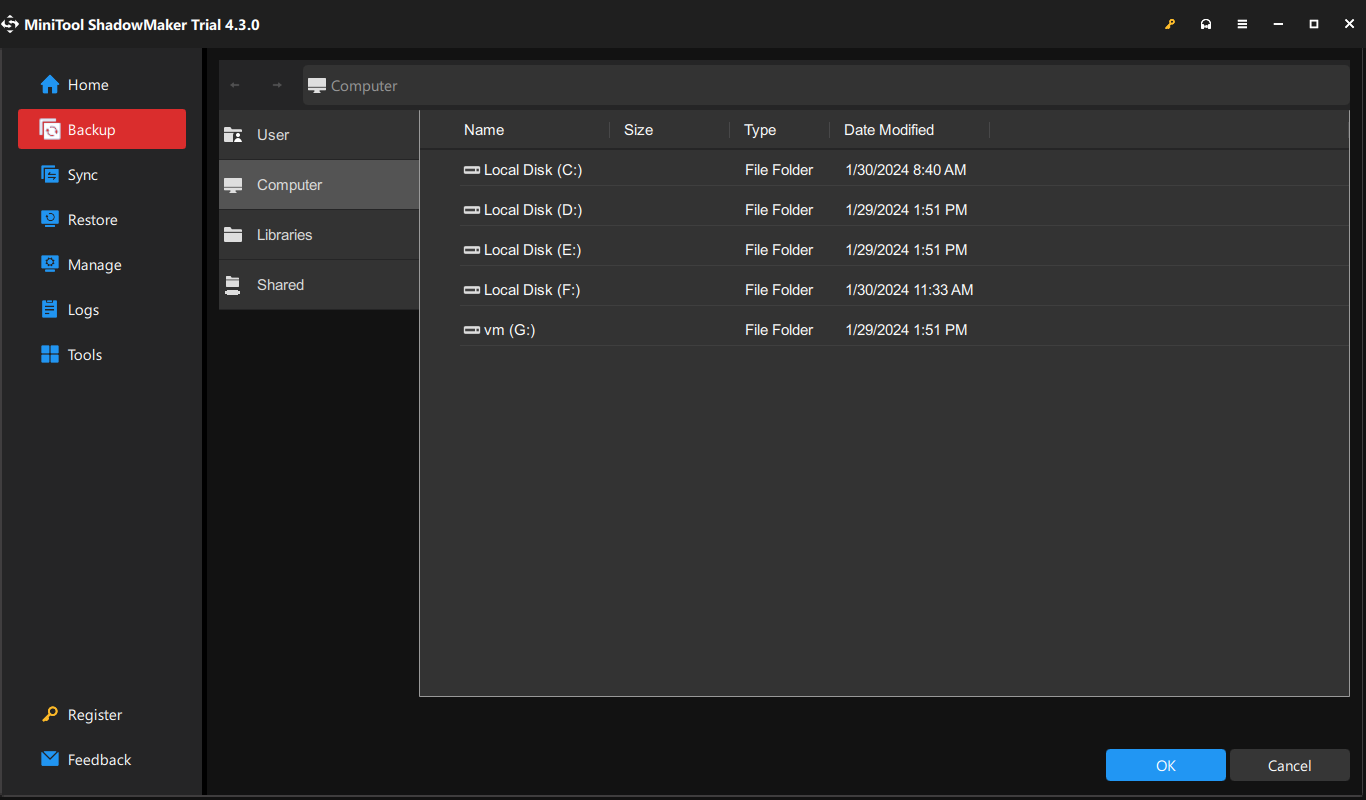
Step 4: After selecting the backup source and destination, you can click Back Up Now to perform the backup task immediately. Or click the Back Up Later button to delay the task.
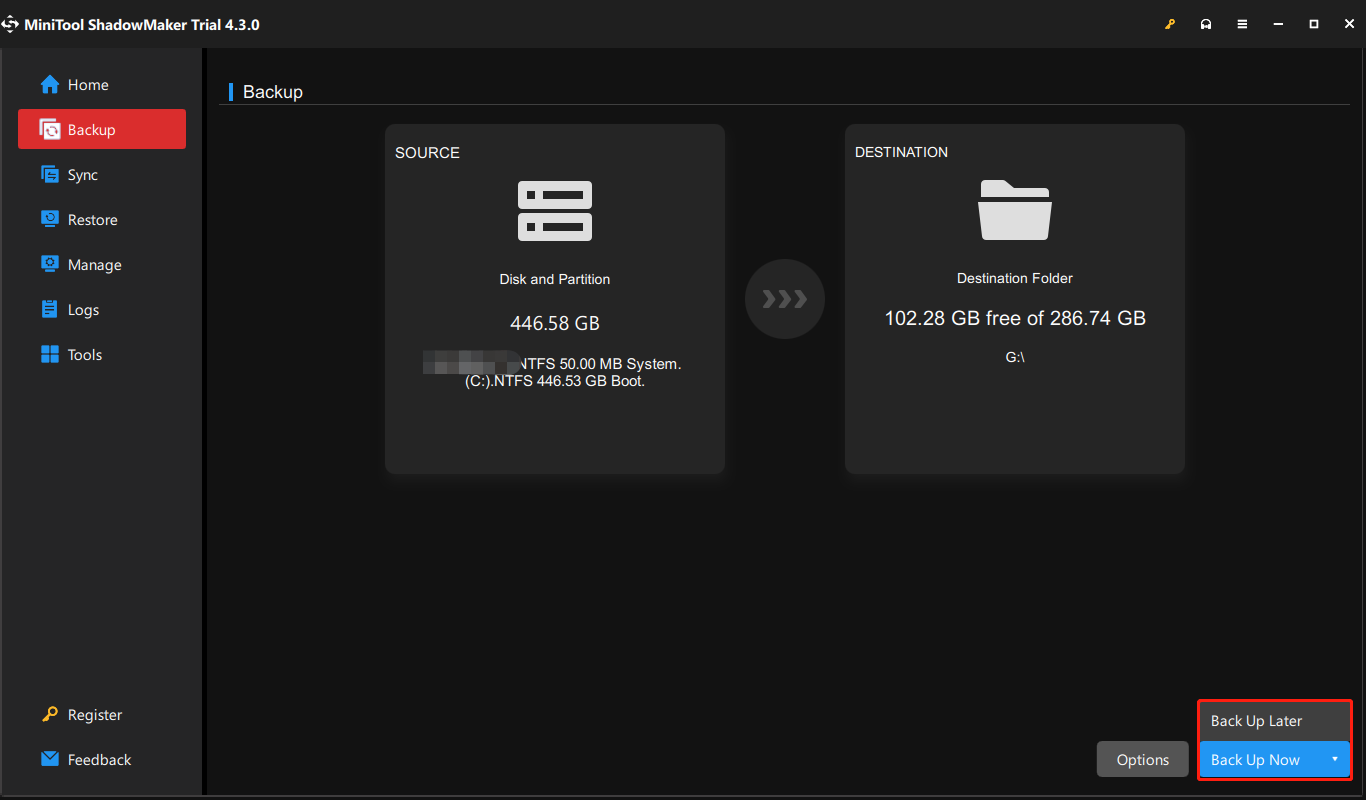
When the backup process is finished, the system image is successfully created.
Full Fixes – We Couldn’t Connect to the Update Service Windows 10/11Click to Tweet
Bottom Line
In short, if you are facing the “we couldn’t connect to the update service” issue and have no idea of how to fix it, then you can find the workable solutions in this post. Besides, to safeguard your system, you had better back up your system regularly.
If you have any better advice to fix the error or have any confusion about the methods, leave a comment below or send an email to [email protected].
We Couldn’t Connect to the Update Service FAQ
- Make sure the updates are stuck.
- Turn it off and on again.
- Check the Windows Update utility.
- Perform Windows update troubleshooter.
- Launch Windows in Safe Mode.
- Perform a System Restore.
- Delete the Windows Update file cache.
- Perform a virus scan.
To learn more detailed information, this post – How to Fix the “Windows Updates Stuck at 100” Issue on Windows 10 is what you need.
- Cumulative updates.
- Security-only updates.
- Monthly rollup updates.
- Preview quality updates.
- Twice-yearly feature updates.
About The Author

Position: Columnist
Vera has been working at the MiniTool Team for over 10 years as a technical editor and content writer. She mainly focuses on disk and partition management, data recovery, Windows backup and restore, and PC troubleshooting. Through in-depth software testing and hands-on experience, she has helped users solve a wide range of computer problems and better protect their data on Windows devices.
User Comments :