
What Is Windows 11 Installation Media
Windows 11 installation media can be a bootable USB drive or CD/DVD, or an ISO file that contains the files required to install, repair, or upgrade Windows 11. The bootable device is usually created by Media Creation Tool, Rufus, or Command Prompt.
| Item | Primary use |
| ISO | Creates a bootable USB drive/CD/DVD, installs Windows in a virtual machine, or runs an in-place upgrade via the mounted virtual drive. |
| USB flash drive | Stores the bootable Windows 11 installation files for installing or repairing the system. |
| CD/DVD | Inserts into an optical drive and boots from it to perform a clean install on older hardware. |
When to Use Windows 11 Installation Media
Creating Windows 11 installation media is necessary in the following situations:
- Perform a clean installation to resolve persistent system issues, remove malware, or start with a fresh Windows installation.
- Upgrade Windows 10 to Windows 11.
- Install Windows 11 on a brand-new SSD or HDD.
- Access Windows Recovery Environment (WinRE) to use tools such as Command Prompt, Startup Repair, or Reset this PC to repair startup issues.
Tips Before Creating Windows 11 Installation Drive/DVD
To avoid installation errors, follow these tips before getting started:
- Check if your PC can run on Windows 11. Installing Windows 11 on unsupported hardware may lead to compatibility issues and prevent you from receiving future updates.
- Use a USB drive with at least 8GB of available space.
- Make sure your computer is connected to a stable internet connection.
- Back up any files stored to the USB drive since the process will erase the drive data.
How to Create Windows 11 Installation Media on Windows PC?
To do this work on your Windows computer, there are three ways for you – use Windows 11 Media Creation Tool, run Rufus, or use Command Prompt. Let’s see them one by one.
Windows 11 Installation Media Creation via Media Creation Tool
Best for: Most users who want an official and straightforward way to create Windows 11 installation media.
Microsoft offers a tool called Windows 11 Media Creation Tool to help you create a bootable USB drive or CD/DVD. See what you should do:
Step 1: Visit the Download Windows 11 page from Microsoft.
Step 2: Move to the Create Windows 11 Installation Media section and click the Download Now button.
Step 3: Run this tool by double-clicking on the MediaCreationToolW11.exe file.
Step 4: After accepting the license terms, choose a language and edition.
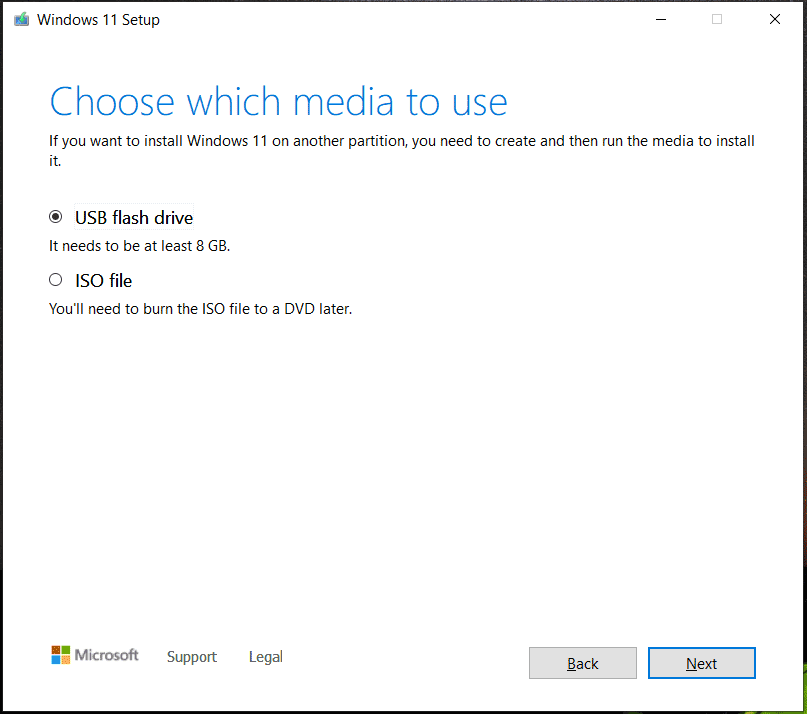
Step 5: Choose which media to use:
- USB flash drive: this can help you directly create a Windows 11 bootable USB after subsequently selecting a USB drive.
- ISO file: this can download an ISO file of Windows 11 and then you need to burn the ISO to a DVD or USB drive using a professional tool (directly go to method 2 to know much).
Step 6: Follow the on-screen instructions to finish all the operations.
Create Windows 11 Installation Media Rufus
Best for: Users who want more control over the installation media.
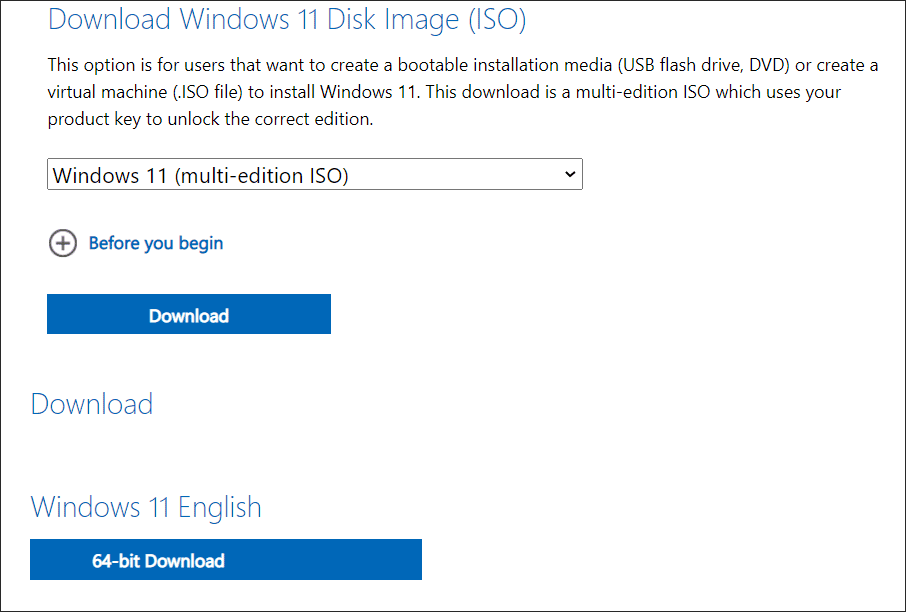
Microsoft gives you an option to directly download Windows 11 ISO from its website to create bootable installation media (USB flash drive, DVD) or create a virtual machine (.ISO file). See how to create Windows 11 installation media from ISO.
Step 1: On the Download Windows 11 page, navigate to the Download Windows 11 Disk Image (ISO) section.
Step 2: Choose Windows 11 ISO, select a language like English (United States), and click the 64-bit Download button to get the ISO image file. The ISO file size is about 5.18GB.
Step 3: Go to download Rufus, connect your USB drive, choose the ISO file you have downloaded, and then click START to create a Windows 11 bootable USB. To know more information, go to read our previous post – How to Make Windows 11 Bootable USB Drive [Step-by-Step Guide].
Make Windows 11 Installation Media via Command Prompt
Best for: Advanced users who want to create installation media using built-in command-line tools.
Some of you are advanced users and there is another way for you – use Command Prompt. The operations are a bit complicated and carefully follow the steps below.
Step 1: Download an ISO file of Windows 11, as shown above, and connect your USB drive to your PC.
Step 2: Type cmd to the search box and run Command Prompt as administrator.
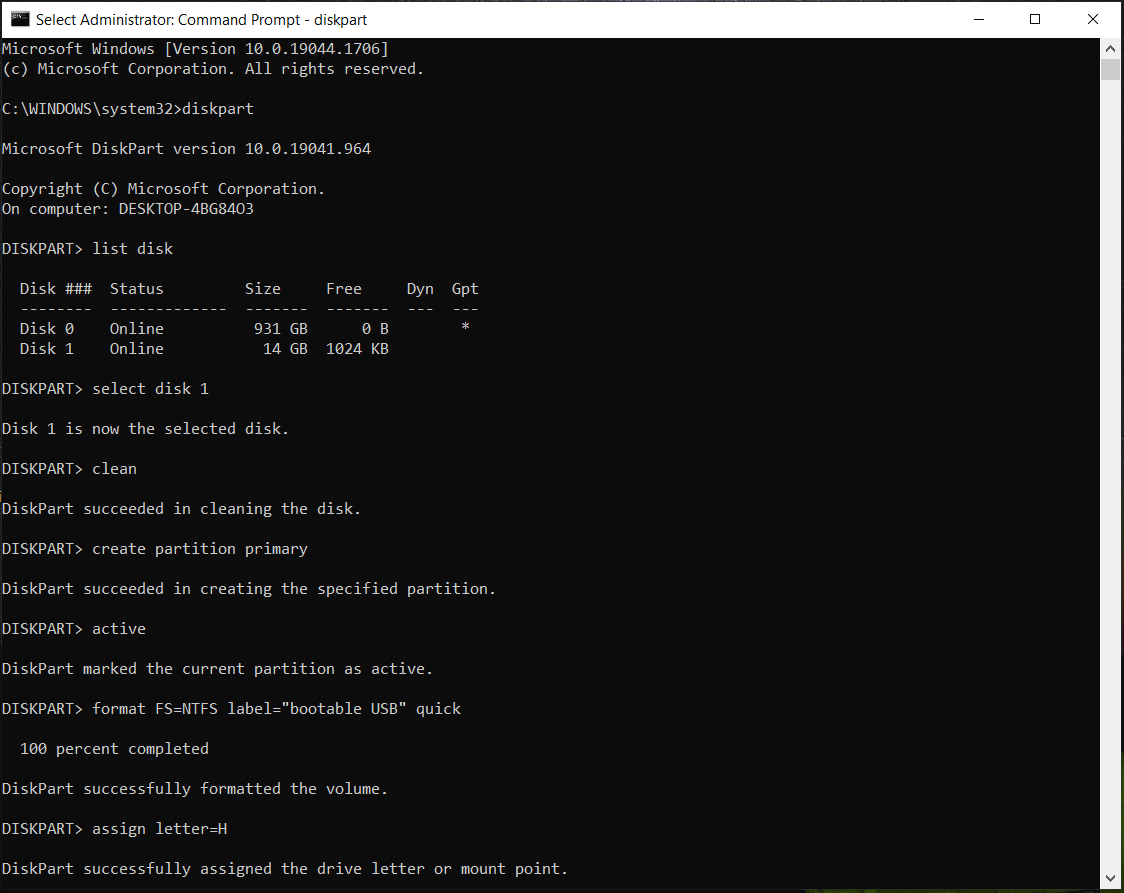
Step 3: In the CMD window, type the following commands and press Enter after each one:
diskpart
list disk
select disk N N means the driver letter of your USB drive
clean
create partition primary
active
format FS=NTFS label=”bootable USB” quick
assign letter=X X means the drive letter of the USB drive
exit
Step 4: Type the command – PowerShell Mount-DiskImage -ImagePath “path\filename.iso”. Replace the path of the ISO image you have downloaded, for example, PowerShell Mount-DiskImage -ImagePath “E:\Win11_English_x64v1.iso” and press Enter.
Step 5: After that, run these commands below and press Enter after each one to determine the drive letter (in our situation, it is G) for the mounted Windows 11 ISO:
diskpart
list volume
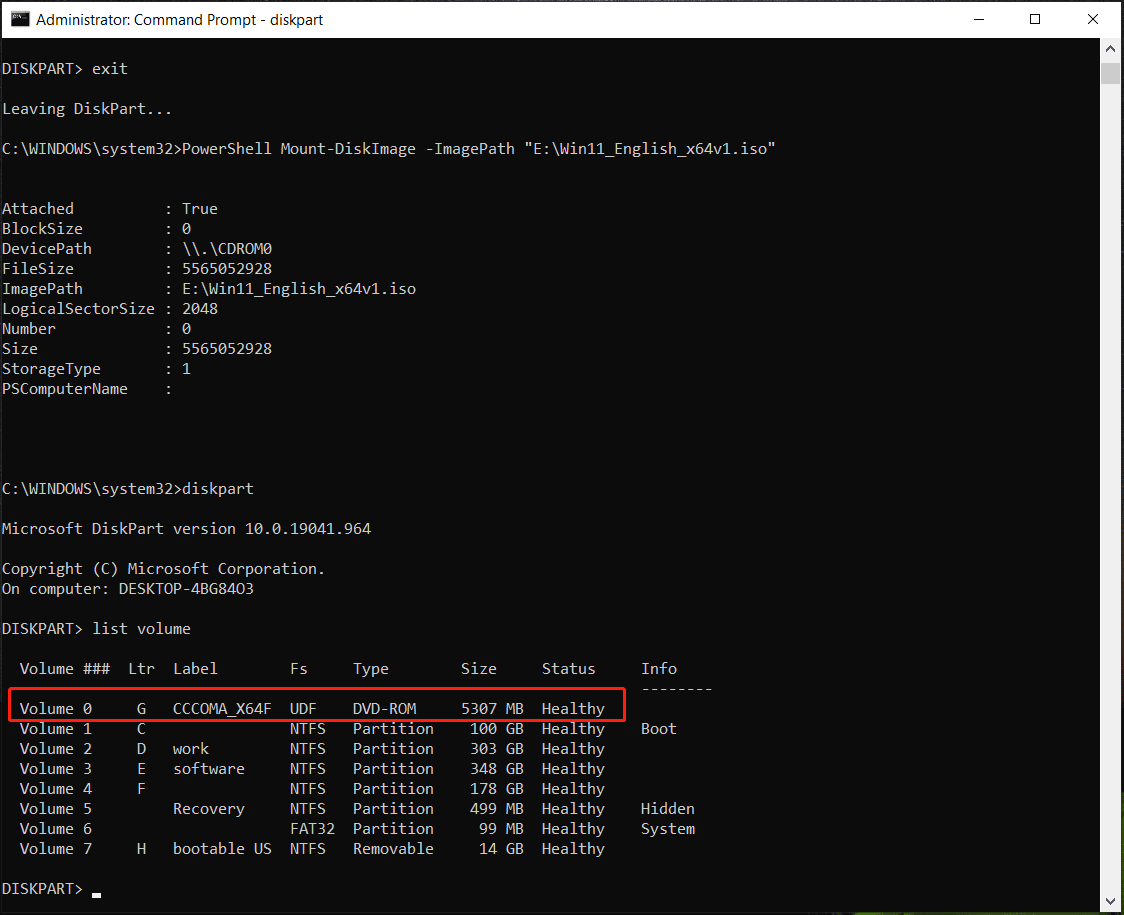
Step 5: Run the exit command to exit Diskpart.
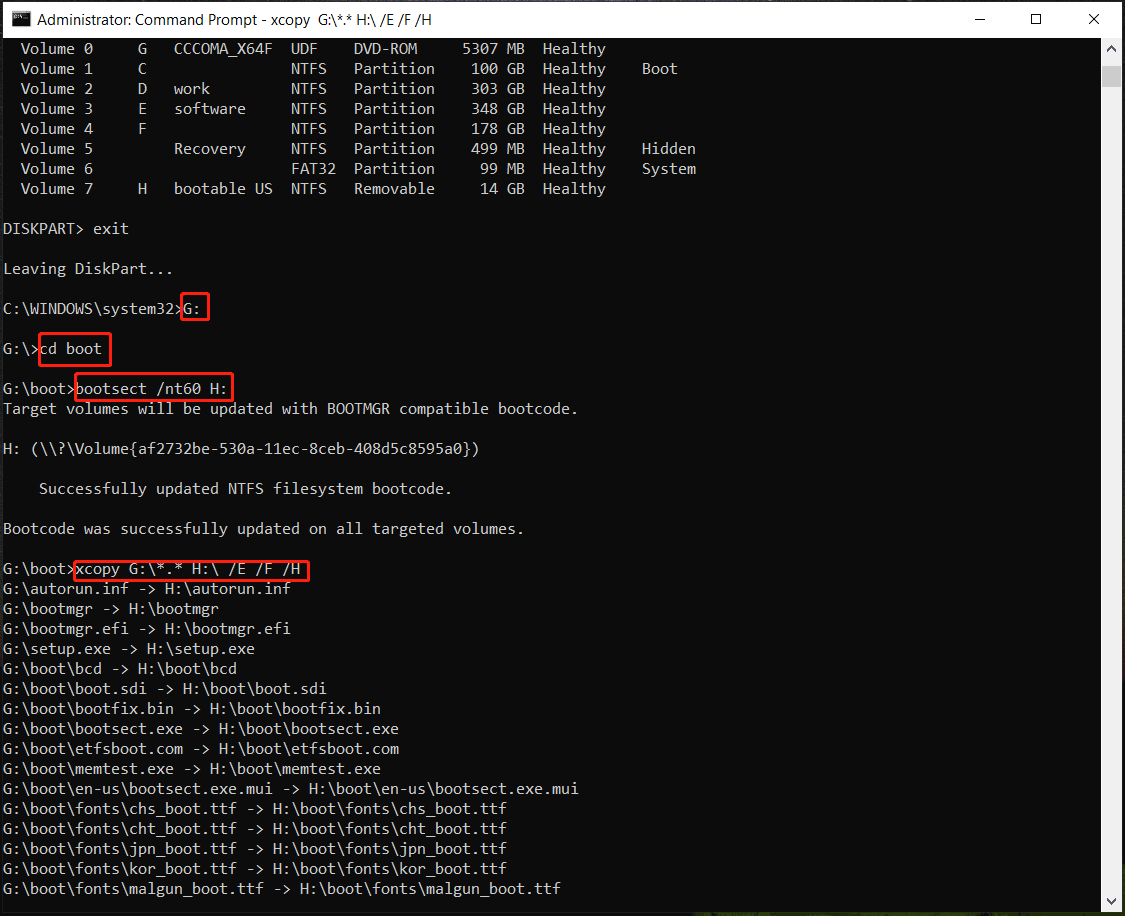
Step 6: Execute these commands and press Enter after each one:
G:
cd boot
bootsect /nt60 H: H is the driver letter of the USB drive
xcopy <mounted ISO volume letter>:\*.* <USB drive letter>:\ /E /F /H Replace the drive letters with your own and here we type xcopy G:\*.* H:\ /E /F /H.
Then, Windows is copying all the Windows 11 installation files to the USB flash drive. This can take several minutes and wait patiently.
Back up Your Important Files Before Windows 11 Clean Install
Using Windows 11 installation media to install the system can lead to data loss since you will run a clean install of this system. Thus, before you do, you had better create a backup of the critical files on your PC, especially the documents, files, or other data you have stored in the C drive.
How to keep the data safe via the backup? Here we recommend you to use a professional file backup software – MiniTool ShadowMaker. This program gives two modes to back up your data – imaging backup and file sync.
The former can help to compress your data to an image file and you need to restore them to use while the latter syncs files & folders to another location and you can directly locate the path to use them without restoration. To know more information, refer to our previous post – Backup vs Sync: What Are the Differences Between Them.
To back up your files, download its Trial Edition by clicking the following button to free use in 30 days. Then, double-click on the exe file to install it on your Windows 11/10/8/7 PC.
MiniTool ShadowMaker TrialClick to Download100%Clean & Safe
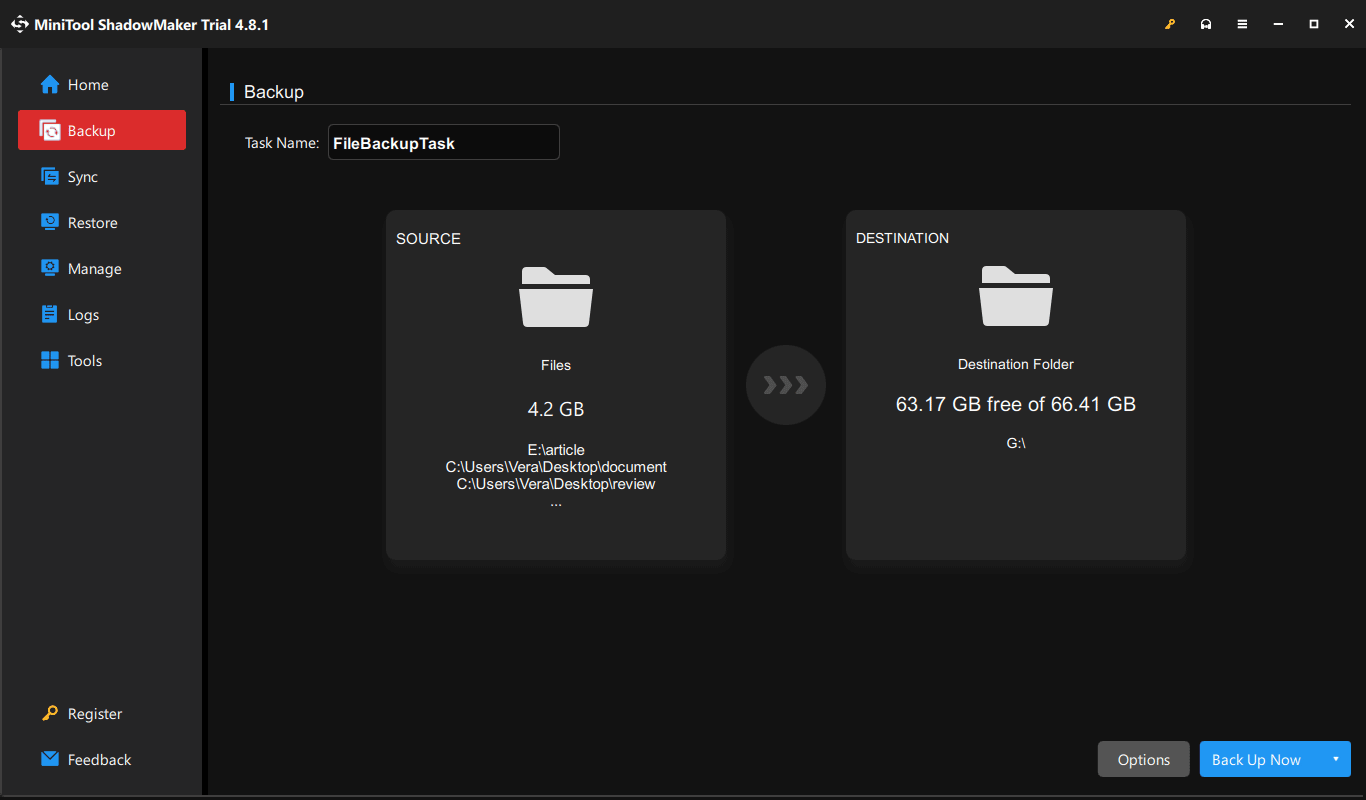
Step 1: Run MiniTool ShadowMaker Trial Edition.
Step 2: Click Keep Trial to continue using this edition.
Step 3: Go to Backup or Sync and choose the backup source & destination.
Step 4: Click Back up Now or Sync Now to execute the backup task at once.
How to Install Windows 11 Using Windows 11 Installation Media?
After creating Windows 11 installation media (bootable USB drive or DVD) and making a backup of your data, now it’s time to use the medium to clean install the new operating system. How to do this work? Follow the guide below.
Step 1: Connect the Windows 11 bootable USB drive or DVD to your computer.
Step 2: Press a specific key like F2, Del, F10, etc. to enter BIOS during the PC boot process. The key differs from different PCs. Next, change the boot order to let the PC run from the installation medium.
Step 3: Customize the language, time and currency format, and Keyboard or input method.
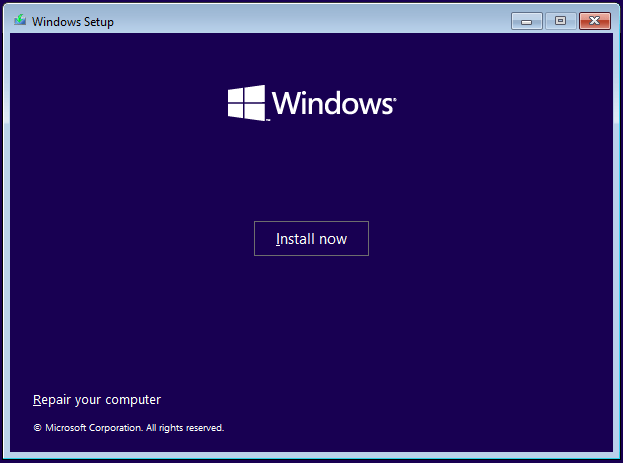
Step 4: Click the Install now button to go on.
Step 5: Then, follow the instructions on the screen to finish the installation of Windows 11.
Now we have shown you much information about how to create Windows 11 installation media on a PC and run a clean install. Sometimes you need to create Windows 11 installation media on Mac, for example, your working Windows 11 PC fails to boot into the desktop and you have a Mac. Here, we will show you some ways for the work.
Create Windows 11 Installation Media on Mac
Use Boot Camp to Make Windows 11 Installation Media
Boot Camp is a useful app that can be used to install Windows 11 on your Mac. Also, you can use it to create a bootable USB from Windows ISO. It is not available on Apple silicon Macs. If you are using an Intel-based Mac with Catalina or a previous version, it is useful here. Note that Boot Camp isn’t available on new macOS.
Step 1: Download an ISO file of Windows 11 by visiting the Windows 11 page, as shown above.
Step 2: Launch the Boot Camp Assistant app by going to Applications > Utilities in Finder.
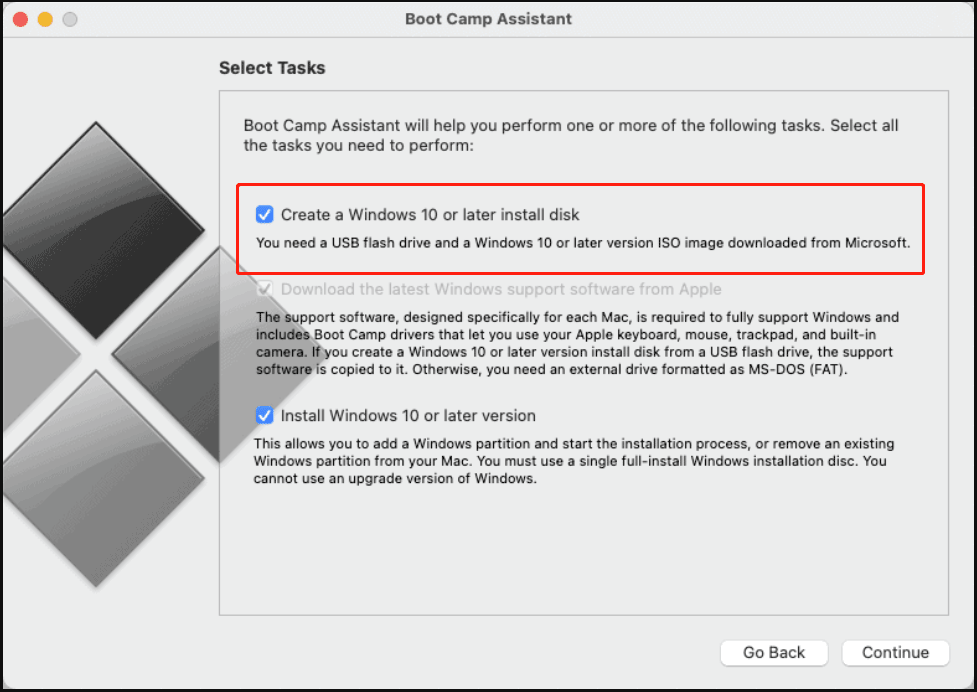
Step 3: Check the box of Create a Windows 10 or later install disk. Here you only need to create a Windows 11 bootable USB drive, so untick the option for Install Windows 10 or later version.
Step 4: Choose the Windows 11 ISO file you have downloaded, select your USB flash drive and click Continue.
Step 5: Boot Camp Assistant will format your USB and start burning the ISO file to your USB drive.
Use a Third-Party App to Create a Windows 11 Bootable USB on Mac
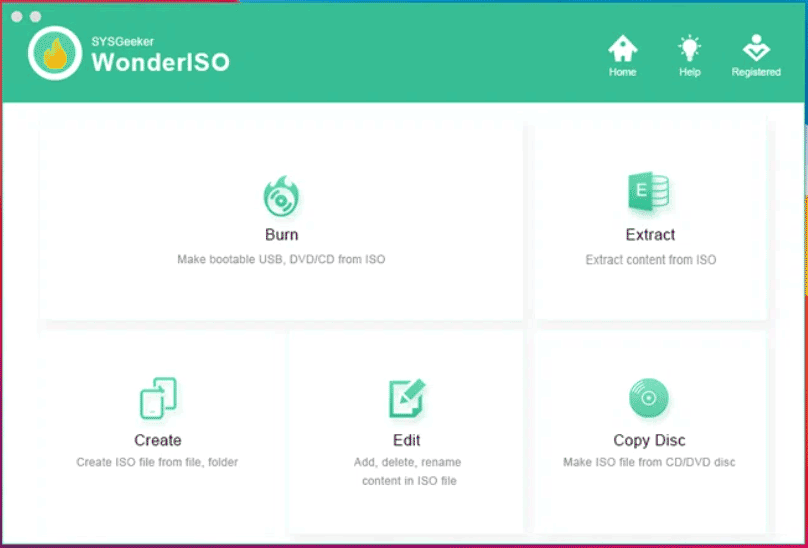
Some tools like UUByte ISO Editor, WonderISO, etc. are useful for you to burn the ISO file to a USB drive or CD/DVD. Just connect the drive to your Mac, launch the tool, and do the work.
After making the Windows 11 installation media on Mac, you can use the DVD/CD or USB drive to install Windows 11 on your Windows PC by following the steps mentioned above.
Create Windows 11 Installation Media on Linux
Sometimes you are running a Linux and want to create a bootable drive on it for installing Windows 11 on your non-working Windows PC.
To do this work:
Step 1: Download a Windows 11 ISO image file.
Step 2: On Linux, launch the Ubuntu app, type in the sudo add-apt-repository ppa:tomtomtom/woeusb command, and press Enter.
Step 3: After typing the password, run this command – sudo apt install woeusb woeusb-frontend-wxgtk to finish installing the WoeUSB app.
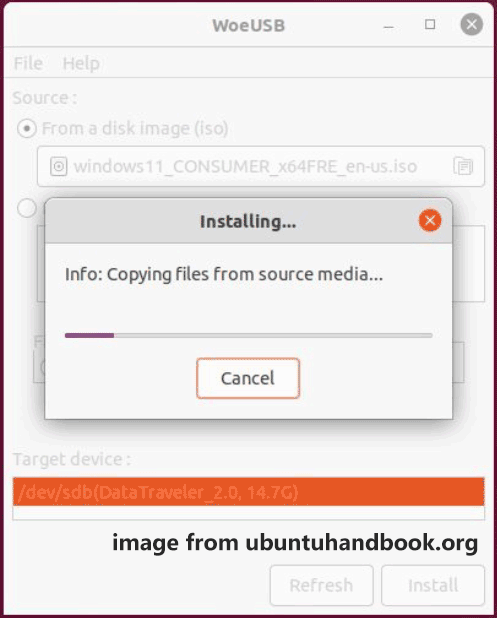
Step 4: Connect the USB drive to your Linux and launch the WoeUSB program.
Step 5: In the From a disk image (iso) section, choose the Windows 11 ISO file you have got. Then, select FAT and a target device (USB drive), and next click Install.
Step 6: Search for Disks in the search box to open the app to unmount the USB device. Or else, an error will appear.
Step 7: Go back to the WoeUSB app, click Refresh, select the USB drive, and press Install. Then, the tool is cleaning the drive and burning the Windows 11 ISO to it.
![How to Set up Windows 11 and Linux Dual Boot? [Full Guide]](https://images.minitool.com/minitool.com/images/uploads/2021/11/windows-11-and-linux-dual-boot-thumbnail.jpg)
That’s all the information about Windows 11 installation media creation. You can get a bootable USB drive or CD/DVD on a Windows PC, Mac, or Linux. Just follow the guide to easily do this task for installing Windows 11.
Windows 11 Installation Media FAQ
About The Author

Position: Columnist
Vera has been working at the MiniTool Team for over 10 years as a technical editor and content writer. She mainly focuses on disk and partition management, data recovery, Windows backup and restore, and PC troubleshooting. Through in-depth software testing and hands-on experience, she has helped users solve a wide range of computer problems and better protect their data on Windows devices.
User Comments :