Windows Could Not Complete the Installation
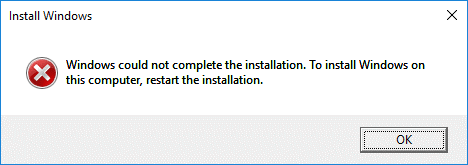
Reportedly, users encountered the Windows could not complete the installation error when they tried to install the latest version of the OS or upgrade to a whole new one. This issue mainly stems from hardware conflicts, partition issues, or broken installation files.
How to fix Windows could not complete the installation?
You can try running Automatic Repair, using Account Creation Wizard or administrator account, changing password requirements, modifying specific registries, rolling back to the previous Windows state, resetting Windows factory settings, or using another installation media.
Now, let’s take a look at these solutions in detail.
Solution 1: Perform Automatic Repair
Windows 10/11 has a built-in recovery tool: Automatic Repair. It is designed to diagnose and fix common issues that prevent your computer from booting properly.
When you get stuck in the “Windows could not complete the installation to install Windows on this computer restart installation” loop, you could run this feature to solve it.
Here’s how to do it:
Step 1. Turn on your PC, and when you see the manufacturer’s logo, press and hold the Power button to turn it off. Repeat this step two times until the Preparing Automatic Repair screen shows up.

Step 2. Your computer will remain in this state for a while. During this period, this feature will attempt to fix the system issues.
If it fails, it will automatically enter Windows Recovery Environment (WinRE). Once this happens, then you can proceed with the next method.

Solution 2: Use Account Creation Wizard
During the Windows installation, user creation failure might be the root cause of the Windows could not complete the installation error. In this case, it’s recommended that you try using the Account Creation Wizard to fix the problem.
Launch Command Prompt, run CD C:\windows\system32\oobe and msoobe respectively, and then create an account again.
Follow the steps:
Step 1. Press Shift + F10 to open Command Prompt.
Step 2. Type CD C:\windows\system32\oobe and hit Enter.
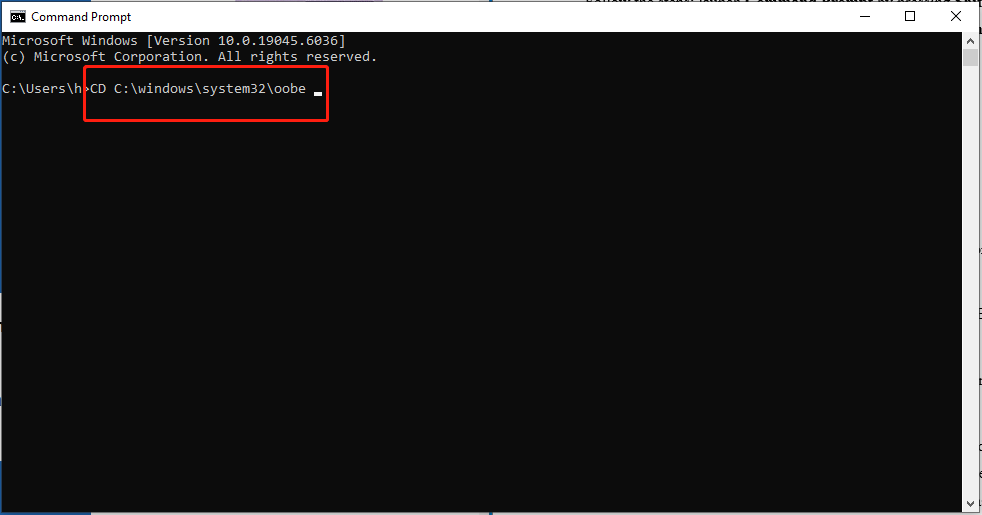
Step 3. Input msoobe and press Enter.
Step 4. Create a generic account and password in a newly popping-up window.
Now, reboot your PC and then check if it runs properly and completes the installation.

Solution 3: Enable Administrator Account
The administrator account is a default account that is created during the Windows installation. It has full control of all the files, directories, services, and other resources on the local device. You can enable it to solve Windows could not complete the installation.
To do so: go to Management Console through Command Prompt, add Computer Management to the main console, and enable the administrator account.
Step 1. Press Shift + F10 to launch Command Prompt.
Step 2. Type MMC and press Enter to bring up Microsoft Management Console.
Step 3. Go to the File tab and choose Add/Remove Snap-in.
Step 4. Look for Computer Management in Available snap-ins.
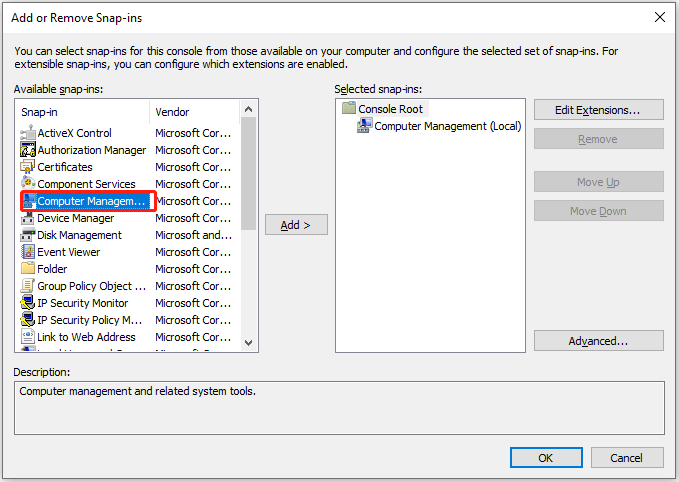
Step 5. Check Local computer > click Finish > OK to return to the main interface.
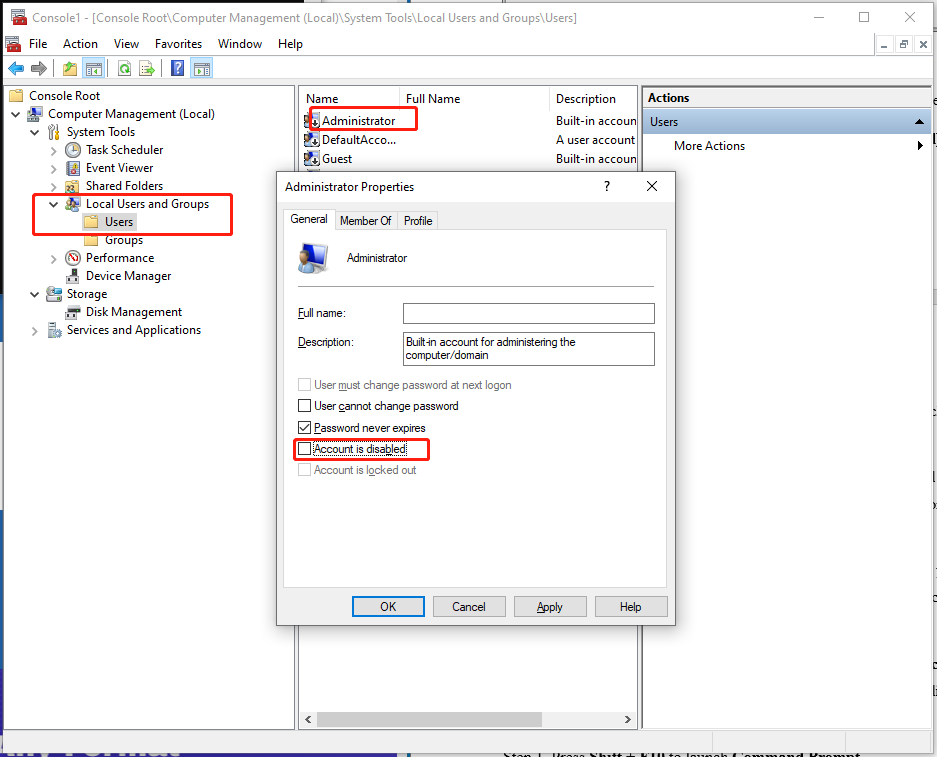
Step 6. In the left console, expand Computer Management (Local) > System Tools > Local Users and Groups > Users.
Step 7. Double-click Administrator in the middle pane and uncheck Account is disabled in the Administrator Properties box. Hit OK.
Step 8. Right-click Administrator again and choose Set Password to create a strong password. Once done, reboot your device and resume the installation.
Solution 4: Change Password Requirements
When your computer is in Audit Mode or joining a certain domain, you may be confronted with the Windows could not complete the installation error. This is because password requirements were added in the local security policy.
Changing the password requirements should do the trick. Go to Local Security Policy via Command Prompt, navigate to Account Policies > Password Policy, change the password length and disable password complexity requirements.
Step 1. Press Shift + F10 to launch Command Prompt.
Step 2. Input secpol.msc and press Enter to bring up Local Security Policy.
Step 3. Select Account Policies > Password Policy.
Step 4. Double-click Minimum password length > set the value to 0.

Step 5. Double-click Password must meet complexity requirements > check Disabled > tap OK.
Restart the PC to apply the changes and try to install Windows again.
Solution 5: Modify Registry
Sometimes, adjusting registry settings can also solve Windows could not complete the installation Windows 11.
You need to launch Registry Editor and change some entries’ values.
Step 1. Press Shift + F10 to open the Command Prompt window, type regedit, and hit Enter to open Registry Editor.
Step 2. Find the following keys and change them to the corresponding values.
HKEY_LOCAL_MACHINE\SYSTEM\Setup\Status\AuditBot –– 0
HKEY_LOCAL_MACHINE\SYSTEM\Setup\Status\ChildCompletion\setup.exe –– 3
HKEY_LOCAL_MACHINE\SYSTEM\Setup\Status\ChildCompletion\audit.exe –– 0
HKEY_LOCAL_MACHINE\SYSTEM\Setup\Status\SysprepStatus\CleanupState–– 2
HKEY_LOCAL_MACHINE\SYSTEM\Setup\Status\SysprepStatus\GeneralizationState –– 7
HKEY_LOCAL_MACHINE\SYSTEM\Setup\Status\UnattendPasses\auditSystem –– 0
Solution 6: Restore/Factory Reset Your PC
Do you have any restore points or system images on your PC?
① If yes, use the restore point or system image to fix Windows 10 couldn’t be installed.
#How to apply a restore point?
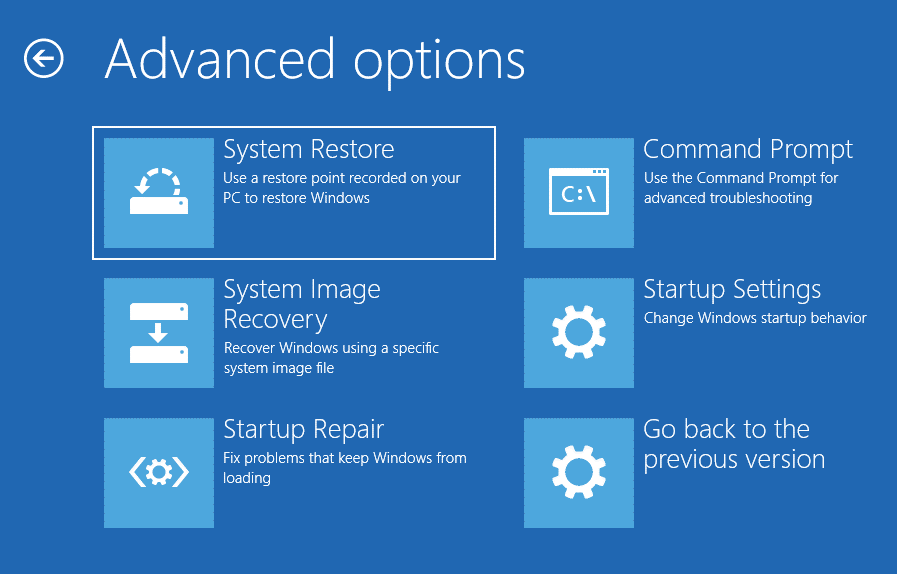
Step 1: Boot into WinRE, select Advanced options > Troubleshoot > System Restore.
Step 2: If prompted, tap on an administrator account you want to provide credentials for, enter the password, and click Continue.
Step 3. If this is your first time doing a system restore, hit Next; if you had previously done it, select Choose a different restore point and hit Next.
Step 4. Pick an available restore point, and click Next & Finish to carry out the process.
Step 5. When the system restore has completed successfully, click on Restart.
#How to restore from a system image?
Step 1. In WinRE, navigate to Advanced options > Troubleshoot > System Image Recovery.
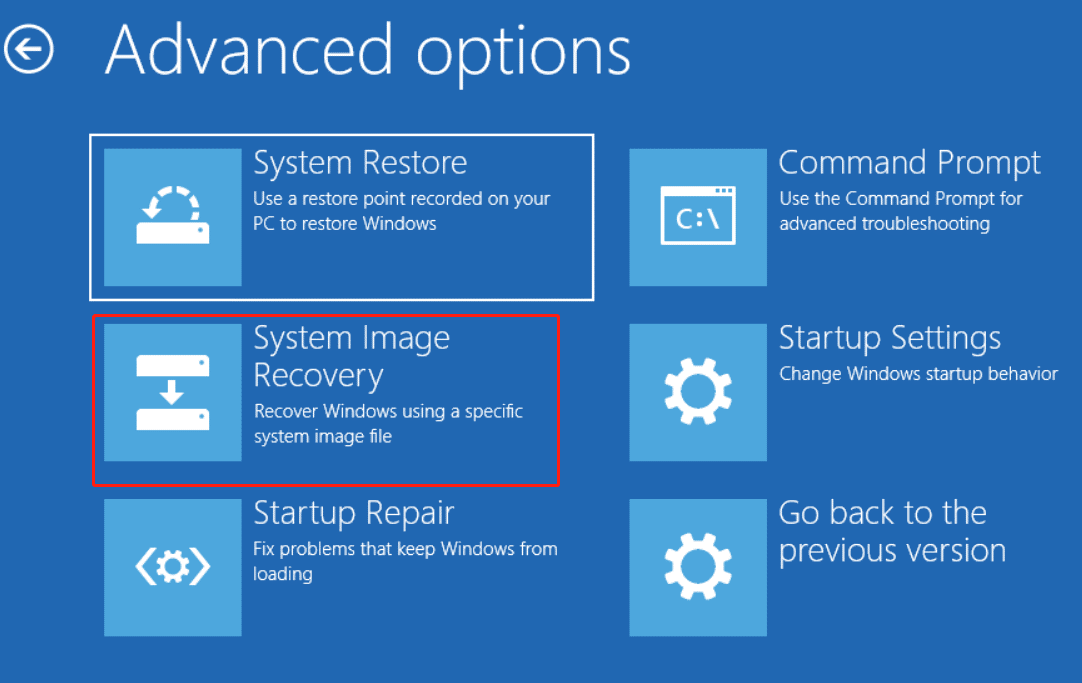
Step 2. Select a target operating system and then the system will automatically search the latest available system image.
Step 3. You can check Select a system image to manually select a system image as well. Click Next.
Step 4. Choose a system image location where you want to use and hit Next. If your system image is saved on an external hard drive, please connect it to your device and click Refresh.
Step 5. Then the system will list all available system images on this drive. Select a system image you want to recover and hit Next.
Step 6. Confirm the restored system image information and select Finish. Then follow the prompts to finish the process.
② If not, then you should try resetting your PC.
In WinRE, click on Advanced options > Troubleshoot > Reset this PC > Keep my files > Reset.
Then do the following to reset your Windows factory settings.
Solution 7: Try Another Installation Media
This method is applicable to the following two situations:
① If you are using an OEM disc, check if there are any deep physical scratches on it. This can cause damage to some parts of the disc or irreparably damage files, which may lead to some data being unreadable and prevent the system from being installed.
In this case, you can try downloading the disc or copying it to a USB flash drive. And convert it into a bootable drive to solve Windows could not complete the installation.
② If the Win 10 install problem persists after trying the previous methods, you can also try creating a bootable media from another computer.
If you are in either of the situations, refer to the following steps to perform the installation.
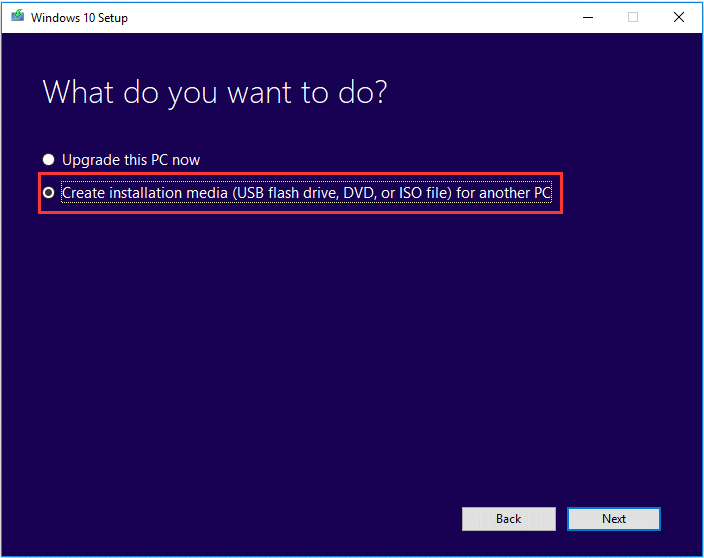
Go to the Windows 10/11 download page, download & create the Windows installation media, and then boot from it to install Windows.
Step 1. Prepare a USB drive of at least 8GB and browse to the Windows 10 or Windows 11 download page.
Step 2. Click Download Now under Create Windows 10/11 Installation Media.
Step 3. Upon the download, run the MediaCreationTool.exe file, select Create installation media (USB flash drive, DVD, or ISO file) for another PC, and then configure other settings.
Step 4. Choose USB flash drive as the media type > insert & select the USB flash drive on the PC.
Step 5. Connect the bootable USB drive to the faulty PC and restart it.
Step 6. As the PC starts, press F12 or Del (depending on your PC’s manufacturer) until enter Boot Menu > change the boot option to the USB drive.
Step 7. Choose Custom: Install Windows only (advanced) > remove every entry starting with Drive 0 > click Next to start to install.
Other Troubleshootings
#Verify Your System Requirements
Sometimes, your computer does not meet the requirements of installing Windows 10/11, which could also lead to the Windows could not complete the installation error.
Therefore, make sure your device meets the minimum requirements by checking RAM, hard disk space, CPU, Screen resolution, Graphics, and internet access.
| OS | Windows 10 | Windows 11 |
| RAM | 1 GB for 32-bit or 2 GB for 64-bit | 4 GB or greater |
| Hard Disk Space | 16 GB for 32-bit OS or 20 GB for 64-bit OS | 64 GB or larger |
| CPU | 1 GHz or faster with two or more cores on a compatible 64-bit processor or SoC | 1 GHz or faster processor or SoC |
| Graphics Card | DirectX 9 or later with WDDM 1.0 driver | DirectX 12 or later with a WDDM 2.0 driver |
| Display | 800×600 | High definition (720p) display that is greater than 9” diagonally, 8 bits per color channel |
#Use Windows Memory Diagnostic Tool
Windows 10 couldn’t be installed might be caused by a faulty RAM or a failing hard drive. You can run Windows Memory Diagnostic Tool to check for memory problems.
Press Shift + F10 to open Command Prompt > type mdsched > hit Enter > select Restart now and check for problems (recommended). Once done, you can view and fix the errors detected.
#Update All Drivers
Outdated drivers, or third-party drivers, especially those for graphics cards or other peripherals, can sometimes conflict with the installation process, and Win 10 install problem is likely to arise.
This way, try disconnecting unnecessary hardware during installation or updating all drivers after installation.
Bonus Tip
You must be free from this Windows could not complete the installation issue now. Here, we’d like to introduce you to a PC backup software, MiniTool ShadowMaker. It can help you prevent data loss caused by such issues.
This program boasts robust data protection ability, and it is renowned for its one-click system backup solution.
With a file backup, partition backup, system backup, or disk backup in hand, it will be much easier to restore your data and system in the event of severe issues in your system, like system crashes, malware attacks, hard drive failures, and more.
In addition, if you want to enhance the overall system performance of your computer, cloning HDD to SSD or moving Windows to another drive is also permitted.
Now, let me show you how the system backup works:
Step 1. Launch MiniTool ShadowMaker and hit Keep Trial to enter its main interface.
MiniTool ShadowMaker TrialClick to Download100%Clean & Safe
Step 2. In Backup, as you can see, the system-required partitions are selected by default in SOURCE, so you only need to pick a storage path in DESTINATION.
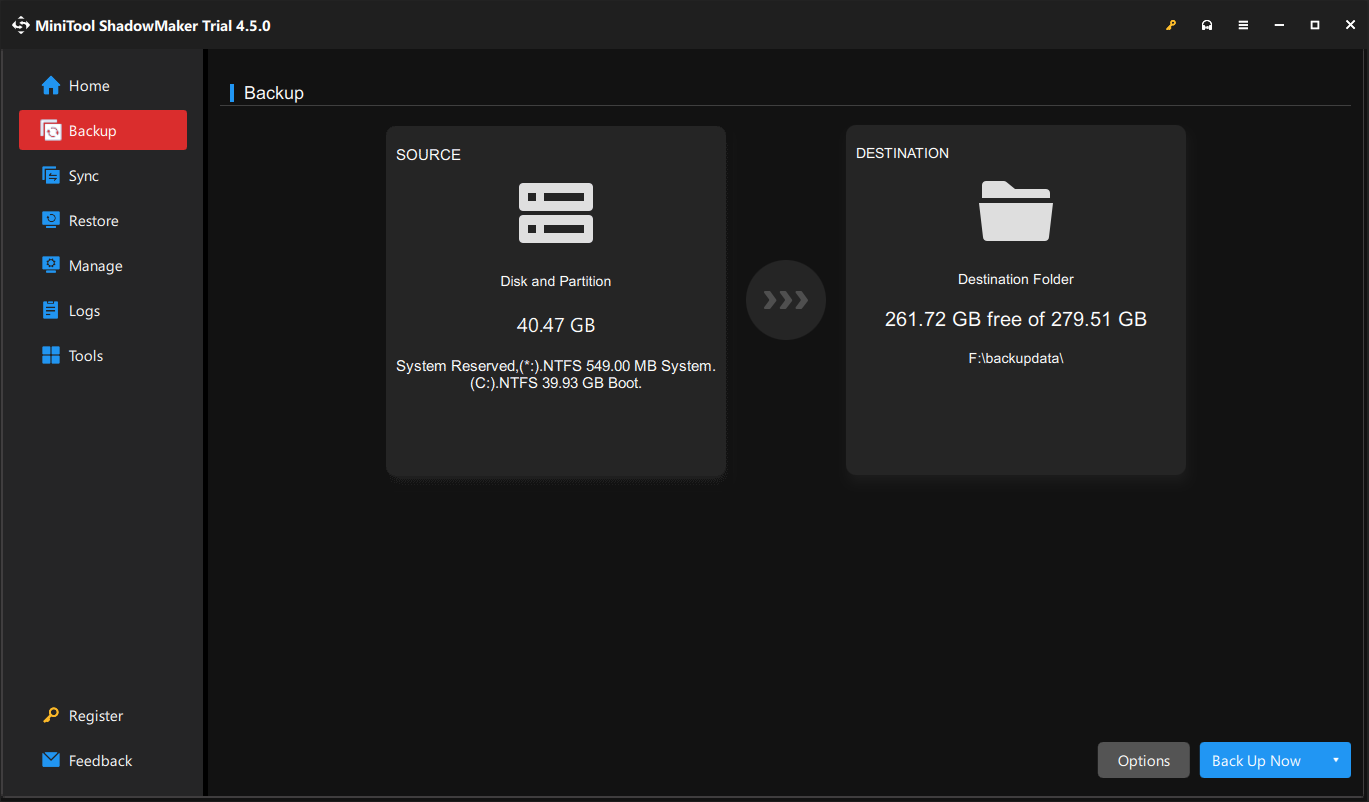
Step 3. Click on Back Up Now to start the process at once.
Wrapping Things Up
This guide gets into the nuts and bolts of Windows could not complete the installation. Try these methods one by one until you find the one that works for you. For more problems about our product, please contact us via [email protected]. We are looking forward to receiving your feedback!
User Comments :