If your external hard drive is not showing up in File Explorer, it is typically caused by a missing drive letter, an uninitialized disk, file system corruption, or partition loss. Read this MiniTool guide to assign a letter, recover lost partitions, or initialize the disk.
Many Windows users encounter a common issue: an external hard drive is connected but does not appear in File Explorer.
Why Is My External Hard Drive Not Showing Up on Windows 10/11
If your external hard drive is not showing up, the most common causes are:
- Connection or hardware issues
- A missing drive letter
- File system corruption
- Outdated or incompatible drivers
- The disk is not initialized
- The partitions are hidden or lost
How to Identify the Cause Quickly?
Determine how your external hard drive behaves:
- If the drive appears in Disk Management but not in File Explorer, it is usually a logical issue, such as a missing drive letter or partition.
- If the drive does not appear in Disk Management, it is more likely a hardware or connection issue.
Physical Connection Issues
A loose or faulty USB cable, a damaged USB port, or a power supply problem can prevent your external drive from being recognized.
Missing or Conflict Drive Letter
If the external hard drive is not assigned a drive letter, it won’t be displayed in File Explorer.
Sometimes, even with a drive letter, conflicts or glitches can still cause disk visibility issues.
Disk Not Initialized
A disk that has not been initialized won’t be recognized by Windows. This often happens with brand-new drives or if the partition table is damaged.
No Partition on the Disk
If your external hard disk has no valid partition, it won’t appear in File Explorer, and you cannot use it.
Driver Problems
An outdated, missing, or corrupted Universal Serial Bus controller driver or disk driver can lead to hard disk recognition issues.
Disk Hidden by Software
Sometimes your hard disk is hidden by a disk management tool, so it won’t show up in File Explorer.
Physical Damage
Mechanical failure or internal damage to your disk may cause it not to be detected.
What to Do if Your External Hard Drive Is Not Displayed in File Explorer
Here are common fixes when an external hard drive is not showing up or recognized:
| Issue | Fixes |
| Not detected at all | Reconnect the driveChange a USB port, cable, or computerSeek professional help |
| Shows as Unallocated | Recover files first, then repartition the diskRecover lost partitions |
| Shows as Not Initialized | Initialize and partition the diskReinstall the disk driverScan for hardware changes |
| No drive letter | Assign a drive letter |
| Hidden partitions | Use MiniTool Partition Wizard to unhide partitions |
When your external hard drive is not visible in File Explorer, try the following troubleshooting steps.
Check if the External Hard Drive Is Physically Recognized
Before trying advanced methods, make sure your external hard drive is properly connected to your computer. You can do the following things:
Try a Different USB Port and Cable
Use a new USB cable (if possible) and plug the external hard drive into another USB port. If the problem is caused by a damaged cable or USB port, this may fix it.
Listen for Sounds
When you connect an external hard drive to your computer, you may hear a USB connection sound. If you hear a beep, it may indicate insufficient power or hardware failures on your disk.
Connect the Disk to Another Computer
If possible, connect the disk to a different Windows computer. If it works fine, the problem may be caused by the original computer.
Check Disk Status in Disk Management
If you make sure the disk is physically connected to your computer but it still does not appear in File Explorer, you can check the disk status in Disk Management.
Right-click the Start button and choose Disk Management.
In the Disk Management window, find your external hard drive. It may show up with one of the following unusual statuses:
- Unknown and Not Initialized: The drive needs to be initialized.
- Unallocated: The drive is detected but not partitioned.
- No Drive Letter: The drive needs a valid drive letter assigned, so it can be accessible in File Explorer.
In the following sections, I will walk you through how to fix each of these problems step by step. Follow the instructions to make your external hard drive visible again.

Case 1. Disk Shows as Unknown and Not Initialized in Disk Management
When your external hard drive shows Not Initialized in Disk Management, it means the disk is not properly set up. So, Windows cannot recognize it.
To resolve this, try the following things:
- Reinsert the disk into its enclosure (applicable for a disk in an enclosure).
- Initialize the disk.
- Reinstall the disk driver.
- Scan for hardware changes in Device Manager.
Here is a breakdown of the solutions.
Solution 1. Remove and Reinsert the Drive in the Enclosure
If your external hard drive is inside an enclosure, try taking it out and then reinserting it carefully.
After that, reconnect the enclosure to your computer and check if the disk appears correctly.
Many users have confirmed that this method resolves the issue.
Solution 2. Initialize the External Hard Drive
To initialize an external hard drive, follow the steps below.
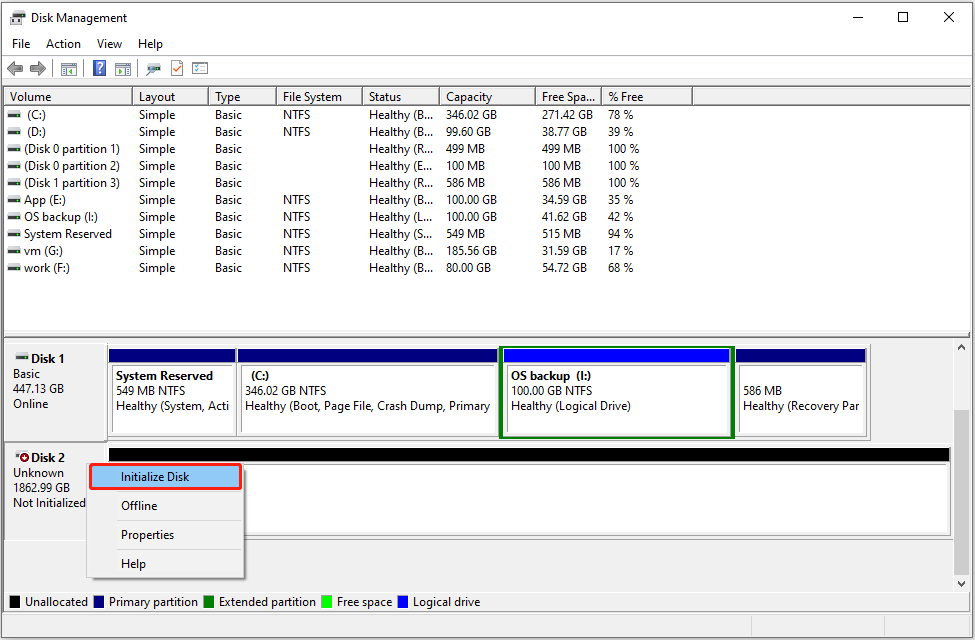
Step 1. Open Disk Management.
Right-click the Start button on the taskbar and choose Disk Management to open it.
Step 2. Initialize the Disk.
Right-click the disk and choose Initialize Disk from the context menu.
Step 3. Choose a Partition Style.
Select the partition table from MBR (Master Boot Record) and GPT (GUID Partition Table) and click OK.
- Choose MBR if your disk is smaller than 2 TB or if you are using an older version of Windows.
- Choose GPT if your disk is larger than 2 TB or if you are using Windows 10/11 on a UEFI-based system.
Step 4. Create a Volume and Format It.
Once you initialize the disk, it will show as Unallocated.
To partition the disk, right-click on the unallocated space and select New Simple Volume.
Next, follow the wizard to set up the volume size, drive letter, and file system.
Finally, format the drive and complete the process.
Solution 3. Reinstall the Disk Driver or Universal Serial Bus Controller Driver
To reinstall the disk driver or Universal Serial Bus controller driver, open Device Manager to uninstall the existing driver first. Then, restart your computer to let Windows automatically reinstall it.
Reinstall the disk driver:
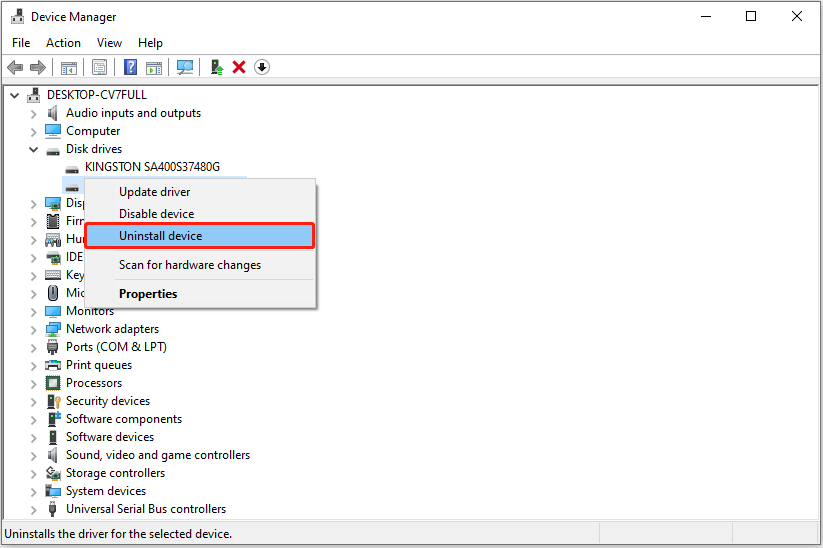
Step 1. Right-click the Windows logo button and choose Device Manager.
Step 2. Expand the Disk drives category.
Step 3. Right-click the specific external disk you want to reinstall the driver for and select Uninstall device.
Step 4. Restart your computer, reconnect the external hard drive, and Windows should automatically detect the disk and reinstall the driver.
Reinstall the Universal Serial Bus controller driver:
Step 1. Open Device Manager.
Step 2. Expand the Universal Serial Bus controllers category.
Step 3. Right-click each device and select Uninstall device.
Step 4. Restart your computer, and the drivers should be installed automatically.
Solution 4. Scan for Hardware Changes
Scanning for hardware changes is another quick way to force Windows to recognize your external hard drive.
To scan for hardware changes on Windows, open Device Manager first.
Next, click Action from the top action panel.
Finally, click Scan for hardware changes. This will let Windows detect any new hardware.
Case 2. Disk Shows Unallocated in Disk Management
Sometimes, when you open Disk Management, you may find that the external hard disk is marked as Unallocated.
What does Unallocated mean?
- There is no partition on the disk.
- The disk has no file system.
- Previously existing files and partitions are lost.
If it is a brand-new disk without any partitions, you can simply create a new partition and start using it.
However, if the disk had data before and the partitions were lost, you should recover the lost files first, and then repartition the disk. Alternatively, you can try recovering lost partitions along with your files directly.
Process 1. Recover Files From Lost Partitions
To recover files from lost partitions or unallocated space, MiniTool Power Data Recovery can help.
What is MiniTool Power Data Recovery?
It is a professional data recovery software for Windows users. It is designed to recover files from various storage media, including hard drives, SSDs, USB flash drives, SD cards, CDs/DVDs, and more.
What types of files can MiniTool Power Data Recovery recover?
It supports the recovery of a wide range of file types, including documents, pictures, videos, audio, emails, archives, etc.
Is MiniTool Power Data Recovery free?
Not exactly. The software offers a free edition, but it only allows you to recover up to 1 GB of data at no cost. If you just need to recover a few files, the free edition should be enough.
However, if you need to recover more than 1 GB, you will need to upgrade MiniTool Power Data Recovery Free to recover the additional files beyond the limit.
MiniTool Power Data Recovery FreeClick to Download100%Clean & Safe
Follow the steps below to recover your files.
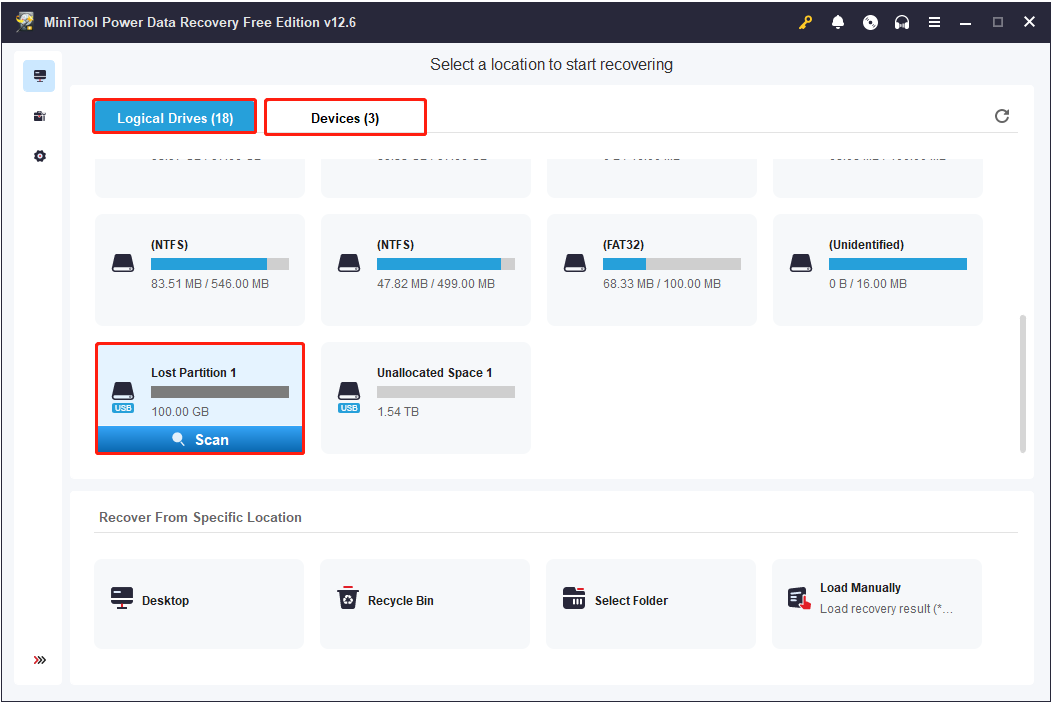
Step 1. Select the Lost Partition to Scan.
Launch MiniTool Power Data Recovery.
On the main interface, locate the lost partition or unallocated space under Logical Drives. Then, select it and click the Scan button to start scanning.
If there are multiple lost partitions, go to the Devices tab to scan the entire disk at once.
Step 2. Locate and Preview Required Files.
The scan duration may vary depending on the amount of data and the status of the disk.
Once the scan is complete, you can expand the file categories and browse the listed files under the Path tab. Alternatively, switch to the Type tab to view files grouped by file type or data format.
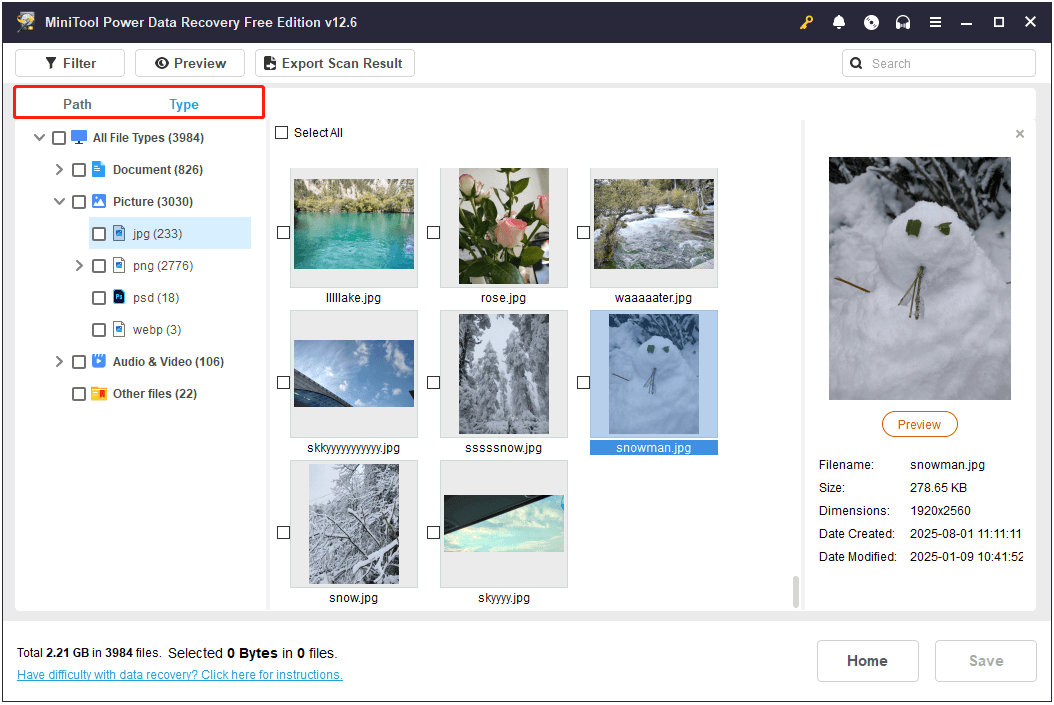
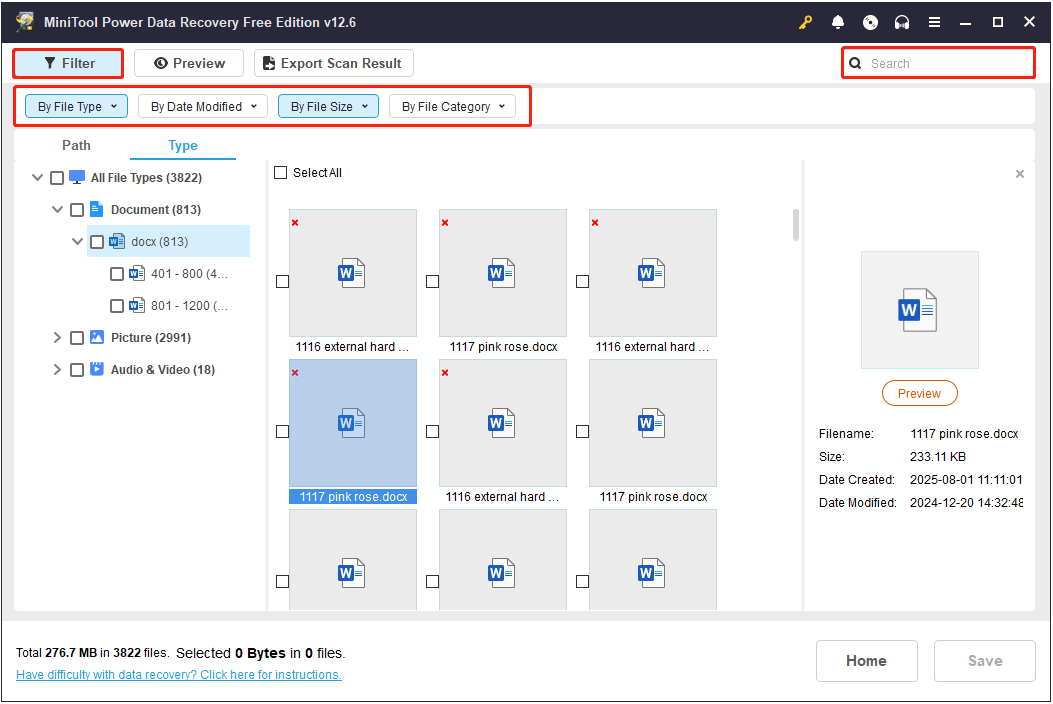
In addition, the Filter and Search features can help you narrow down the file list further:
- Click Filter to set rules based on file type, modification date, file size, or file category.
- Enter a keyword or complete file name into the search box, and then press Enter to locate specific files.
Moreover, you can preview file contents before recovery. Simply double-click on a file to open the preview window.
Step 3. Save Recovered Files.
Finally, select all the files you want to recover and click Save. In the new window, choose a safe location and click OK to store them.
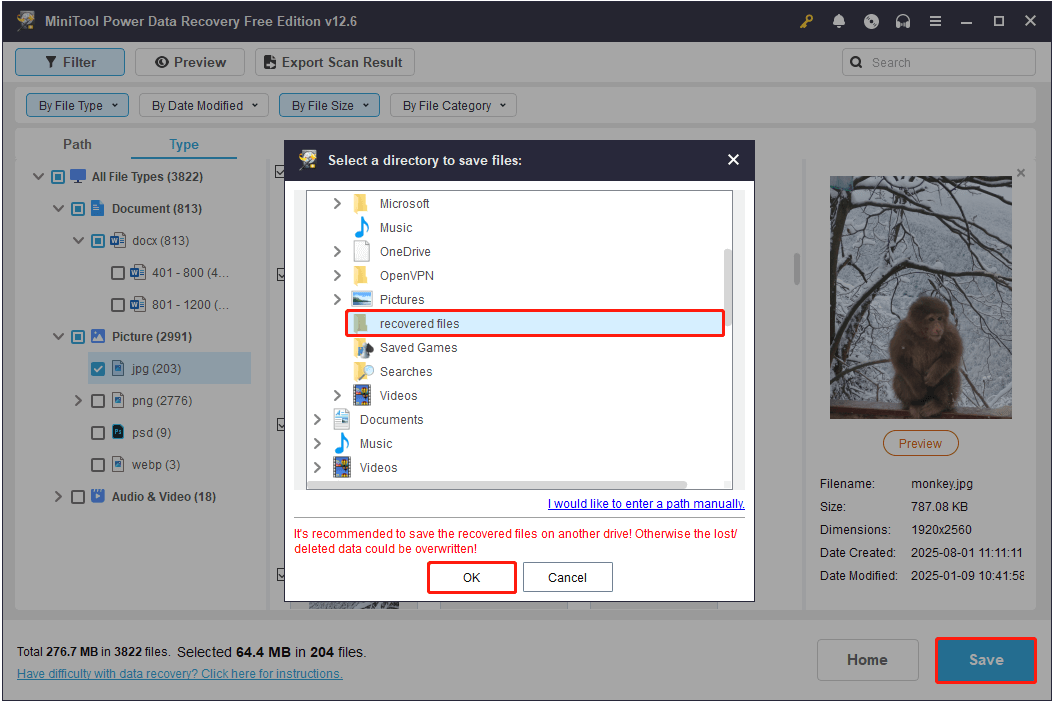
Once the recovery process is complete, you can go to the selected location to view and use the recovered files.
Process 2. Repartition the External Hard Drive
After performing external hard drive data recovery, the next step is to partition the disk.
To partition an external hard drive, you need to use the Disk Management tool. The process involves specifying volume size, assigning a drive letter, and formatting it with a file system.
Here is a detailed breakdown:
Step 1. In Disk Management, right-click the unallocated space and choose New Simple Volume.
Step 2. Click Next to continue.
Step 3. Specify the volume size and hit Next.
Step 4. Assign an available drive letter and hit Next.
Step 5. Choose a file system and format the disk.
Alternative Method: Use MiniTool Partition Wizard to Recover Lost Partitions
Instead of recovering files first and then recreating the partition manually, you can try another approach:
Use MiniTool Partition Wizard to recover the lost partition and its data at the same time.
MiniTool Partition Wizard offers a Partition Recovery feature. It allows you to scan disks, identify lost partitions, and recover them along with the data on them.
MiniTool Partition Wizard FreeClick to Download100%Clean & Safe
Here is how to use MiniTool Partition Wizard to recover lost partitions:
Step 1. Access Partition Recovery Wizard.
On the home page of this partition manager, click Partition Recovery from the top action panel and hit Next.
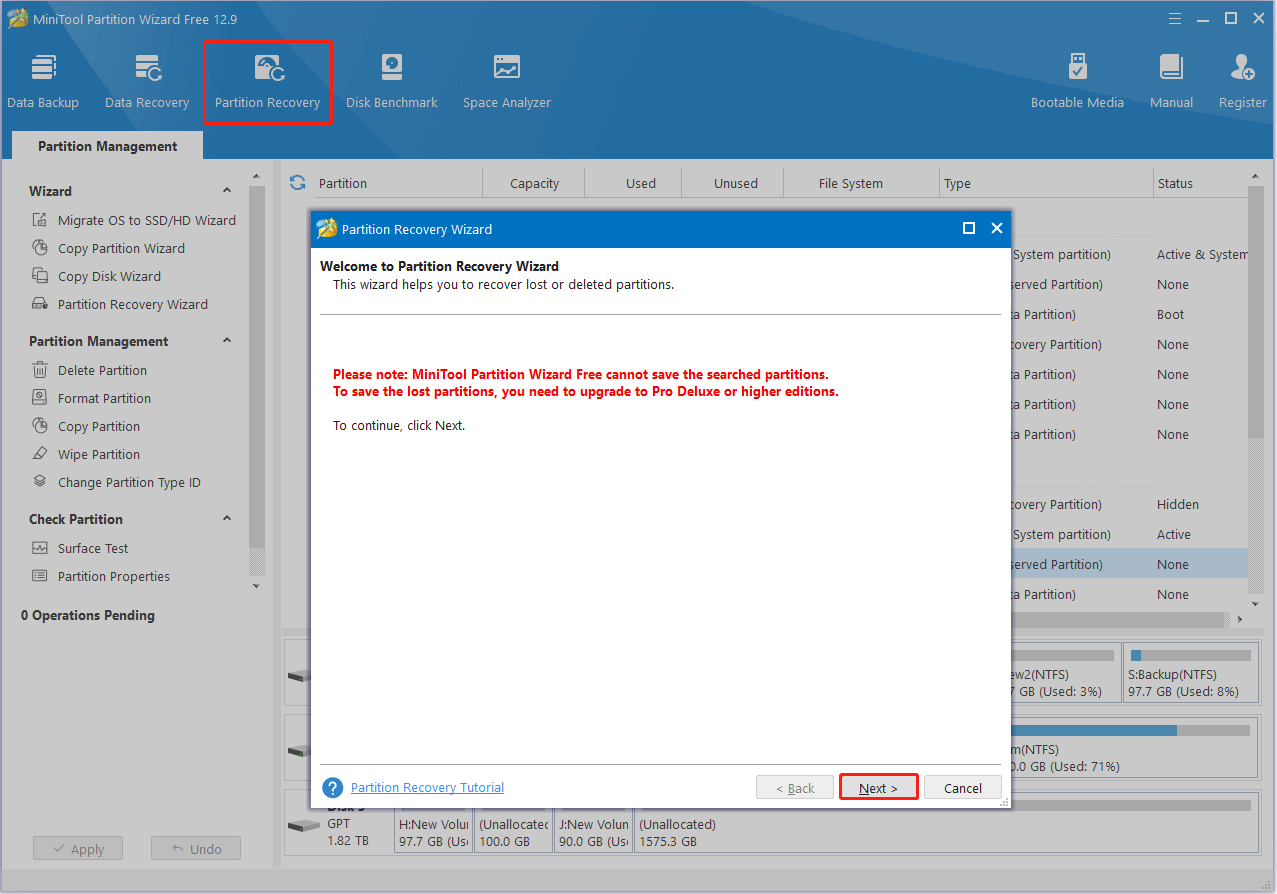
Step 2. Select the Disk and Scanning Range.
Choose the disk where the lost partitions were located and hit Next.
Select an appropriate scanning range from Full Disk, Unallocated Space, and Specified Range. Then hit Next.
Step 3. Choose a Scanning Method.
Select a scanning method from Quick Scan and Full Scan, and click Next.
The software will start to scan the selected disk for lost or deleted partitions.
Step 4. Select Partitions to Recover.
Once the scan is finished, the existing partitions will be ticked by default.
Tick all other partitions you want to recover, and then click Finish.
Step 5. Assign a Drive Letter.
Right-click the recovered partition and choose Change Letter.
Choose an available drive letter and hit OK.
Finally, click the Apply button in the lower left corner.
Now your external hard drive should be visible in File Explorer.
Case 3. Disk Lacks a Drive Letter in Disk Management
When your external hard drive does not have a drive letter, it won’t show up in File Explorer.
To fix it, try assigning a drive letter in Disk Management.
Solution – Add a Drive Letter
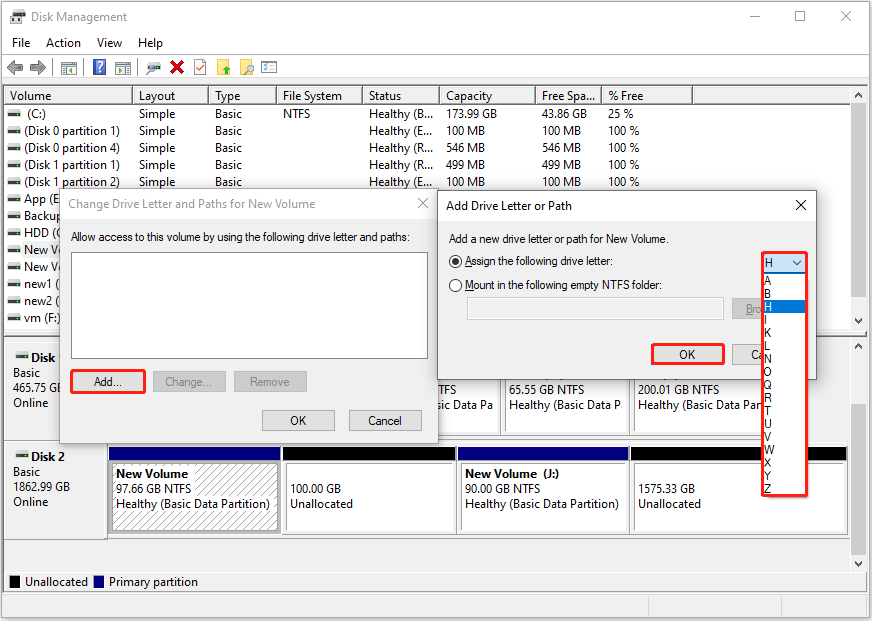
Here is how to add a drive letter in Disk Management:
Step 1. Open Disk Management.
Step 2. Right-click the volume you want to assign a letter to and choose Change Drive Letter and Paths.
Step 3. Click Add. Select a preferred drive letter from the drop-down menu and hit OK.
Occasionally, even if your external drive has a drive letter assigned, it may still not appear in File Explorer. Glitches or conflicts with the existing drive letter can cause this issue.
In this case, try changing a drive letter.
If you find this post helpful, feel free to share it with others who may have the same question.
Case 4. Disk Is Hidden
Sometimes, after changing the drive letter, nothing happens. This may be because the partition is hidden by disk management software.
In this case, you can use MiniTool Partition Wizard Free to unhide the disk partition.
MiniTool Partition Wizard FreeClick to Download100%Clean & Safe
Solution – Unhide Partition Using MiniTool Partition Wizard
Here is how to unhide a partition with this free MiniTool disk management tool:
Step 1. Run the software.
Step 2. Find the disk partition without a drive letter, and select it. In the left action panel, click Unhide Partition.
Step 3. Choose an available drive letter and hit OK.
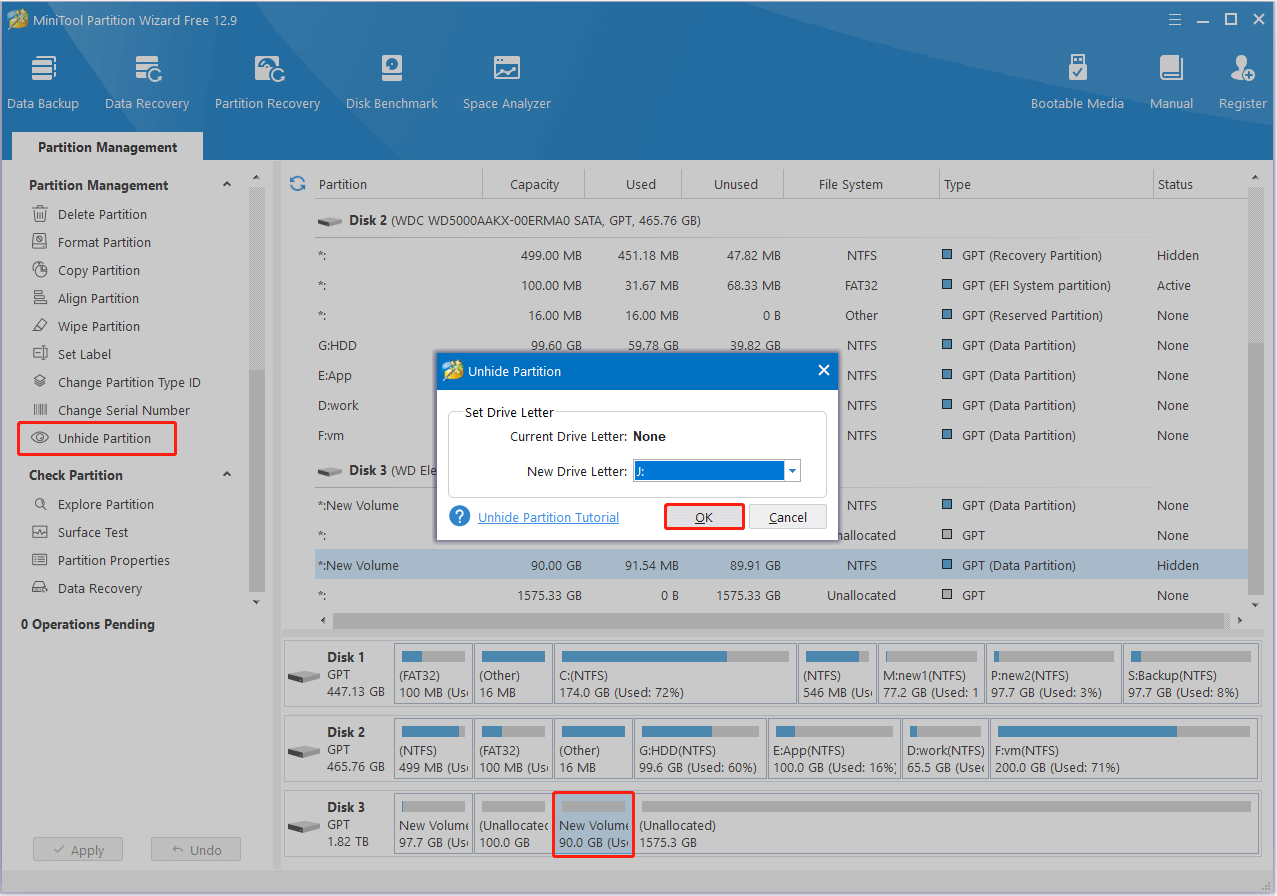
Step 4. Click Apply to confirm. After that, your disk should appear in File Explorer.
Case 5. Disk Is Not Showing Up Anywhere
If your disk does not appear in File Explorer, Disk Management, or even in Device Manager, it may indicate a hardware-level issue.
If this is your case, you are probably unable to fix the drive by yourself.
What should you do when this happens?
Solution – Seek Professional Help
At this point, your best option is to contact a professional data recovery or disk repair service.
They usually have the tools and expertise to diagnose hardware issues and perform secure data recovery.
Tips to Avoid External Hard Drive Recognition Issues in the Future
Dealing with the problem of an external hard drive not showing up can be frustrating, especially if important files are at risk.
Here is how to avoid this stress in the future and keep your data and disk safe:
Back Up Files Regularly
Prevention is better than a cure. No matter how reliable your external hard disk is, unexpected things could happen.
Regular file or disk backups ensure that you always have a copy of your files and partitions.
MiniTool ShadowMaker (free for 30 days) can help back up files, partitions, and disks.
MiniTool ShadowMaker TrialClick to Download100%Clean & Safe
Safely Eject Your External Hard Drive
Before unplugging your external hard drive, always use the Safely Remove Hardware or Eject option.
This prevents file corruption and disk failures.
Avoid Unplugging During File Transfer
Unplugging your external hard drive while files are transferring can cause disk corruption or file loss.
Wait for the file transfer to finish before removing your disk.
Be Cautious With Partition Deletion
Deleting a partition removes all files stored on it and makes the drive invisible in File Explorer.
Double-check before making changes to your disk partitions, especially for those affecting your files.
Protect Your Disk From Viruses
Malware and viruses can corrupt your external drive or delete files.
Keep your antivirus software, like Windows Defender, turned on and scan external drives regularly.
Monitor Drive Health With Tools
Use Windows’ built-in CHKDSK or third-party tools like CrystalDiskInfo to monitor your disk’s health.
These tools help you notice potential problems early and prevent serious disk corruption or data loss.
Bottom Line
When your Samsung/WD/Seagate external hard drive is not showing up but detected in Disk Management, it usually means the drive has no drive letter, the disk is not initialized, or the partition is hidden or missing.
Try assigning a drive letter, initializing the disk, unhiding the partition, or recovering the lost partitions.
If your external hard drive only appears in Device Manager, try reinstalling the disk driver.
Should you encounter any problems or have any questions while using MiniTool products, please send an email to the support team at [email protected].
External Hard Drive Not Showing Up FAQ
If the disk has no drive letter, right-click it and choose Change Drive Letter and Paths. Then click Add to assign a drive letter.
If the disk shows another status, try reinstalling the disk driver, running CHKDSK, or connecting it to another computer.
Try reconnecting the drive, reinstalling the driver, assigning a drive letter, or recovering the lost partitions.
2. Open Command Prompt as an administrator, and execute diskpart, then list disk to see if the drive appears.
3. Restart your PC. During boot, press the BIOS key such as F2, F8, F12, or Esc to enter BIOS. Then check if the disk is shown in Storage Configuration or SATA Management.
About The Author

Position: Columnist
Shirley holds a bachelor’s degree in English and has been an editor at the MiniTool Team for many years. She specializes in IT-related content, with a focus on data recovery, file backup, disk management, and other technical topics. She is committed to delivering clear, accurate, and practical solutions to help users resolve common computer issues.
User Comments :